

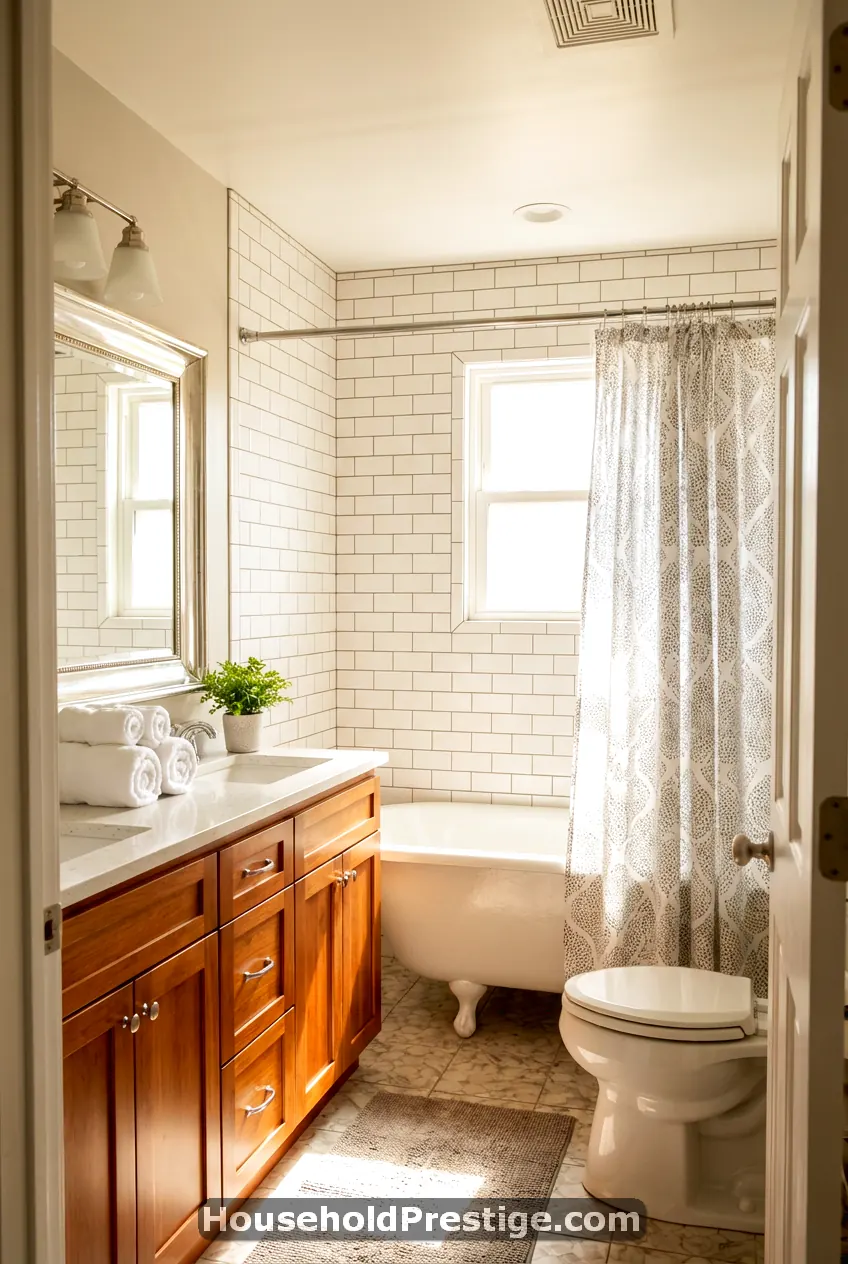
Why Does My Bathroom Still Smell Weird After I Clean It?
You scrub. You spray. You wipe everything down. But somehow, your bathroom still doesn’t feel truly clean. That weird smell lingers. The grout looks dingy. And don’t even get me started on the toilet bowl ring that refuses to budge.
I’ve been there – standing in my bathroom, cleaning supplies scattered everywhere, wondering why I just spent 45 minutes, and it still looks… meh.
Here’s the truth: most of us are cleaning the surfaces we can see while ignoring the hidden grime factories that keep our bathrooms smelling less than fresh. That film on your shower door isn’t going anywhere with regular glass cleaner. And that toilet smell? It’s probably not coming from where you think.
I’m sharing 12 cleaning hacks that changed everything for me. These aren’t trendy TikTok tricks that waste your time – these are the real deal methods that professional cleaners use (yes, I asked my cousin who cleans houses for a living). You’ll get a sparkling, fresh-smelling bathroom without spending hours or buying expensive specialty products.
Ready to finally win the bathroom cleaning battle? Let’s get into it.
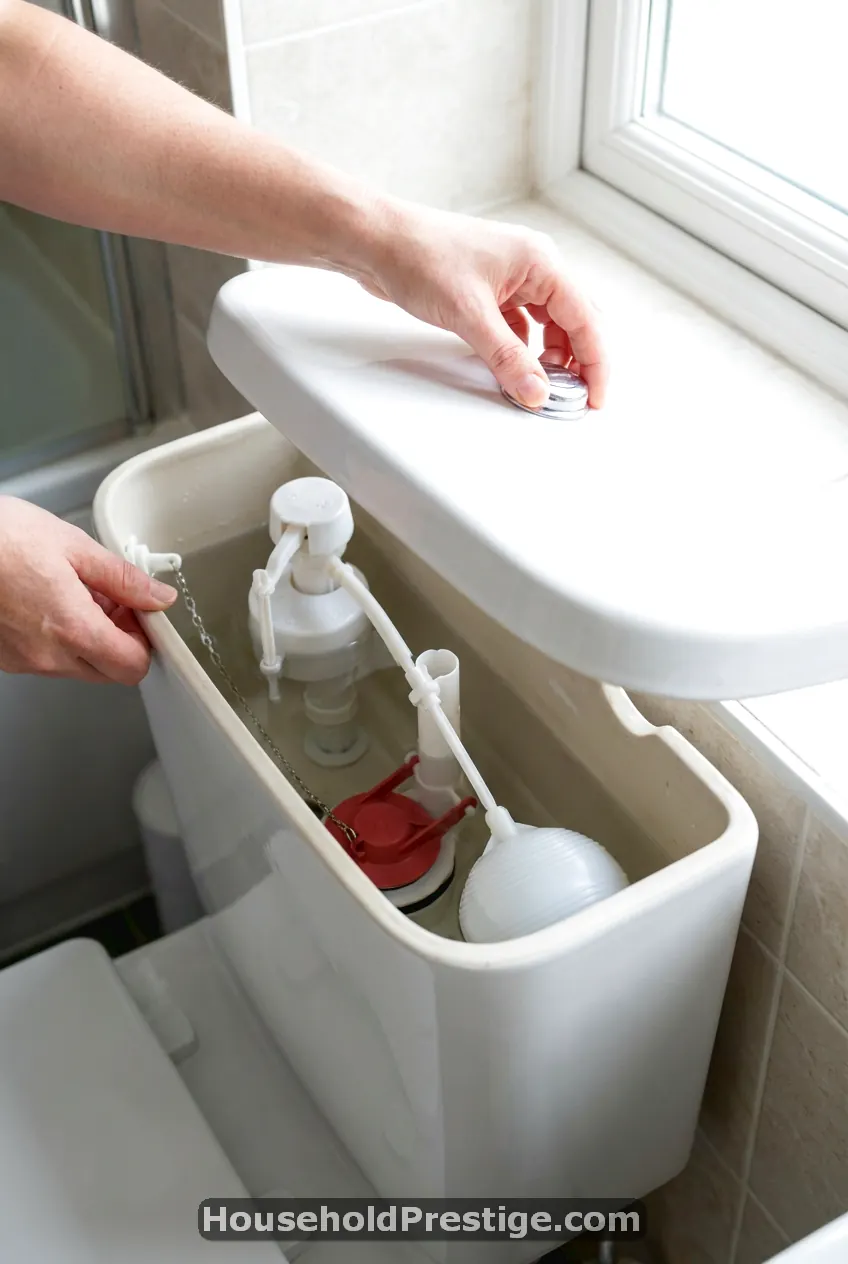
1. The Toilet Tank Secret Everyone Misses
Your toilet bowl might look clean, but if you’re ignoring the tank, you’re missing the source of that mystery bathroom smell.
Here’s what happens: mineral deposits, bacteria, and mildew build up inside the tank over time. Every time you flush, that contaminated water refills the bowl. You’re essentially rinsing your “clean” toilet with dirty water.
What to do: Remove the tank lid and peer inside. See that rust-colored buildup? That’s your problem. Turn off the water valve behind the toilet, flush to empty the tank, then spray the inside walls with white vinegar. Let it sit for 30 minutes. Scrub with a toilet brush, then turn the water back on and flush twice.
Do this every three months. Your toilet will stay cleaner between deep cleans, and that weird smell disappears.
Pro tip: Drop two denture cleaning tablets into the full tank once a month. Let them fizz overnight. Flush in the morning. This prevents buildup and keeps everything fresh.
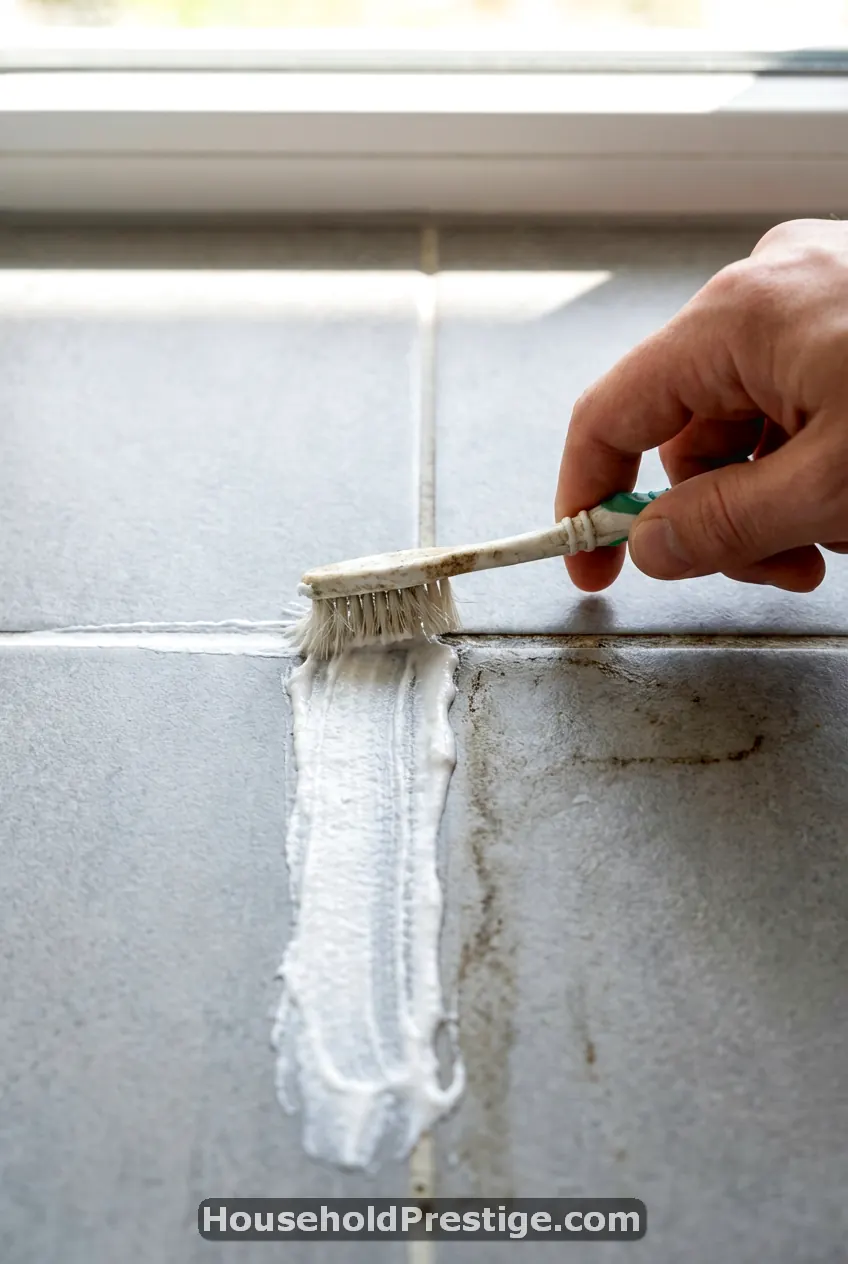
2. Grout Whitening with Hydrogen Peroxide Paste
Grout turns gray not because you’re a bad cleaner—it’s porous and traps dirt, soap scum, and mildew deep inside where regular mopping can’t reach.
Most grout cleaners are either toxic or ineffective. This paste works because hydrogen peroxide is a mild bleaching agent that lifts stains, while baking soda provides gentle abrasion.
The paste recipe: Mix 3/4 cup baking soda with 1/4 cup hydrogen peroxide until you get a toothpaste-like consistency. That’s it.
Application method: Use an old toothbrush to apply the paste directly onto grout lines. Work in 3-foot sections so the paste doesn’t dry out. Let it sit for 10-15 minutes (you’ll see it working—the paste bubbles slightly as it lifts grime). Scrub in small circular motions, then rinse with warm water.
For vertical grout in showers, apply the paste thicker so it sticks to the wall. Check back every 5 minutes and add more paste if it’s sliding down.
Results: Your grout goes from dingy gray to its original light color. This method works on both floor and wall tiles.
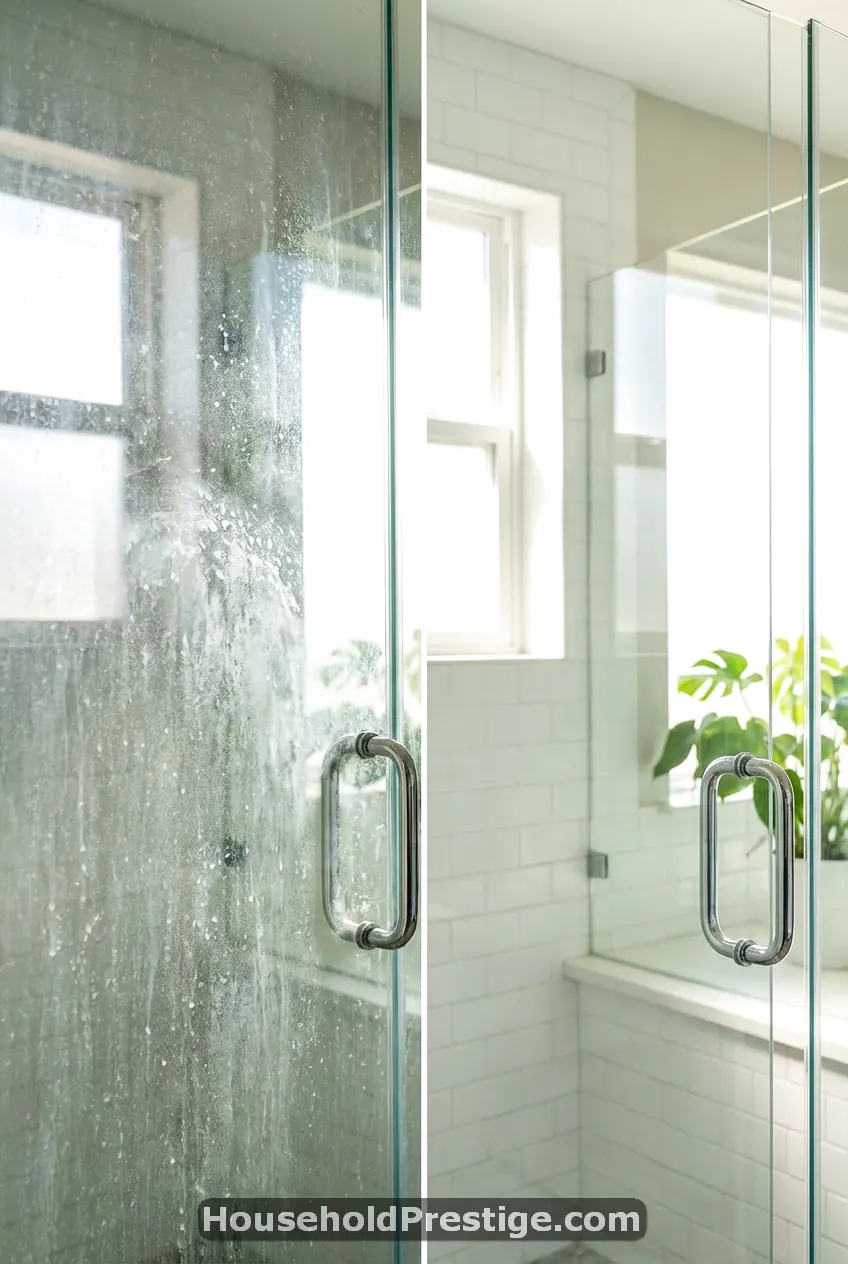
3. Shower Door Film Eliminator (No Scrubbing Required)
That cloudy film on glass shower doors is soap scum mixed with hard water minerals. It builds up in layers, and scrubbing just scratches the glass while barely touching the buildup.
The secret? You need to dissolve it, not scrub it.
The method: Heat white vinegar in the microwave for 45 seconds (warm, not boiling). Pour into a spray bottle. Spray your shower doors liberally – I mean, drench them. Let it sit for 30 minutes.
The vinegar breaks down both the soap scum and mineral deposits. After 30 minutes, wipe with a damp microfiber cloth. The film comes right off.
For stubborn buildup: Mix equal parts Dawn dish soap and heated white vinegar. The Dawn clings to vertical surfaces better. Spray, wait 30 minutes, wipe clean.
Prevention hack: After each shower, use a squeegee on the glass. Takes 20 seconds. This one habit prevents 90% of soap scum buildup. I keep mine hanging inside the shower, so I actually use it.
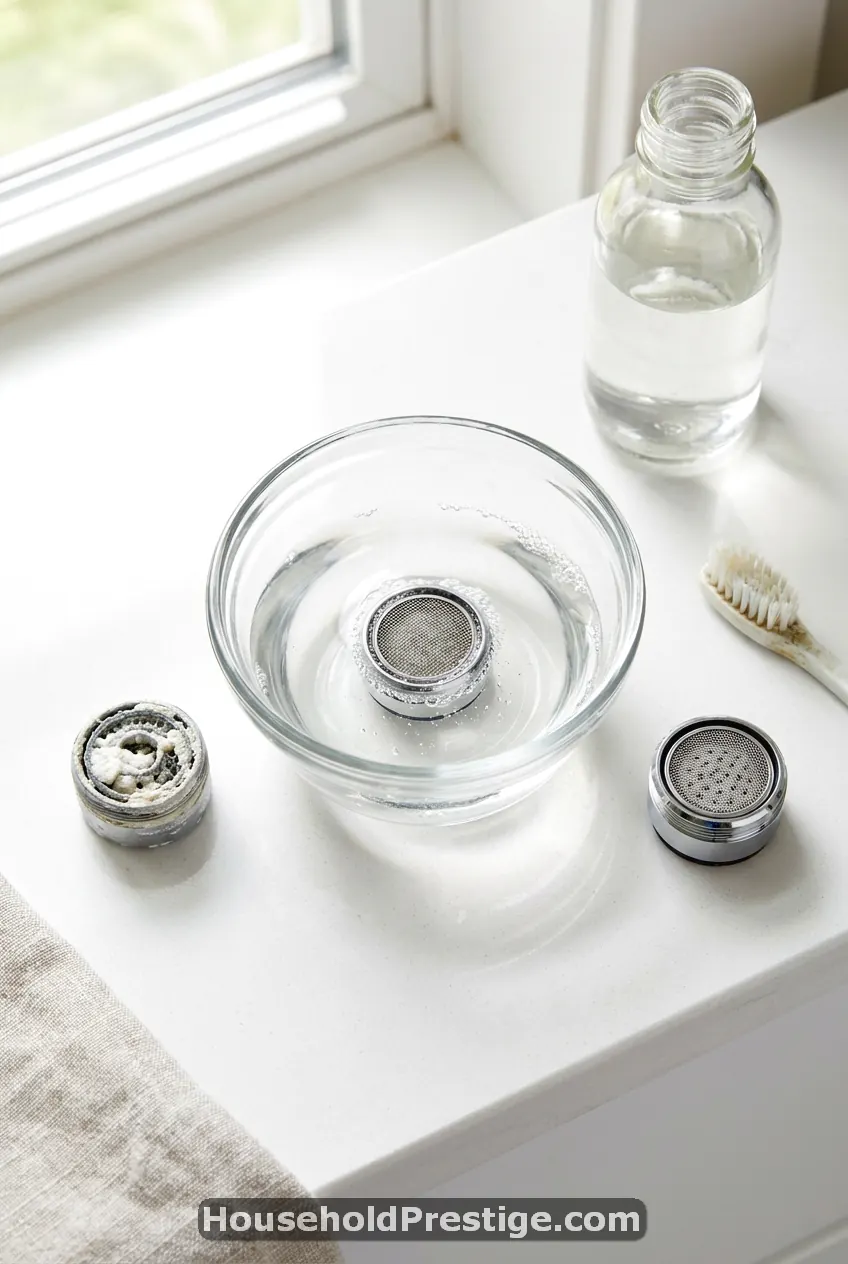
4. Faucet Aerator Deep Clean
Low water pressure from your faucet? Nine times out of ten, it’s not your plumbing—it’s the aerator (that tiny screen at the tip of your faucet) clogged with mineral deposits.
The 5-minute fix: Unscrew the aerator from the faucet tip. You might need pliers, but wrap the aerator in a cloth first so you don’t scratch the finish.
See those tiny holes in the screen? They’re supposed to be open. Yours are probably caked with white crusty deposits.
Soak the aerator in a small bowl of white vinegar for 30 minutes. The vinegar dissolves the mineral buildup. Use an old toothbrush to scrub away any remaining deposits, then rinse and screw it back on.
Instant results: Your water pressure returns to normal. The stream flows evenly instead of spraying in weird directions.
Do this every 6 months if you have hard water, once a year if you have soft water.
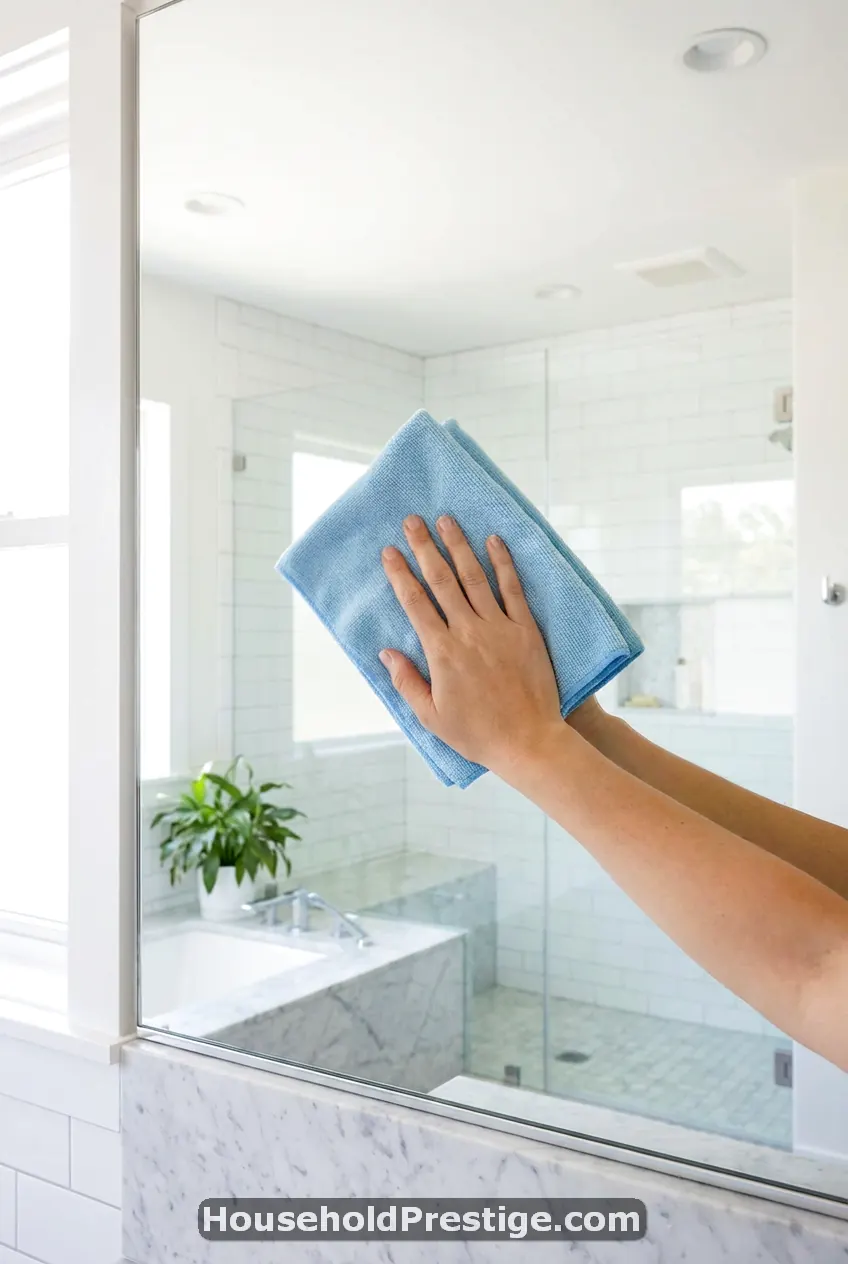
5. Mirror Streak-Free Perfection
Every mirror cleaning tutorial tells you to use a newspaper or coffee filters. Here’s what actually works: rubbing alcohol and a clean microfiber cloth.
Why this works: Rubbing alcohol evaporates faster than water, so it doesn’t leave streaks. It also cuts through hairspray, toothpaste splatter, and face product residue better than glass cleaner.
The technique: Fill a spray bottle with 70% rubbing alcohol (you can add 2-3 drops of dish soap if your mirror is really grimy, but usually straight alcohol works). Spray the mirror. Wipe in an S-pattern from top to bottom using a clean, dry microfiber cloth.
Key detail: Use a microfiber cloth that’s completely dry. Damp cloths create streaks. And here’s the part most people mess up—flip to a fresh section of the cloth as you work. Don’t keep wiping with the same dirty section.
For stubborn toothpaste spots: Put a tiny dab of rubbing alcohol directly on the cloth and rub the spot. It dissolves instantly.
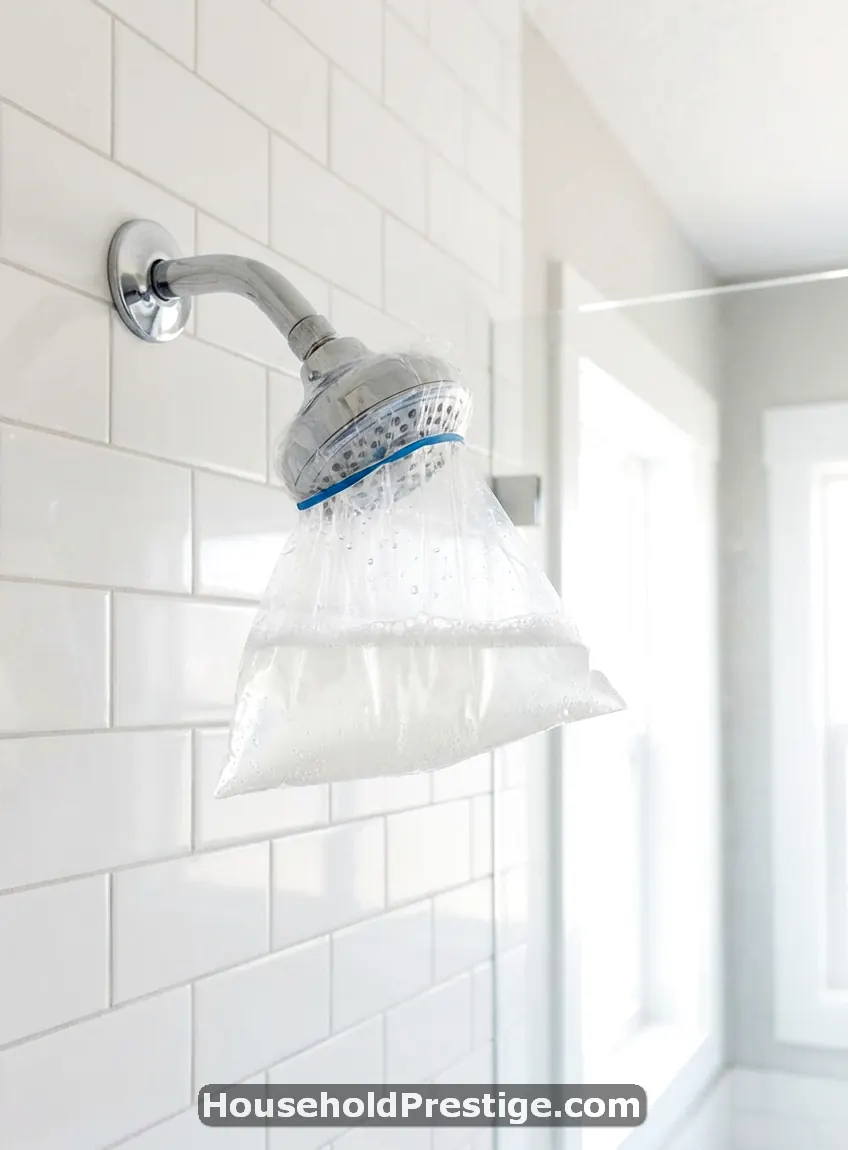
6. Shower Head Deep Clean and Pressure Restoration
When your shower feels weak and the water sprays in random directions, mineral buildup inside the shower head is choking the flow.
Unscrewing it and cleaning it manually works, but there’s an easier way that requires zero tools.
The overnight soak method: Fill a plastic sandwich bag with white vinegar—fill it enough to submerge the shower head. Secure the bag around the shower head with a rubber band or hair tie, making sure the shower head is fully immersed in the vinegar.
Leave it overnight (or at least 4 hours). The vinegar dissolves the mineral deposits inside the nozzles.
In the morning, remove the bag and run hot water for 2 minutes. Use an old toothbrush to gently scrub the nozzle openings while the water runs—you’ll see white flakes washing away.
Results: Your shower pressure returns. The spray pattern becomes even instead of shooting in weird directions. The water feels more luxurious.
Monthly maintenance: Do a quick 1-hour soak once a month if you have hard water. This prevents heavy buildup.
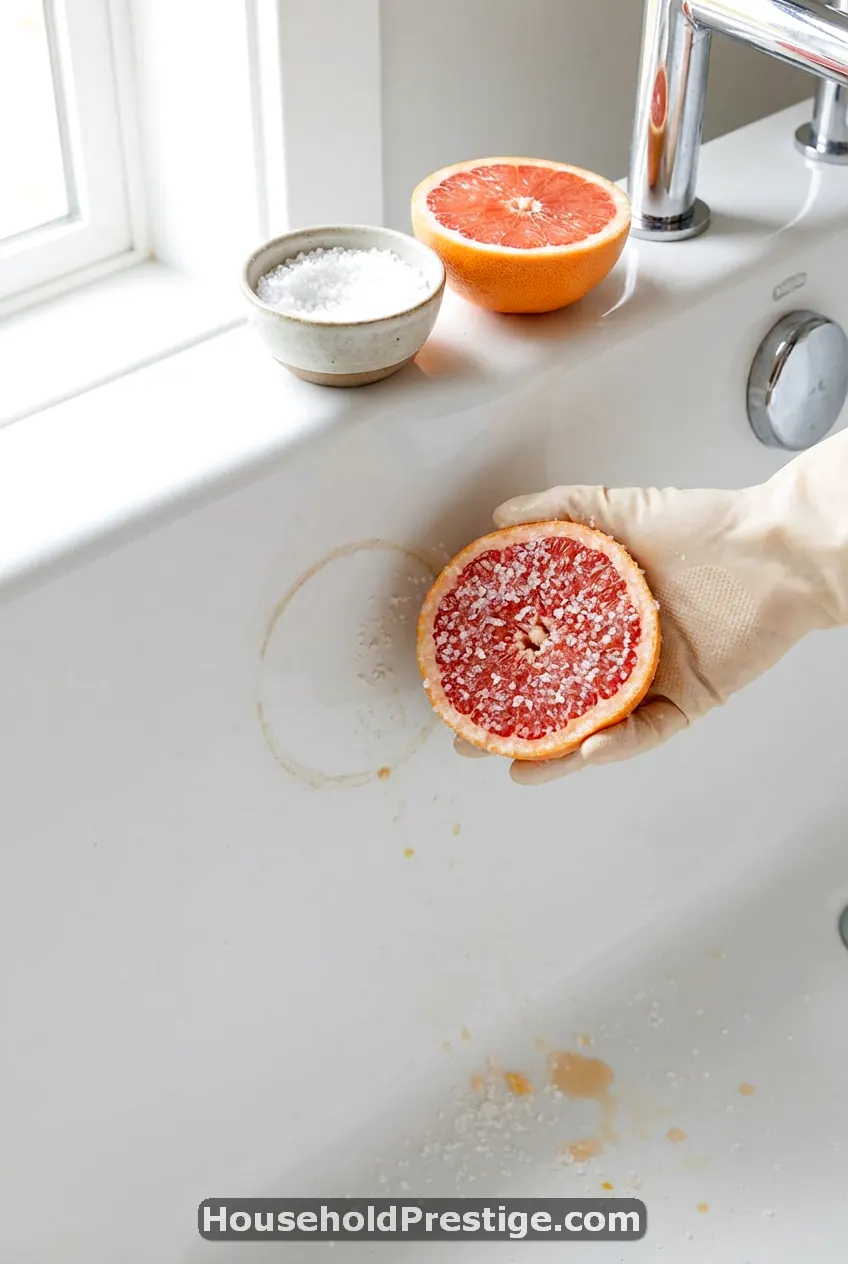
7. Bathtub Ring Removal Without Toxic Chemicals
That stubborn ring around your bathtub isn’t dirt—it’s a combination of body oils, soap residue, and hard water minerals. It bonds to the tub surface, which is why wiping doesn’t work.
The grapefruit and salt method: Cut a grapefruit in half. Sprinkle coarse salt (kosher salt works great) directly on the cut surface. Use the grapefruit as a scrubber, rubbing it in circular motions along the tub ring.
The citric acid in grapefruit breaks down oils and soap scum. The salt provides gentle abrasion without scratching. The bonus? Your bathroom smells amazing instead of like harsh chemicals.
For white porcelain tubs: The grapefruit method works, but for tough stains, make a paste with cream of tartar and hydrogen peroxide (equal parts). Apply to the ring, let sit 10 minutes, scrub with a soft sponge, rinse.
For acrylic tubs: Never use abrasive cleaners—they scratch the surface. Stick with the grapefruit method or use a paste of baking soda and water. Gentle circular motions are your friend.
Prevention: After each bath, rinse the tub with hot water while it drains. This takes 15 seconds and prevents most ring buildup.
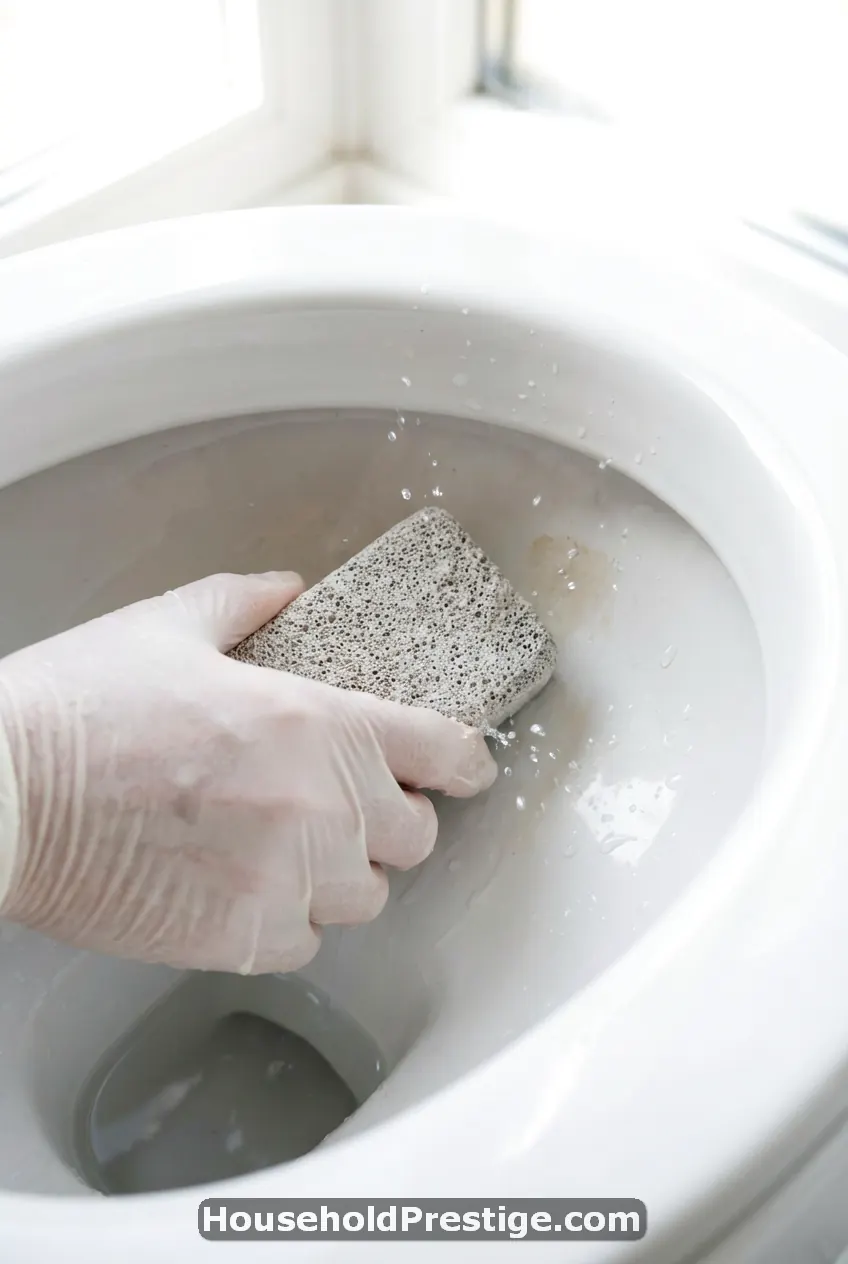
8. The Toilet Bowl Deep Clean (Beyond Regular Scrubbing)
You scrub your toilet regularly, but there’s still a ring or stains that won’t budge. That’s because regular toilet bowl cleaner can’t penetrate old mineral deposits and stains—you need a different approach.
The pumice stone method: Get a pumice cleaning stone (they’re sold specifically for toilets). Wet the stone and wet the stained area. Gently rub the stone on the stain using light pressure.
The pumice is softer than porcelain but harder than the mineral deposits. It literally sands away the stains without damaging your toilet. You’ll see the stain disappearing as you work.
For rust stains: Sprinkle citric acid powder (available in the canning section of grocery stores) into the toilet bowl. Let it sit overnight. Scrub in the morning. Rust stains dissolve completely.
Warning: This method ONLY works on porcelain toilets. Don’t use pumice on colored toilets or composting toilets—it can scratch.
Deep clean schedule: Do this every 3-4 months, or whenever you notice a ring forming that regular scrubbing doesn’t remove.
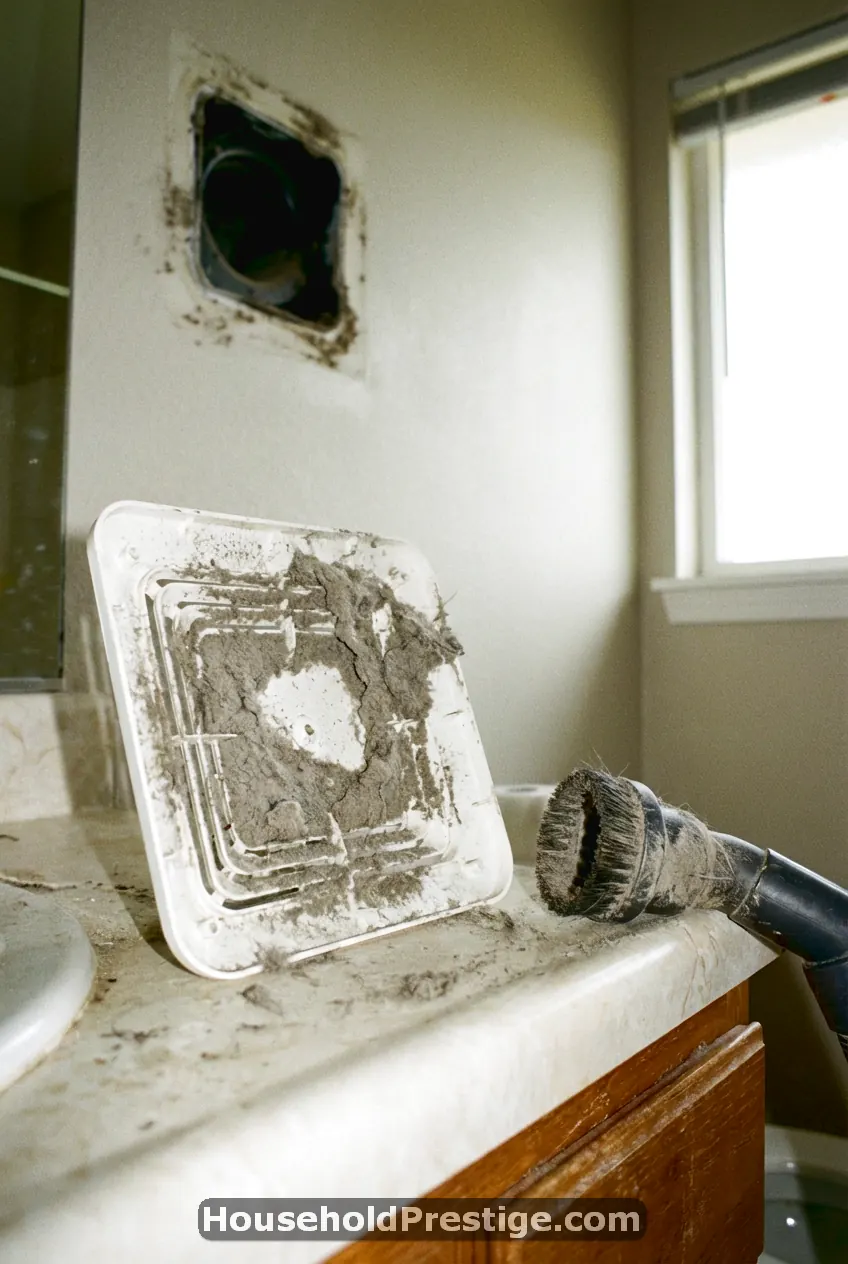
9. Exhaust Fan Cleaning (The Smell-Reducer You’re Ignoring)
Your exhaust fan is supposed to remove moisture and odors. But when it’s caked with dust, it barely works. That dust also holds onto smells, circulating stale air instead of fresh air.
Most people never clean their exhaust fan. It’s literally one of the dirtiest things in your bathroom.
The vacuum and wipe method: Turn off the power to the fan at your breaker box (safety first). Remove the cover—most pop off or have two spring clips. You’ll probably gasp at the dust buildup.
Use your vacuum’s brush attachment to suck up the loose dust from the fan blades and inside the housing. Then wipe the fan blades and cover with a damp microfiber cloth and a tiny bit of all-purpose cleaner.
If the cover is really grimy: Soak it in warm water with a squirt of dish soap for 10 minutes. Scrub with a soft brush, rinse, let it dry completely before reattaching.
How often: Clean it every 6 months. It takes 10 minutes and makes a huge difference in bathroom air quality and odor control.
Bonus benefit: A clean fan runs quieter and more efficiently. Plus, your bathroom dries faster after showers, which means less mildew.
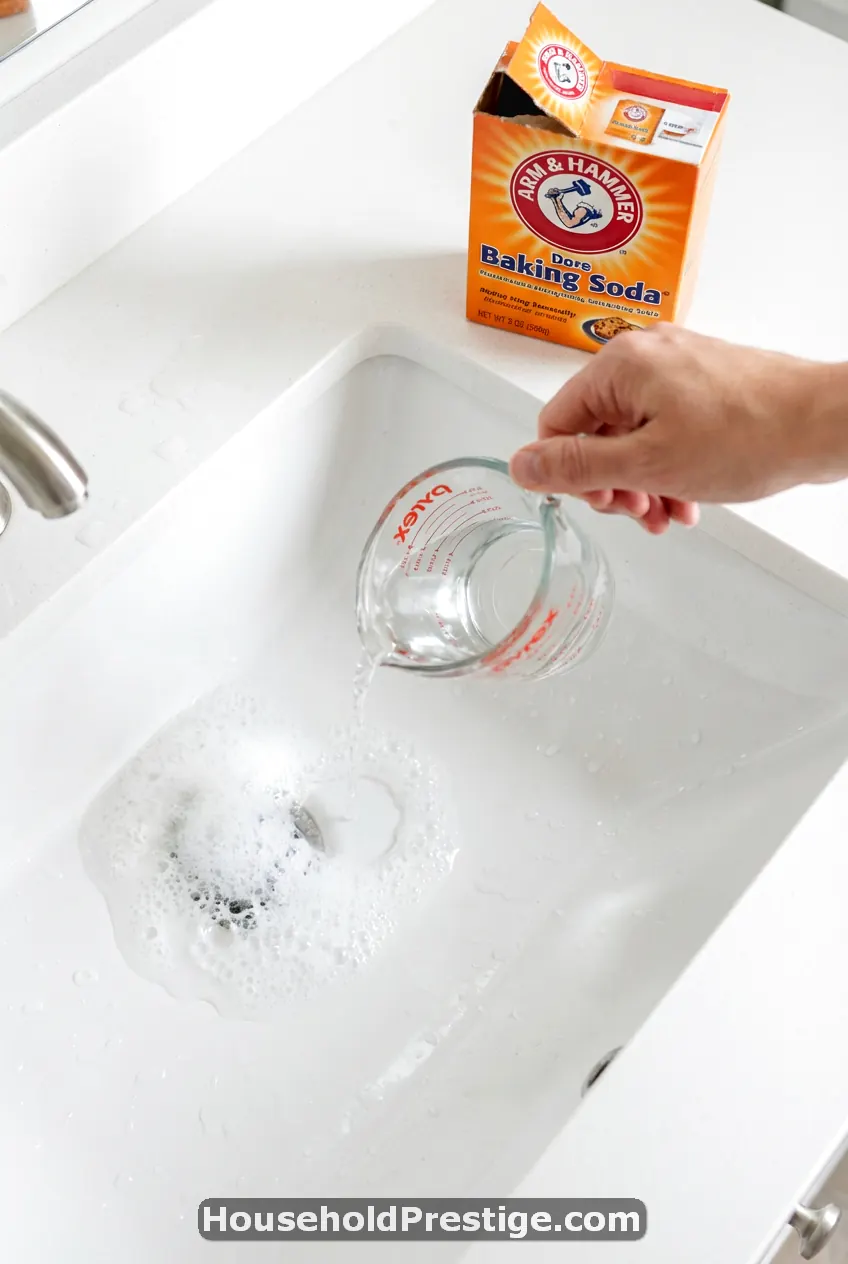
10. Sink Drain Odor Eliminator
That smell coming from your sink drain isn’t from dirty pipes—it’s from biofilm, a slimy layer of bacteria, soap scum, and hair clinging to the inside of your drain.
Pouring drain cleaner down doesn’t fix the smell because most cleaners don’t touch biofilm. They’re designed for clogs, not odor.
The baking soda and vinegar flush: Pour 1/2 cup of baking soda down the drain. Follow with 1 cup of white vinegar. You’ll hear it fizz—that’s the reaction breaking up the biofilm. Let it sit for 30 minutes.
Boil a kettle of water. After 30 minutes, slowly pour the boiling water down the drain to flush everything away.
Why this works: The fizzing action physically disrupts the biofilm coating. The hot water rinses it away. Chemicals aren’t necessary.
For persistent odors: Your p-trap (the curved pipe under the sink) might have dried out, letting sewer gases seep up. Run water for 30 seconds to refill the trap. If that doesn’t fix it, you might need to check for plumbing issues.
Monthly maintenance: Do this flush once a month. Takes 2 minutes (plus wait time), and your sink never smells weird.
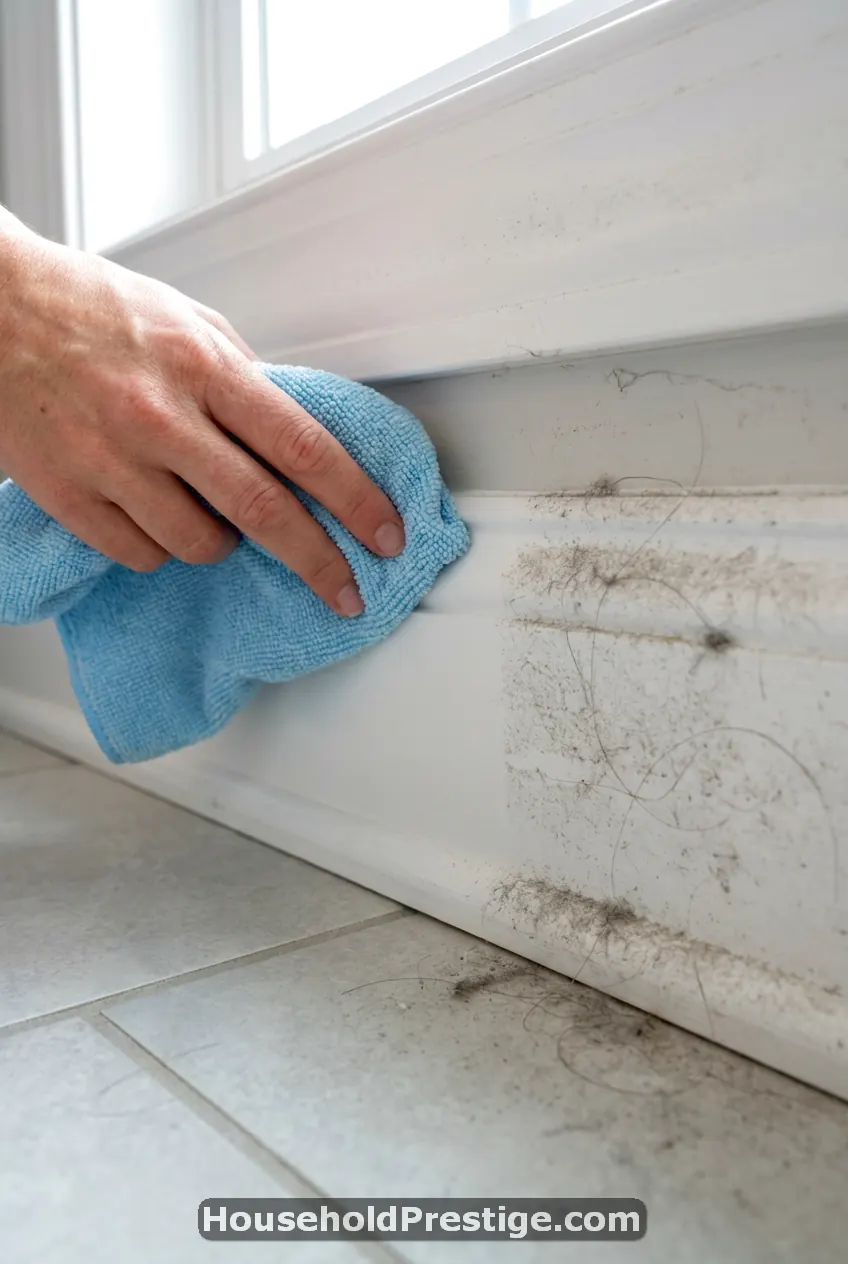
11. Baseboard and Trim Cleaning (The Detail That Makes Everything Look Cleaner)
Nobody notices clean baseboards. But everyone notices dirty ones—even if they can’t quite put their finger on why your bathroom looks dingy.
Baseboards collect dust, hair, soap splatter, and moisture. They’re like a dirt magnet at floor level.
The quick method: Use a microfiber cloth dampened with all-purpose cleaner. Wipe along the top edge of the baseboard where dust collects. Then wipe the front face, working from one end of the bathroom to the other.
For textured baseboards: Use an old toothbrush dipped in cleaning solution to get into the grooves and corners. This sounds tedious, but it takes less than 5 minutes for an average bathroom.
For stubborn scuffs: Magic Eraser (melamine foam) removes scuff marks without scrubbing. Just wet it and rub gently—but test in a hidden spot first, since it can remove paint if you press too hard.
The transformation: This one simple step makes your entire bathroom look more finished and professional. It’s the difference between “yeah, I cleaned” and “wow, this is spotless.”
Do this every time you deep clean. It becomes second nature.
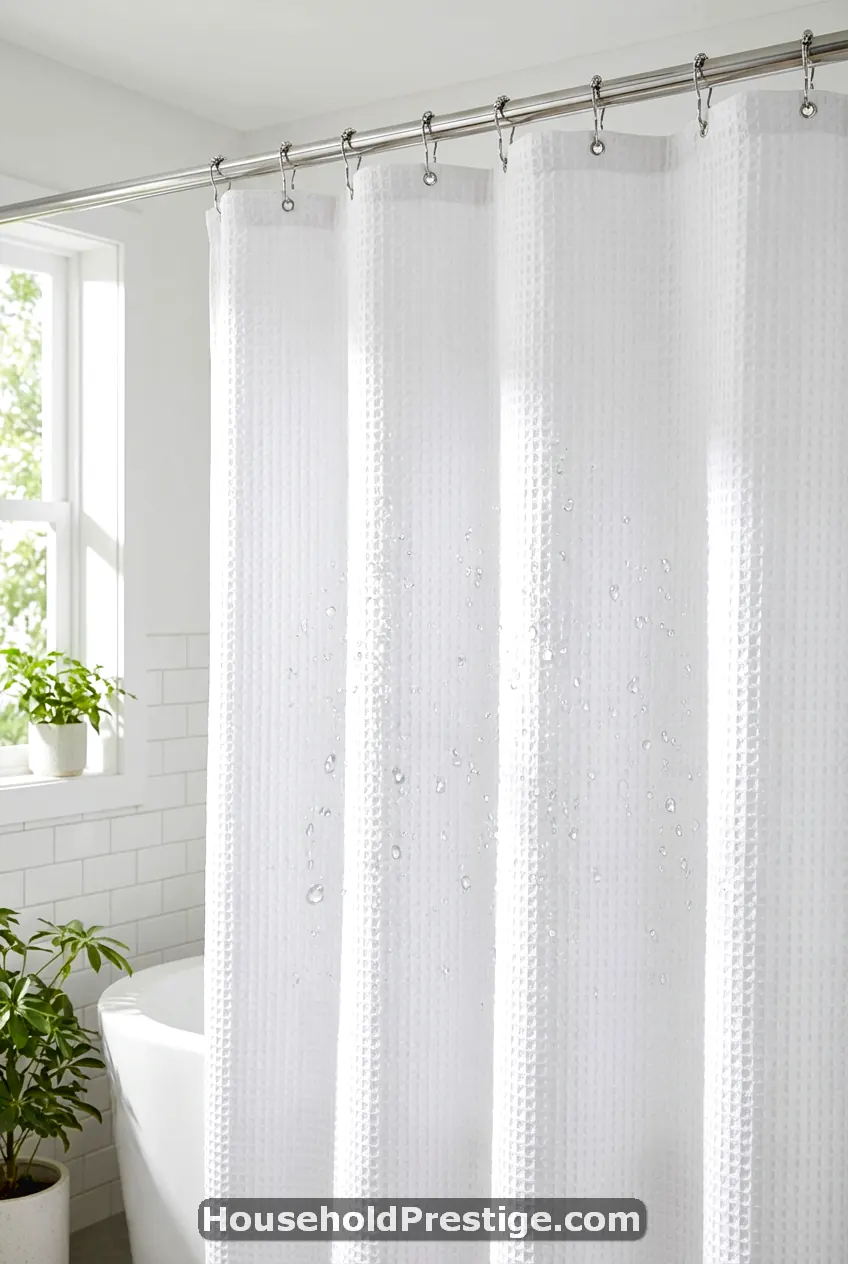
12. The Shower Curtain Refresh
Plastic shower curtains and liners get moldy and dingy fast. Most people throw them out and buy new ones. But you can deep clean them in your washing machine and make them look brand new.
The washing machine method: Remove the shower curtain and liner from the rings. Throw them in your washing machine with 2-3 bath towels (the towels provide scrubbing action and prevent the plastic from wrinkling).
Add your regular detergent plus 1/2 cup of baking soda. Run a warm water cycle. During the rinse cycle, add 1/2 cup of white vinegar to the fabric softener dispenser.
Critical step: Remove the curtain immediately when the cycle ends. Hang it back up while it’s still damp—it’ll dry, and the weight prevents wrinkles. Don’t put it in the dryer.
For fabric shower curtains: Wash the same way, but you can put fabric curtains in the dryer on low heat.
Mold prevention: After each shower, push the curtain all the way across the rod so it can dry fully. Bunched-up curtains stay damp in the folds, creating the perfect environment for mildew.
How often: Wash your shower curtain every 2-3 months. It takes the same effort as washing towels, and your bathroom instantly looks and smells fresher.
You Just Leveled Up Your Bathroom Cleaning Game
Look, I get it – bathroom cleaning isn’t glamorous. But there’s something satisfying about walking into your bathroom and actually feeling good about how it looks and smells.
These 12 hacks work because they tackle the root causes of bathroom grime, not just the surface dirt. You’re not just wiping things down anymore – you’re actually solving problems.
The toilet tank cleaning alone will change your life. The first time I did it and realized I’d been flushing contaminated water into my “clean” toilet for years? Mind blown.
Start with just one or two of these hacks this weekend. The grout whitening paste takes 20 minutes, and the results are so satisfying you’ll want to keep going. Before you know it, you’ll have knocked out the whole list, and your bathroom will be the cleanest it’s been in years.
Your bathroom should be a space that feels fresh and relaxing, not a chore you dread. Now you’ve got the tools to make that happen.
Want more cleaning hacks that actually work? Head over to HouseholdPrestige.com for room-by-room deep cleaning guides, organization tips, and time-saving routines that fit real life.