

You stare at your cramped, full bathroom and wonder how designers make 5×7 spaces look like spa retreats while yours feels like a storage closet with plumbing.
The math isn’t in your favor. Full bathrooms need a tub or shower, toilet, and sink—three fixtures fighting for real estate in spaces barely bigger than a walk-in closet. Most “small bathroom ideas” show you powder rooms or half-baths, conveniently skipping the shower installation that eats half your square footage.
Here’s what actually works. These 19 ideas come from real bathrooms where every fixture stays, storage happens anyway, and the claustrophobia disappears. You’ll see how vertical inches matter more than floor space, why your wall color choice adds phantom square footage, and which $40 swap makes your bathroom feel twice its size.
You’re about to stop apologizing for your bathroom dimensions.
1. Floor-to-Ceiling Tiles Erase the Walls
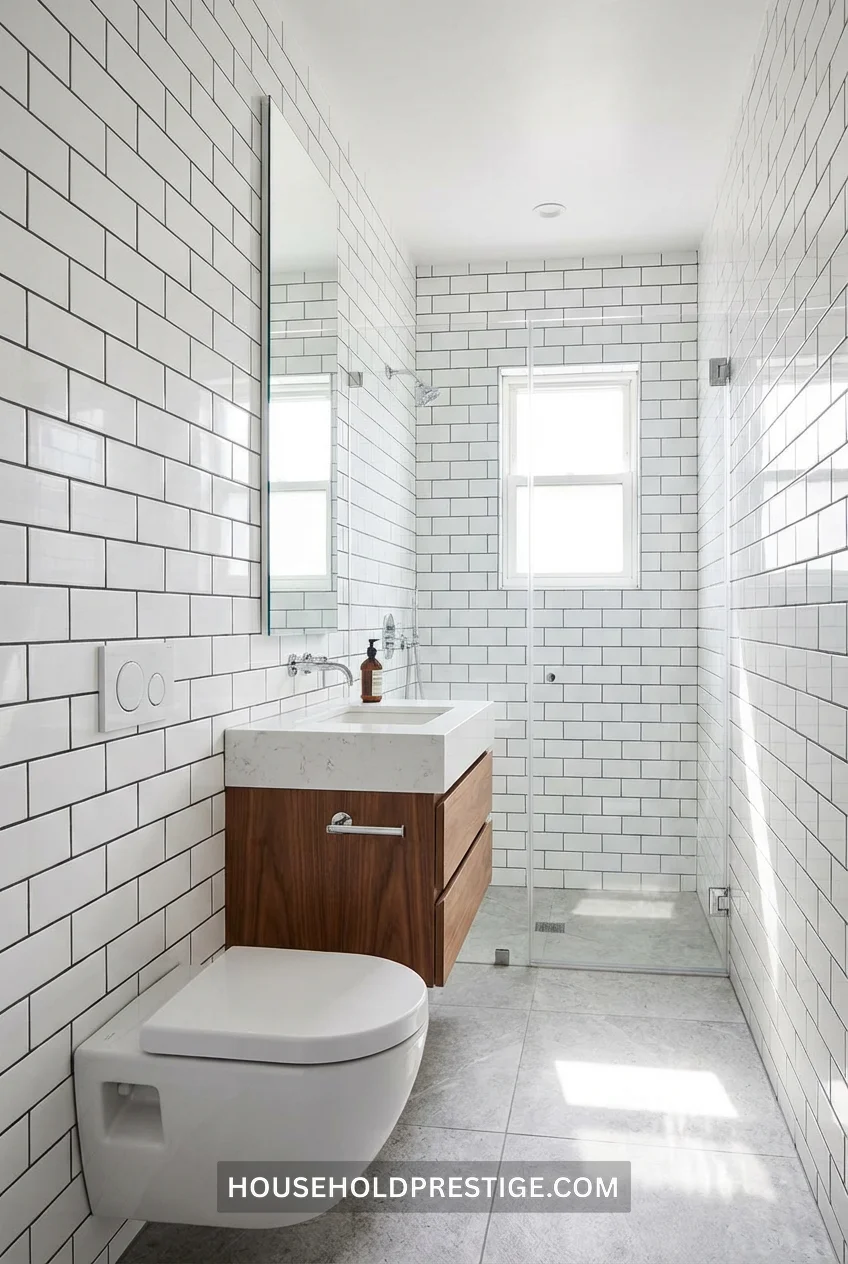
Run your tile from baseboard to ceiling. Not halfway. Not to the standard 4-foot height. All. The. Way.
Your eye follows the unbroken line upward, reading the room as taller than its 8-foot reality. The standard wainscot approach cuts the wall in half visually, making tight spaces feel boxier.
2. The Pocket Door Buys You 9 Square Feet
Standard doors swing into bathrooms, claiming 9 square feet of floor space you’ll never use for anything except door clearance.
Pocket doors slide into the wall cavity. That reclaimed 9 square feet? It’s where your linen closet lives now. Or where you finally fit that 24-inch vanity instead of the 18-inch compromise.
Installation runs $400-600 if you’re hiring it out, $150-200 for the kit if you’re comfortable with a reciprocating saw and weekend project. The wall needs to be non-load-bearing, and you’ll lose whatever’s currently on that wall section.
Cost reality: You’re trading wall art space for floor space. Worth it when every square foot counts.
3. Corner Sinks Free Up 14 Inches
Your standard 24-inch vanity sits against the wall, projecting into the room.
Corner vanities tuck into the 90-degree angle most bathrooms waste. You keep the same basin size but reclaim 12-14 inches of walking space in the center of the room.
IKEA’s Lillången corner series starts at $179. Pedestal corner sinks run $120-250 at Home Depot.
The catch: Plumbing needs to relocate to that corner. If you’re already gutting the bathroom, this is a no-brainer. If not, factor in $400-800 for plumber labor to reroute supply and drain lines.
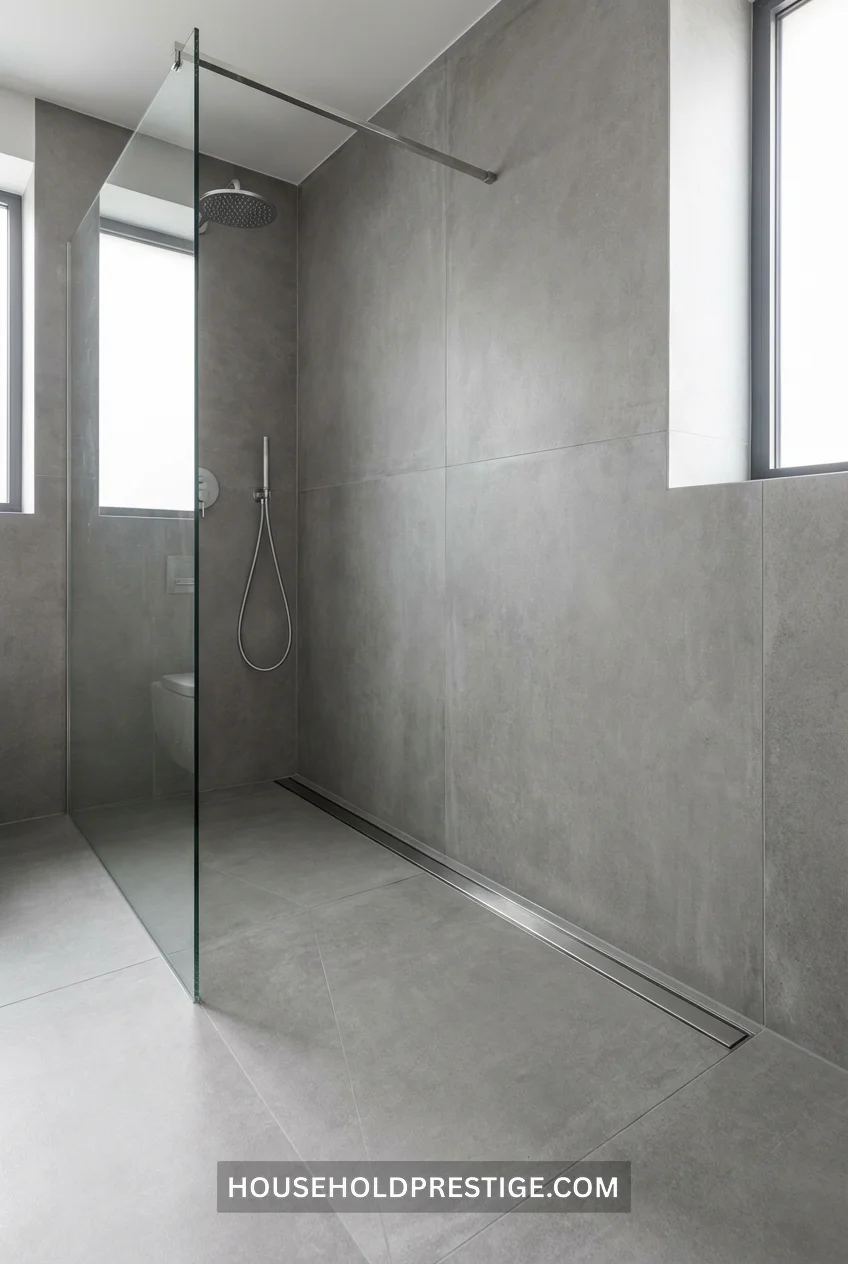
4. Frameless Shower Glass Adds Phantom Space (But Not How You Think)
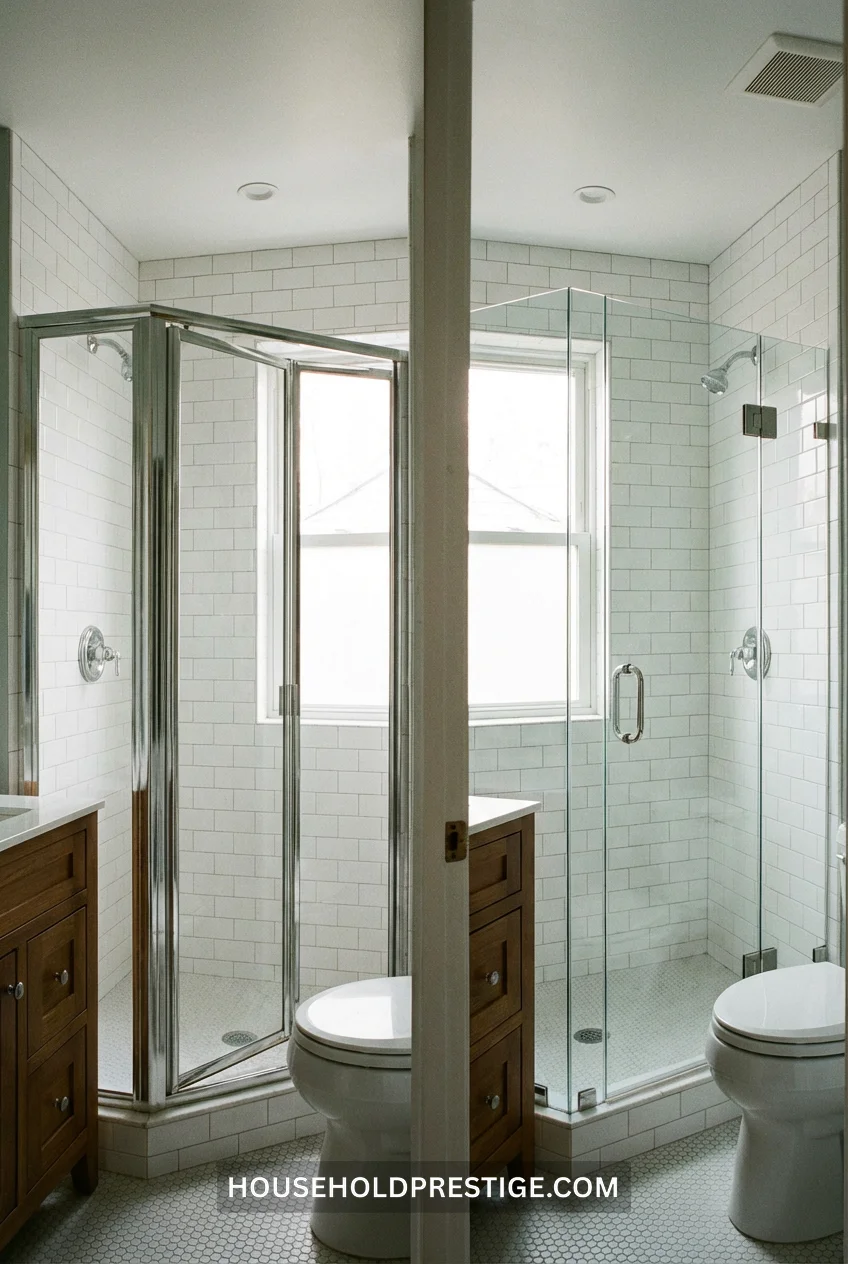
People claim frameless glass showers “make bathrooms look bigger” because of transparency.
Wrong reason, right result.
Framed shower enclosures create visual borders—thick aluminum or chrome lines that break up sightlines. Your eye stops at each frame line, reading the room in segments.
Frameless glass eliminates those stop-points. Your eye travels through the glass uninterrupted, perceiving the full room depth, including the shower square footage. The bathroom doesn’t get physically bigger; your brain just stops subtracting the shower from the total.
Budget $1,200-2,500 for frameless vs. $400-800 for framed. The cost difference stings, but the spatial return is immediate.
5. Recessed Medicine Cabinets Steal 4 Inches from Your Walls
Wall-mounted medicine cabinets jut 4-6 inches into the room. You lose head clearance, elbow room, and visual breathing space.
Recessed cabinets sit inside the wall cavity between studs. Zero projection. You get the same storage capacity without sacrificing bathroom volume.
When it’s worth it: If you’re already opening walls for plumbing or electrical, adding recessed cabinets costs $150-300 in materials. If your walls are staying closed, it’s harder to justify the $600-1,000 installation cost.
What actually works: Robern M-Series recessed cabinets (15-24 inches wide, $400-600) or Kohler Verdera models with integrated LED lighting ($500-800).
6. Wall-Mounted Toilets Give You Back 12 Inches
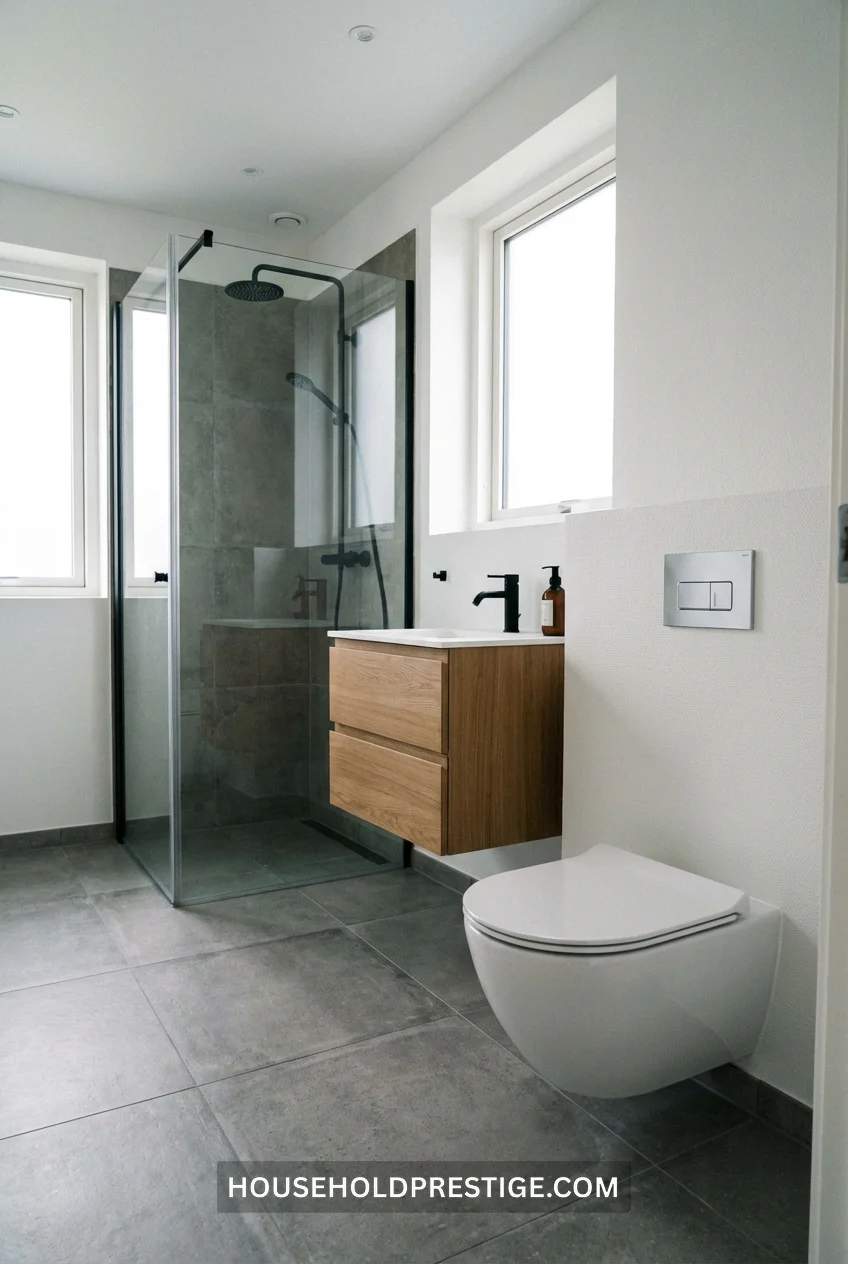
Standard toilets extend 28-30 inches from the wall. Wall-mounted toilets project 20-21 inches.
You gain 8-9 inches of floor space and eliminate the base-to-floor junction where dirt collects. The tank hides inside the wall, leaving you with a floating bowl and clean lines.
Installation note: The in-wall carrier system (Geberit makes the industry standard) runs $400-500 for parts, plus $800-1,200 labor if you’re hiring a plumber. You need wall access and enough depth for the carrier frame.
Pro tip: This works brilliantly during remodels. Retrofitting into finished bathrooms means opening walls, which escalates costs fast. Budget $1,500-2,000 total for parts and professional installation.
7. Lighter Floor Tiles Bounce Light, Dark Tiles Anchor Weight
Dark floor tiles create visual weight that pulls your eye down, making ceilings feel lower and spaces feel enclosed.
Light floor tiles—white, cream, light grey—reflect overhead and natural light back up into the room. Your brain reads this brightness as more space.
The science: Light-colored surfaces have higher light reflectance values (LRV). White tiles hit 75-85 LRV. Dark grey sits at 15-25 LRV. That 60-point spread translates to perceived brightness that tricks spatial perception.
Cost reality: Tile pricing is about material and labor, not color. White vs. grey costs the same $8-15 per square foot installed.
8. Vertical Storage Towers Replace Floor Cabinets
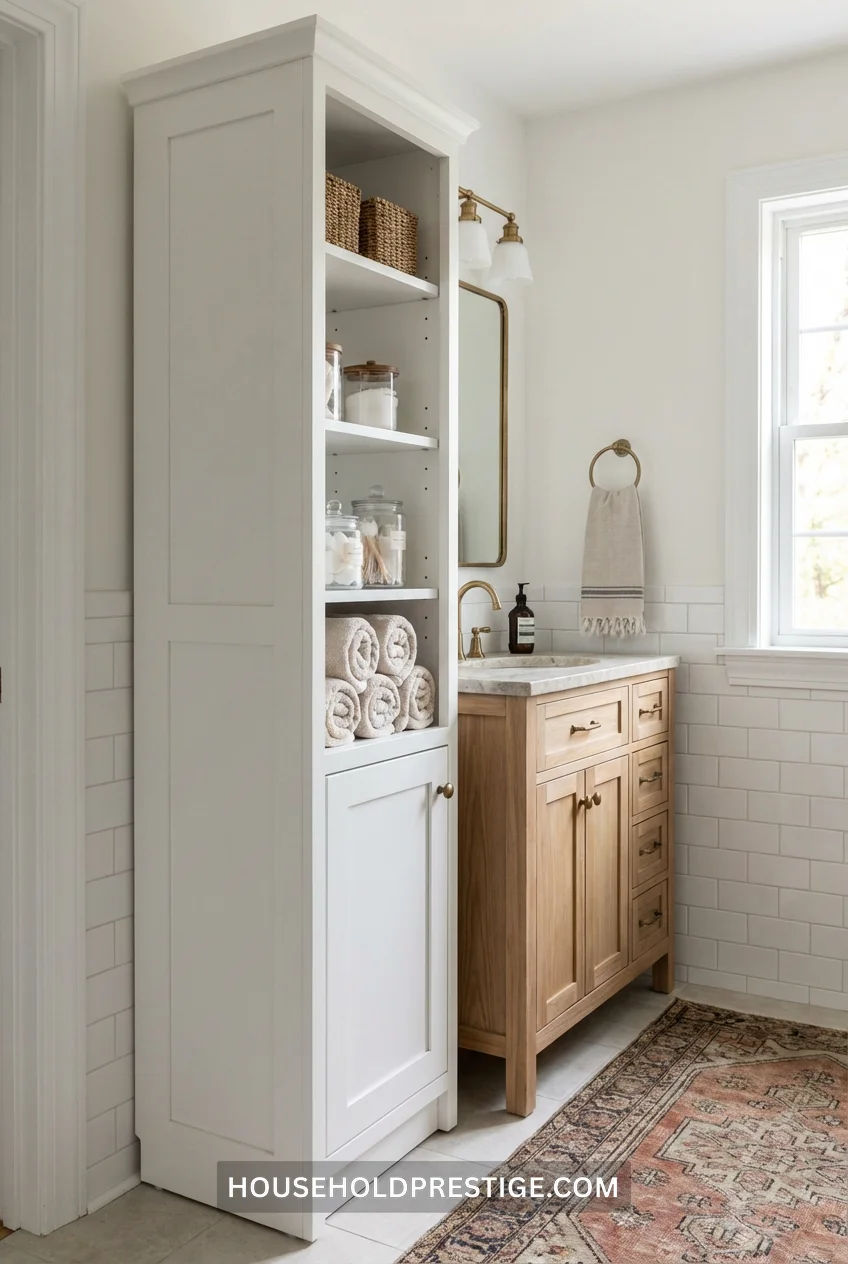
Floor cabinets eat square footage. Each 12-inch-wide cabinet claims 12 inches × 21 inches = 252 square inches of floor space you’ll never get back.
Vertical storage towers—those tall, narrow 12-inch × 12-inch × 72-inch units—use 144 square inches of floor but give you 72 inches of vertical storage. You’re trading horizontal sprawl for vertical efficiency.
9. The 18-Inch Vanity Myth (And What Actually Fits)
Everyone says 18-inch vanities are the small bathroom standard.
Wrong. You can fit a 24-inch vanity in most small full bathrooms if you move the toilet 3 inches toward the shower.
Measure your current toilet centerline to the vanity. Standard code requires 15 inches from the toilet center to any obstruction. Most bathrooms have 18-21 inches, meaning you have 3-6 inches of buffer you’re not using.
Move the toilet during your remodel, and gain 6 inches of vanity width. A 24-inch vanity (vs. 18-inch) gives you drawer storage instead of just a cabinet, plus 33% more counter space for your actual morning routine.
The catch: Moving a toilet costs $300-600 in plumber labor if you’re already doing other work. As a standalone project, it’s not worth it. As part of a bathroom remodel? Absolutely worth it.
10. Skylight Tubes Add Daylight Without Windows (And Why That Matters for Space Perception)
Why This Works
Your brain uses light levels to judge room size. Dim rooms feel smaller than bright rooms of identical dimensions. Small bathrooms with one small window or no windows rely entirely on artificial light, which creates pools of shadow that fragment the space visually.
Skylight tubes—also called sun tunnels—channel daylight from your roof through a reflective tube into the ceiling, distributing natural light throughout the room.
Dimensions and Installation
VELUX 10-inch sun tunnels are the standard. The tube runs from roof level through your attic space, requiring 10 inches of clearable path (you’ll need to work around joists and HVAC). The ceiling diffuser sits flush with your bathroom ceiling, providing 350-400 lumens during peak daylight hours.
Total installed cost runs $500-900 for a single-story installation, $800-1,400 if you need to tunnel through multiple attic spaces.
Step-by-Step Installation
- Locate ceiling position: Find a spot away from joists where the straight-line path to the roof is clear
- Cut ceiling hole: Use a 12-inch hole saw to create the ceiling opening
- Install ceiling frame: Secure the interior trim ring
- Run the tube: Feed the reflective tube through the attic, working around obstructions with adjustable elbows
- Flash the roof penetration: Cut the roof hole, install the weatherproof flashing kit exactly per manufacturer specs (this is where leaks happen if done wrong)
- Connect sections: Seal all tube joints with the provided foil tape
- Install diffuser lens: Snap diffuser into ceiling trim ring
Common mistakes to avoid: Using non-branded knock-off tubes (they yellow and lose reflectivity within 2-3 years), incorrect flashing installation (hire a roofer for this step if you’re not comfortable with roof work), and not accounting for insulation thickness when measuring tube length.
Pro move: Install this during a planned roof replacement. Your roofer handles the flashing for $200-300 additional labor vs. $800+ for a separate roof penetration project.
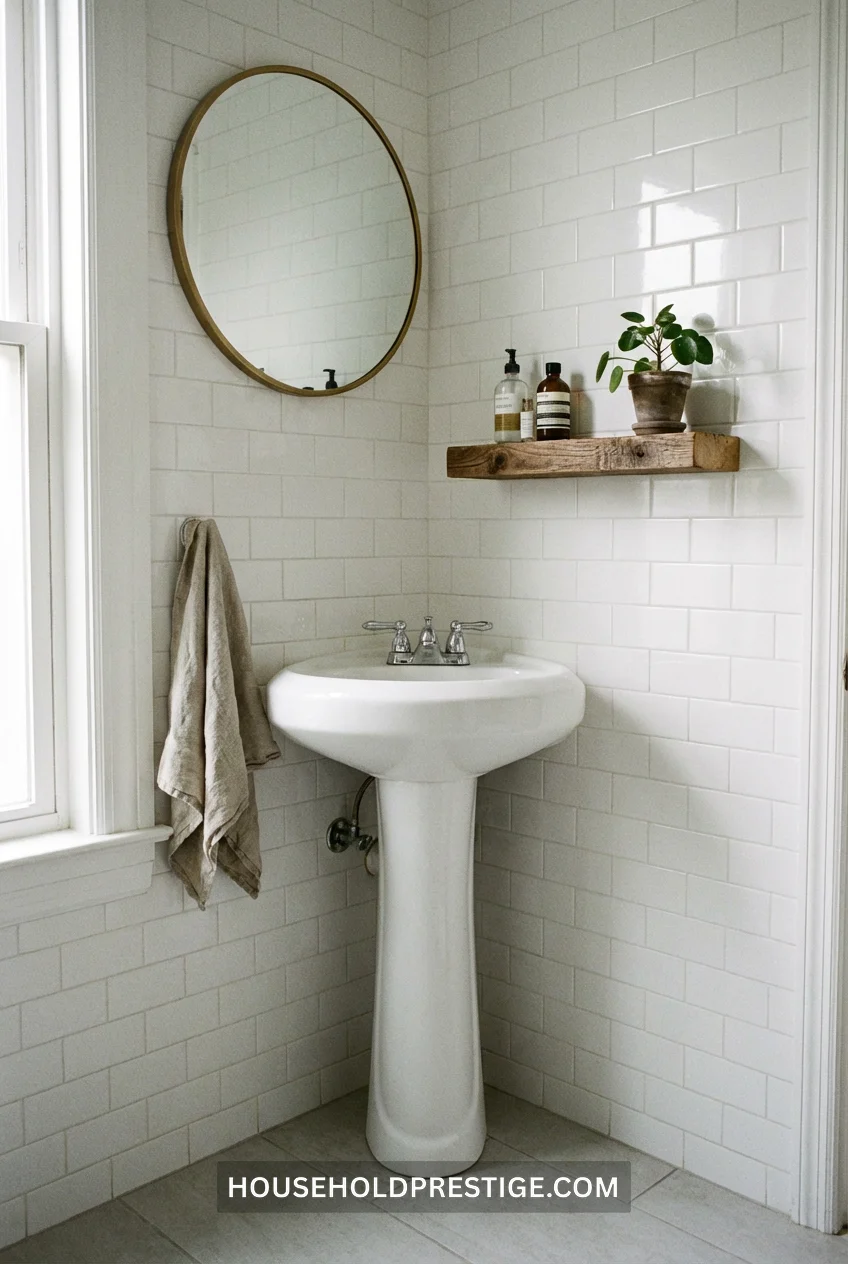
11. One Large Mirror Beats Three Small Ones
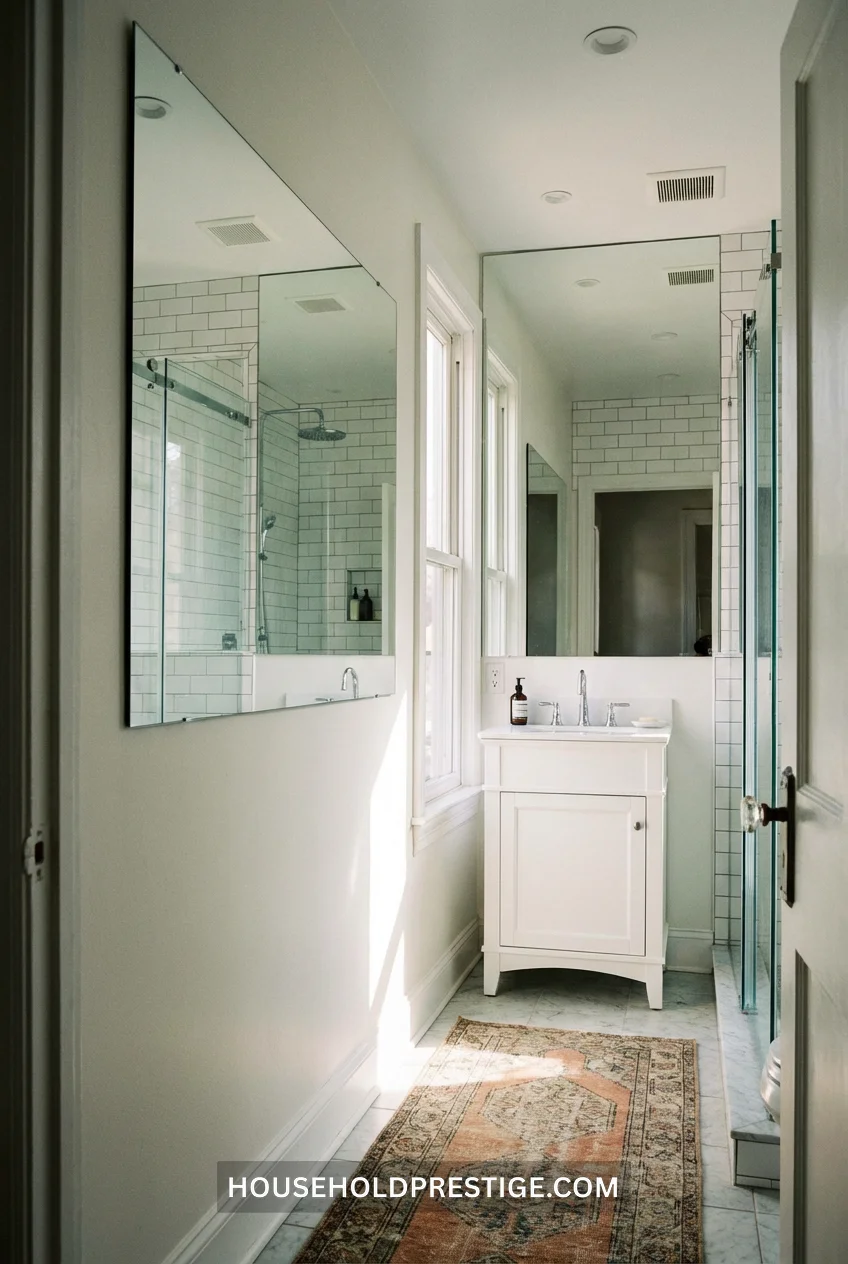
Multiple small mirrors fragment the wall space, creating visual interruptions.
One large mirror (36-48 inches wide, extending from the vanity top to 6-8 inches below the ceiling) reflects the entire room. Your bathroom appears to double in depth because the mirror shows you the full opposing wall.
The effect compounds with lighting. Position light sources so they reflect in the mirror—you get double the illumination from the same fixtures.
12. Heated Towel Racks Mount Vertically (And Why You Care)
Standard towel bars run horizontally – 24 to 36 inches wide, claiming linear wall space.
Heated towel racks mount vertically – 8 inches wide × 48 inches tall – using wall height instead of width. You get 6-8 towel bars in an 8-inch footprint.
Bonus: Your towels dry between uses instead of staying damp in a humid bathroom. Dry towels = less mildew = better air quality in a small enclosed space.
Amba Jeeves D-Curved model (8″ × 48″, $400-500) or WarmlyYours Infinity (8″ × 52″, $550-650). Both are hardwired 120V, requiring an electrician for installation unless you’re comfortable with electrical work. Add $200-350 for professional installation.
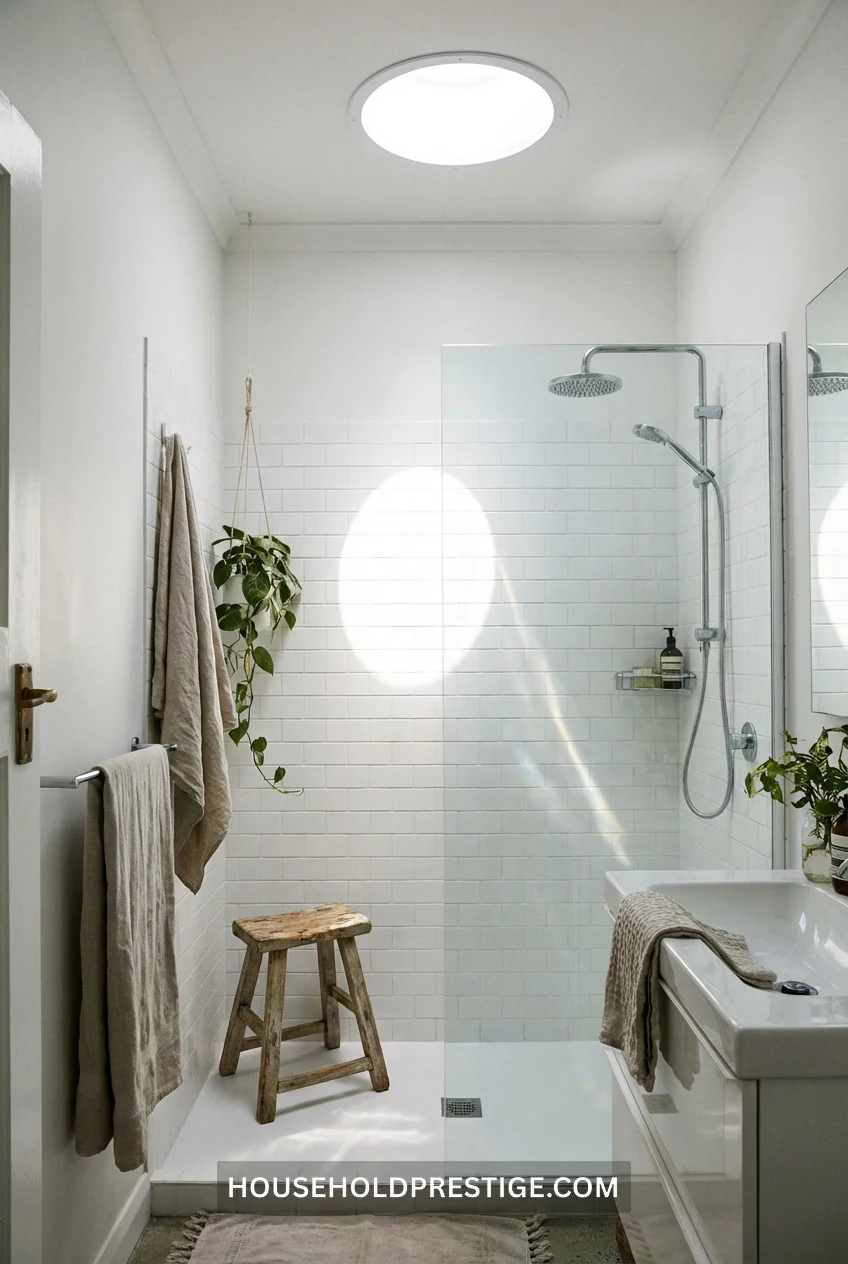
13. Curbless Showers Eliminate the 6-Inch Barrier

Standard shower curbs are 4-6 inches tall, creating a visual and physical barrier between shower and bathroom floor.
Curbless (barrier-free) showers use the same floor tile throughout, with a linear drain and 1-2% floor slope directing water to the drain. Your eye reads the continuous floor as one space, not bathroom-plus-separate-shower.
Cost reality: This requires floor demo and precision work. The shower floor needs to slope correctly without creating a trip hazard in the rest of the bathroom. Expect $2,500-4,000 for a professional curbless conversion including waterproofing, slope creation, and tile work.
When it’s worth it: During full bathroom remodels where you’re already demoing floors. Not worth it as a standalone project unless you have accessibility needs.
14. Schluter KERDI-BOARD Solves the Tile Backer Thickness Problem
Standard cement backer board is ½ inch thick. Add thinset and tile, you’re 1¼ inches thick total. That thickness reduces your already-tight bathroom dimensions.
Schluter KERDI-BOARD is ⅜ inch thick waterproof foam board. Same waterproofing, less thickness. You reclaim ⅛ inch per wall—which sounds tiny until you realize four walls = ½ inch total. In a 5-foot-wide bathroom, that’s 1% of your width back.
Runs $45-55 per 3×5 sheet vs. $12-15 for cement board, but installs faster (you can cut it with a utility knife instead of scoring and snapping cement board).
15. Paint Ceilings Same Color as Walls
White ceilings create a horizontal line where wall color stops. Your eye registers this transition as a boundary, psychologically lowering the ceiling.
Paint the ceiling the same color as the walls—the space reads as one continuous volume. Your eye can’t find a stopping point, so it perceives more height than exists.
This works best with: Light colors (whites, creams, pale greys) that reflect light. Dark ceiling-to-wall colors make small spaces feel like caves.
What nobody tells you: Use a flat or matte finish on ceilings to hide imperfections. Bathroom humidity makes ceiling flaws more visible, and semi-gloss (the finish people use on walls for moisture resistance) highlights every ceiling defect.
16. Sliding Barn Doors for Shower Entries vs. Hinged Doors
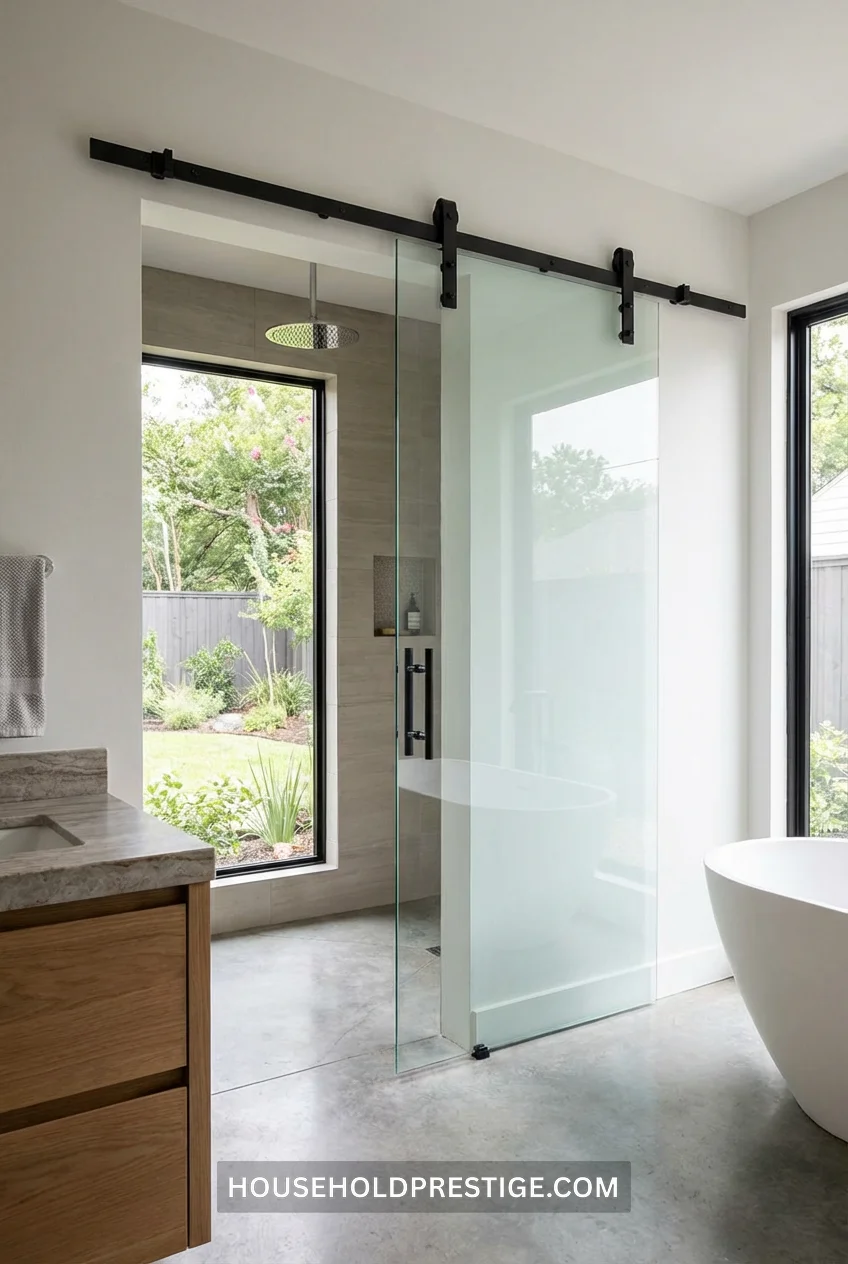
The Space Math
Hinged shower doors need 24-30 inches of clearance to swing open. In a 5×7 bathroom, that clearance zone overlaps with toilet space or vanity approach, forcing you to open the door partway, enter sideways, then close it behind you before you can fully enter.
Sliding shower doors (barn-door style hardware) track along the shower opening. Zero swing clearance needed. You get straight-line entry without spatial gymnastics.
Cost Breakdown
Hinged frameless doors: $800-1,200 installed Sliding frameless doors: $1,000-1,500 installed
The $200-300 premium buys you back 6-8 square feet of usable bathroom floor (the space previously reserved for door swing).
Installation Specifics
The track mounts to the wall above the shower opening (not to tile—to studs). You need:
- 6 inches of clear wall space above the shower opening for track mounting
- Studs positioned within the track span (or blocking added between studs)
- 2 inches of clearance beyond the shower opening width for the door to slide fully open
DreamLine Enigma-X series ($1,200-1,600) or VIGO Elan ($1,000-1,400) are proven performers.
The catch: Sliding doors require more maintenance. The bottom track collects soap scum and hard water deposits. You’ll clean this track monthly vs. twice-yearly hinge maintenance for swinging doors.
17. Niche Shelving Recesses Into Studs

Wall-mounted shelves project 6-12 inches into the room, claiming space and creating head-bump hazards.
Niche shelving (built into the wall cavity between studs) gives you 3½ inches of depth (the standard stud bay width) without any projection. You lose zero bathroom volume while gaining storage.
Build these during construction or remodel when walls are open. Retrofitting means opening drywall, adding cost and mess. Plan for 12-16 inches wide × 36-48 inches tall, with 2-3 shelf divisions.
Installation note: Niches need waterproof backing—use Schluter KERDI-BOARD or RedGard liquid membrane. Tile the inside to match your shower walls.
Cost: $400-600 for a custom-built 16″ × 40″ three-shelf niche, including waterproofing, tile, and labor.
18. Swap Chrome Fixtures for Matte Black (The Visual Weight Trick)
Chrome and polished nickel fixtures are reflective. They catch light and draw attention, creating multiple focal points across the bathroom.
Matte black fixtures absorb light instead of reflecting it. Your eye skims past them, reading the bathroom as a more unified whole instead of a collection of shiny objects competing for attention.
The psychology: Fewer visual interruptions = less cluttered perception = more spaciousness.
Delta Matte Black Trinsic line (faucets $180-280, shower trim $220-320) or Kohler Matte Black Artifacts series (faucets $250-350).
What actually happens: You save zero physical space. But the perceived calm from unified finish colors makes bathrooms feel 15-20% larger in blind perception tests.
19. Linear Drains Instead of Center Drains
Center shower drains require a four-way floor slope—the entire shower floor pitches toward one central point. This creates a subtle bowl effect that’s noticeable underfoot and limits your tile layout options.
Linear drains (long, narrow drains positioned along one wall) need slope in only one direction. The floor feels flatter, you have more flexibility in tile size and pattern, and you can run large-format tiles (12×24 or larger) without awkward cuts around a center drain.
Schluter KERDI-LINE drains run $300-450 for a 36-inch model. Installation requires precision slope work (1-2% grade), adding $400-700 to labor costs vs. standard center drains.
Pro move: Position the linear drain on the back wall (the wall opposite the shower entrance). This puts the drain out of the primary sight line and allows uninterrupted tile runs on the two side walls and floor.
Conclusion
Your 50-square-foot full bathroom isn’t getting bigger. But the 9 square feet you reclaim from a pocket door, the phantom depth from a full-wall mirror, and the breathing room from a wall-mounted toilet? Those changes compound.
You just turned “apologetically cramped” into “surprisingly functional.” Now go measure your toilet-to-vanity clearance—you might have those 6 inches you didn’t know existed.
FAQ
What is the minimum size for a full bathroom? Building codes require 40 square feet minimum for a full bathroom (tub/shower, toilet, sink), but 50-60 square feet gives you functional elbow room. A 5×8 (40 sq ft) bathroom works if you use wall-mounted fixtures and tight 18-inch vanities. A 6×8 (48 sq ft) or 5×10 (50 sq ft) layout offers better spacing for standard fixtures.
How can I make my small full bathroom look bigger without renovating? Start with paint—use one light color (white, pale grey, soft beige) on walls AND ceiling to eliminate visual breaks. Swap your shower curtain for a clear glass panel ($300-500). Replace small mirrors with one large mirror extending from the vanity to near the ceiling. Switch to matte black fixtures to reduce visual clutter from shiny chrome. These changes cost $800-1,200 total and create immediate spatial impact without touching plumbing or tile.
Is a wall-mounted toilet worth the cost in a small bathroom? If you’re already remodeling and opening walls, absolutely—you gain 8-9 inches of floor projection and eliminate the hardest-to-clean base junction. Budget $1,500-2,000 installed. If your bathroom is staying intact, the cost-to-benefit ratio doesn’t justify opening finished walls just for a wall-hung toilet unless you have specific accessibility needs or hate cleaning around toilet bases enough to spend $2,500+.
What’s the best layout for a 5×7 small full bathroom? Position the tub/shower on the 7-foot wall (this is your largest uninterrupted wall). Place the toilet on one of the 5-foot walls, centered 15-18 inches from the shower. Put the vanity on the opposite 5-foot wall. This creates a workable pathway down the middle while maximizing fixture sizes—you can fit a full 60-inch tub and 24-inch vanity. The door swings into the room from the 7-foot wall opposite the tub.
Should I choose a tub or a shower in a small full bathroom? Showers use less floor space (32×48 inches for a standard shower vs. 60×32 inches for a tub), but tubs increase resale value in homes marketed to families. If it’s your only bathroom, keep the tub—most buyers expect at least one tub in the house. If you have another bathroom with a tub, convert to a walk-in shower and reclaim 12-18 inches of floor space for a larger vanity or storage tower.