

You walk past that same corner every single day. The one with the sad little money plant in its plastic nursery pot, vines trailing down like they’re trying to escape.
Here’s the thing nobody tells you about money plants: they’re not the problem. That basic setup is.
Money plants are basically the chameleons of the houseplant world. They’ll climb, trail, wrap around things, or sprawl across surfaces—whatever you need them to do. Which means with the right setup, that $12 plant could be the focal point people actually comment on when they walk into your space.
I’ve spent way too many weekends experimenting with money plant displays (my husband calls it an obsession, I call it research), and I’ve figured out which setups look intentional versus which ones scream “I tried but gave up halfway.”
These 17 ideas range from stupid-simple swaps you can do in 10 minutes to weekend projects that’ll have your guests asking who your interior designer is. Some cost under $15. Others require actual tools. But every single one turns those trailing vines into something that looks like you planned it.
1. The Floating Shelf Cascade
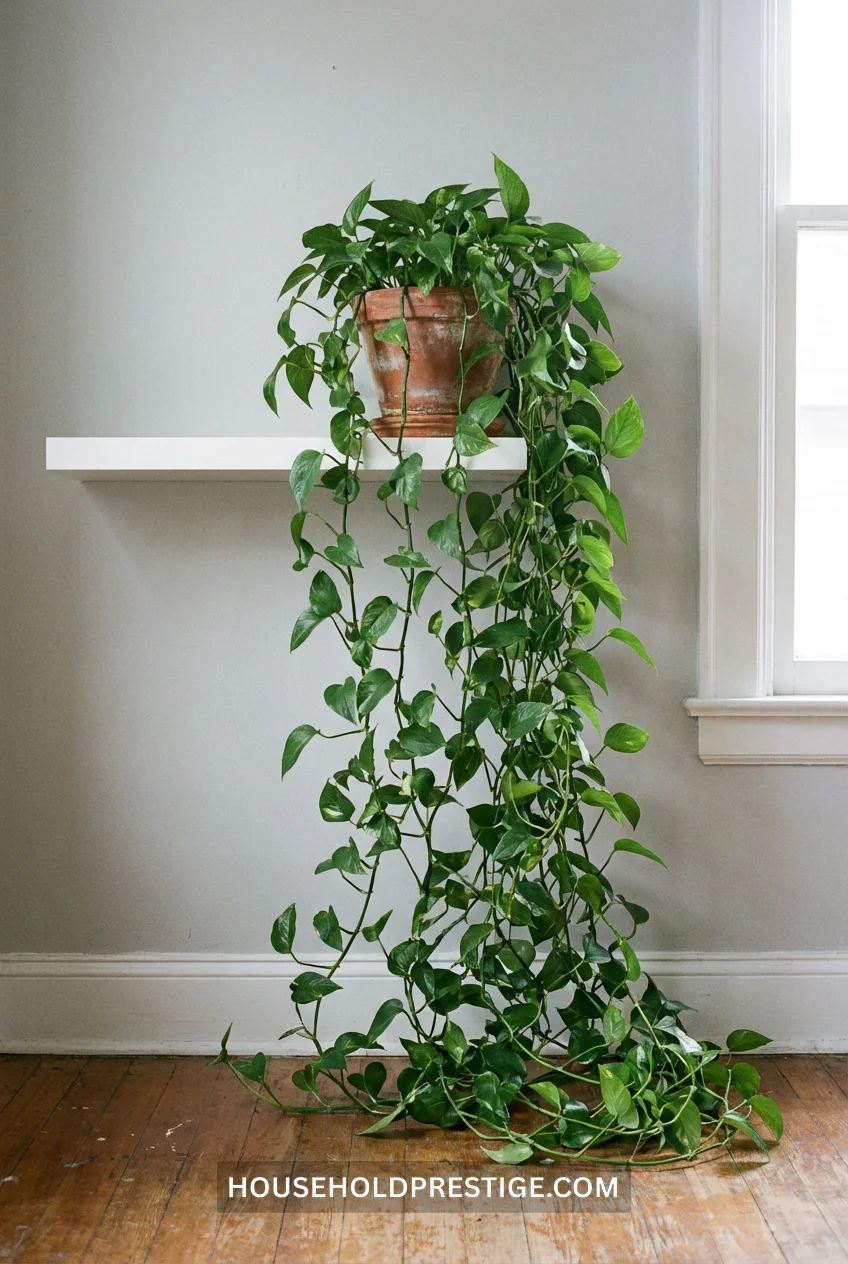
Mount a floating shelf 5-6 feet high. Put your money plant on it. Walk away.
That’s it. The vines grow down instead of looking like they’re drowning on your coffee table. Trim them once they hit about 4 feet so they don’t look stringy.
2. The DIY Copper Pipe Trellis (Because Pinterest Made You Do It)
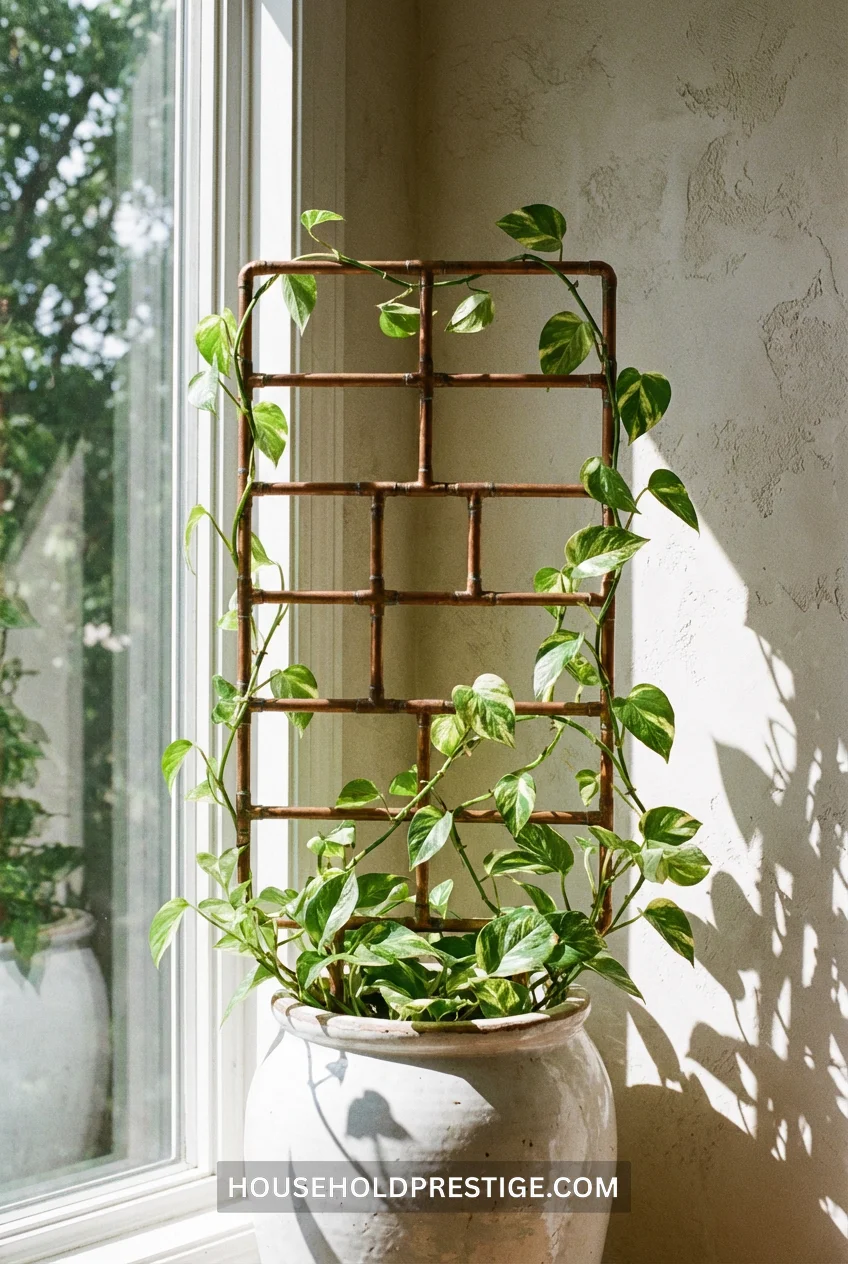
Why this works: Money plants are climbers. Give them something vertical, and they’ll grab onto it like their life depends on it—because it kind of does in nature.
What you need:
- 3/4-inch copper pipes (get them cut at hardware store): two 4-foot pieces, two 18-inch pieces
- 4 copper elbows
- Fishing line or jute twine
- 10-inch pot minimum
- Cost: $25-35 depending on copper prices
Step-by-step:
- Build the frame: Connect your pipes into a rectangle using the elbows. No soldering needed—friction fit works fine for a lightweight plant.
- Create the grid: Run fishing line or twine horizontally and vertically across the frame, spacing lines about 6 inches apart. Secure with small zip ties at intersections.
- Anchor it: Push two pieces of rebar or wooden dowels into your pot soil (opposite corners), then attach your copper frame to these stakes using zip ties.
- Train the vines: This is the tedious part. Gently wrap each vine around the grid as it grows. Check every few days and redirect any stragglers.
The catch: Copper tarnishes. Some people love the patina look (raises hand), others hate it. If you want it shiny forever, spray with clear coat before assembly.
Pro move: Position this setup in front of a window. The light coming through the leaves creates these incredible shadows on your wall in the afternoon.
3. The Grocery Store Hack
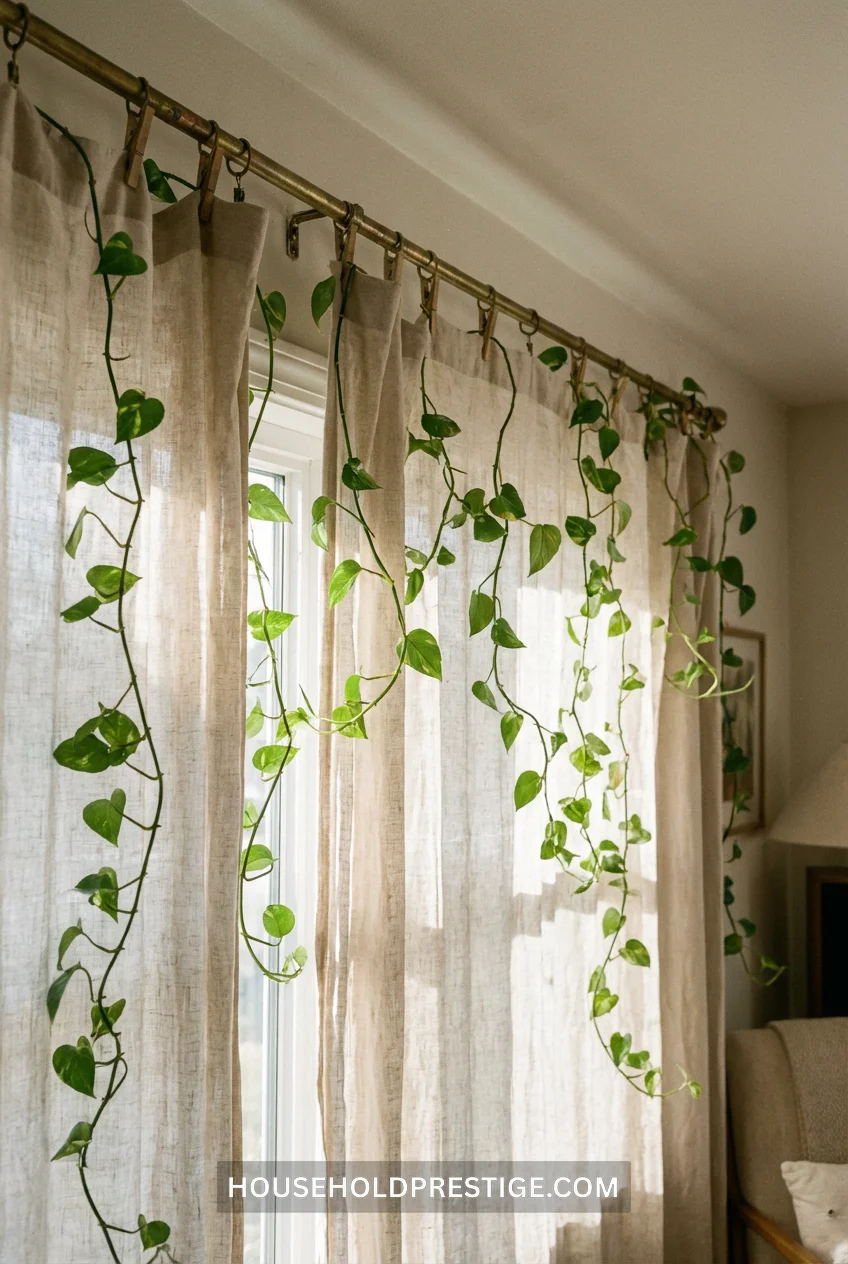
Buy a bag of clothes pins. Clip vines to your curtain rod.
Costs $3. Looks like you hired someone. Don’t overthink this one.
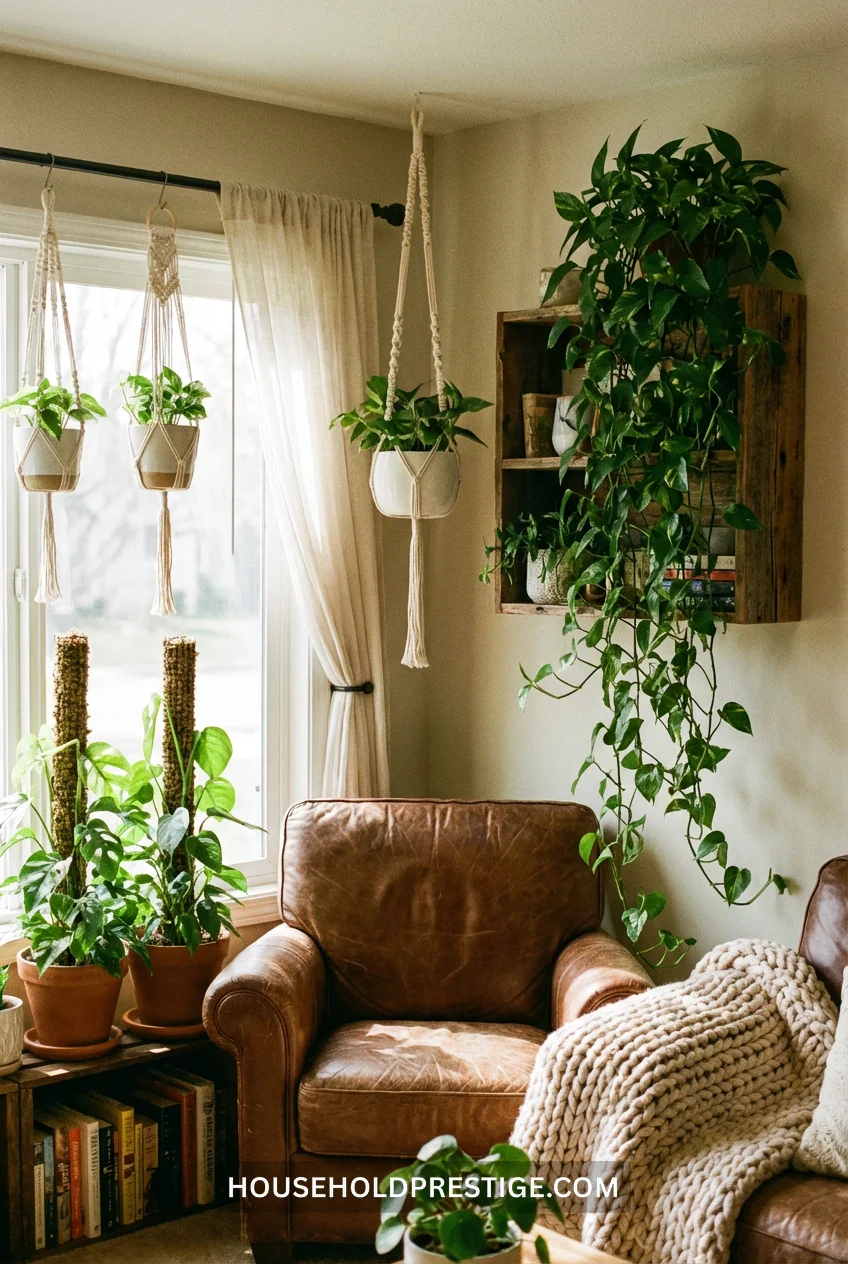
4. Macramé Doesn’t Have to Mean ‘Boho Overload’
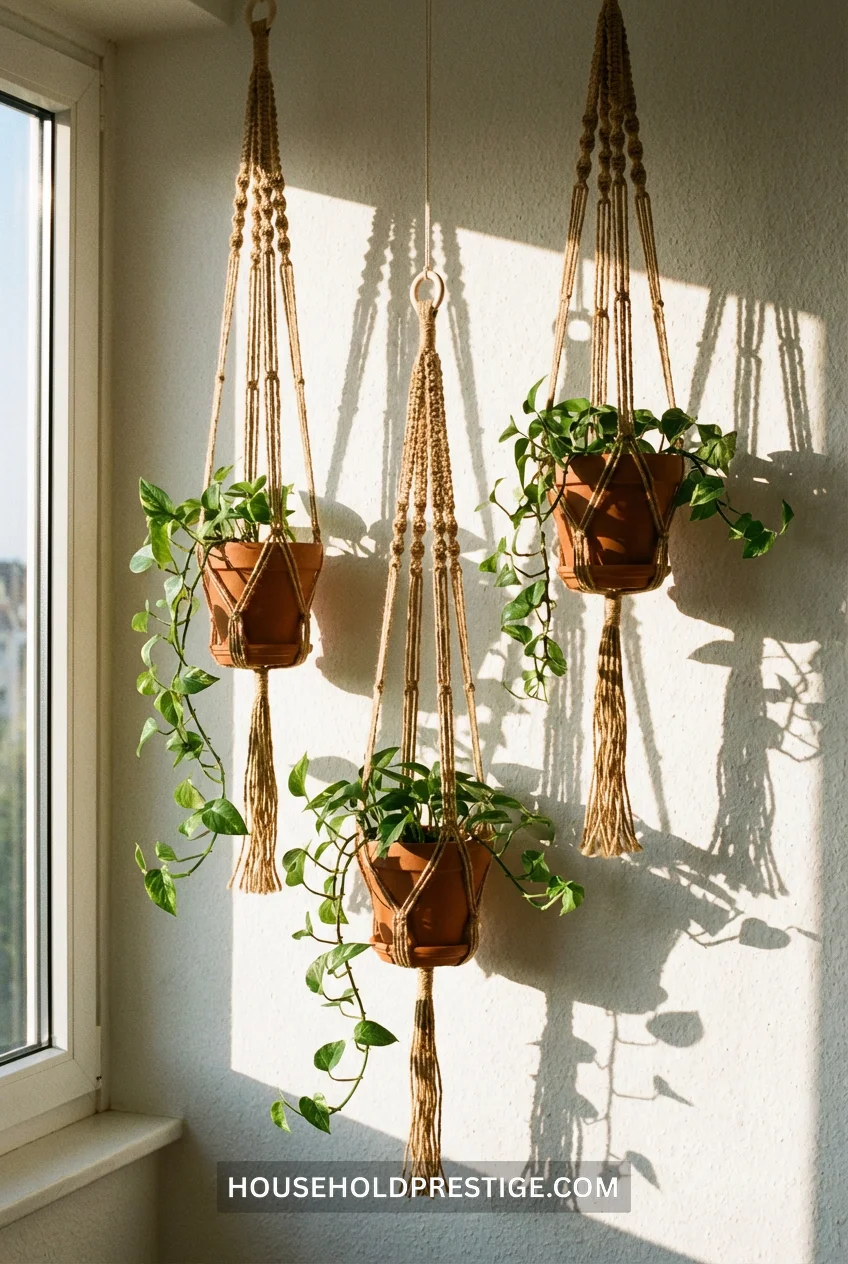
I resisted macramé plant hangers for years because I thought they’d make my apartment look like a 1970s commune. Then I found minimalist versions that are literally just rope with strategic knots.
Look for simple three-strand designs in natural jute or black cotton. Hang them at different heights in a cluster of three—one at eye level, one a foot higher, one a foot lower. The varying heights make it look curated instead of like you just bought three identical hangers.
The placement trick: Don’t hang them in a straight line. Create a triangle shape with your eye-level hanger as the point. Your eye will naturally follow the pattern.
5. The Shelf Divider That Actually Divides
Got an open floor plan that feels too…open? Train a money plant along a bookshelf to create a living room divider.
Use a 4-5 shelf unit (IKEA’s Kallax works). Position it perpendicular to your wall. Put money plants on the top two shelves on both sides. As they grow, guide the vines down the sides using small command hooks as anchor points.
Within 3-4 months you’ve got a green privacy screen that doesn’t require construction or blocking all your light. Plus you still get storage in the middle shelves.
6. Wall-Mounted Propagation Stations (That Look Intentional)
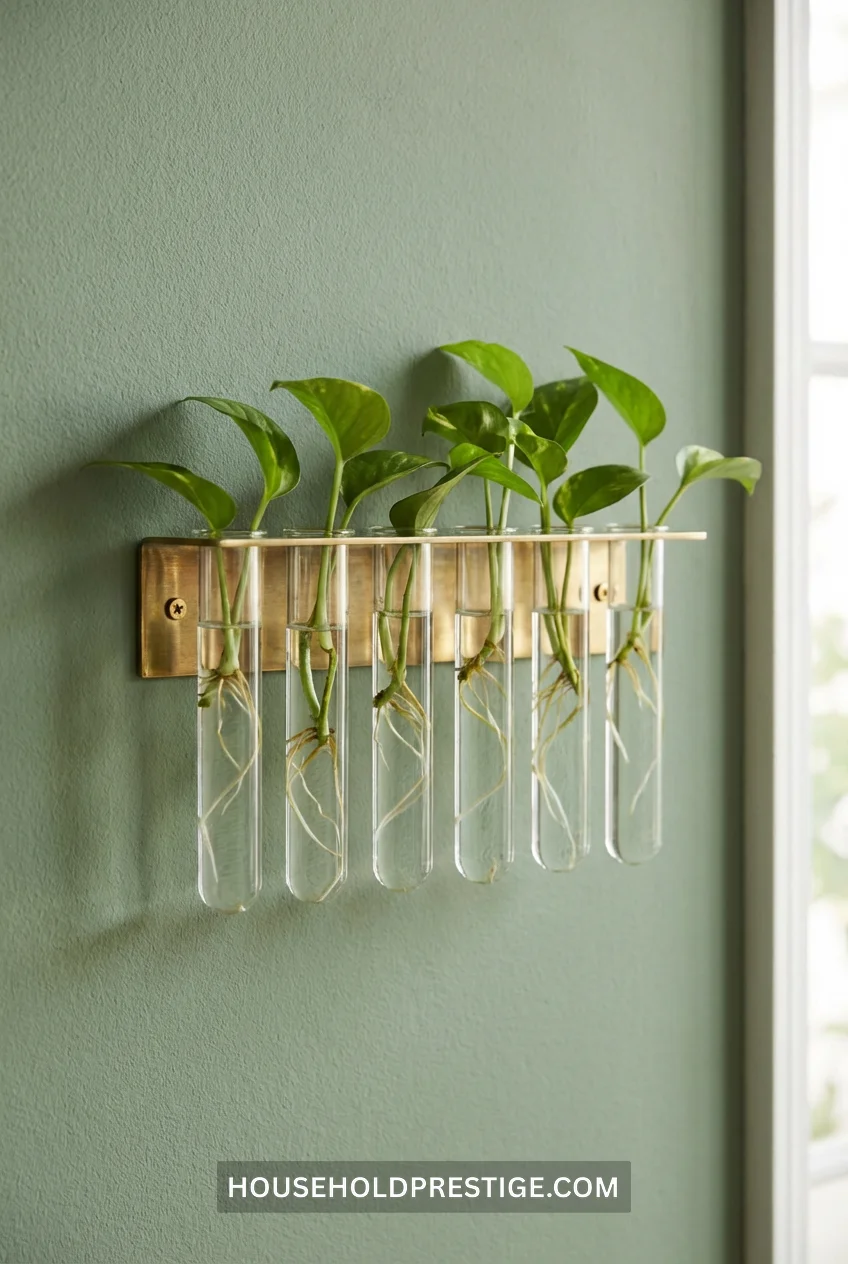
What nobody tells you: Those glass wall vases everyone pins aren’t just decorative. They’re genius money plant propagation displays that look like art installations.
The setup:
Materials:
- Wall-mounted test tube holders (search “wall-mount test tube vase”)
- 6-8 glass tubes or small bud vases
- Money plant cuttings (6-inch pieces with 3-4 leaves)
- Cost: $20-40 depending on finish (brass looks expensive, matte black looks modern)
Installation:
- Mount the holder 5-6 feet high where you’d normally hang art
- Fill tubes with filtered water (tap water works, but gets cloudy faster)
- Drop one cutting per tube
- Change water every 5-7 days
Why it works: The tubes show off the root development, which is actually beautiful—those white threadlike roots against clear glass look intentional. Plus you’re constantly creating new plants, so you’ll never run out of gifts for people.
Cost reality: The tubes cost about $3 each, but if you already have a money plant, your propagations are free. Compare that to buying new plants at $12-20 each.
Common mistakes:
- Using opaque vases (defeats the whole purpose of watching roots grow)
- Overcrowding—one cutting per tube or roots tangle
- Forgetting to change water (goes cloudy and gross in under 2 weeks)
7. The Shower Plant Move
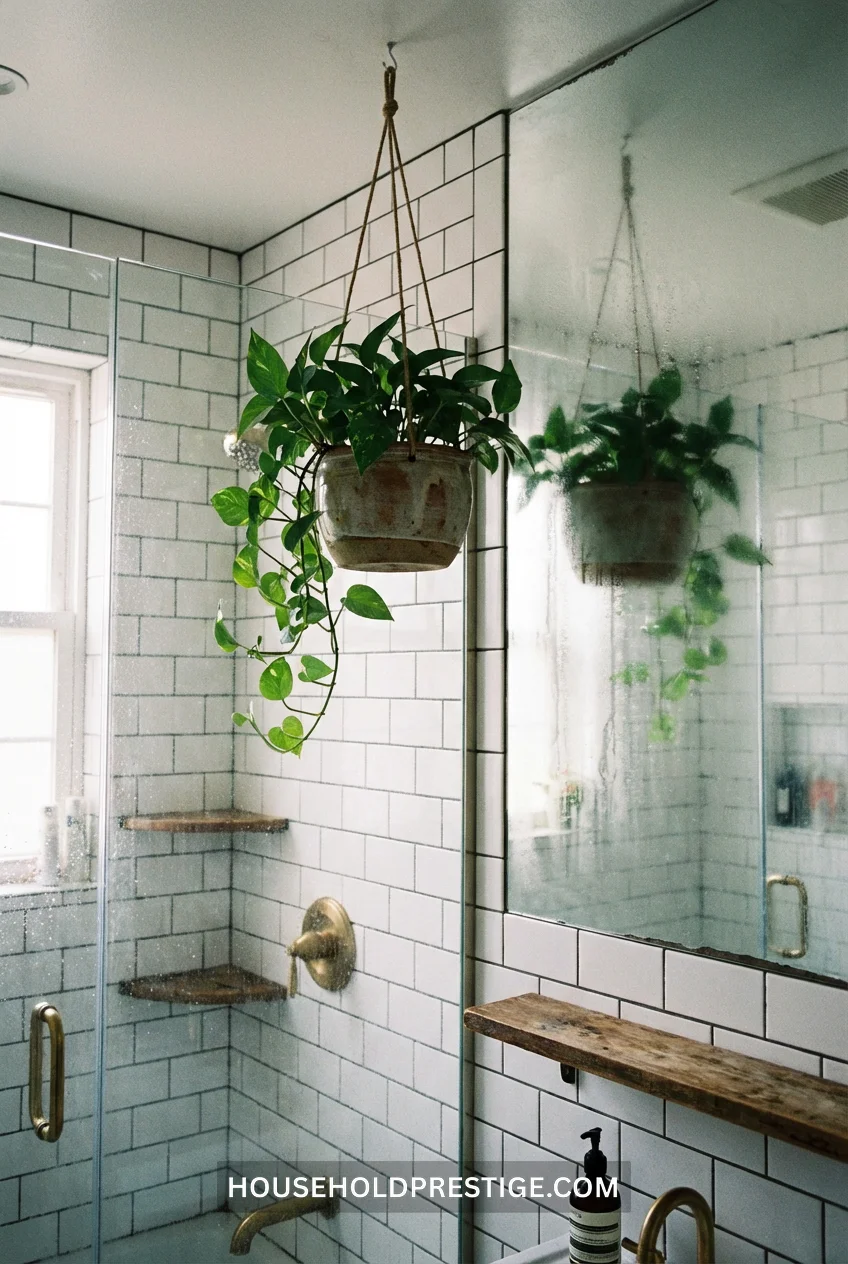
Water-loving plant meets humid environments. Hang a money plant near (not in) your shower.
Just make sure it’s at least 3 feet from direct water spray or leaves get spotty. The ambient humidity is perfect, though.
8. Kokedama Balls (Less Complicated Than They Sound)
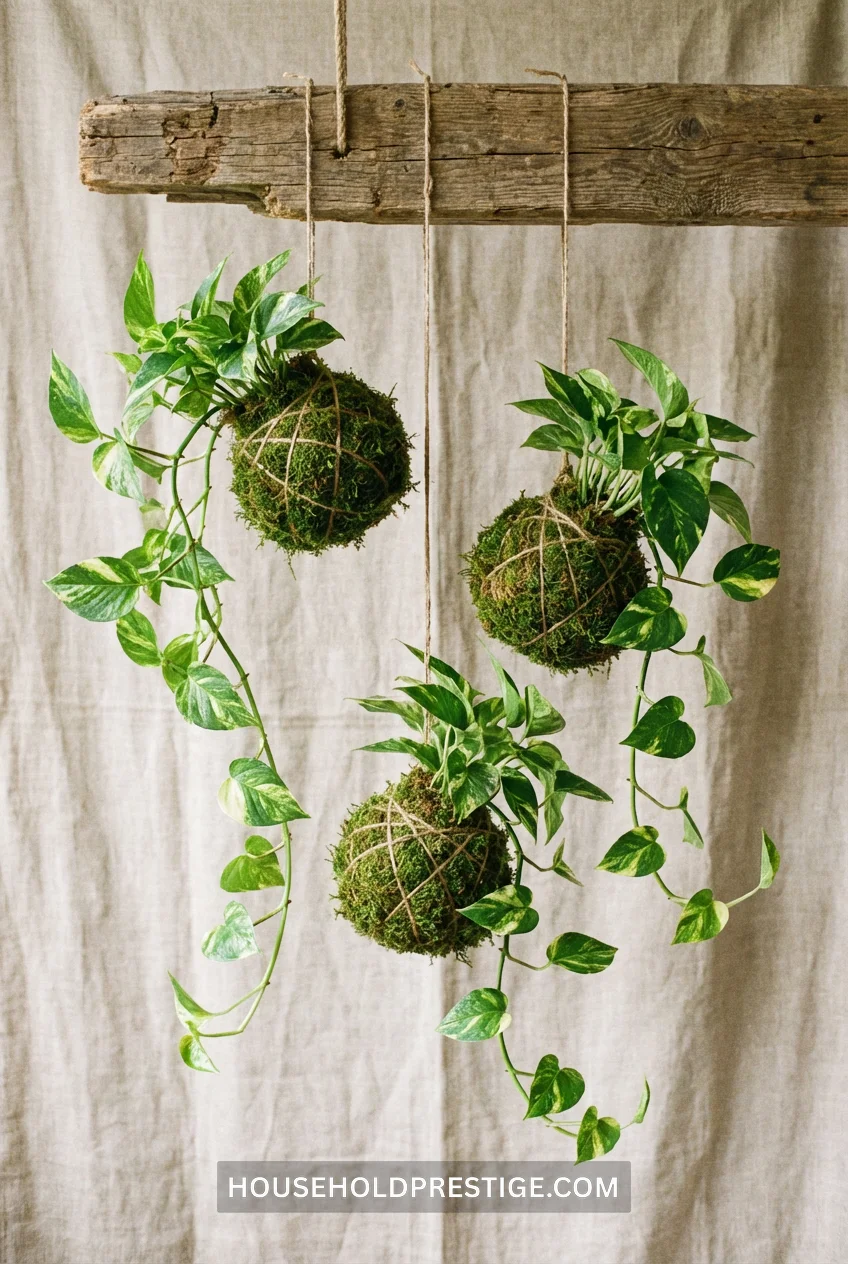
Kokedama is Japanese for “moss ball” and it’s basically a soil ball wrapped in moss that you hang with string. Money plants love this setup because it mimics how they’d grow epiphytically in nature.
Quick version:
- Mix potting soil with clay (ratio 7:3)
- Form around roots into a ball
- Wrap in sheet moss (buy at craft stores)
- Wrap fishing line around 15-20 times to secure
- Hang with macramé cord
Water by dunking the whole ball in a bucket for 10 minutes once a week. Sounds weird, works perfectly.
9. The Corner Ladder That’s Not a Towel Rack
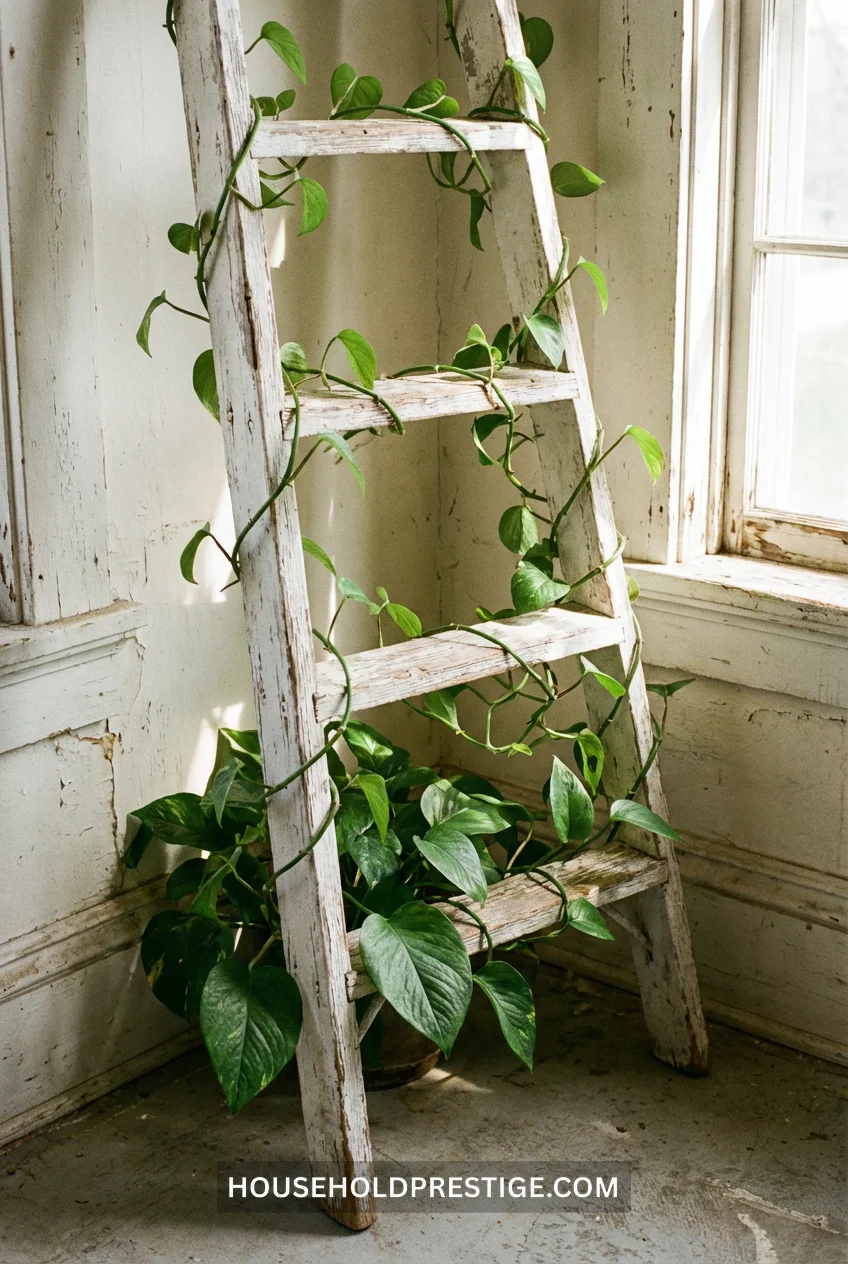
Decorative ladders are having a moment. Put one in a corner, pot your money plant at the base, and train vines up the rungs using plant clips.
Looks intentional. Costs maybe $30 for a basic ladder at Target. Takes 15 minutes to set up.
The vines wrap around each rung as they climb, creating this organic spiral effect that looks way more complicated than it actually is.
10. Concrete Planters (When You Want That Gallery Look)
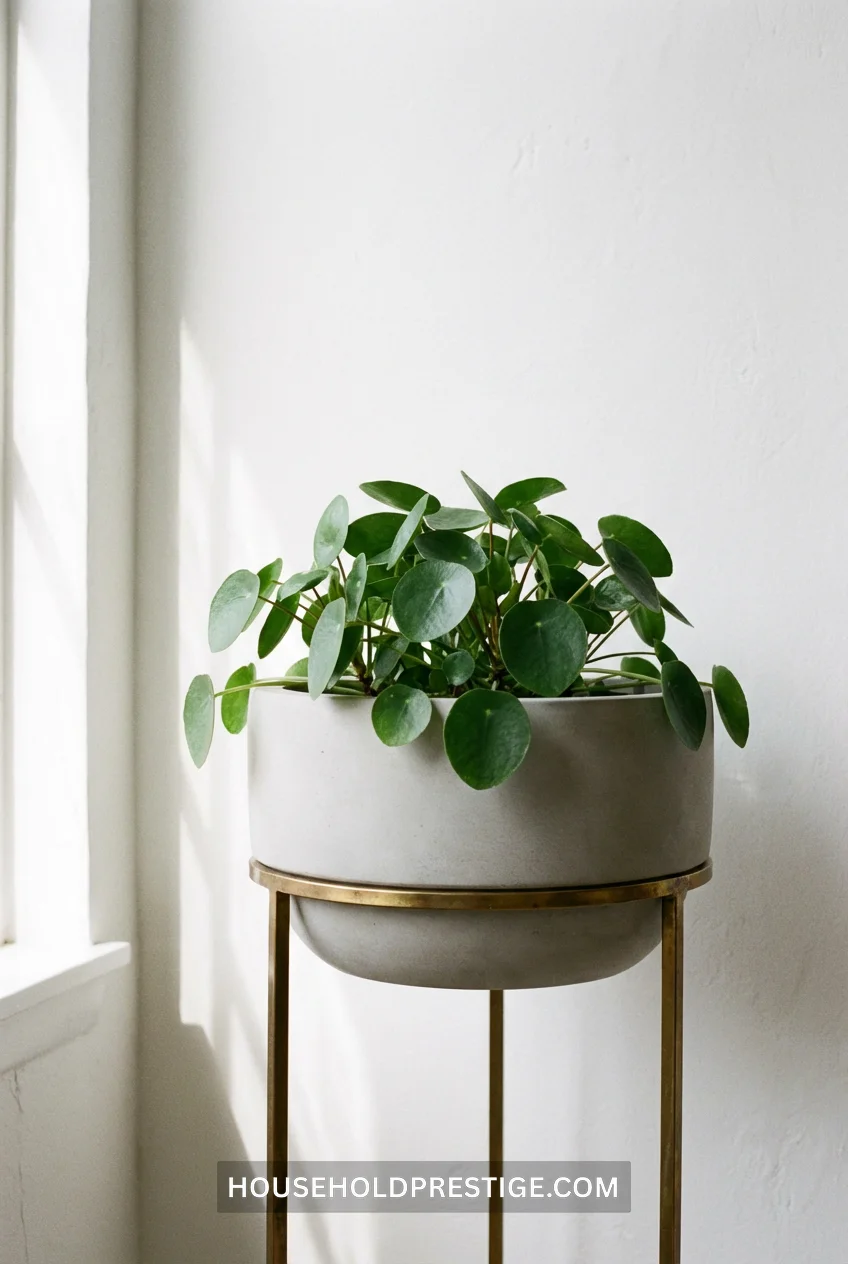
The aesthetic shift: Concrete planters immediately elevate any plant from “I bought this at the grocery store” to “I might have an interior designer.”
What to look for:
- Size: 8-10 inches in diameter, minimum. Money plants hate being cramped.
- Drainage: This is non-negotiable. If it doesn’t have a drainage hole, drill one or pass. Wet concrete roots = dead plant.
- Finish: Smooth concrete looks modern, raw concrete looks industrial. Both work, just pick your vibe.
- Weight: These suckers are heavy. A 10-inch planter weighs 5-8 pounds empty, 15-20 pounds with soil and plant. Don’t plan on moving it frequently.
Price breakdown:
- Basic concrete pot: $15-25
- “Designer” versions with geometric patterns: $40-60
- DIY concrete molds if you’re crafty: $10 in supplies
The hidden benefit: Concrete is porous, which means it absorbs excess moisture from soil. This basically gives you a buffer against overwatering—the #1 way people kill money plants.
Pro tip: Pair concrete with a brass or copper plant stand. The warm metal against cool concrete is chef’s kiss for contrast. Adds $20-30 but makes the whole setup look like it came from West Elm.
What not to do: Don’t put concrete directly on wood furniture without a cork pad underneath. The rough bottom will scratch. Ask me how I know.
11. The ‘Trained Around Window Frame’ Situation
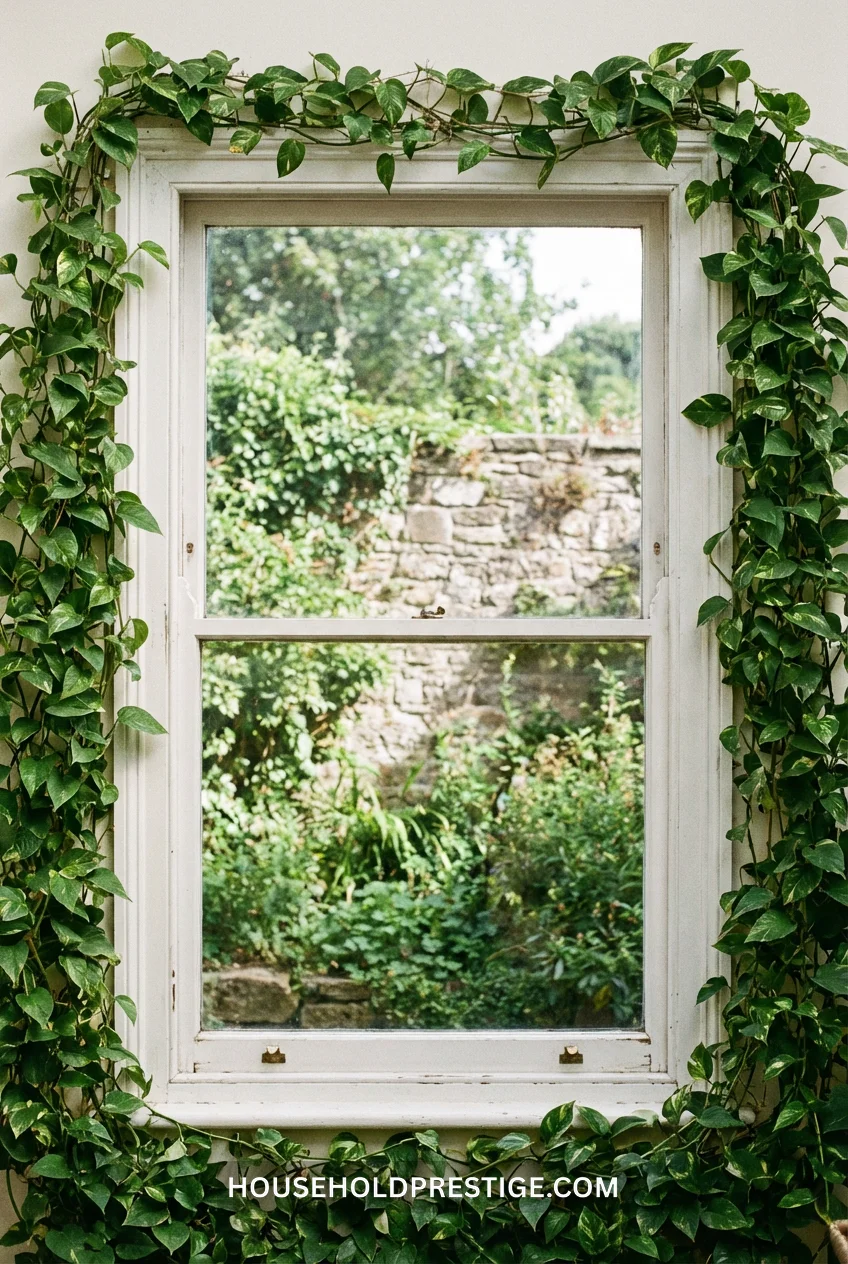
Use tiny command hooks around your window frame. Guide vines to follow the perimeter.
It takes 2-3 months to fill in, but then you’ve basically got a living picture frame around your window view. Redirect stragglers every week and trim anything that crosses the actual window glass.
12. Terrarium Towers (When You’re Feeling Extra)
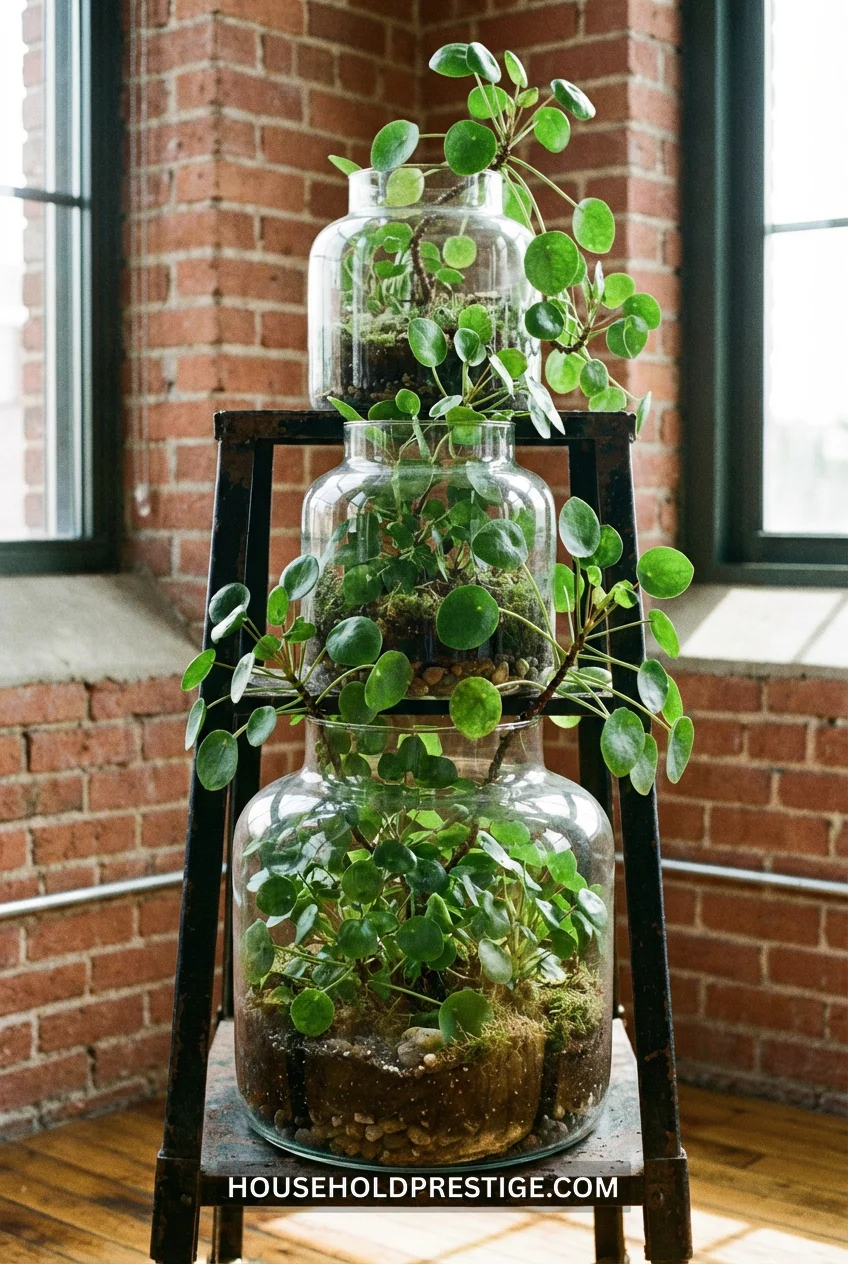
Stack three clear glass terrariums of graduating sizes (large, medium, small) vertically using a metal plant stand. Put a money plant in the largest bottom one.
The vines grow up through the open tops of the stacked terrariums, creating this contained jungle effect. It’s dramatic but the glass keeps it from looking messy.
Water sparingly since there’s no drainage—about 2-3 tablespoons every 10-14 days for the large terrarium.
13. The Shelf Brackets You Didn’t Know You Needed
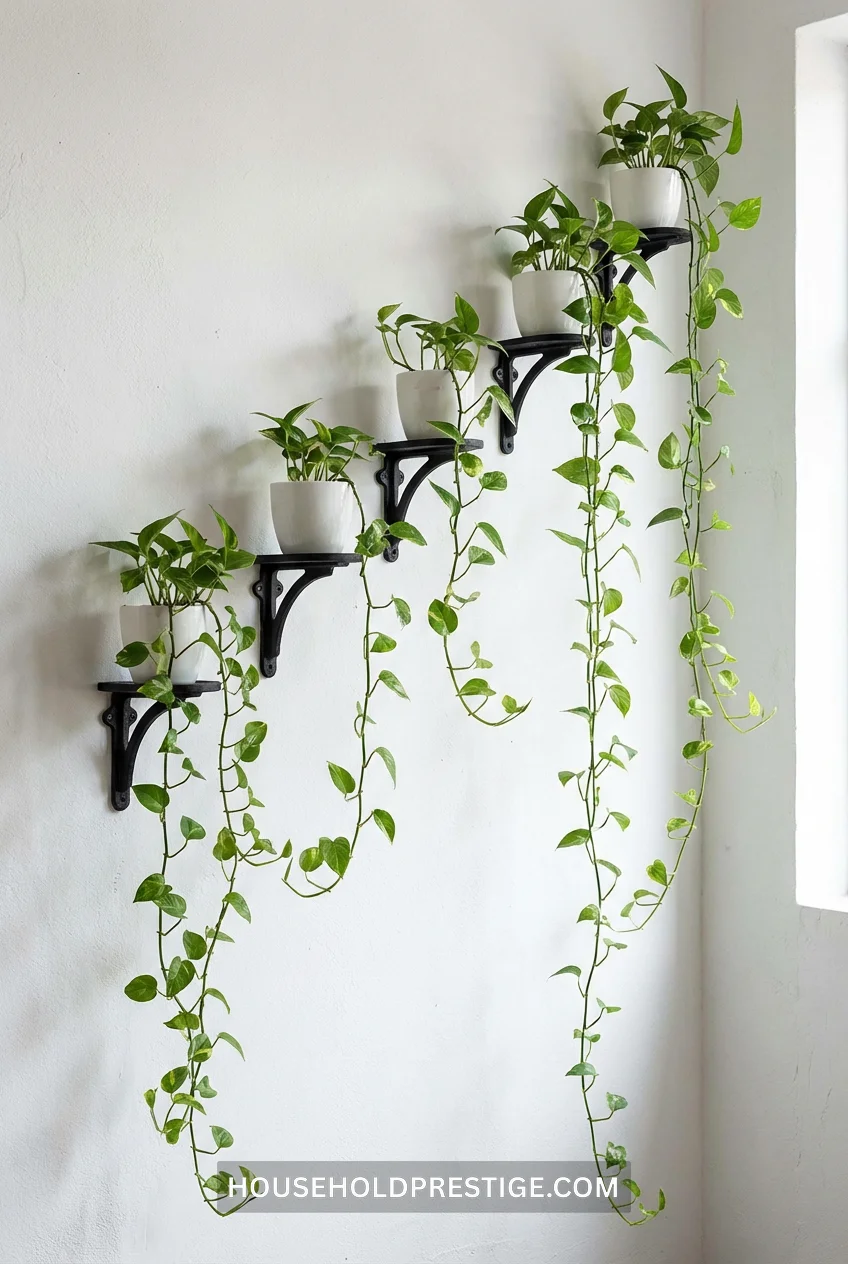
Forget floating shelves—use individual L-brackets spaced 18-24 inches apart in a staggered pattern up your wall. Put a small pot on each bracket.
This creates a vertical garden effect without needing a big planter setup. Each plant gets its own space but they read as one cohesive display. Start with 4-5 brackets and add more as your collection grows.
14. Wire Basket Planters With Moss Lining
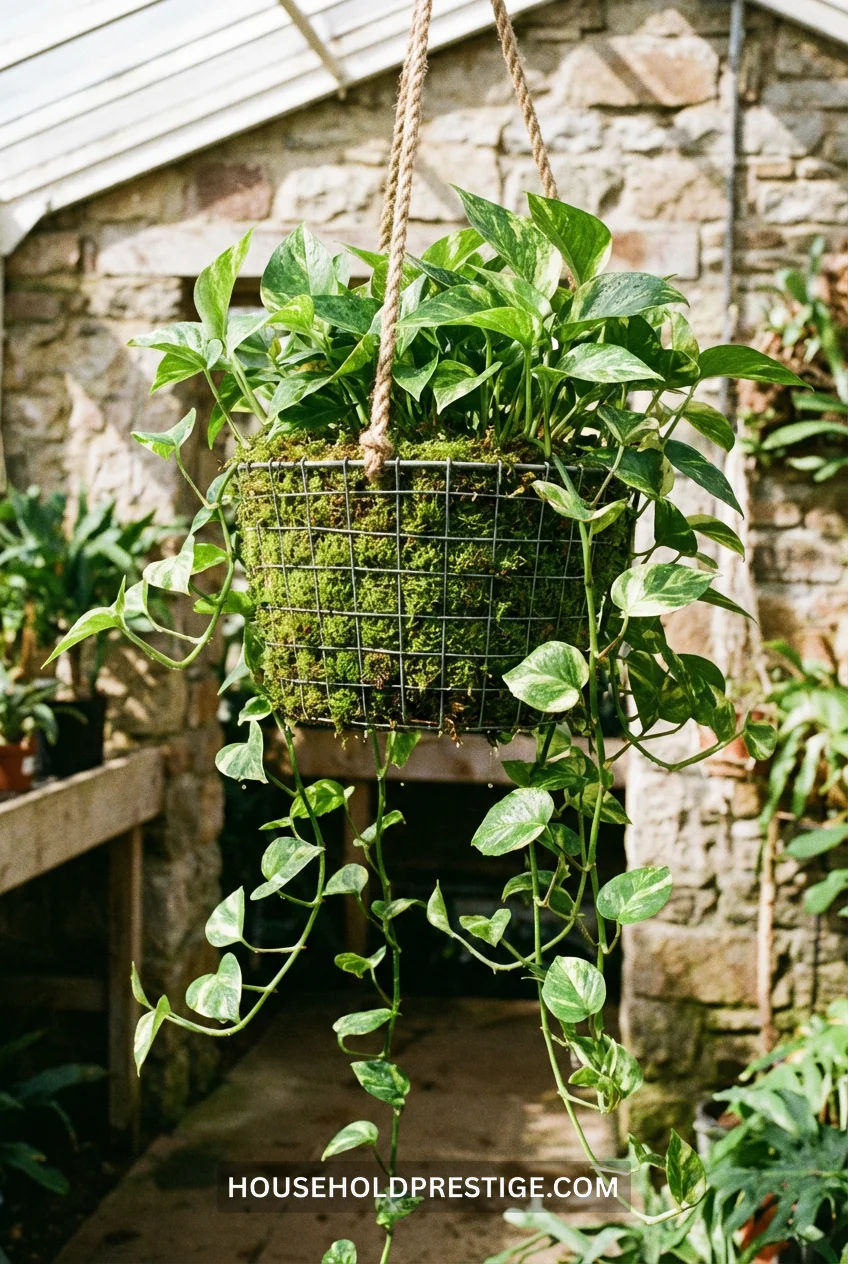
This is the move when you want hanging planters but hate how plastic pots look. Get wire baskets (the open-weave kind meant for fruit), line them with sheet moss, insert a plastic pot inside.
The moss hides the plastic pot, but you still get drainage through the wire weave. Water drips through so hang these over something that can get wet or put a small tray underneath.
The look? Like you foraged these from a French flower market. The reality? $8 at HomeGoods plus moss from the craft store.
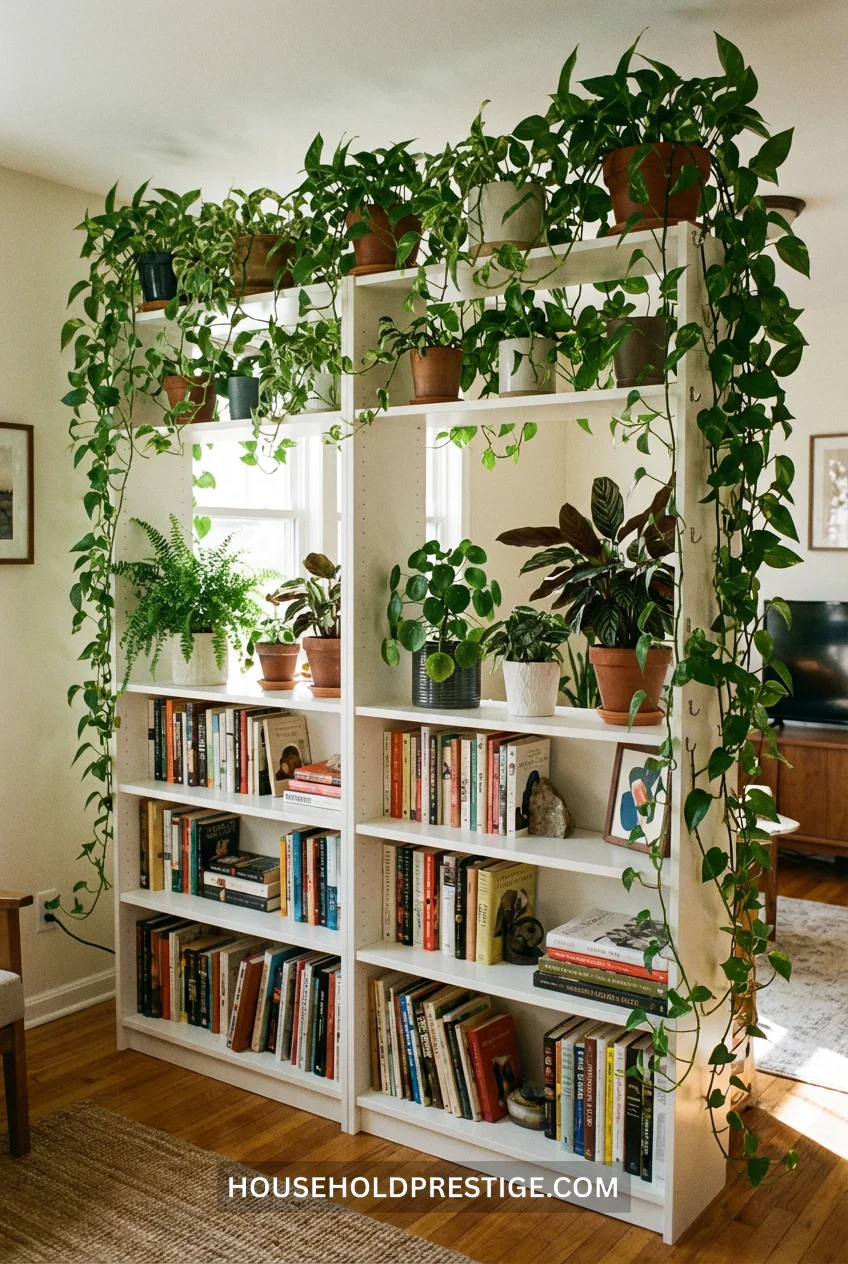
15. The Built-In Bookshelf Integration
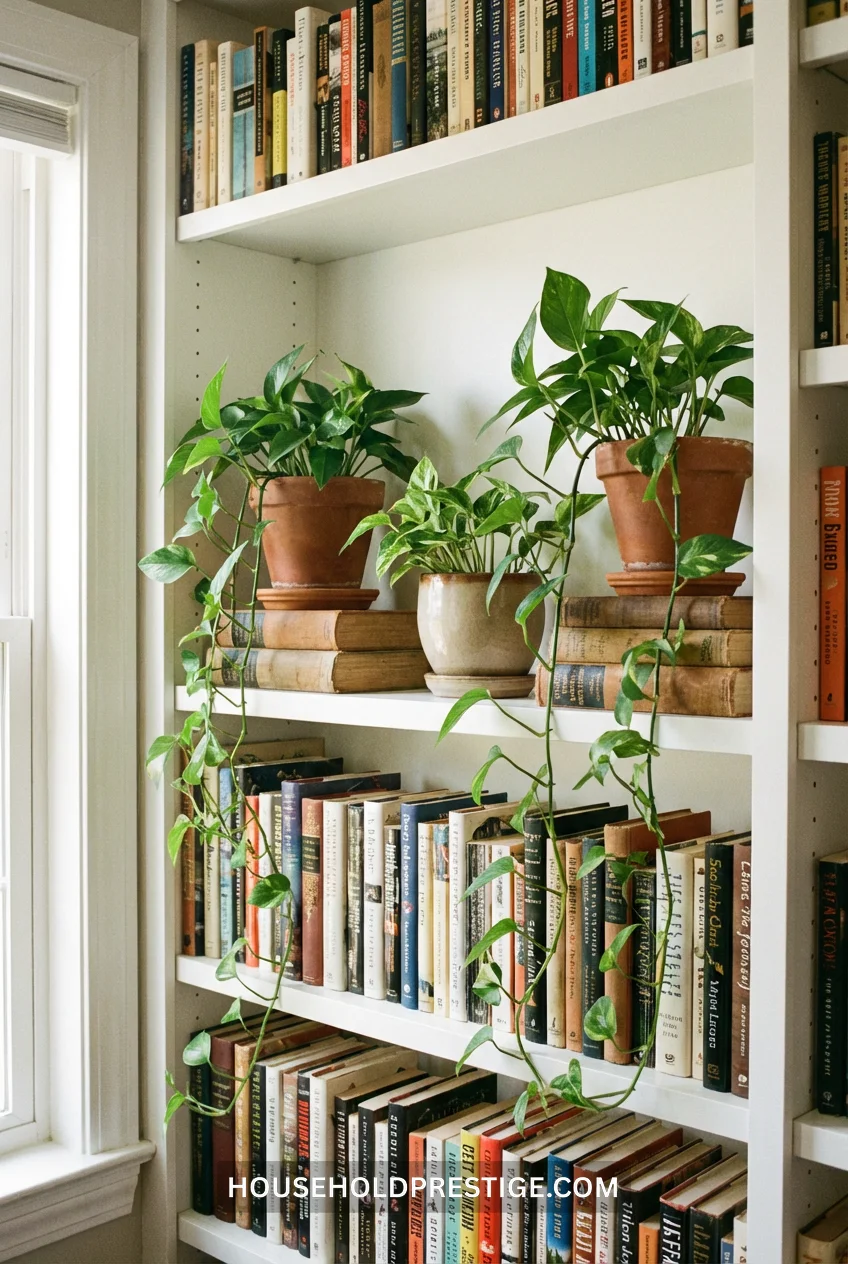
This one’s for people with floor-to-ceiling bookshelves: Instead of putting plants on top of the bookshelf (where you can’t even see them), put them on middle shelves between book sections.
Let the vines trail down in front of the books below. It creates depth and breaks up what would otherwise be a wall of spines.
The formula that works:
- One money plant every 3-4 feet of shelf width
- Position pots at different depths—some flush with shelf edge, others pushed back 4-6 inches
- Let vines grow to different lengths (trim shorter ones to maintain variation)
Why this setup looks professional: The mix of organic vine shapes against rigid book spines creates visual interest. Your eye moves around the bookshelf instead of glossing over it as “just books.”
Pro move: Use books as height risers under some pots. Stack 2-3 hardcovers, place pot on top. Adds dimension and you can easily adjust heights as vines grow.
16. Glass Cloche With Moss Base
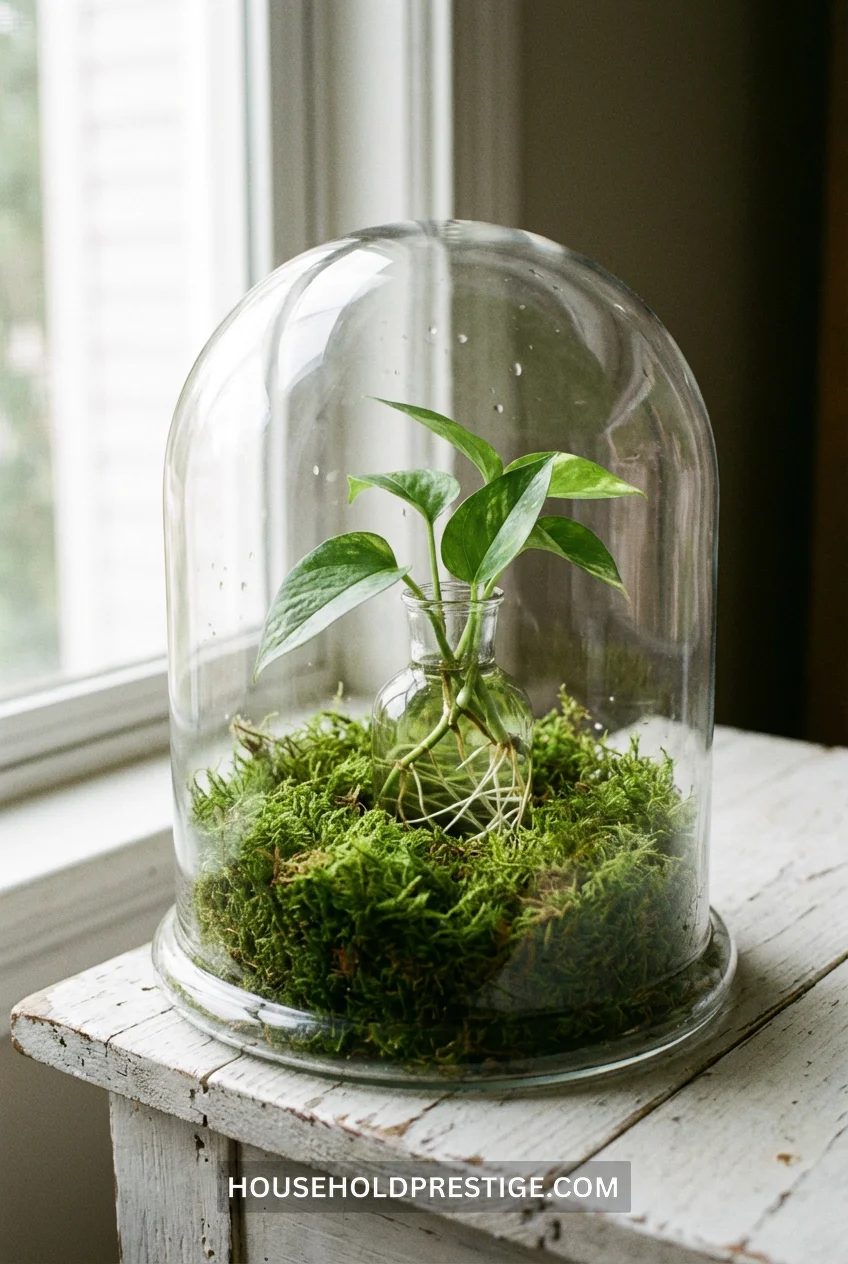
Put a money plant cutting in water inside a glass cloche or bell jar sitting on a bed of decorative moss. It’s like a mini ecosystem that looks way fancier than the $15 cloche you got on Amazon.
The humidity from the water keeps the moss green. Change water every week and you’ve got a self-contained display that works on coffee tables, bathroom counters, anywhere.
17. The Pegboard Wall Garden
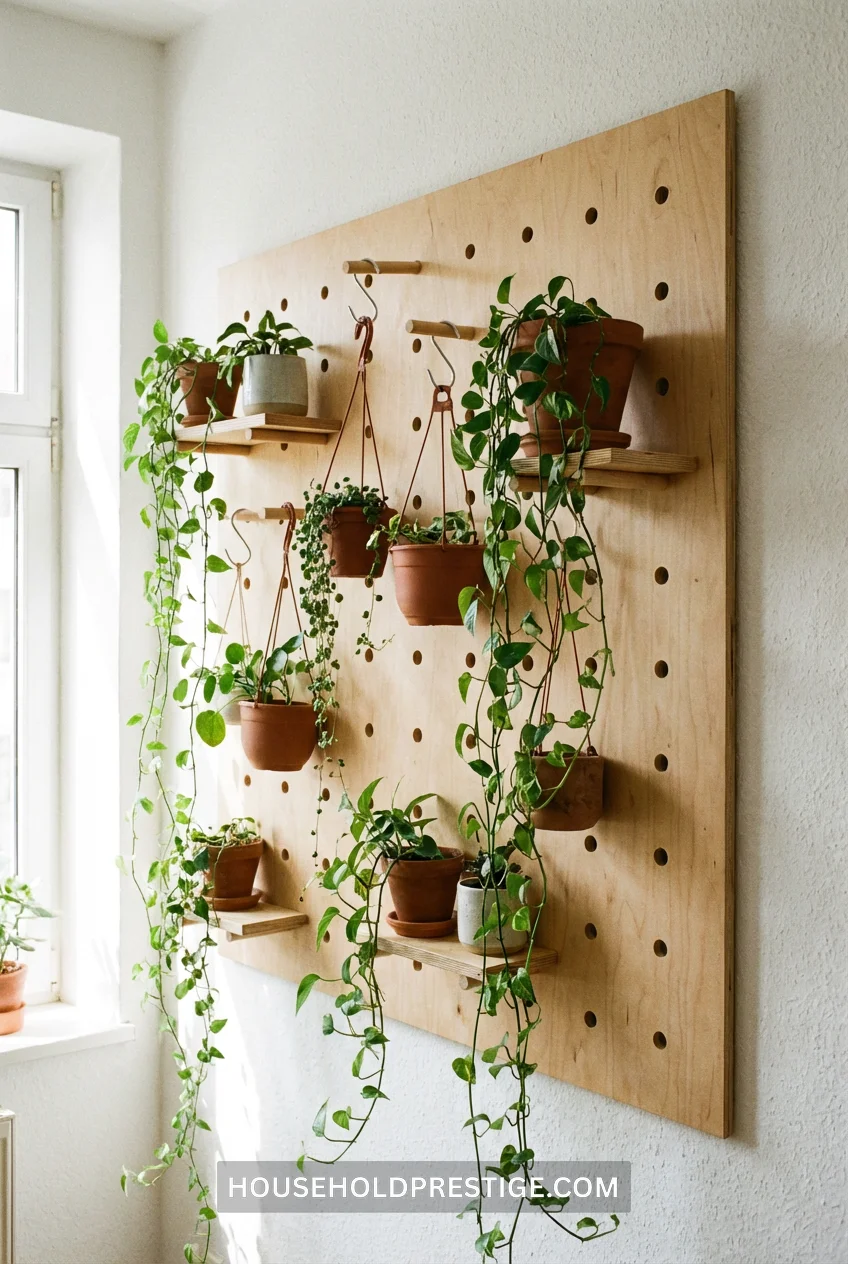
Mount a pegboard (painted or raw wood), add shelf pegs, hang small pots using S-hooks. The pegboard system lets you rearrange your plant display whenever the mood strikes without putting new holes in your wall.
Start with 3-4 money plants in 4-inch pots. Mix in other plants for variety, but keep money plants as your “vine element” that softens the geometric pegboard structure.
The unexpected benefit: You can move pots higher or lower as vines grow to maintain visual balance. No other wall system gives you that flexibility.
Conclusion
Look, none of these ideas requires a degree in horticulture or a trust fund. Some of them literally just involve moving your existing plant to a different spot or adding a $3 bag of clothespins.
The point isn’t to do all 17—that’d be insane, and your space would look like a jungle (though I wouldn’t judge). The point is that your money plant can be so much more than that sad trailing thing on your windowsill.
Pick one idea. Try it this weekend. If it works, try another one next month.
Your money plant’s been waiting for you to give it something to do. Give it a wall to climb or a spot to cascade from, and watch it actually become the feature you keep telling people it is.
FAQ
Q: How fast will money plant vines grow with these setups?
During growing season (spring/summer), expect 4-6 inches per month if you’ve got decent light. Fall/winter slows down to maybe 1-2 inches monthly. That copper trellis setup? Give it 3-4 months to really fill in. The shelf cascade? Looks decent in 6-8 weeks.
Q: Can I do multiple ideas together, or will my money plant get confused?
Plants don’t get confused, but your space might look cluttered. The rule I follow: pick one major setup (like the bookshelf integration or trellis) and then add one simple accent (like the propagation wall or a single macramé hanger). More than that and you’re veering into “trying too hard” territory.
Q: What if my money plant isn’t long enough yet for trailing displays?
Start with the propagation station (#6) or kokedama (#8)—these work with shorter plants. As those grow, you’ll have enough length for the cascade options. Or just buy a second, more mature plant specifically for trailing. They’re cheap enough that having a “climber plant” and a “trailer plant” makes sense.
Q: Do I need to change my watering schedule with these different displays?
Generally, no, but moss-based setups (kokedama, wire baskets with moss lining) dry out slightly faster. Check those every 5-6 days instead of weekly. The terrarium setup is the opposite—needs way less water since moisture can’t evaporate as easily. Everything else, stick with your normal schedule.
Q: Which idea has the highest impact for the least effort?
The floating shelf cascade (#1) or clothespin curtain rod trick (#3). Both take 10 minutes, cost under $15, and immediately change how the plant looks in your space. Save the trellis and propagation station for when you’re feeling ambitious.