

Ever walk past that awkward corner in your living room—the one that’s too small for furniture but too visible to ignore? Same corner, every single day, doing absolutely nothing.
Meanwhile, your houseplants are fighting for window space like it’s Black Friday. The snake plant is leaning sideways. The pothos is blocking your coffee table. Your fiddle leaf fig has officially taken over the reading chair you haven’t sat in since 2023.
Here’s what nobody mentions about plant corner ideas: they’re not just about shoving greenery into unused space. A well-designed plant corner pulls double duty—it’s a focal point that actually makes your room look bigger (weird, but true), plus it concentrates your plant care routine into one manageable zone instead of watering stations scattered across three rooms.
I’ve tested every configuration from vertical jungle walls to minimalist single-specimen displays. Some flopped spectacularly (RIP to the succulents I drowned trying to group with ferns). But the ones that worked? They turned corners from “forgot that existed” to “can’t stop staring” without requiring a trust fund or a botany degree.
You’re about to see 19 setups that range from “30 minutes with a step stool” to “weekend project that’ll get compliments for years.” Pick what fits your space, your light situation, and how often you actually remember to water things.
1. The Tiered Corner Cascade
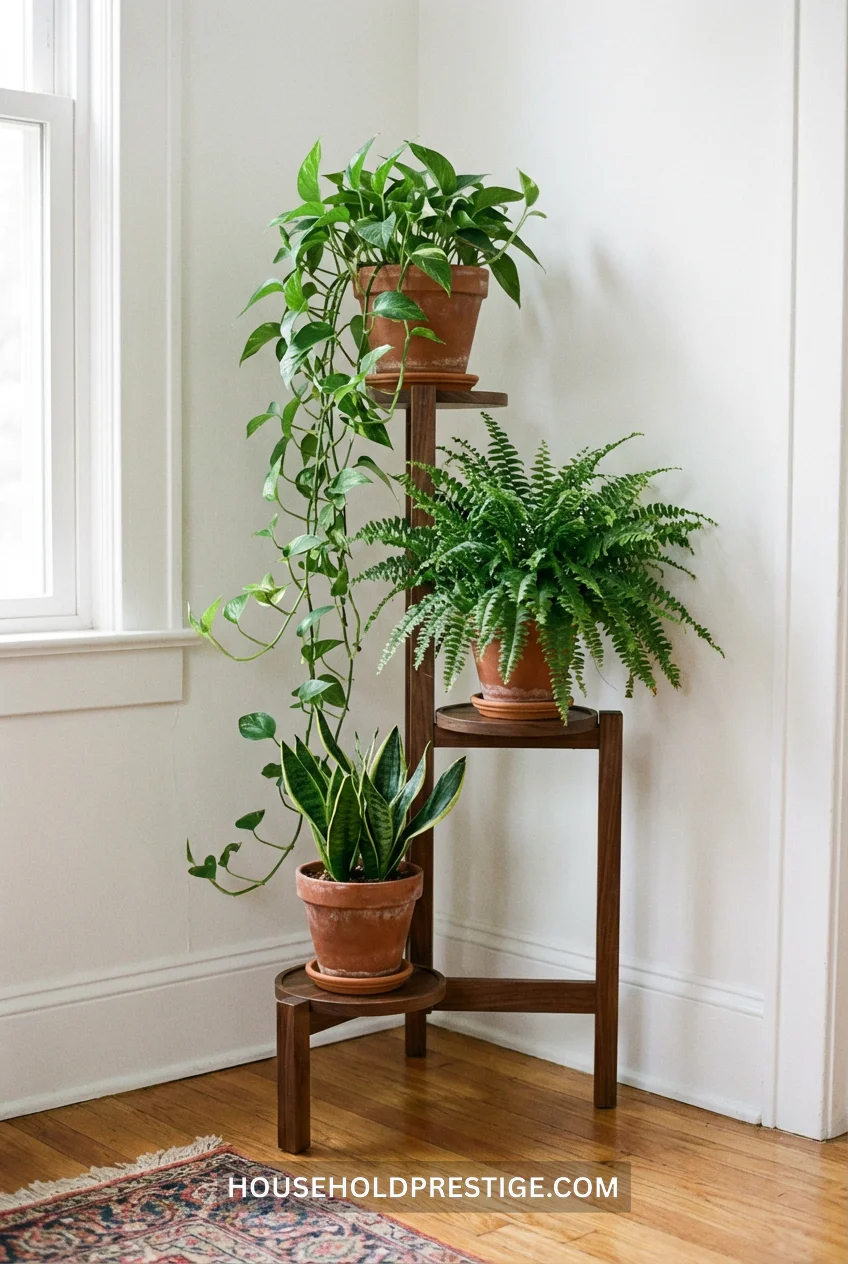
This works because your eye travels vertically instead of getting stuck at floor level. Three tiers = three different light exposures, which means you can mix high-light plants (top shelf gets 6+ hours) with shade-tolerant varieties (bottom barely sees direct sun).
The stand itself: 24-30 inches tall, 18-20 inches wide at the base. Target and IKEA’s Satsumas plant stand ($40-60) fit most corners without blocking outlets. Skip the flimsy wire versions—anything holding 15+ pounds of wet soil needs solid construction.
Plant it with a trailer (pothos, string of hearts), a filler (ferns, calatheas), and a thriller (snake plant, ZZ plant). Water from top to bottom so excess drains through. Takes maybe 5 minutes weekly.
2. Floor-to-Ceiling Tension Rod Garden
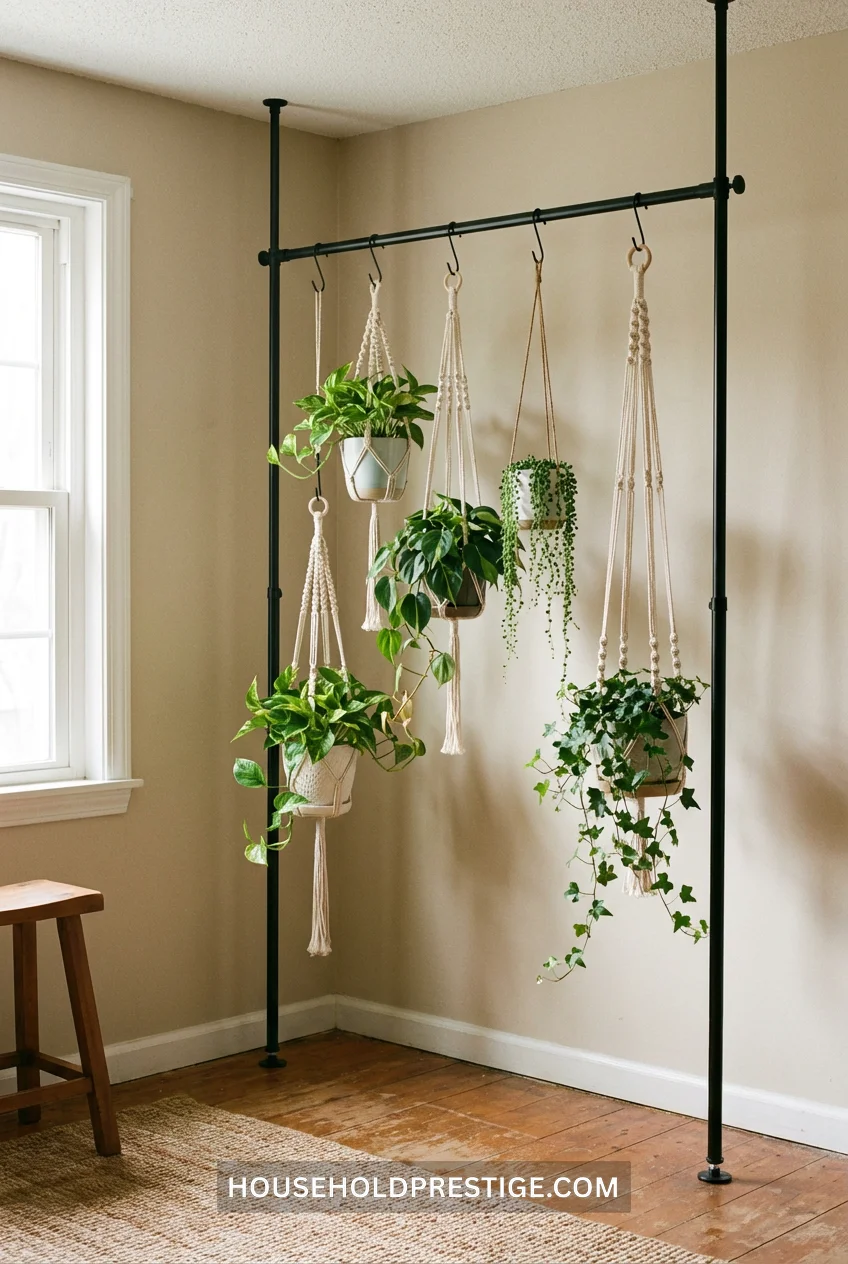
Tension rods hold 20-30 pounds (check the packaging, they vary wildly). You’re installing this between floor and ceiling in the corner itself—no wall damage, fully removable for rentals.
Why This Works:
Hanging plants take zero floor space but give maximum visual impact. You’re creating layers of green that draw the eye up, making 8-foot ceilings read as 10.
Installation Reality:
15 minutes if your ceiling is standard height. Measure twice, twist once. The rod needs to hit ceiling joists or you’re adding ceiling anchors (another 20 minutes, requires a drill).
Plant Selection:
All trailers, all the time. Devil’s ivy, heartleaf philodendron, string of pearls (if you’ve got bright light), regular pothos in 3-4 color variations. Stagger heights so they’re not all at eye level—that looks like a plant prison lineup.
Pro Tip:
Use S-hooks instead of permanently attaching planters. Rotate plants in and out as seasons change or as some inevitably croak. I swap in a holiday cactus every December, swap it back to my kitchen windowsill in February.
3. Mirror + Single Statement Plant
Run a floor mirror (6-7 feet tall, 2-3 feet wide) diagonally across the corner. Place one large plant—fiddle leaf fig, bird of paradise, monstera deliciosa—in front of it.
The mirror doubles the visual impact of one plant. You’re not maintaining 15 small varieties; you’re babying one dramatic specimen that looks like two. Works in low-light corners because the reflection bounces whatever light you’ve got.
Cost: $80-150 for a decent floor mirror (IKEA Hovet, Target’s full-length options). $40-100 for a 3-4 foot tall plant depending on whether you’re buying from a local nursery or marking up at West Elm.
4. Ladder Shelf With Descending Sizes
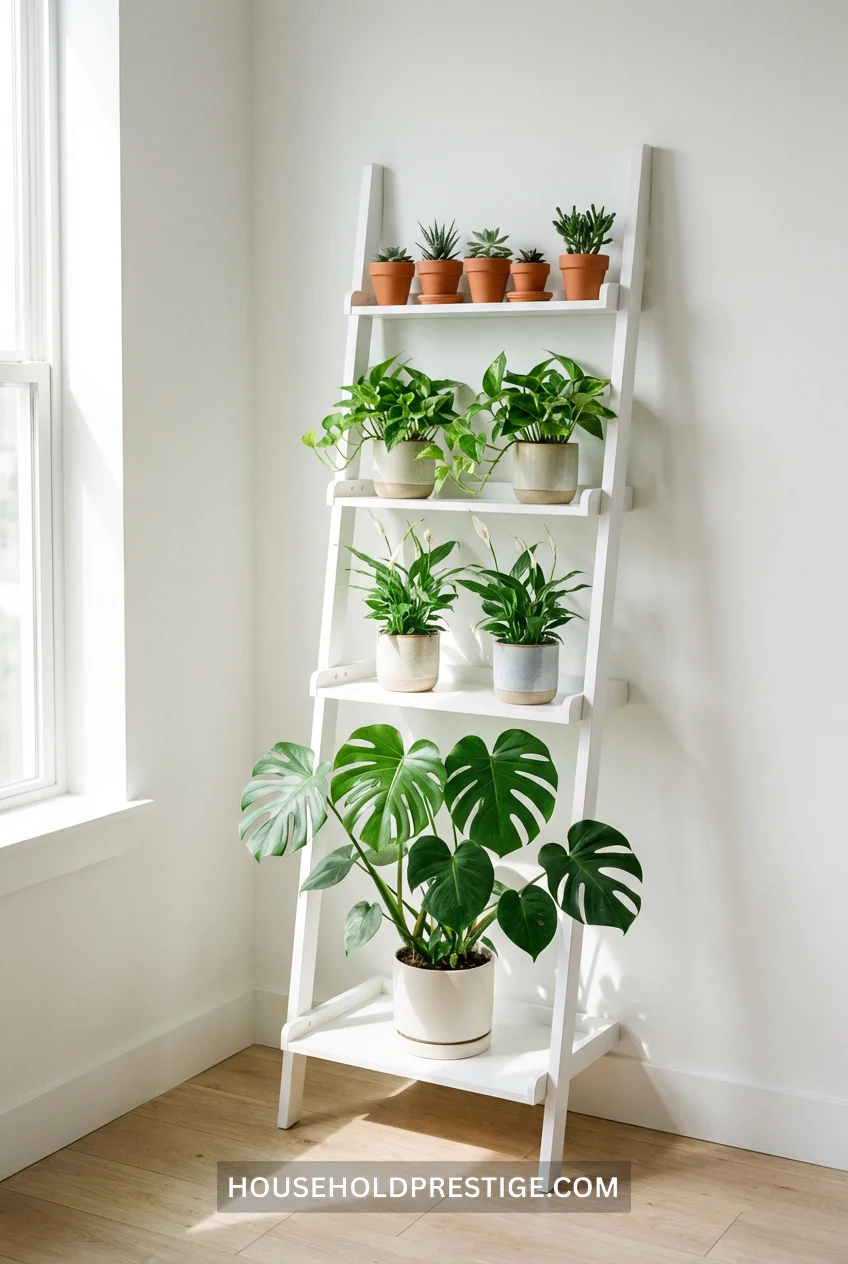
Ladder shelves lean at 70-75 degrees, putting weight on the wall without requiring heavy-duty anchoring. The slant creates a natural visual flow from smallest plants (top) to largest (bottom)—opposite of how most people arrange, which is why it works.
Each rung is 12-16 inches deep. You can fit 2-3 small pots (4-inch diameter) on top rungs, one medium pot (8-10 inch) on middle, one large floor plant (12-14 inch) at the base.
Brands: Article’s Tiered Shelf ($180), World Market’s ladder shelf ($70), or DIY with a reclaimed ladder and paint ($30-50 if you thrift the ladder). All achieve the same visual effect.
Materials Needed:
- Ladder shelf (or actual ladder, cleaned and sealed)
- Pot selection in 3 sizes
- Drip trays for each pot (non-negotiable unless you enjoy mopping)
- Optional: small LED clip lights for darker corners ($15 per light)
Installation:
Lean it, level it with furniture pads under the feet if your floor slopes, secure the top to the wall with furniture straps if you have pets or toddlers. 10 minutes max.
Common Mistakes:
Overloading top shelves. Weight distribution matters. Heavy pots = lower rungs. Lightweight plastic or terra cotta = upper rungs.
5. The Chunky Pot Cluster (No Furniture)
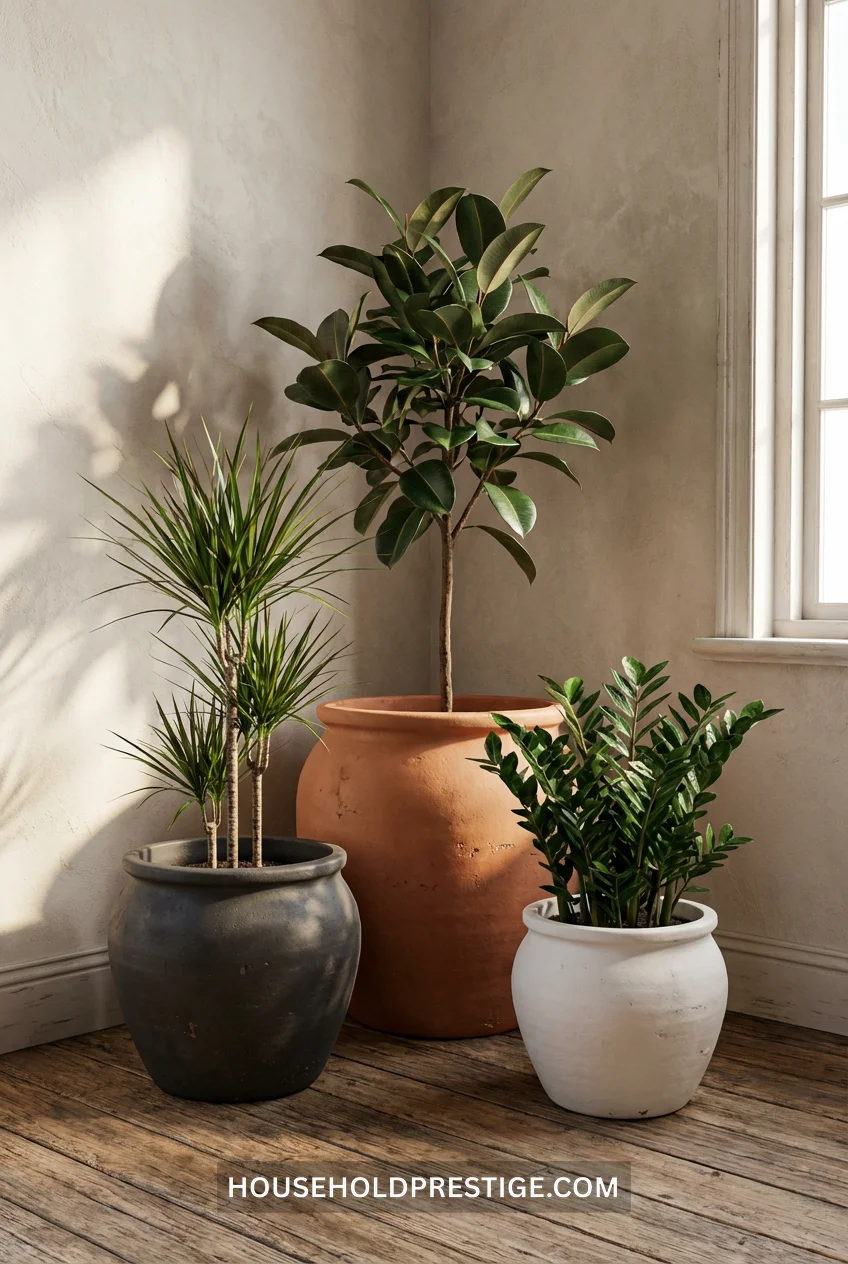
No stands, no shelves. Just pots in graduating heights (12-inch, 18-inch, 24-inch) filled with low-maintenance plants that tolerate neglect.
This is for people who hate fussing with furniture or don’t want “another thing to dust.” The pots ARE the design. Use textured ceramics—ribbed, reactive glaze, two-tone finishes. West Elm, CB2, and Terrain sell these in the $40-120 range per pot. Thrift stores often have vintage ceramic planters for $10-25 if you’re patient.
Plant roster: Rubber plant (Ficus elastica), dracaena marginata, ZZ plant, cast iron plant. All survive low light, infrequent watering, and general abandonment. Water every 10-14 days. Done.
6. Wall-Mounted Shelves in Asymmetrical Heights
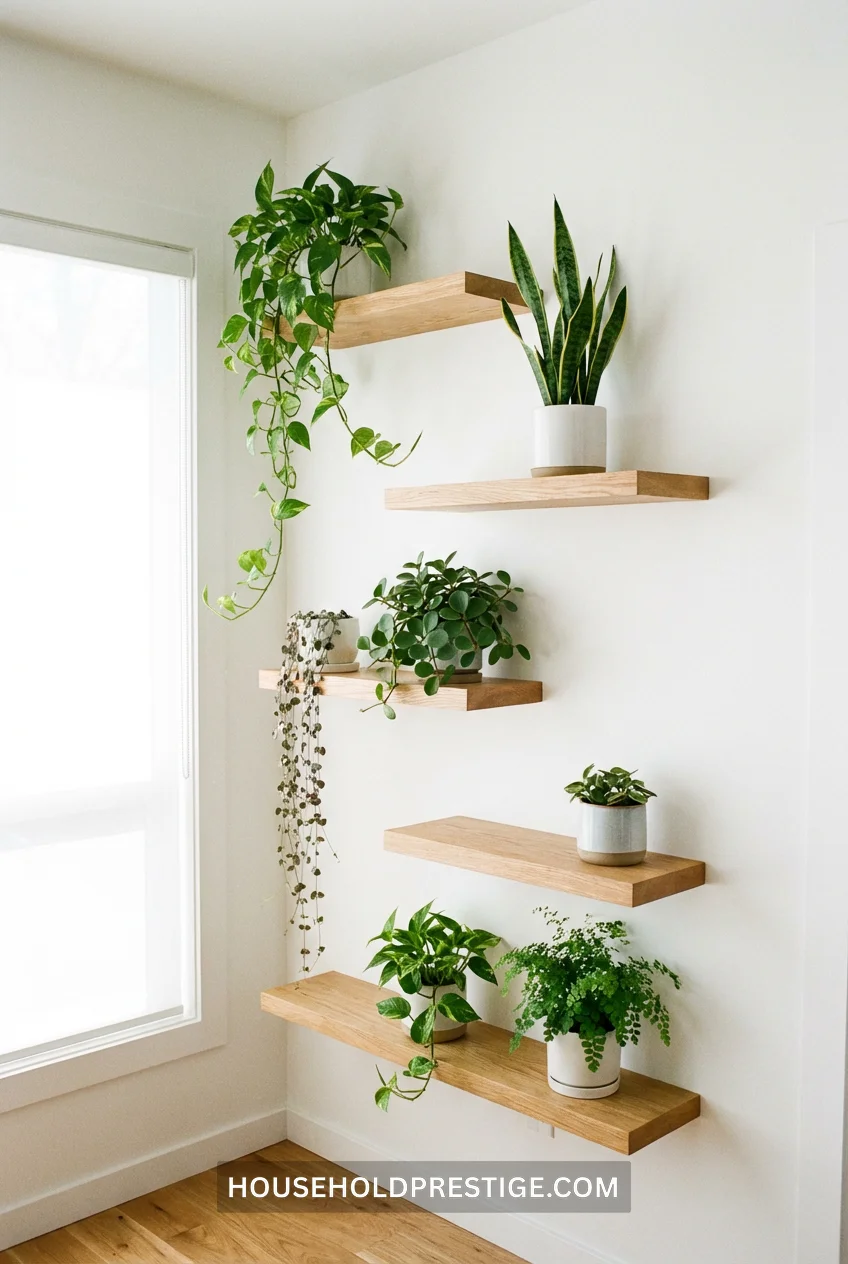
Mount floating shelves at staggered heights—one at 36 inches, next at 52 inches, another at 68 inches. The asymmetry keeps your eye moving instead of landing on a predictable pattern.
Shelf depth: 8-10 inches minimum or pots tip forward. Length: 18-24 inches fits most corners without overwhelming the space.
Step-by-Step Installation:
- Mark your heights with a pencil (use a level, or everything will look drunk)
- Locate studs with a finder ($10 at hardware stores)—drywall anchors alone won’t hold 15-pound pots long-term
- Pre-drill holes for shelf brackets
- Mount brackets, then shelves
- Test weight with something heavy before adding plants
- Add plants, starting with tallest/heaviest on lowest shelf
Time estimate: 1-2 hours for 4-5 shelves if you’ve never done this. 30 minutes if you’re comfortable with a drill.
Weight Reality:
Each shelf supports 15-25 pounds depending on construction. A 6-inch pot with soil and water = roughly 8-12 pounds. Do the math before you mount.
Pro Move:
Install LED strip lights under each shelf ($12-20 per 6-foot strip). Adds task lighting + your plants get supplemental light in darker corners. Plug into a smart outlet, set it on a timer, pretend you’re a plant care genius.
7. Corner Bookshelf (Repurposed for Plants)
You already own a corner bookshelf that’s 40% empty. Put plants on it.
I’m serious. Those IKEA Billy corners, the Target 5-tier units, the hand-me-down shelving from your last apartment—they’re already there. Clear off three shelves, add plants. You’ve just created a plant corner without spending a dollar.
Mix books and plants on alternating shelves if you can’t commit to full jungle mode. One shelf: books. Next shelf: plants. Repeat. The varied heights and textures keep it from looking like a dorm room cliché.
8. Hanging Macramé Plant Wall
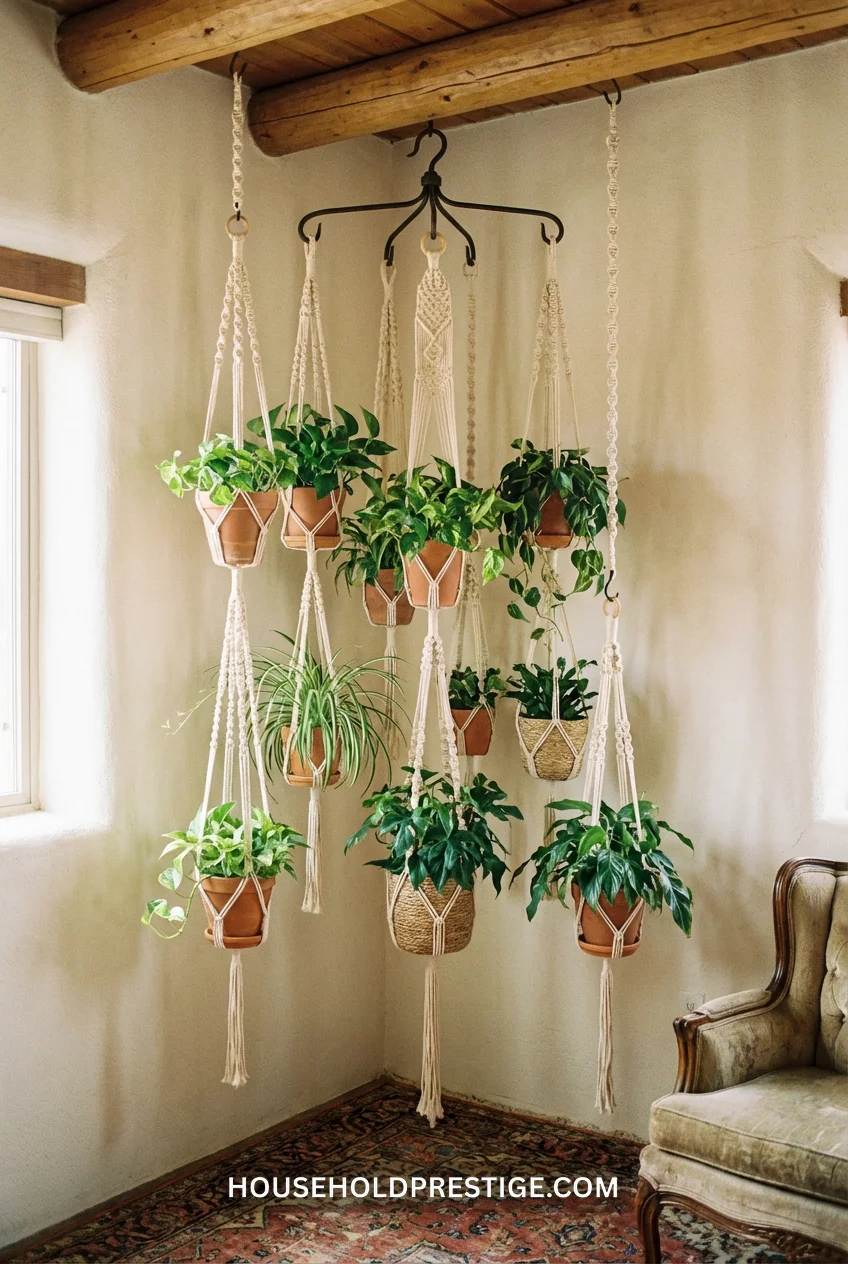
One heavy-duty ceiling hook (rated 50+ pounds) in the corner. Multiple macramé hangers at varying lengths—shortest at 18 inches, longest at 48 inches. Creates a plant wall effect without drilling 15 holes.
The trick: Buy hangers in different cord lengths or adjust them yourself if you’re crafty. All the same length = boring vertical line. Staggered = actual visual interest.
Plants: All trailing varieties. Pothos (golden, marble queen, neon), spider plants, philodendron heartleaf, string of hearts if you’ve got bright light. Water over the sink or bathtub, let drain completely, then re-hang.
Installation Notes:
That ceiling hook needs to hit a joist. Use a stud finder. If you’re between joists, install a toggle bolt or use multiple hooks distributed across joists. This isn’t optional—50 pounds of wet plants will absolutely rip out of drywall.
9. The Rolling Plant Cart Corner

A bar cart. From the kitchen. Rolled into the corner. Filled with plants instead of liquor.
This is mobility disguised as design. You can wheel the whole setup to a brighter spot when plants need more light, roll it back when company’s coming and you need floor space, move it entirely for deep cleaning.
Load it with smaller pots (4-6 inch diameter)—herbs if you’re near a kitchen, propagation stations in glass jars, small ferns, peperomias, nerve plants. The top tier holds 8-10 small pots. Bottom tier: 4-6 larger ones or a watering can and supplies.
Cost: $60-120 for a decent cart (Target’s threshold line, IKEA Raskog, Amazon’s gold bar carts). Already own one? Free.
10. Vertical Pallet Garden (DIY Weekend Project)
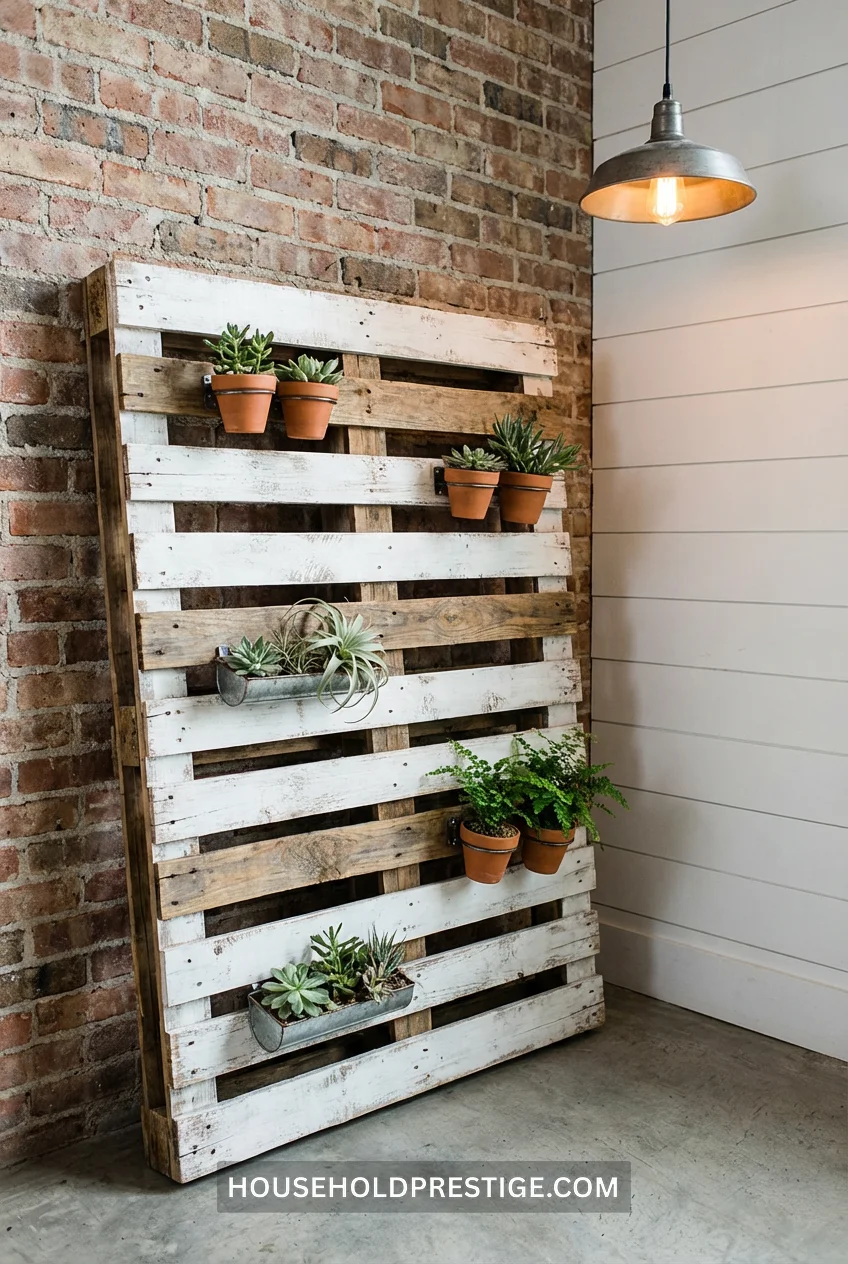
One wooden pallet (free from behind grocery stores or $10-15 at hardware stores). Sand it. Seal it. Mount it vertically in your corner. Attach small pots or create pockets for succulents and air plants.
The Process:
- Find a pallet: Look for heat-treated (HT stamp) not chemically treated (avoid MB stamp—that’s methyl bromide, not plant-safe)
- Sand it down: 80-grit sandpaper, remove splinters and rough edges (30-45 minutes)
- Seal or paint: Outdoor wood sealer or paint ($15-25), 2 coats, let dry 24 hours between coats
- Attach mounting hardware: Heavy-duty picture hangers or L-brackets to secure to wall studs
- Add plant holders: Small terra cotta pots zip-tied to slats, mason jars with hose clamps, or purpose-built pallet planters ($8-12 each at craft stores)
Dimensions:
Standard pallets are 40×48 inches. You’re mounting the 48-inch side vertically. Fits corners with 5+ feet of height.
Time Investment:
Weekend project. Saturday: sand and seal. Sunday: mount and plant. Or spread it across 2-3 evenings.
Plant Choices:
Succulents and air plants work best—they need minimal soil depth. Avoid anything requiring deep roots or constant moisture. This setup dries out faster than traditional pots.
Cost Breakdown:
- Pallet: $0-15
- Sandpaper: $5
- Sealer/paint: $15-25
- Mounting hardware: $10-15
- Plant holders: $20-40 (depends on how many pockets you create)
- Plants: $30-60 for 6-10 small succulents Total: $80-155
When It’s Worth It:
You want a statement piece. You’ve got DIY skills. You’re bored with standard furniture. You like telling people you “made that.”
11. Tall Plant Stand + One Fiddle Leaf Fig
One tall plant stand (30-36 inches), one large fiddle leaf fig (5-6 feet), corner behind a couch or next to a window.
This is the minimalist approach. Not a collection—a specimen. The stand elevates the pot so the plant’s leaves start at 5 feet and reach 7-8 feet. It fills vertical space without crowding the floor.
Fiddle leaf figs need bright indirect light and drama. They’ll drop leaves if you move them. They’ll sulk if you underwater. They’ll rot if you overwater. But nail the balance (water when top 2 inches of soil is dry, rotate quarterly, wipe leaves monthly) and you’ve got a living sculpture.
Stands: West Elm’s mid-century options ($80-150), Target’s Threshold line ($40-70), or DIY with a concrete block and wood round ($25).
12. The Propagation Station Corner
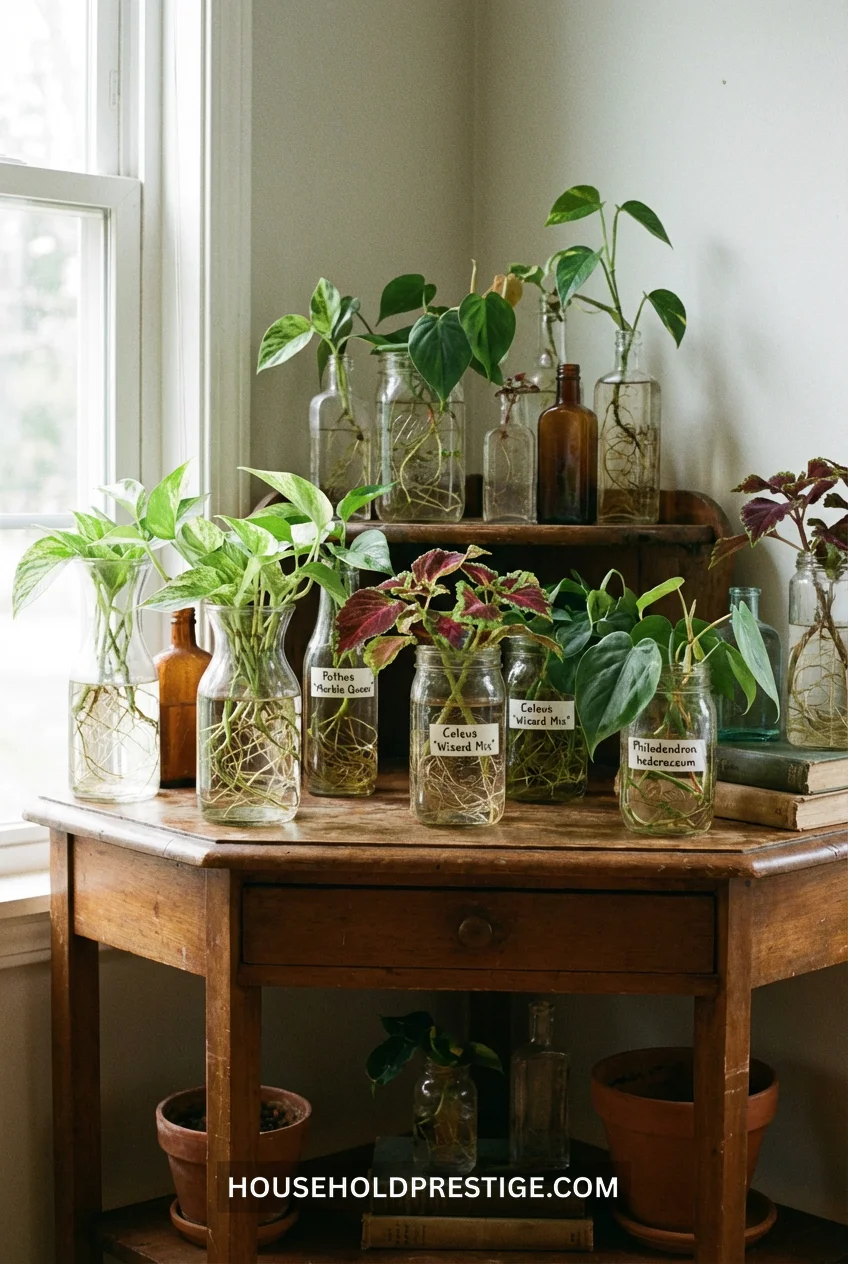
A small table or console (24-30 inches wide). Collection of glass vessels (vases, jars, bottles) filled with water and plant cuttings. Labels optional but satisfying.
This isn’t decorative storage—it’s active plant production. You’re growing new plants from cuttings you took from existing plants or begged from friends. The roots are visible through clear glass, which is unexpectedly mesmerizing.
Cuttings that root in water: pothos (all varieties), philodendron heartleaf, coleus, wandering jew, spider plant babies, string of hearts, monstera adansonii.
The Setup:
- Take 4-6 inch cuttings just below a node (the little bump on the stem)
- Remove bottom leaves so they won’t rot underwater
- Place in clean water (tap is fine, change weekly)
- Wait 2-4 weeks for roots
- Pot in soil once roots are 2-3 inches long
Free plants. Forever. You’ll be giving away pothos cuttings like sourdough starter.
13. Corner Gallery Wall With Botanical Prints + Real Plants Below
Half art, half plants. Mount botanical prints or plant photography on the two walls forming the corner. Place a simple plant arrangement (see idea #3 or #5) at the base.
The art extends the plant theme upward without requiring maintenance. Your actual living plants get to coast on the aesthetic heavy lifting the framed prints are doing.
Prints: Minted, Society6, Desenio, or thrifted vintage botanical illustrations ($20-60 per print framed). Arrange in a cluster or asymmetrical grid.
Real plants below: Keep it simple. 1-3 larger pots in complementary planters. The art is doing the visual complexity; the plants just need to not be dead.
14. Mounted Staghorn Fern on Cork Board
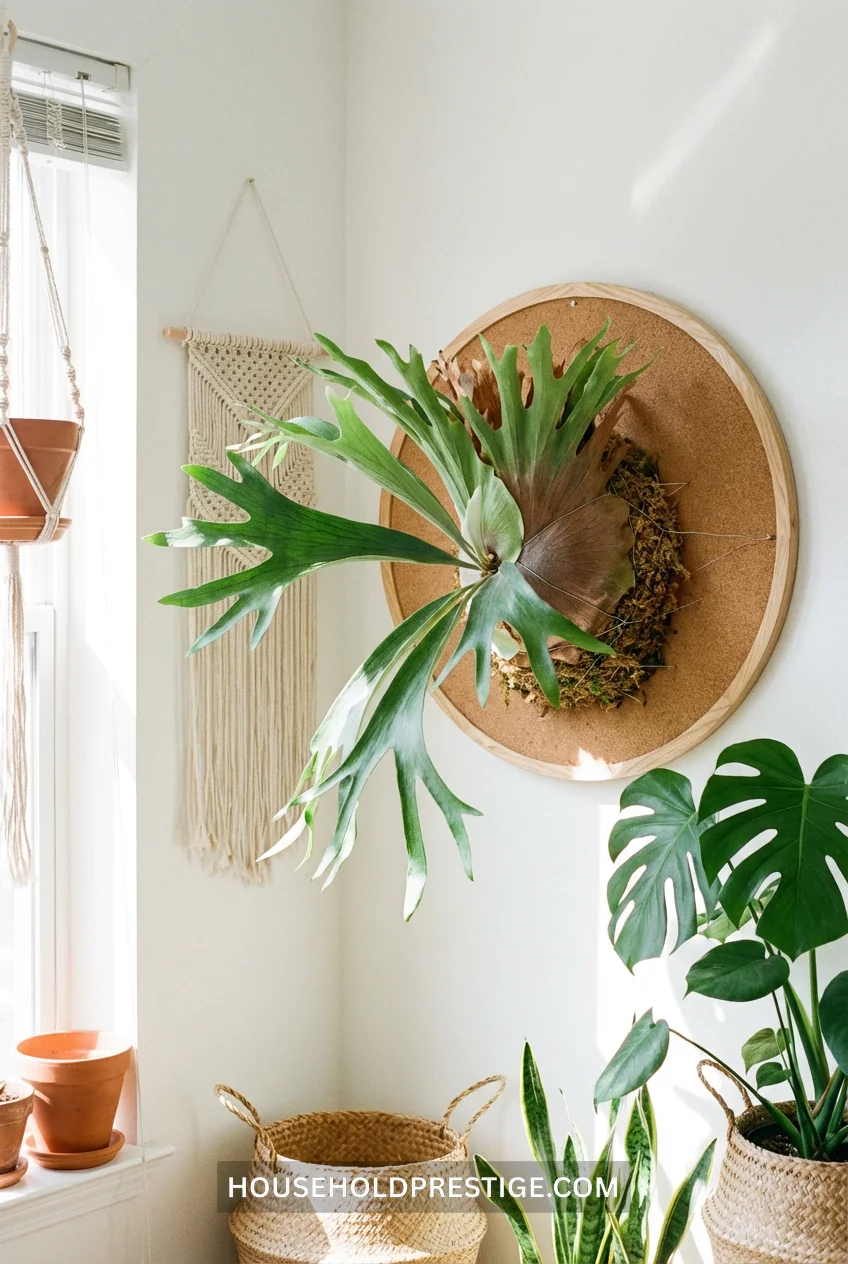
One staghorn fern (Platycerium bifurcatum) mounted on a round cork board or wood plaque. Hung in the corner where two walls meet.
Staghorns grow on trees in the wild—they’re epiphytes, not soil plants. You’re mimicking their natural habitat by mounting them on bark or cork. Water by soaking the entire mount in a sink or bucket weekly, then re-hanging. They’re conversation pieces that happen to be alive.
Materials:
- Staghorn fern ($30-60 depending on size)
- Cork round or wood plaque (12-18 inches diameter, $15-25)
- Sphagnum moss ($10)
- Fishing line or thin wire
- Heavy-duty picture hanger
Mounting Process:
- Soak sphagnum moss until saturated
- Press moss onto cork backing
- Position fern roots on moss
- Secure with fishing line, wrapping around and through the backing
- Hang on wall with heavy-duty hanger
- Mist 2-3 times weekly, soak whole mount weekly
It’s weird. It’s architectural. People will ask where you bought it, not realizing it’s a living plant.
15. Terraced Corner With Descending Pot Heights (DIY Riser Boxes)
Build or buy three wooden boxes in descending heights (24″, 18″, 12″). Arrange in corner. Place one large pot on each box.
You’re creating a terraced effect—like stadium seating for plants. Each pot gets its own platform, all three visible simultaneously. No plant is hiding behind another.
DIY Box Construction:
Simple pine boxes, open-top. Dimensions: 12×12 inches footprint, heights as listed. Cost: $40-60 in lumber if you’re building, $80-150 if buying pre-made plant stands.
Plant Selection:
Varying textures and heights: tall dracaena (on shortest box so it still reaches upward), medium rubber plant (mid-height box), compact snake plant or ZZ (tallest box for contrast).
Why It Works:
Your eye reads it as one cohesive installation instead of three random pots shoved in a corner. The descending heights create movement and dimension.
16. Industrial Pipe Shelving Corner Unit

Black iron pipes assembled into corner shelving with wood planks. Industrial aesthetic, fully customizable, shockingly stable once assembled.
Materials from Hardware Store:
- Black iron pipe and fittings (flanges, elbows, tees, nipples in various lengths)
- Wood planks (pine, poplar, or reclaimed wood cut to size)
- Pipe thread sealant
- Wood stain or sealer
Typical Configuration:
3-4 shelves, 12-16 inches deep, 24-30 inches per side (corner shelves are L-shaped). Each shelf supported by pipe frame attached to wall flanges and floor flanges.
Cost Reality:
$150-250 depending on size and how many shelves. Pipes aren’t cheap, but this is one-time investment furniture that’ll outlast you.
Assembly Time:
4-6 hours if you’re new to pipe projects. Pipes thread together (righty-tighty). Flanges bolt to walls and floor. Wood sits on pipe supports.
Load Capacity:
Way more than you need. Black pipe shelving regularly holds 200+ pounds per shelf. Your plants weigh 10-30 pounds each. You’re fine.
17. Oversized Basket Collection (Woven Seagrass)
Three large woven baskets (seagrass, water hyacinth, or rattan) in descending sizes. Drop in plastic nursery pots directly—no need to repot.
This is the lazy genius method. Baskets hide ugly plastic pots, provide texture, and you can swap plants seasonally without commitment. Winter: evergreens and snake plants. Spring: ferns and flowering bulbs. Summer: tropicals.
Sizes: 16-inch, 14-inch, 12-inch diameter. Heights: 14-16 inches. You want belly baskets that are wider than they are tall.
Sources: Target (Threshold brand), West Elm, World Market, CB2. $25-60 per basket depending on size and whether you catch a sale.
18. Wire Grid Panel Plant Display
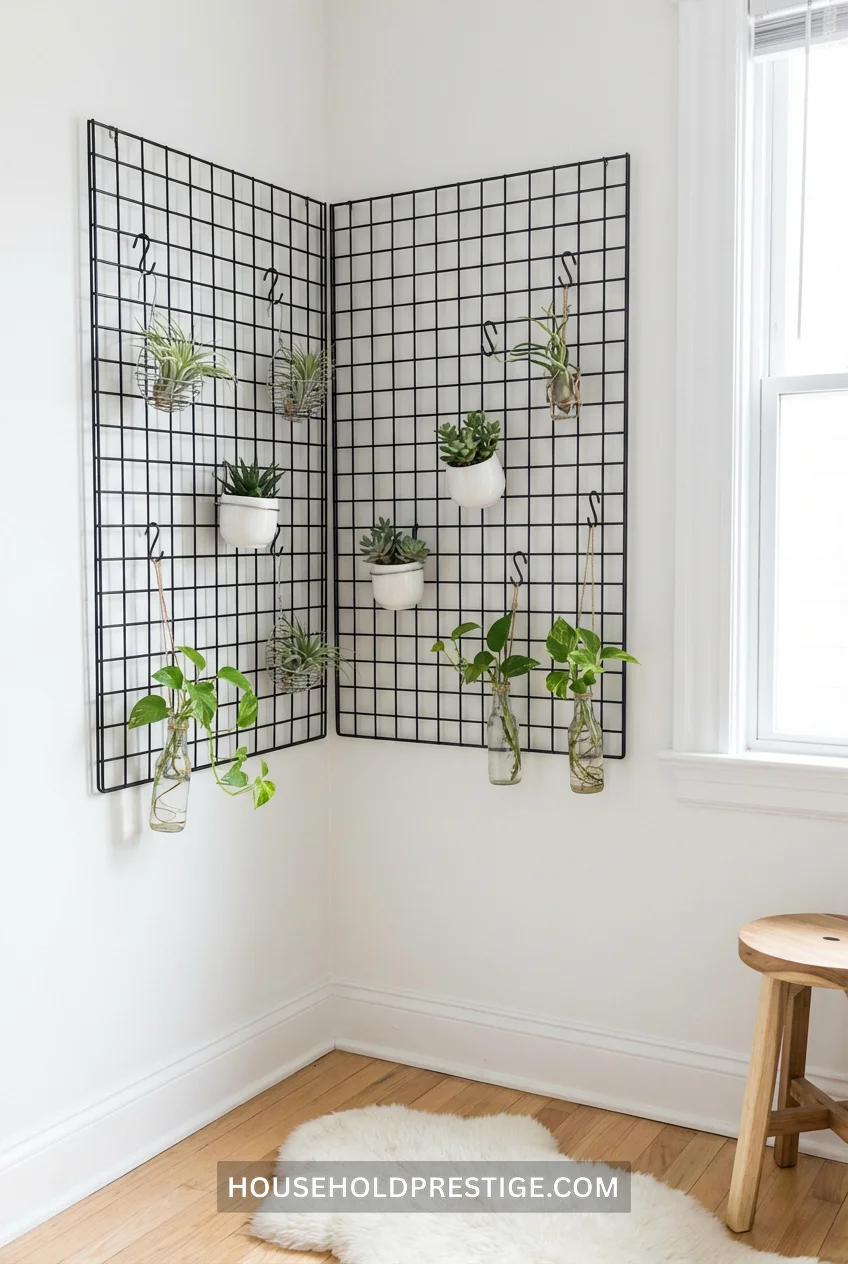
One metal grid panel (the kind used for organizing offices). Mounted in corner. Small pots hung with S-hooks at varying heights.
This is modular and endlessly rearrangeable. Pot died? Unhook it, replace it. Want to change the layout? Move the S-hooks. Seasonal rotation? Swap entire grid sections.
Grid panels: $15-30 on Amazon (search “wire mesh panel” or “grid panel wall organizer”). Comes in black, white, or gold. Mount with command strips for damage-free installation or screws into studs for permanent.
Pots: Mini 3-4 inch diameter with built-in hooks or holes for hanging. Fill with succulents, air plants, small trailing varieties. Each pot weighs 1-2 pounds max.
Layout Strategy:
Don’t make it symmetrical. Cluster 3-4 pots in one area, leave other sections sparse. Asymmetry = interesting. Perfect grid = boring.
19. Single Tree Corner With Underplanting
One large floor plant (6-7 feet tall)—corn plant, dracaena, rubber tree, weeping fig. At its base: smaller shade-tolerant plants in a cluster.
You’re creating layers as you’d see in nature. The tall “tree” provides structure. The understory plants (pothos, ferns, peace lily, calathea) fill in below. All in one grouped planting zone.
Container Strategy:
Option A: Extra-large single pot (18-24 inch diameter) with everything planted together. This works but makes watering tricky since different plants have different needs.
Option B: Large pot for the tree, smaller pots grouped around its base. More flexible, easier to manage individual plant care. This is the better option.
Space Requirements:
You need 3-4 feet of floor space minimum for this to not look cramped. If your corner is tight, skip this one—it’ll read as cluttered instead of lush.
Conclusion
Your corner doesn’t need to stay empty just because you can’t fit a chair there. Plants work harder than furniture anyway—they clean your air, they don’t collect laundry, and when something dies, you replace it for $12 instead of scrolling Craigslist for three weeks.
Pick one idea. Start small if you’re new to this or prone to killing things. The tiered stand (idea #1) or the chunky pot cluster (idea #5) are basically plant-proof. Already have 15 houseplants scattered everywhere? Go big with the vertical pallet garden (idea #10) or the pipe shelving (idea #16).
Either way, that corner’s about to earn its keep.
FAQ
How much light do corner plant displays actually need?
Depends entirely on your plants, not your corner. South or west-facing corners get 6+ hours of direct light—ideal for fiddle leafs, rubber plants, and succulents. East-facing gets morning light (medium indirect), perfect for pothos, philodendrons, and ferns. North-facing or interior corners with no windows? Snake plants, ZZ plants, pothos, and cast-iron plants tolerate low light. Match the plant to your actual light conditions, not what looks pretty on Pinterest.
What’s the easiest low-maintenance corner setup for someone who travels frequently?
The chunky pot cluster with drought-tolerant plants (idea #5). Load it with ZZ plants, snake plants, and one rubber plant. These survive 2-3 weeks without water easily, sometimes longer. Skip anything trailing or fast-growing—those need consistent attention. Set up a watering reminder for when you’re home (every 10-14 days), and you’re basically automated.
How do I keep corner plants from looking cluttered or overwhelming a small room?
Stick to odd numbers (3, 5, 7 plants max) and vary heights dramatically. One tall floor plant + two medium shelf plants reads cleaner than seven same-height pots crammed together. Use a unified color palette for pots—all terracotta, all white ceramic, all woven baskets. Mixed pot styles in small spaces = visual chaos. Also, leave breathing room—not every inch needs a plant.
Can I do a plant corner without drilling holes in the wall?
Absolutely. Try the chunky pot cluster (idea #5), the tiered corner cascade (idea #1), the tall plant stand with one statement plant (idea #11), or the rolling plant cart (idea #9). All sit on the floor, zero wall damage. For vertical options without drilling: tension rod setups (idea #2), wedge between floor and ceiling, or use heavy-duty command strips for lightweight wire grid panels (idea #18)—just follow weight limits religiously.
How often should I actually water a corner full of different plants?
You can’t water everything on the same schedule—that’s how you kill half and drown the other half. Group plants with similar needs: high-water plants (ferns, peace lilies) in one section, drought-tolerant varieties (snake plants, ZZ plants) in another. Check soil moisture before watering—stick your finger 2 inches deep. Dry = water. Still moist = skip it. Most corner plant failures come from overwatering on a schedule instead of checking actual soil conditions.