

You stare at that big, round pool parked in your backyard and think… this could be so much more. Because right now? It just sits there. No seating, no shade, no personality. You climb a flimsy ladder, splash around, then climb back out onto bare grass. Not exactly the backyard escape you imagined when you bought it.
Above-ground pool deck ideas are the single fastest way to turn that basic pool into something you’re proud to show off. A well-built deck hides those exposed walls, gives you room to lounge, and makes the whole setup feel permanent rather than temporary. And here’s what most people don’t realize — you don’t need an in-ground pool budget to get an in-ground pool look.
I’ve rounded up 23 ideas that range from dead-simple weekend pallet builds to full-on multi-level wraparounds with lighting and bars. Some cost less than dinner for two. Others are a proper investment. All of them beat staring at a bare metal wall while you float on a pool noodle.
Let’s get into it.
1. The Floating Platform Deck
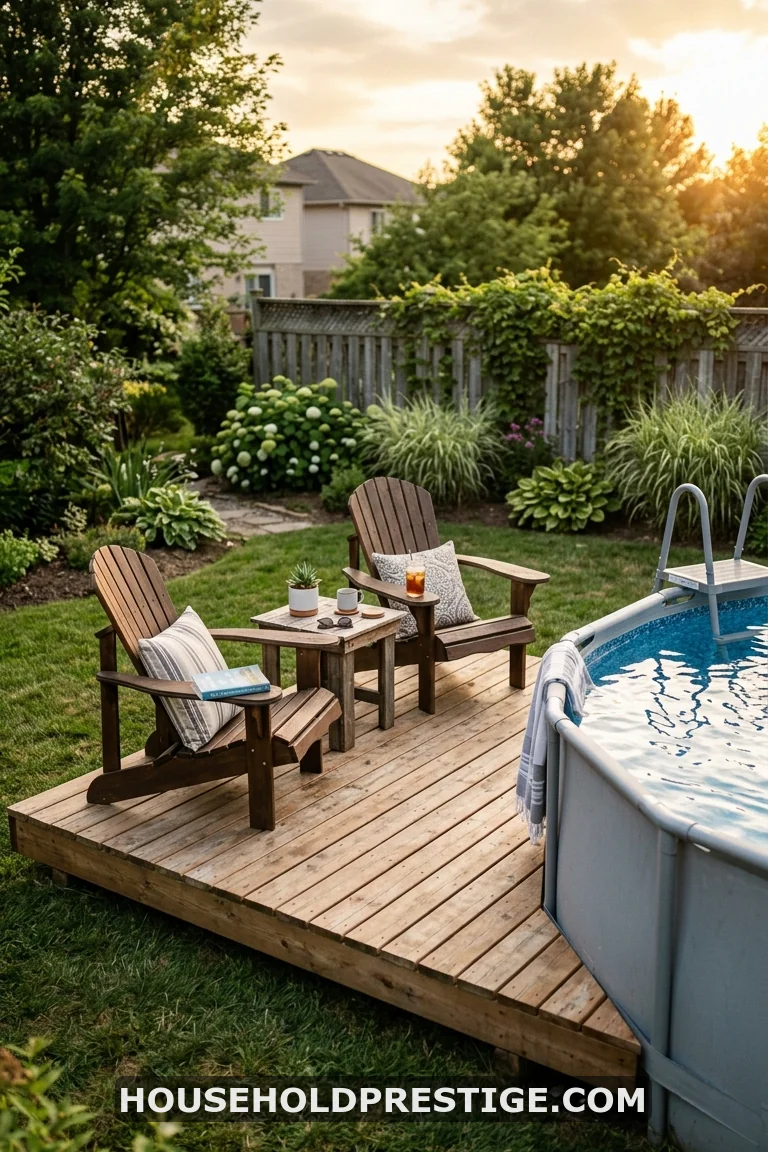
Lay concrete deck blocks on level ground. Frame with pressure-treated 2x6s. Top it with deck boards. Done.
A floating platform doesn’t require footings, doesn’t need a permit in most municipalities, and costs $300-$600 in lumber. Build it flush against your pool wall, add two chairs and a side table, and you’ve just created a poolside lounging area that took one weekend.
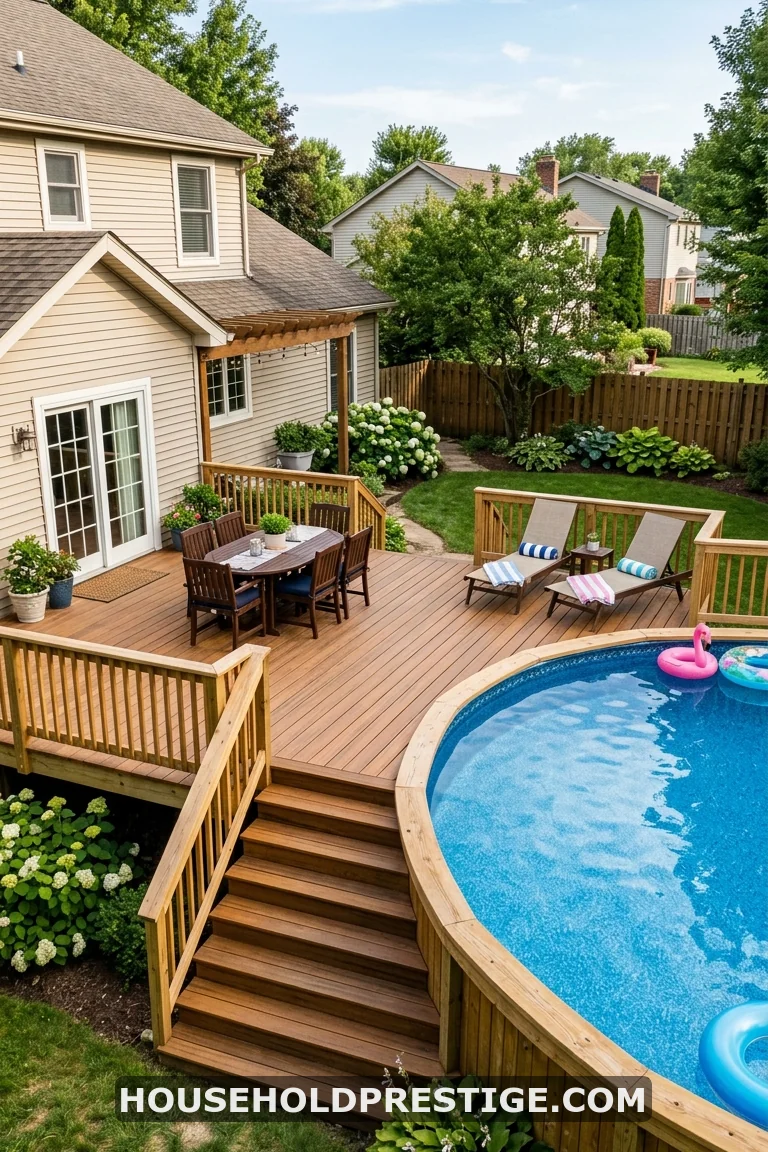
2. The Full Wraparound Deck
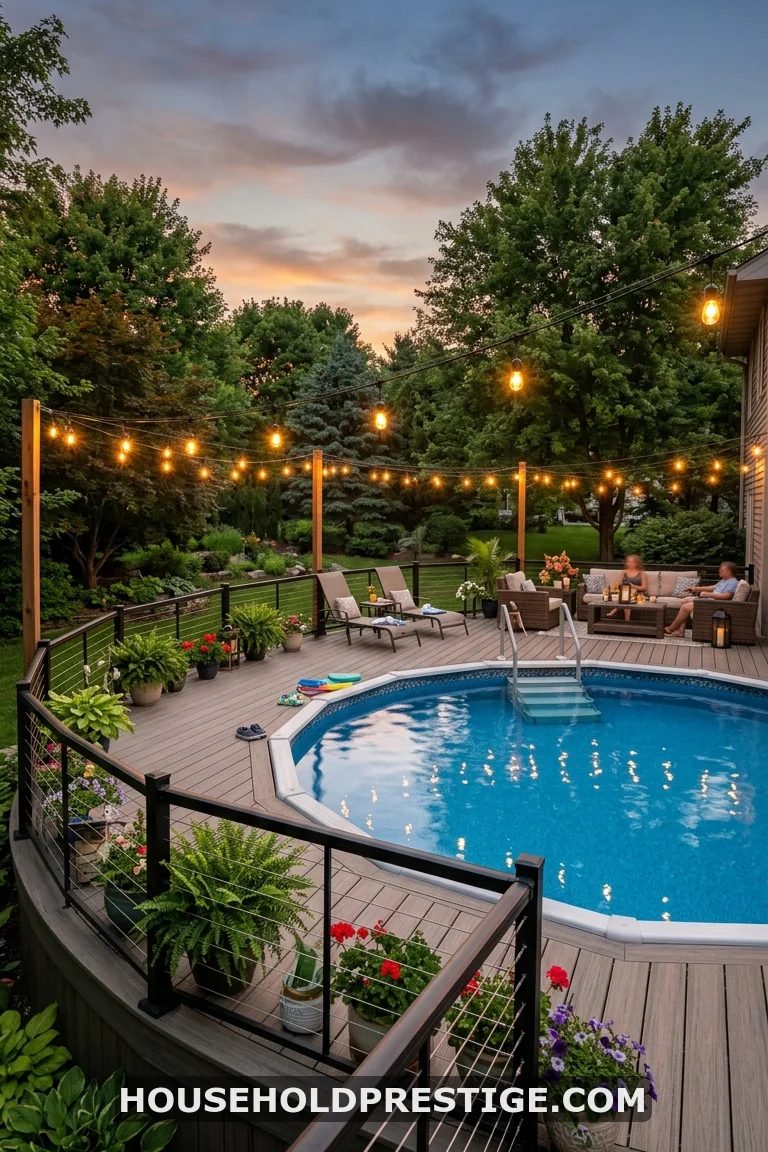
This is the one that makes people ask, “Wait, is that an in-ground pool?” And the answer is no — it just looks like one.
A full wraparound deck encircles your entire pool, bringing the deck surface level with the pool rim. The exposed walls vanish. The ladder disappears. What you’re left with is a seamless transition from deck to water that rivals setups costing three times the price.
Why It Works So Well
When you surround the pool completely, the deck becomes the dominant visual element. Your eye doesn’t register the pool as above ground anymore because there’s no wall to see. You step from the deck straight into the water. It changes the entire experience.
Dimensions and Planning
For a standard 24-foot round pool standing 52 inches tall, your deck surface sits about 50-52 inches off the ground. That means you’ll need railing. Most building codes require a railing once the deck surface exceeds 30 inches — and at 50+ inches, you’re well past that threshold.
Plan for a minimum 4-foot walkway around the pool on all sides. That’s your baseline for moving furniture, walking comfortably, and having enough space that the deck doesn’t feel like a catwalk. Bigger is better here — 6 feet of clearance gives you room for chaise lounges.
Materials and Costs
Your two main options are pressure-treated lumber and composite decking.
Pressure-treated pine runs $1-$2 per linear foot for deck boards and about $1.50-$3 for framing lumber. It’s cheap upfront but demands annual maintenance — staining, sealing, checking for splinters. A full wraparound in pressure-treated wood for a 24-foot pool typically lands between $3,000-$5,000 in materials alone.
Composite decking (Trex, TimberTech, Fiberon) costs $4-$8 per linear foot but requires almost zero maintenance. No staining. No sealing. No splinters on bare feet — and that matters a lot around a pool. A full composite wraparound runs $6,000-$12,000 in materials.
Step-by-Step Overview
- Mark your layout and call 811 to check for buried utilities
- Dig footings to your local frost line (typically 36-48 inches)
- Pour concrete footings and set post brackets
- Install 6×6 support posts, then beam framing
- Run joists at 16-inch centers (12-inch for composite)
- Install deck boards, starting at the pool wall and working outward
- Add railings with balusters spaced no more than 4 inches apart
- Build stairs with a minimum 36-inch width
Common Mistakes
Attaching the deck directly to the pool wall. Never do this. Above ground pool walls are not structural. The deck must be freestanding — supported by its own posts and footings — with a small gap (about 1 inch) between the deck and the pool wall.
Skipping the permit. A deck this size and height almost certainly needs a building permit. Check with your local building department before you buy a single board.
3. The Pallet Deck
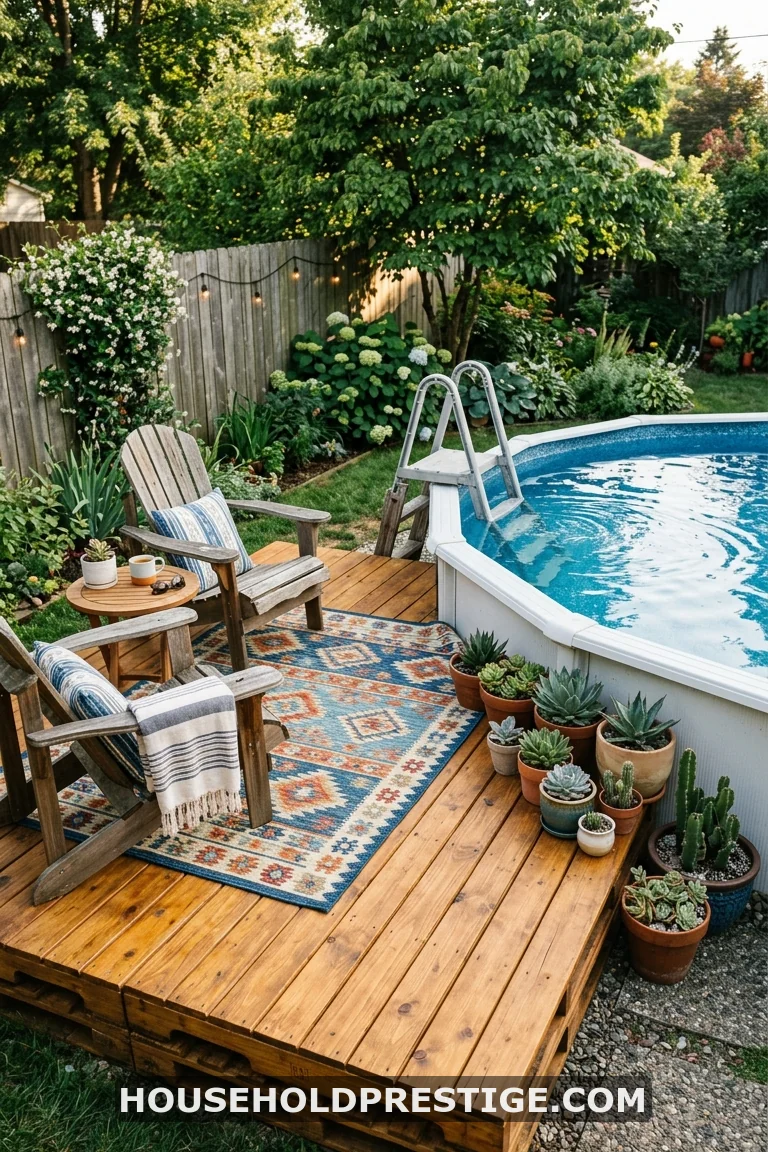
Free pallets from local warehouses. Sand them. Seal them. Arrange them poolside. Total cost: under $200 for stain, screws, and sealant.
Will they last forever? No. Will they rot faster than pressure-treated lumber? Yes. But if you’re renting, on a tight budget, or just want something functional for one or two summers, pallets get the job done without financial stress.
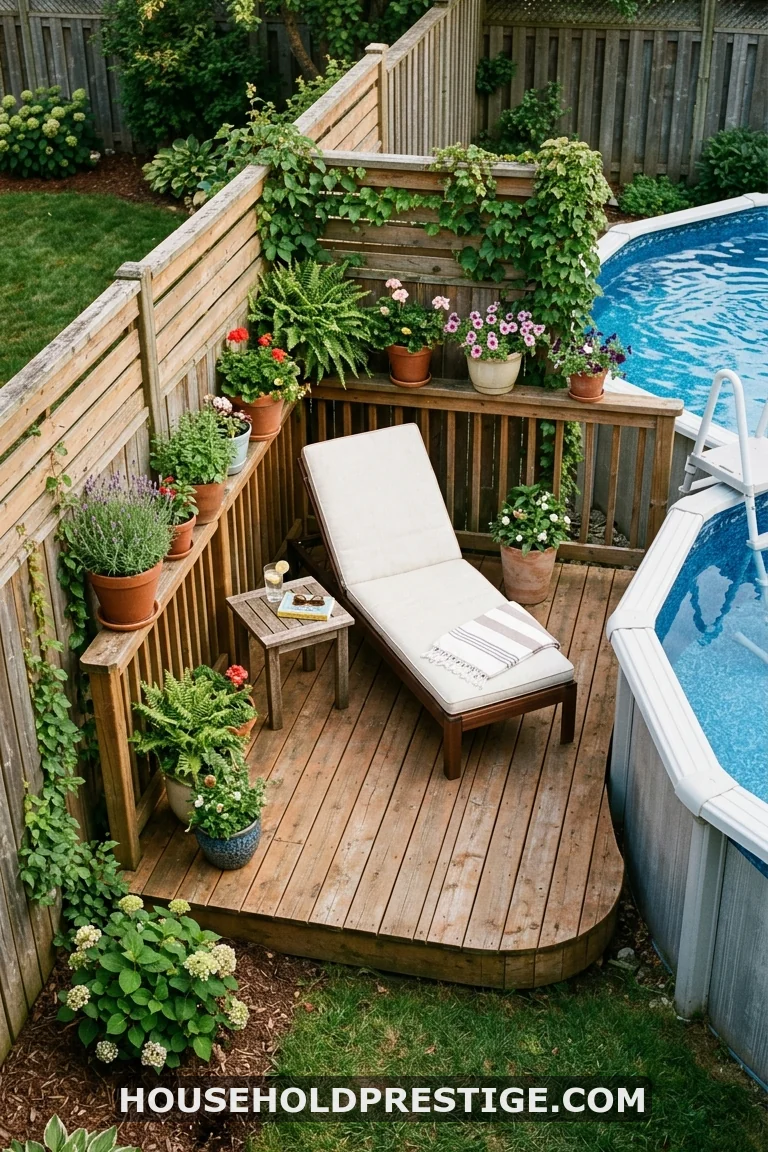
4. The Half-Surround Deck
Cover half your pool with decking and leave the other half open. You still get lounging space, a platform for entry, and a place to stash towels — but you cut your lumber costs nearly in half compared to a full wraparound.
This works especially well for oval pools positioned against a fence or property line. Deck the accessible side and let landscaping handle the rest. Mulch, ornamental grasses, or a gravel border on the exposed side keeps things polished without additional deck construction.
The half-surround is also the gateway build. Start with half now, add the other half next summer. Your wallet stays happy and you get the eventual full wraparound without a single lump-sum hit.
5. The Multi-Level Tiered Deck
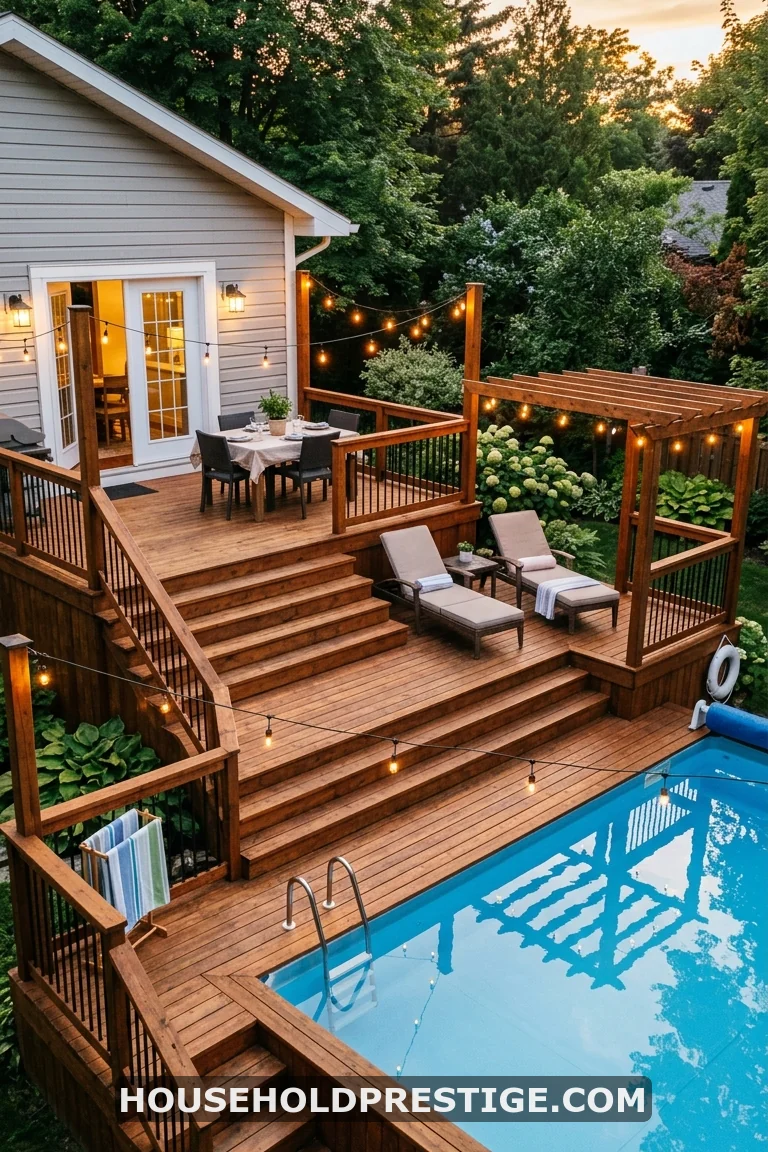
This is a deck with zones. One level for grilling. One for sunbathing. One for pool access. Each tier steps down (or up) naturally, creating flow and purpose across your backyard.
Multi-level decks shine in yards with a natural slope. Instead of fighting the grade with fill dirt and retaining walls, you work with it. The top tier connects to your back door. The middle tier drops 12-16 inches for a dining space. The bottom tier meets the pool.
If your yard is flat, you’re still building up. The pool sits about 52 inches high, so your deck needs tiers that climb to meet it. Think of it like stadium seating — each step up gives a different perspective and a different use.
Cost reality: multi-level builds run 30-50% more than a flat deck because of the additional framing, posts, and stairs required. For a 24-foot round pool, expect $5,000-$8,000 in materials for pressure-treated, $10,000-$18,000 for composite.
Worth it? If you entertain regularly, absolutely. The separation between zones keeps the grilling smoke away from the swimmers, gives parents a higher vantage point for watching kids, and creates a backyard that feels like it was professionally designed.
6. The Corner Wedge Deck
Pool jammed into a corner of your yard? Build a wedge-shaped deck to fill the triangle between the pool and the fence. Small footprint, minimal materials, maximum impact.
7. The Deck with a Built-In Bar
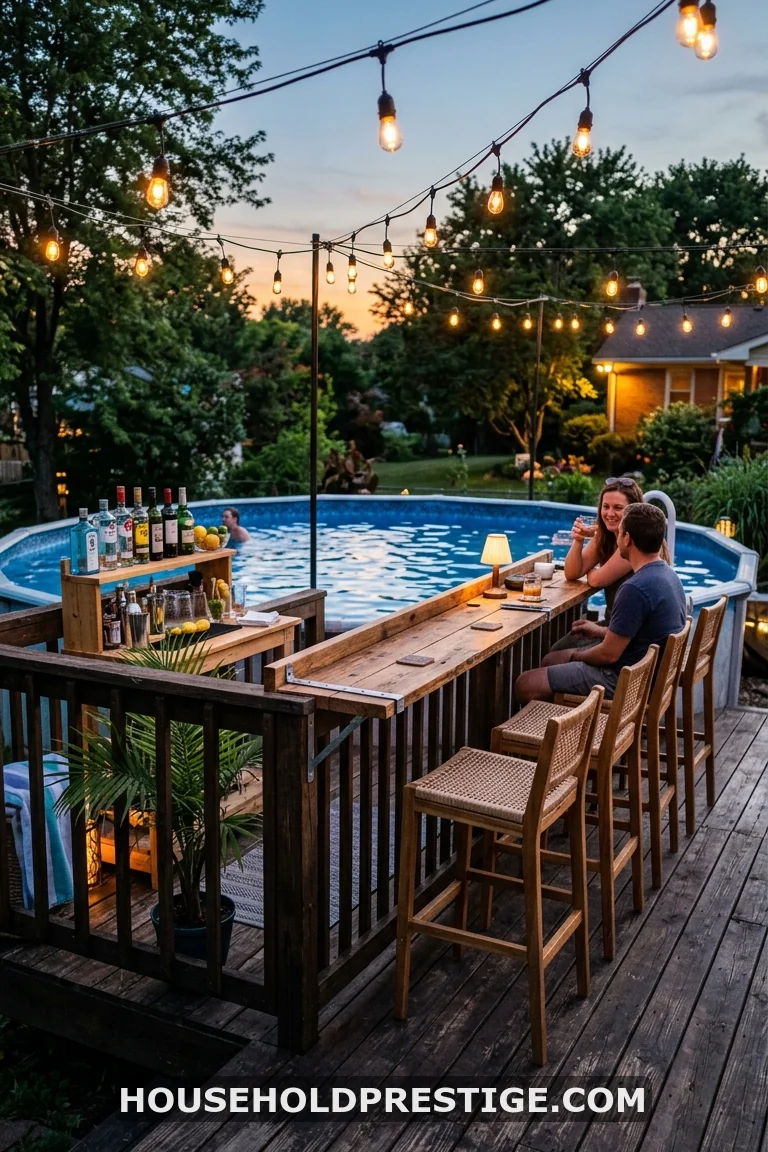
A 2×12 plank, sanded and sealed, makes a surprisingly solid bar top when mounted at 42-inch height along the pool-facing edge of your deck. Add three bar stools and a small shelf underneath for bottles. You just built a swim-up bar for under $150 in materials.
The trick is placement. Mount the bar section where the deck meets the pool wall so swimmers can rest their arms on it from inside the pool. Keep the bar top wide enough (12-16 inches minimum) for drinks and snacks.
For a more polished look, wrap the bar base in stone veneer panels. These self-adhesive panels run about $8-$15 per square foot at most home improvement stores and install with construction adhesive — no masonry skills needed.
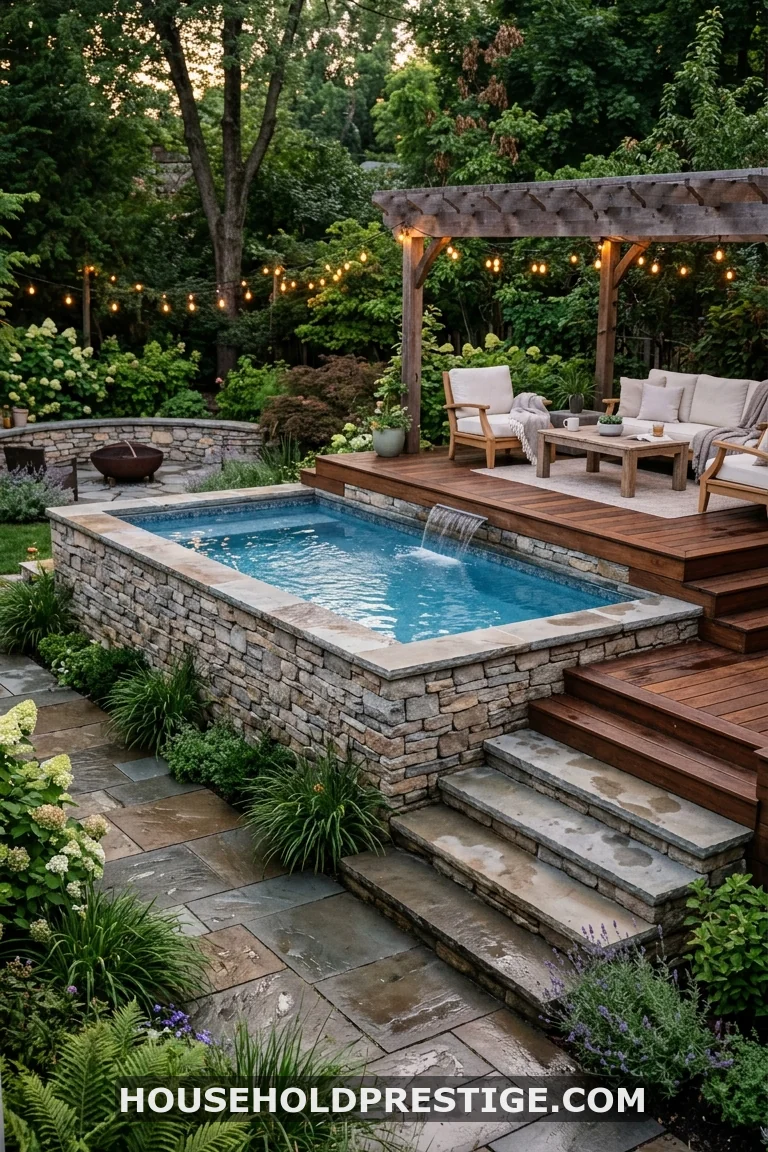
8. The Sunken Semi-Inground Look
Dig a hole. Sink the pool halfway into the ground. Build the deck at the new, lower rim height. What you get is a pool that reads as semi-inground without the semi-inground price tag.
This approach cuts your deck height from 52 inches down to around 24-26 inches — which means shorter posts, less railing (if any), and cheaper framing. Many building codes don’t require railing below 30 inches, so you might skip it entirely.
The catch: excavation. You need proper drainage around the buried portion to prevent hydrostatic pressure from pushing the pool walls inward. Install a French drain or gravel bed beneath the buried section and slope the surrounding grade away from the pool.
Cost for excavation varies wildly by region — anywhere from $500 for a DIY weekend with a rented mini excavator to $2,000-$4,000 for professional grading.
9. The Stone and Wood Hybrid
Use stone pavers at ground level for the high-splash zones. Run wooden deck boards on the elevated areas where bare feet do the walking. You get durability where water hits hardest and warmth where comfort matters most.
10. The Deck with a Pergola
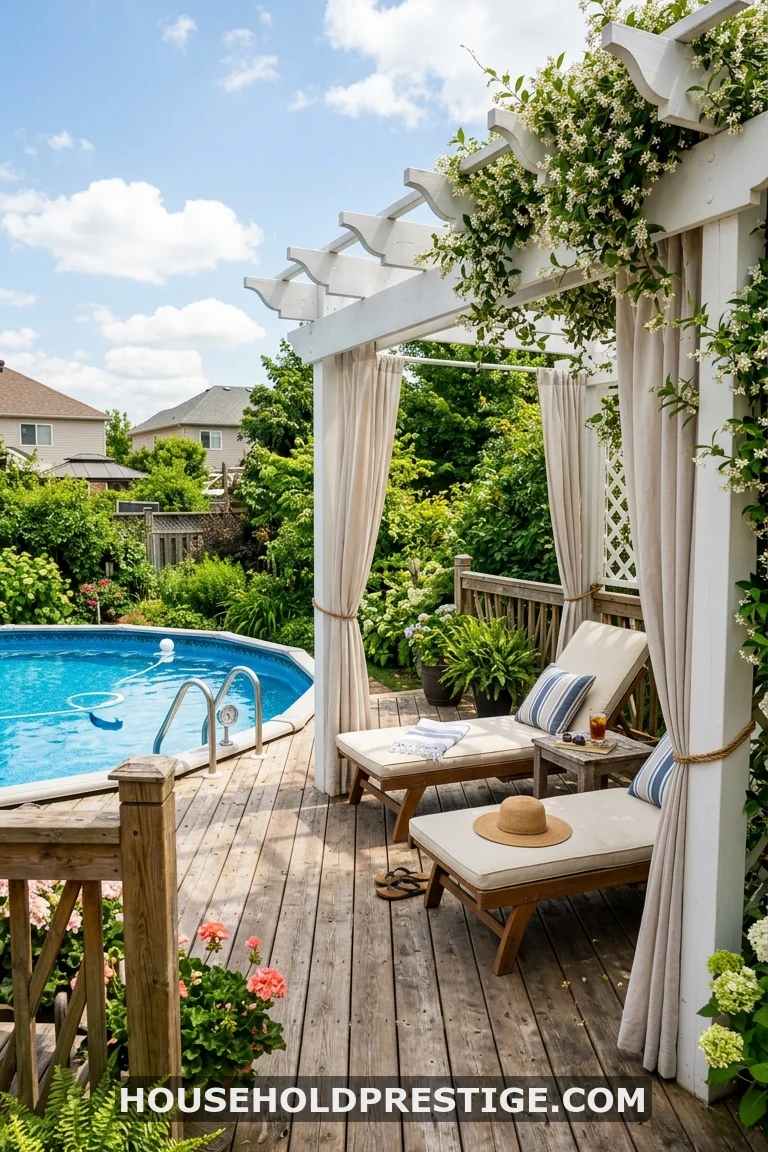
A pergola mounted to one section of your deck creates an instant shaded zone. You can go full DIY with four 6×6 posts and 2×8 rafters for about $400-$700 in lumber, or buy a pre-fab pergola kit ($800-$2,500) that bolts together in an afternoon.
The shade factor is real. Direct sun on bare deck boards can heat surfaces to 140°F+ in summer. A pergola cuts that dramatically and gives you a spot to retreat without leaving the pool area.
Drape outdoor curtains on the sides for privacy. String lights across the rafters for ambiance at night. Train climbing plants — jasmine, clematis, or bougainvillea — along the posts for a living canopy that fills in over 1-2 growing seasons.
11. The Privacy Fence Deck
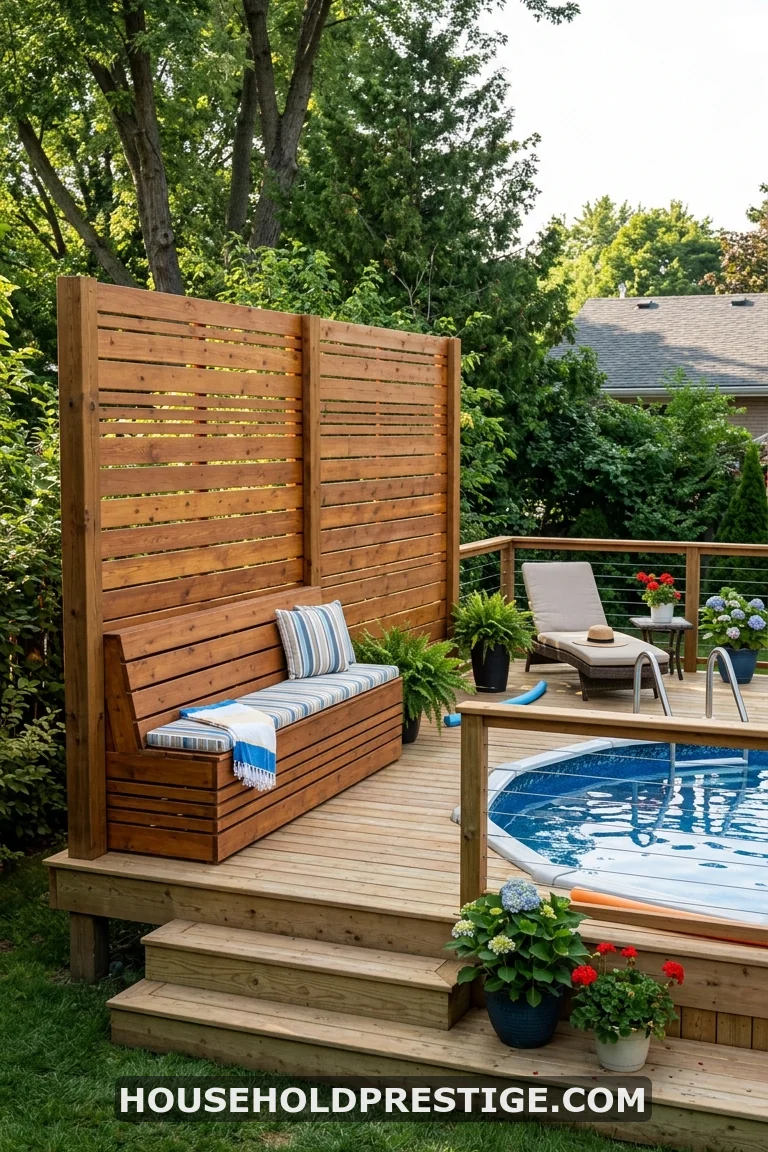
Integrate a 6-foot privacy screen directly into one or two sides of your deck frame. Horizontal slat fencing looks modern and costs less than traditional vertical picket fencing because you can use 1×4 or 1×6 boards spaced 1/2 inch apart.
Dual purpose: it blocks the neighbors’ view and acts as a windbreak for above-ground pools, which catch wind like a sail.
12. The “We Spent $800 and Nobody Believes It” Build
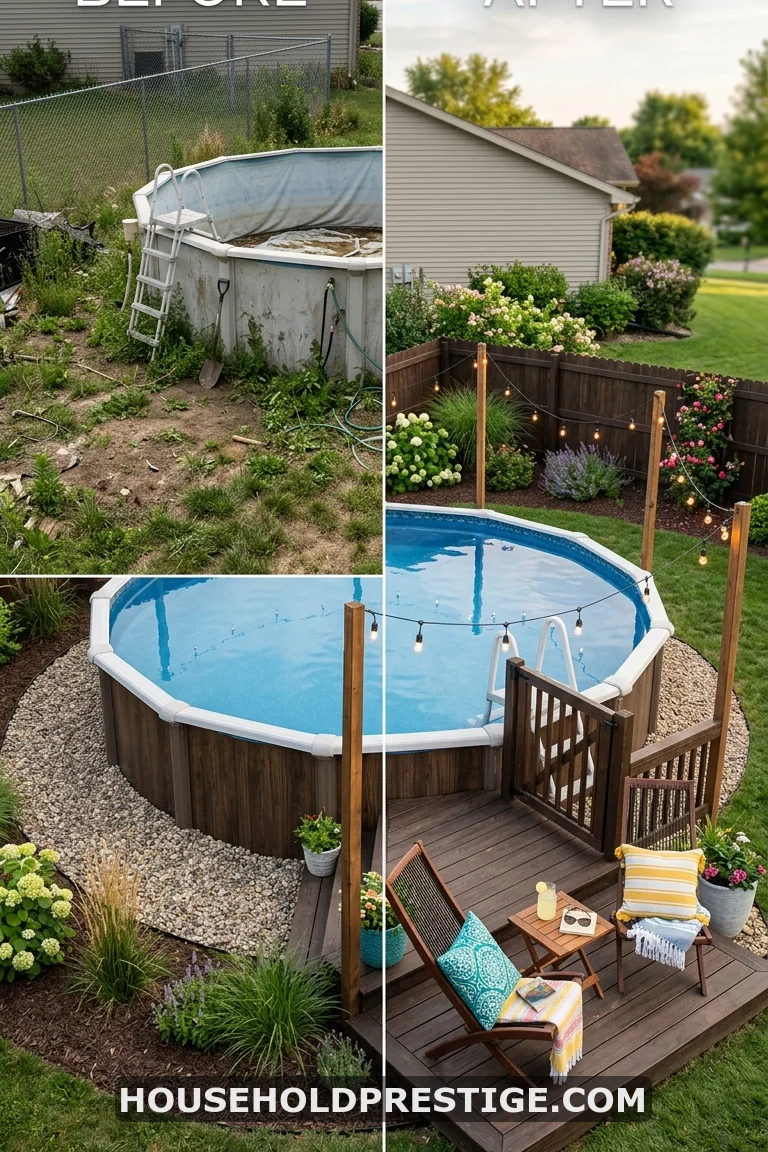
I want to bust a myth right now: you do not need thousands of dollars to make your above ground pool look intentional.
This is the story of what $800 and two weekends can do. The “before” is the pool most people have — bare walls, patchy grass around the base, a wonky A-frame ladder, and a garden hose draped across the yard for filling.
The “after” uses five moves:
A 6×8-foot floating platform deck ($350 in pressure-treated lumber) positioned on the entry side. Pea gravel border ($120 for two tons from a landscape supply yard) raked smooth around the remaining perimeter. Four 4×4 posts driven into the ground with solar-powered string lights strung between them ($60 total). A coat of exterior spray paint on the pool walls in a dark charcoal or forest green ($40 for 4 cans). And two folding lounge chairs from a big box store end-of-season clearance ($100-$200 for the pair).
Total spent: roughly $700-$800. Time invested: two weekends. The transformation is so dramatic that the real question becomes why more people don’t do this immediately after buying the pool.
What makes it work isn’t any single element. It’s that each piece signals intention. The gravel says “this was planned.” The paint says “this belongs here.” The deck says “sit down, stay a while.” That ladder leaning against a bare silver wall in a bald patch of lawn? That says “I haven’t gotten around to it.”
You have gotten around to it. For the price of a nice dinner out.
13. The Deck with Built-In Storage
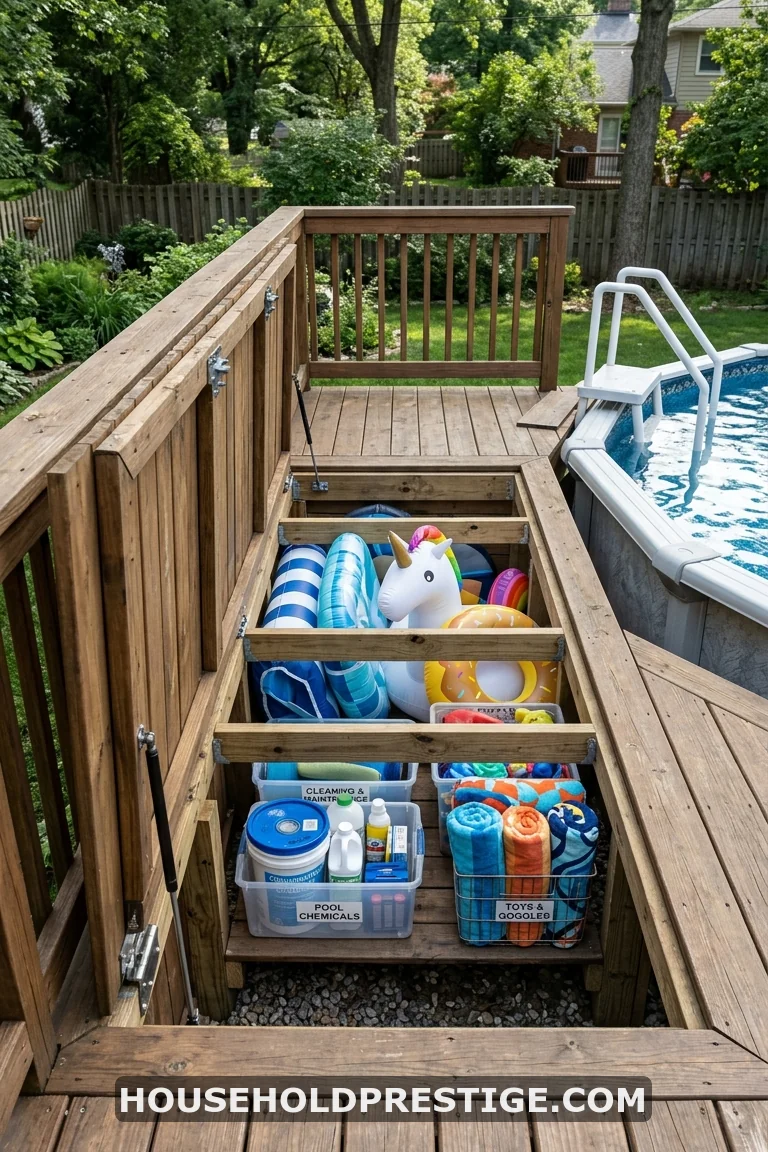
Build hinged sections into your deck surface. Lift them up, stash pool noodles, chemicals, floats, and covers below. Close them flat and nobody knows they’re there.
The under-deck space on an above-ground pool deck is prime real estate that most builds ignore completely. You’ve already framed the structure. The void beneath the deck boards exists whether you use it or not.
Cut 2×3-foot sections of deck board, hinge one edge with heavy-duty exterior hinges, and add a recessed pull handle. Line the compartment below with landscape fabric to keep critters out and you’ve got weatherproof storage that’s invisible when closed.
14. The Composite Low-Maintenance Deck
Run composite decking (Trex Enhance, TimberTech PRO, or Fiberon Good Life) and never stain, seal, or sand again. Costs more upfront — $4-$8 per linear foot versus $1-$2 for pressure-treated — but the math flips within 5 years once you factor in annual staining supplies, time, and replacement boards.
Barefoot-friendly. Splinter-free. Fade-resistant for 25+ years. Around a pool where everything is wet and everyone is barefoot, that matters more than anywhere else in your yard.
15. The L-Shaped Deck Off the House
Connect your existing back porch or patio door directly to the pool with an L-shaped deck. One arm of the L runs along the house. The other extends out to meet the pool. You walk straight from your kitchen to the water without ever stepping on grass.
This layout works well when the pool sits 15-25 feet from the house. The long arm bridges the gap and the short arm wraps a portion of the pool for entry.
Structurally, attach the house-side ledger board properly with lag screws and flashing tape — improper ledger attachment is the number one cause of deck collapses in the U.S. according to the North American Deck and Railing Association. This is not a corner to cut.
The big advantage here is flow. When you have guests, food moves from kitchen to table to poolside without a single awkward transition through grass or mud. It makes the pool feel like part of the house rather than an afterthought at the back of the lot.
16. The Deck with a Fire Pit Zone
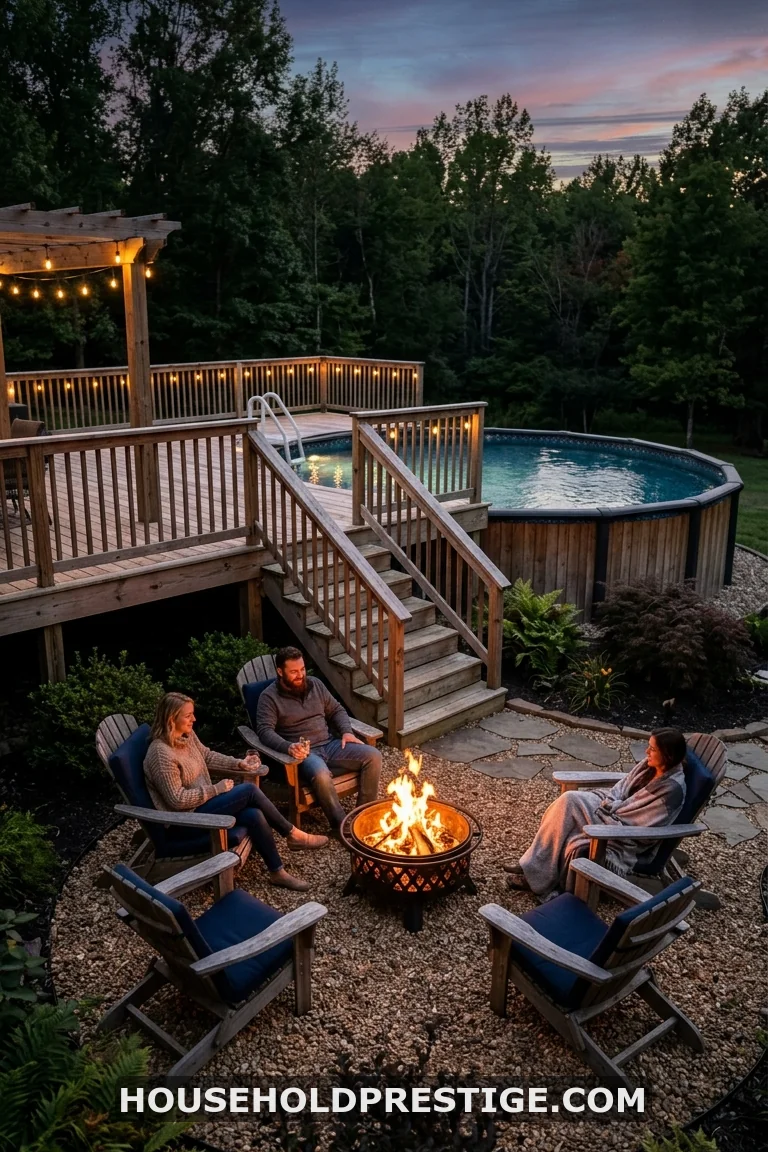
Drop a lower deck tier 8-10 feet away from the pool. Center a portable fire pit. Add four chairs. You’ve just extended your pool season by 6 weeks on either end — cool spring evenings and crisp fall nights become poolside fire nights.
Keep the fire pit at least 10 feet from the pool wall and never use a permanent gas or wood-burning pit on a wood deck without a fire-rated pad underneath. Portable steel fire pits with spark screens are the safest option at $80-$200.
17. The Budget Deck Kit Build
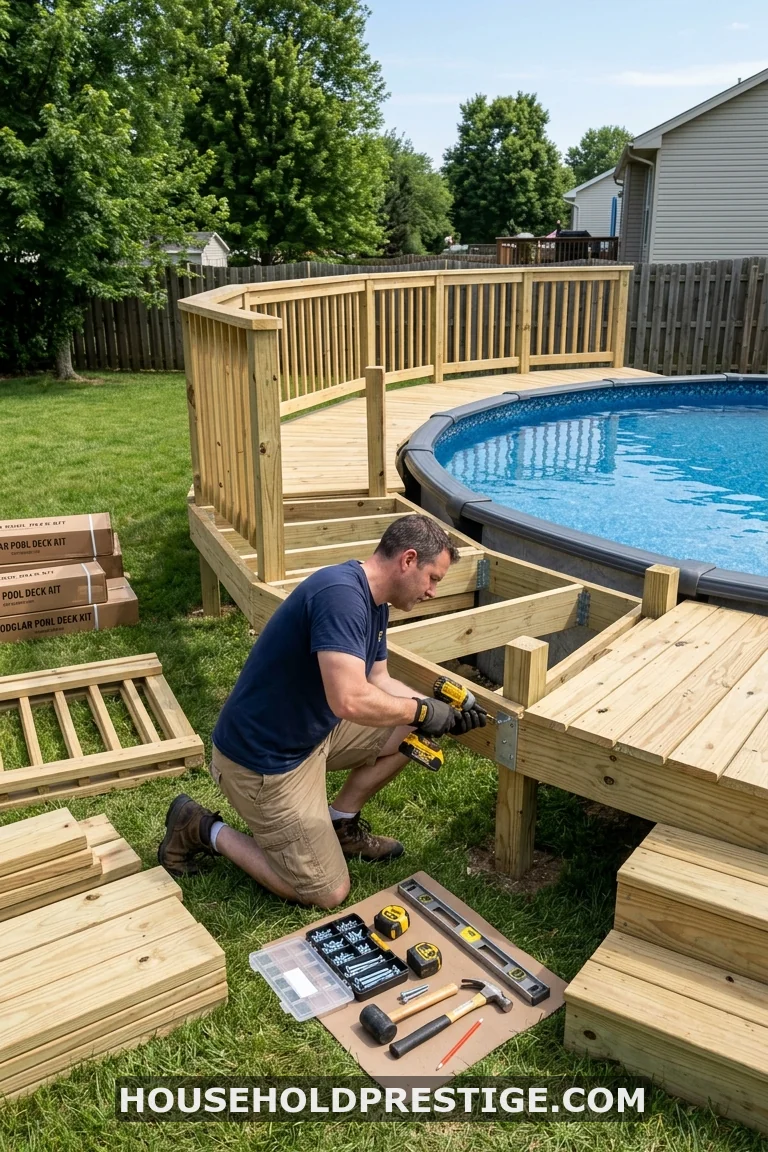
Deck kits exist for exactly this purpose, and they remove the scariest part of any deck project: measuring, cutting, and hoping everything is square.
What’s in the Box
A standard above-ground pool deck kit from brands like Kayak Pools, Vinyl Works, or Heritage includes pre-cut framing, pre-drilled deck boards (usually resin or composite), stair sections, and all fastening hardware. Most are designed for specific pool sizes — 15-foot, 18-foot, 21-foot, 24-foot rounds and common oval sizes.
Prices range from $1,500-$4,000 depending on the brand, material, and deck coverage area (5×10 platform versus a half-surround). The Vinyl Works Premium 5×10 kit, one of the best-selling models, runs about $2,200-$2,800 and assembles in 4-6 hours.
What You’ll Need Beyond the Kit
A level surface. Seriously — this is 80% of the work. Use a long spirit level and fill low spots with compacted gravel or sand. If your ground slopes more than 2 inches across the kit footprint, you need to grade before assembly.
A drill/driver, a socket set, and a second pair of hands. These kits are manageable for two people. Solo assembly is possible but frustrating, especially when aligning the frame sections.
Assembly Tips
Start at the pool wall side and work outward. Kits are designed to reference the pool wall for alignment, so if you start from the far edge, you’ll fight tolerances all the way back.
Dry-fit every connection before driving screws. Resin and composite materials don’t forgive misdrilled holes the way wood does — once you make a hole, it’s there forever.
Check for level at every stage. Every. Stage. A kit that’s 1/4 inch out of level at the base will be 1 inch out of level at the deck surface, and that slope will haunt you with rolling drinks and uneven chairs for the life of the deck.
When a Kit Makes Sense
You want something up this weekend, not in three weeks. You don’t own a miter saw. Your pool is a standard size. You rent your home and might take it with you. You want the fastest, lowest-risk path from bare ground to poolside seating.
When It Doesn’t
You want full coverage (most kits are partial platforms). Your pool is non-standard. You want cedar, ipe, or a specific material. You want a deck taller than the kit supports. In these cases, a custom build is your move.
18. The Deck with an Outdoor Shower
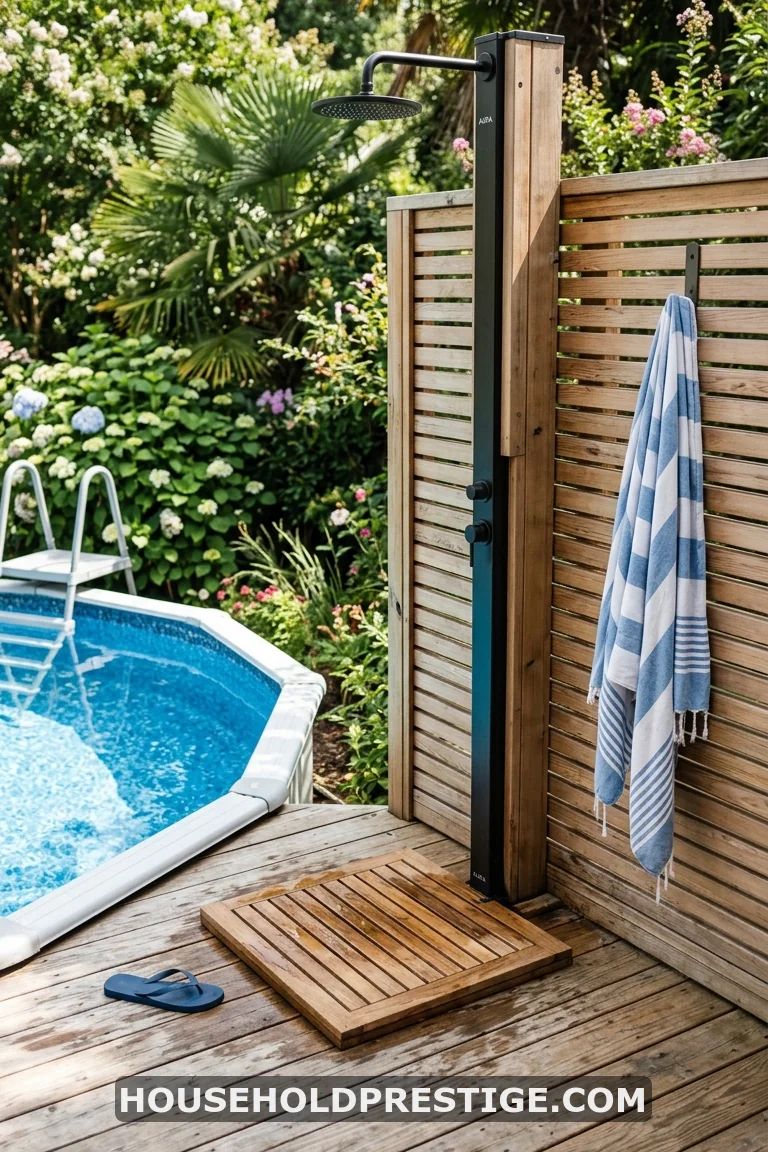
Mount a garden-hose-fed outdoor shower post to one corner of your deck. A basic cold-water shower post from hardware stores costs $50-$100 and connects with a standard hose fitting. Install a 3×3-foot slatted drainage mat under it. Rinse before entering, rinse after leaving. Your pool stays cleaner longer.
19. The Stepped Entry Deck
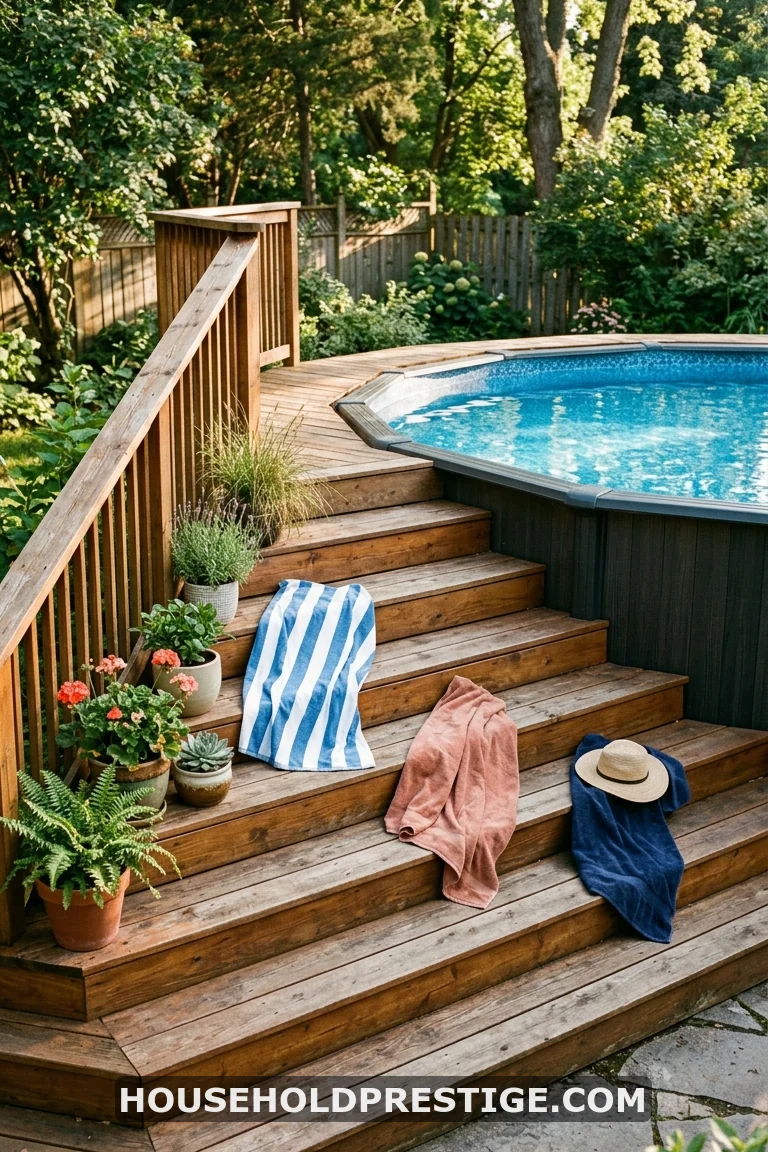
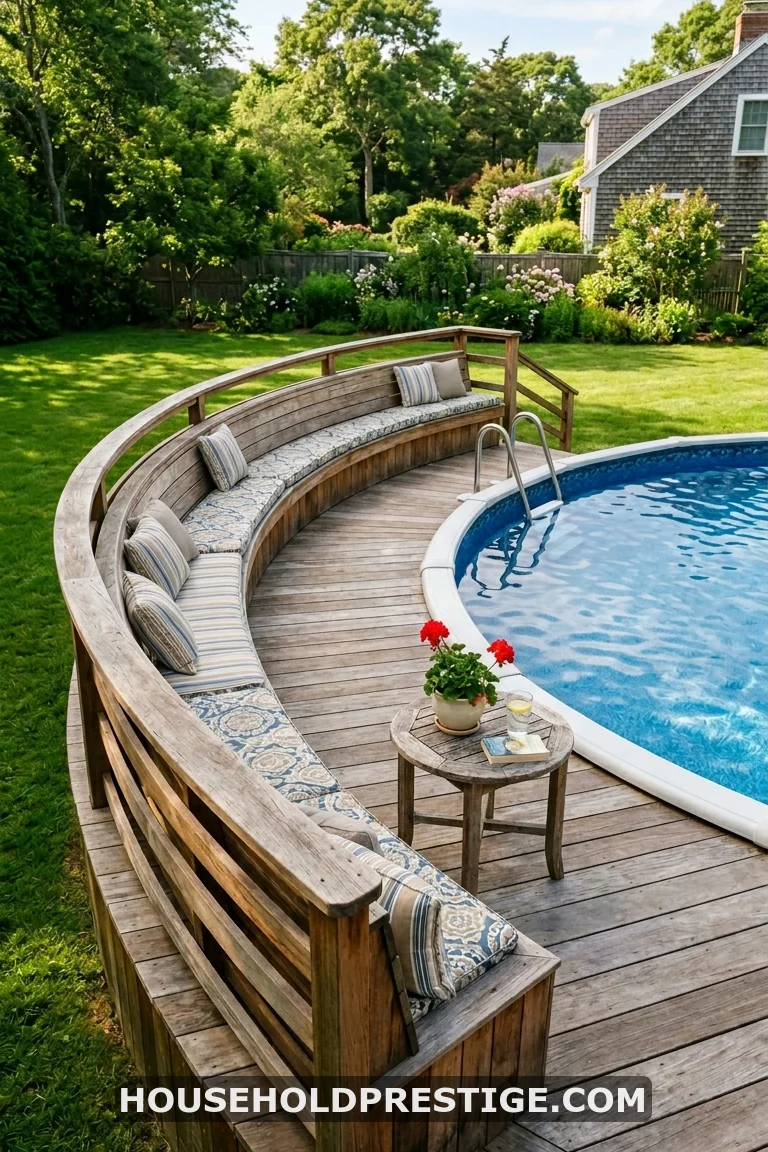
Replace the flimsy A-frame ladder entirely. Build wide (48-inch) steps that cascade down from the deck surface to the ground, turning the entry into a feature rather than a necessity.
Wide treads double as seating. Leave a 14-inch depth on each tread and people will sit on them naturally — feet in the water, drink in hand, conversation flowing. This is the detail that separates an above ground pool that feels deliberate from one that feels provisional.
Build at least three steps for a standard-height pool. Four or five steps with a gentler rise feel more luxurious and are safer for kids and older family members. Use anti-slip tape or textured composite treads for wet-foot safety.
20. The String Light and Ambiance Deck
Forget the deck design for a second. Sometimes, lighting does more transformation work than lumber ever could.
Drive four 4×4 posts into the ground in a rectangle around your pool and deck. String commercial-grade outdoor LED string lights in a criss-cross pattern overhead. Wrap a few solar-powered path lights into the landscaping. Add one or two solar lanterns on the deck rail. Total: $60-$120.
You just made a $500 deck look like a $5,000 deck — but only at night. And honestly, when do you use your pool deck most?
21. The Glass Railing Deck
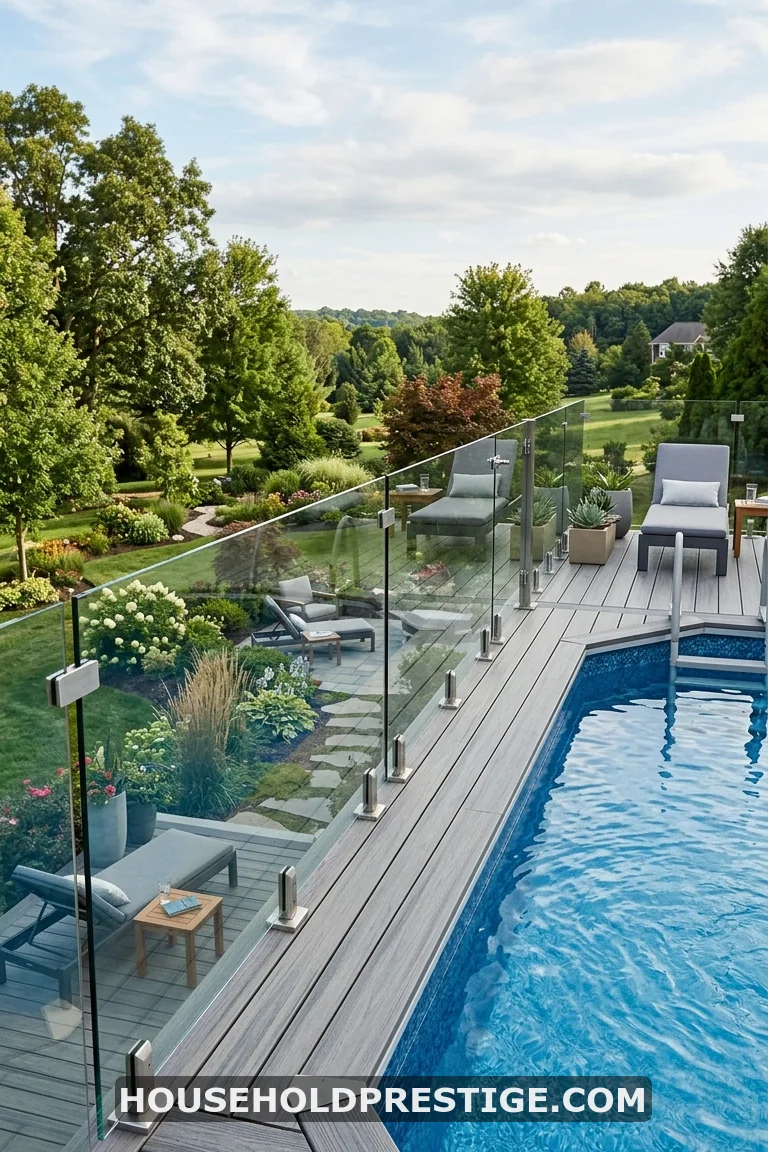
Standard wood balusters and lattice panels make above ground pool decks look boxy and enclosed. Glass panel railings do the opposite — they disappear.
Tempered glass railing panels ($150-$300 per 4-foot section) mount between aluminum posts and give you the safety of a railing without the visual bulk. You see through them to the landscaping, the yard, the sunset. The deck feels twice as big because nothing blocks your sightline.
The premium option is frameless glass mounted with stainless steel spigots — stunning but expensive ($300-$500 per linear foot installed). The practical option is semi-framed panels with a thin aluminum top rail. Same transparency, 40% less cost.
Either way, glass railings work with code requirements while making your deck look like it belongs at a boutique hotel rather than a suburban backyard.
22. The Slope-Adapted Deck

Sloped yards aren’t a problem — they’re an opportunity.
On the high side, your deck barely rises above grade. On the low side, you’re elevated with a view. The slope creates a natural multi-level effect without you building separate tiers. You just follow the land.
The key is adjustable post heights. Use longer 6×6 posts on the downhill side, cut shorter on the uphill side, and keep your beams and joists level across the span. This is where a laser level earns its keep — eyeballing a sloped build is a recipe for regret.
For slopes steeper than 1:4 (one foot of drop for every four feet of run), consider a retaining wall on the downhill side. Concrete block or timber retaining walls provide a clean visual termination and prevent erosion beneath the deck.
The bonus: the tall downhill side creates a cavernous under-deck space perfect for equipment storage, pool pump housing, or even a shaded hangout zone with curtains and cushions.
23. The Equipment-Hiding Deck
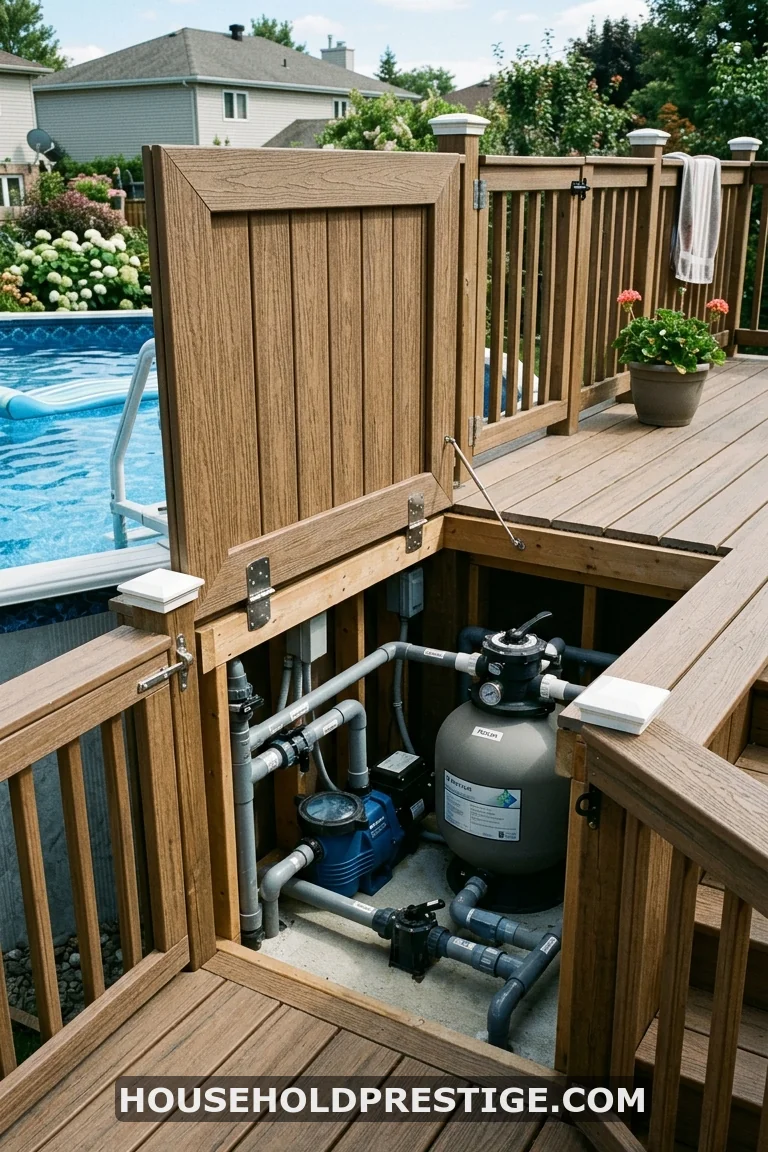
Your pump, filter, hoses, and chlorinator don’t need to be on display. Build a skirt panel section into your deck that swings open for maintenance access but stays closed during everyday use.
Use the same deck board material for the panel so it blends seamlessly. Mount it on piano hinges at the bottom and add a magnetic catch at the top. When it’s shut, it looks like a deck. When you need to backwash the filter or check the pump basket, swing it open, and everything is right there.
This one detail separates “I have a pool” from “I have an outdoor living space that happens to include a pool.”
Wrapping It Up
You don’t need a contractor, a second mortgage, or a degree in carpentry to make your above-ground pool look like it belongs. You need a plan. You need a weekend (or two). And you need to stop treating the pool like a temporary fixture parked on your lawn.
Whether you’re spending $200 on a pallet platform or $12,000 on a full composite wraparound with glass railings and built-in storage, the deck is what makes the pool feel like home. It’s the difference between a place to swim and a place to live.
Pick the idea that fits your budget, your skill level, and your backyard. Then build it before summer gets here.
Frequently Asked Questions
Do I need a permit to build a deck around my above-ground pool?
In most areas, yes — especially if the deck surface exceeds 30 inches above grade or is attached to your house. Building codes vary by municipality, so check with your local building department before starting. Freestanding floating decks under 200 square feet and under 30 inches high are exempt in many jurisdictions, but always confirm locally.
What is the best decking material for around an above ground pool?
Composite decking (brands like Trex, TimberTech, and Fiberon) is the top choice for pool decks because it resists moisture, won’t splinter under bare feet, and requires almost no maintenance. Pressure-treated wood is significantly cheaper upfront, but needs annual staining and sealing to hold up around constant water exposure.
How much does it cost to build a deck around an above-ground pool?
A simple floating platform starts around $300-$600 in materials. A half-surround deck runs $1,500-$4,000. A full wraparound deck for a 24-foot round pool ranges from $3,000-$12,000 depending on the material (pressure-treated versus composite) and whether you DIY or hire a contractor. Labor typically adds 50-100% to material costs.
Can I attach a deck directly to my above-ground pool?
No. Above-ground pool walls are not designed to bear structural loads. Your deck must be freestanding with its own footings and support posts. Leave a small gap (about 1 inch) between the deck frame and the pool wall to allow for movement and prevent damage to the pool structure.
How long does it take to build an above-ground pool deck?
A simple floating platform or deck kit takes one weekend for two people. A half-surround custom build typically takes 2-3 weekends. A full wraparound with multiple levels, railings, and stairs is a 3-6 weekend project, depending on complexity and experience level. Add time for permit approvals, which can take 1-4 weeks in some areas.