

Your neighbor just installed an in-ground pool. You’re standing in your yard, staring at your above-ground pool, and thinking: Why does mine look like a stock tank from a farm supply store?
Here’s the thing nobody tells you when you buy an above-ground pool — the pool itself isn’t the problem. The exposed metal wall is. Once you hide that wall, either by sinking it into the ground, building up around it, or wrapping it so cleverly that nobody can tell, the whole experience shifts. You stop looking at a pool product and start looking at a backyard feature.
These sunken above-ground pool ideas range from a full partial-bury excavation with multi-level decking to zero-dig tricks that create the same visual result in a weekend. Some cost under $500. One will run you $8,000–$15,000. All of them dramatically change how your pool reads in the yard.
I’ve dug into what actually works — and what looks great in a render but falls apart in the real world. Let’s get into it.
1. The Stone Coping Edge Trick
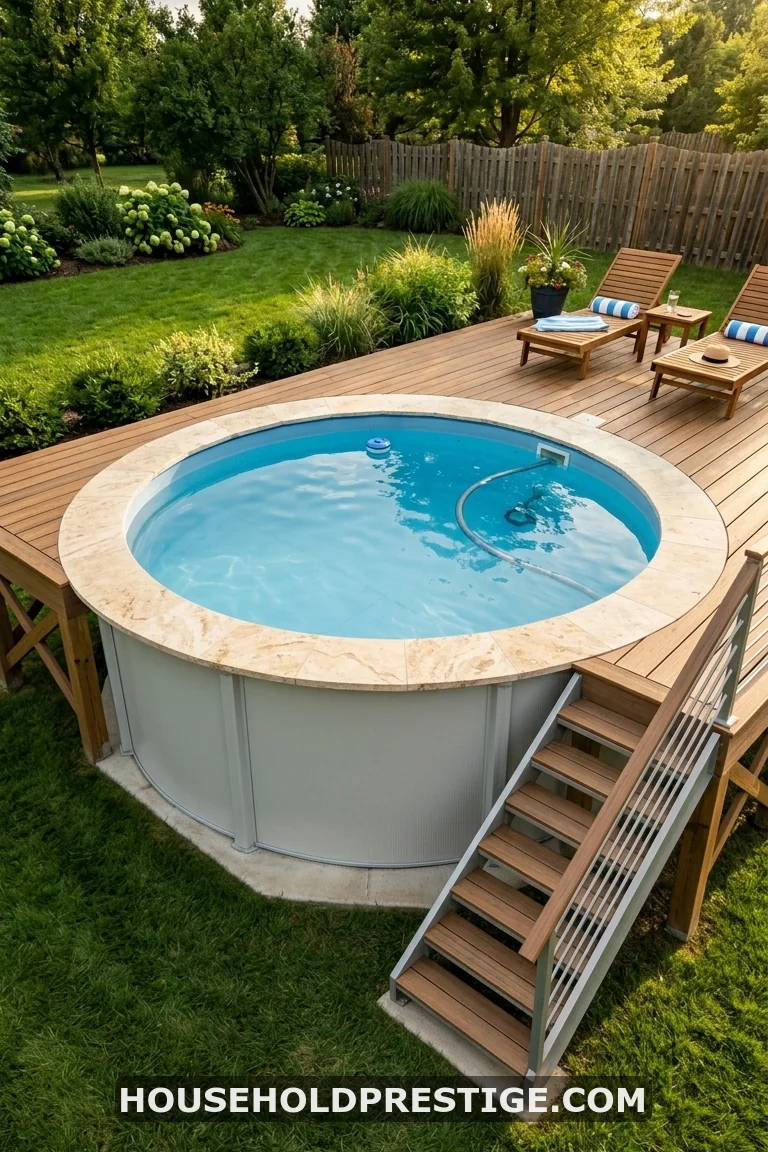
Buy a box of 12″×12″ travertine or bluestone pavers. Set them flush against the pool rim, leaning slightly inward. From any standing viewpoint, you now see stone where you used to see metal. The pool reads as permanent.
This single change — installing coping stones at the lip — is responsible for more “is that in-ground?” reactions than almost anything else on this list. It costs $150–$300 for a standard 24-ft round pool and takes one afternoon.
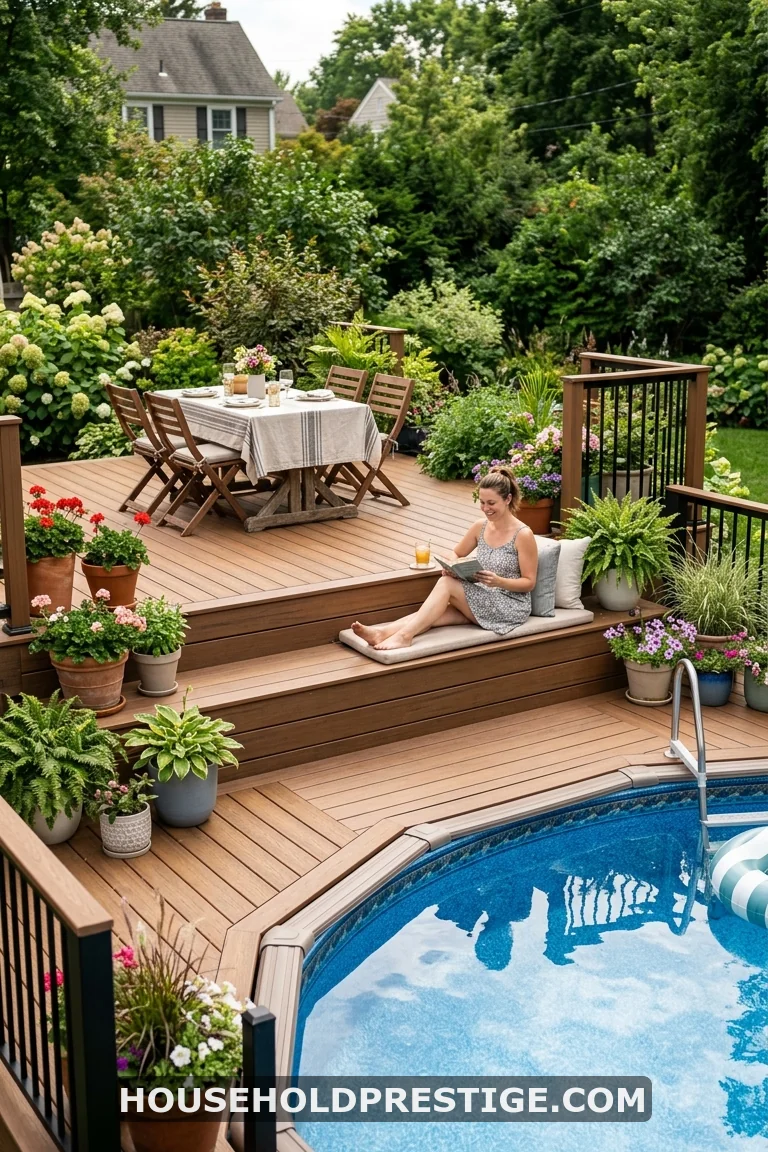
2. The “No-Dig” Raised Deck Illusion
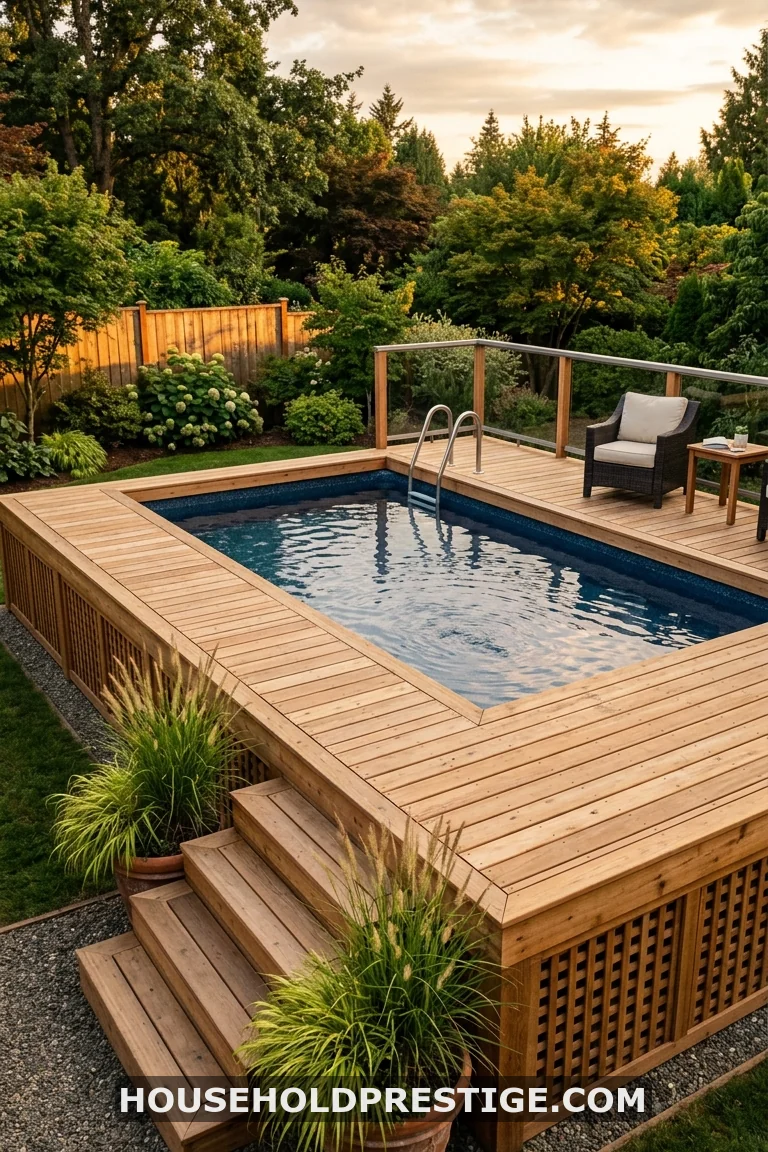
You don’t have to move a single shovelful of dirt to make a pool look sunken. You just have to build up to it.
The raised deck illusion works by constructing a floating deck — supported by concrete blocks or post footings — at exactly the height of your pool’s top rail. When the deck surface sits flush with the pool rim, the water line looks inset from the deck. From any standing position, the pool appears to drop into the landscape rather than sit on top of it.
This approach works on any pool, any backyard, any soil condition. It’s the most foolproof no-excavation sunken look in this list, and for a 24-ft round pool, a full wraparound deck runs $2,500–$6,000 in materials if you DIY. Hire it out and budget $6,000–$12,000 depending on your region.
Pro tip: Use composite decking (Trex Enhance® or TimberTech Azek) rather than pressure-treated wood. The pool chemicals splash onto that deck constantly. Composite handles it; wood starts graying and warping within two seasons.
3. Tiered Retaining Walls + Terraced Lawn
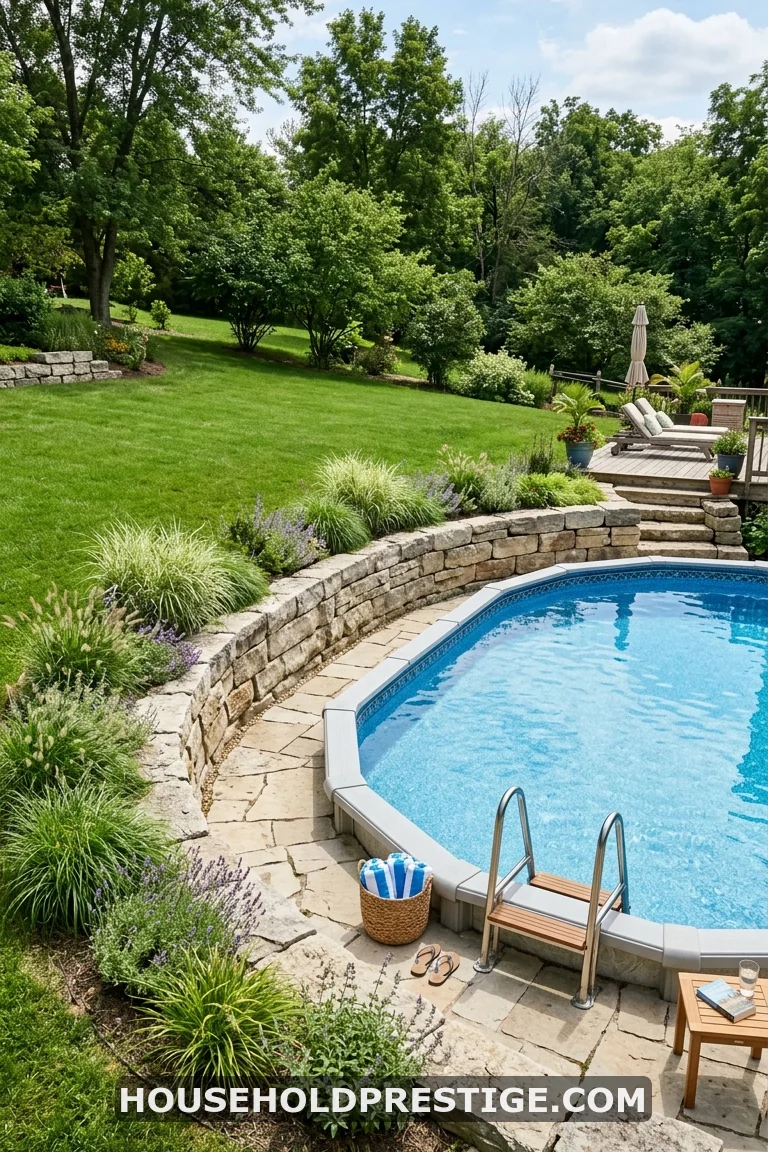
If your yard has any slope to it at all — even a gradual 18-inch drop over 15 feet — you’re sitting on an opportunity most people waste.
Retaining walls let you partially sink one side of the pool into the hillside while the lower side remains at or above grade. You’re not excavating a hole; you’re cutting into a bank that was already there. The pool’s uphill wall disappears into the earth. The downhill side gets wrapped in a low retaining wall finished in stone veneer or natural fieldstone.
The result looks like a design decision, not a compromise. Costs vary widely: simple concrete block retaining walls run $15–$25 per square foot installed. Natural stone or tumbled block with a quality finish is $30–$50 per square foot. On a sloped lot, you may only need 20–30 linear feet of wall — so the full project can land at $3,000–$8,000 including pool prep and backfill.
The catch: You need a soil engineer or a licensed pool contractor to sign off before you bury any part of a pool wall. The pool’s structural rating matters too — more on that in idea #12.
4. Composite Wraparound Deck at Pool Rim Level
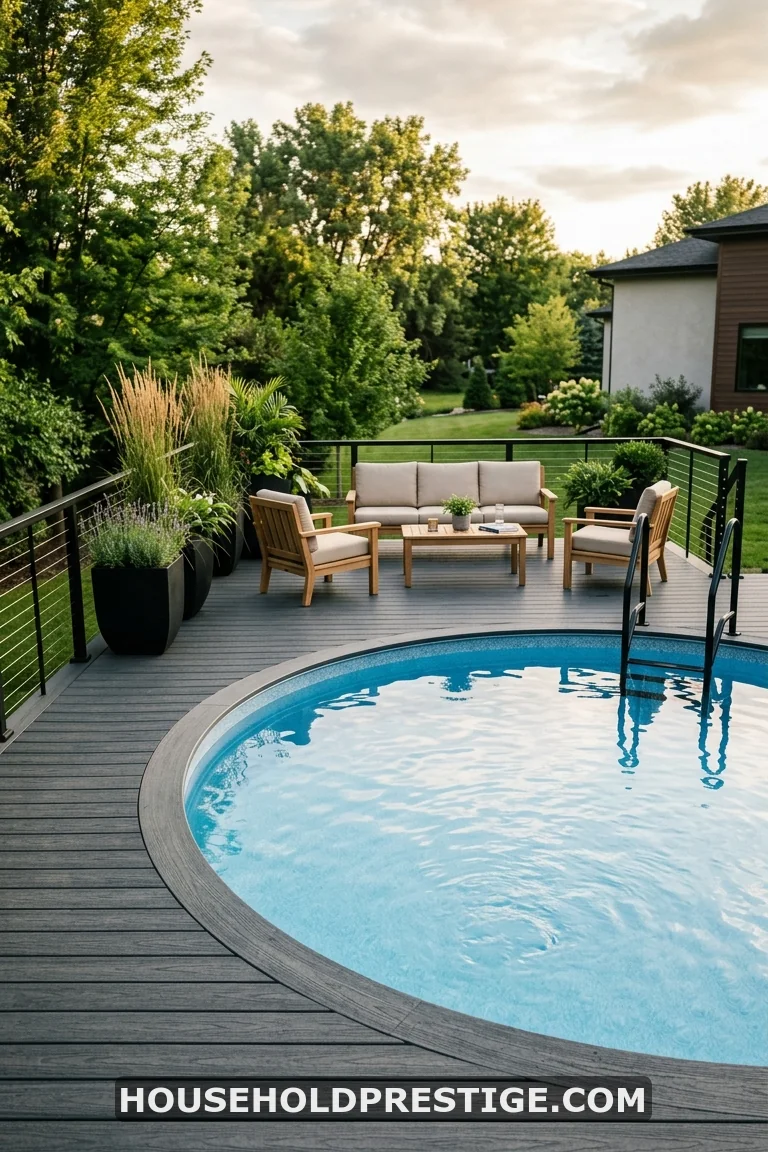
The wraparound deck is the closest you’ll get to an in-ground pool look without touching a shovel. Full perimeter. Deck surface flush with the water line. Cable railings so you don’t lose the open visual.
What makes this different from a standard deck-around-pool build is the material and height relationship. The deck must hit the pool rim — not sit 6 inches below it, not hover above it. That flush connection is the visual trick. And the railing system matters: bulky wood balusters create a visual barrier that makes the pool look smaller and more contained. Cable rail or glass panel systems preserve the sightline so the water reads as the feature.
For a 24-ft round pool: expect 1,400–1,800 sq ft of deck surface for a full wrap. Materials in Trex Enhance® Naturals will run $8–$12 per square foot for boards alone. Full project with framing, footings, and cable rail: $15,000–$25,000 professionally installed. That’s real money — but compare it to an in-ground pool at $50,000–$80,000 and the math changes entirely.
5. The Full Partial-Bury: Step-by-Step Deep Dive
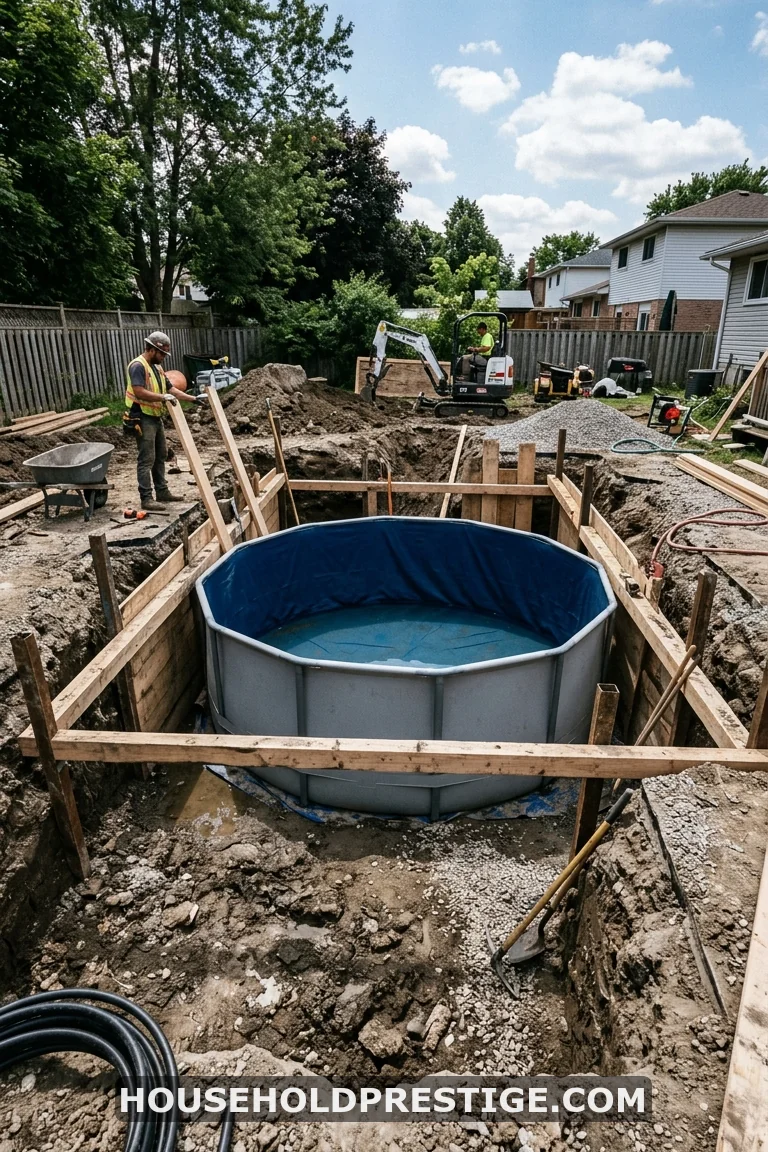
This is the real deal — the sunken above ground pool ideas project that produces the most convincingly in-ground result. Done correctly, nobody knows. Done incorrectly, you void your warranty, compromise the pool structure, and end up with a drainage nightmare. Here’s how to do it right.
Why It Works
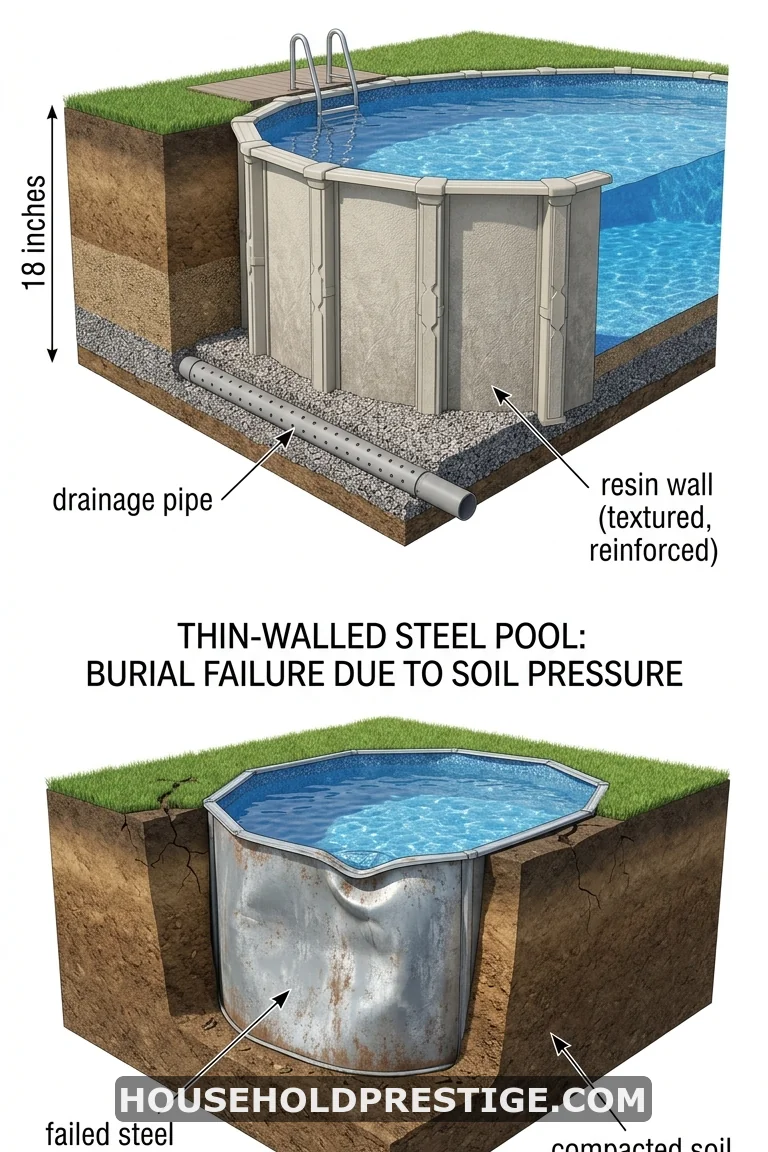
Above-ground pool walls are designed to hold water pressure from the inside. When you bury the pool partially, the surrounding soil creates inward pressure from the outside. Most resin-walled and steel-hybrid pools can handle partial burial of 12–24 inches without structural compromise. Full steel pools with thinner walls can flex and collapse under soil pressure. Soft-sided inflatable pools cannot be buried at all.
The sweet spot: 18–24 inches of burial depth. This hides roughly half the pool wall on a standard 52-inch pool, which is enough to completely eliminate the “it’s above-ground” visual tell.
Materials & Costs
| Item | Estimated Cost |
|---|---|
| Pool-rated excavation (24-ft round, 24″ depth) | $800–$1,800 |
| Compacted gravel base (drainage layer) | $300–$600 |
| Drainage pipe + dry well or French drain | $400–$1,200 |
| Pool installation | $400–$800 (professional) |
| Backfill + compaction | $200–$500 |
| Coping stones or deck flush finish | $300–$2,000+ |
| Total | $2,400–$6,900 |
Note: These are material and basic labor estimates. Add $1,500–$3,000 if you hire a licensed pool contractor to oversee the full job, which I’d recommend for anything beyond 12 inches of burial depth.
Step-by-Step: The Partial Bury Process
1. Verify your pool is burial-rated. Check the manufacturer’s documentation before anything else. Doughboy, Radiant, and Sharkline make pools rated for partial or full in-ground use. Most Intex and Bestway pools are not. Burying a non-rated pool voids the warranty and risks collapse.
2. Mark and excavate. Mark a circle or rectangle 6 inches larger than your pool’s footprint on all sides. You need that extra perimeter clearance for backfill access and drainage pipe installation. Excavate to your target burial depth plus 6 inches for the gravel base. For 18 inches of burial: dig 24 inches deep.
3. Install the drainage layer. This is the step most DIYers skip, and it’s the one that causes problems. A perforated drainage pipe (4-inch Schedule 40 PVC, perforated) runs in a gravel-filled trench around the pool perimeter at the base of the excavation. Water accumulating against the pool walls — from rain, from pool splashout — needs somewhere to go. Without this, hydrostatic pressure builds and pushes the pool wall inward. Slope the pipe to a dry well, a pop-up emitter, or a French drain at least 10 feet away.
4. Set the gravel base. Pour 6 inches of compacted pea gravel into the excavation bottom. This provides drainage under the pool floor and a stable, level base for pool installation. Rent a plate compactor and run it three passes before placing the pool.
5. Assemble the pool in the hole. Lower pool components into the excavation as you assemble them. This is easier said than done — pool wall sections are awkward in confined spaces. Have two additional people for this step. Do not use a crane or heavy equipment; pool walls dent easily.
6. Fill partially, then backfill. Add 6 inches of water to the pool before backfilling. This creates internal pressure that counteracts the inward pressure of the soil as you pack it in. Backfill in 4-inch lifts, tamping each layer before adding the next. Never backfill against an empty pool wall.
7. Cap it. Once backfilled and leveled, your pool rim sits roughly at grade. Now run your coping stones, pavers, or deck boards flush to the top rail. This final surface is what sells the in-ground look.
Common Mistakes to Avoid
- Burying a non-rated pool. The wall collapses inward under soil pressure. This is a safety issue, not just cosmetic.
- Skipping drainage. Within two seasons, soil moisture accumulates at the buried wall and either corrodes steel or causes the liner to shift.
- Backfilling dry. Always have water in the pool when you’re pushing soil against the walls.
- Going too deep. Even on a burial-rated pool, exceeding the manufacturer’s depth spec by more than 20% risks frame stress. More depth doesn’t mean a better outcome — it means more risk.
- Forgetting permits. Many municipalities require a permit for any excavation over 18 inches deep. Check with your local building department before you dig.
Pro Move
Install a resin-wall pool (not steel) for a partial bury project. Resin walls don’t corrode when surrounded by moist soil. Steel pools buried without proper drainage become rust problems within 5–7 years, right where you can’t see them — just below grade.
6. Natural Stone Veneer Panels Around the Pool Wall
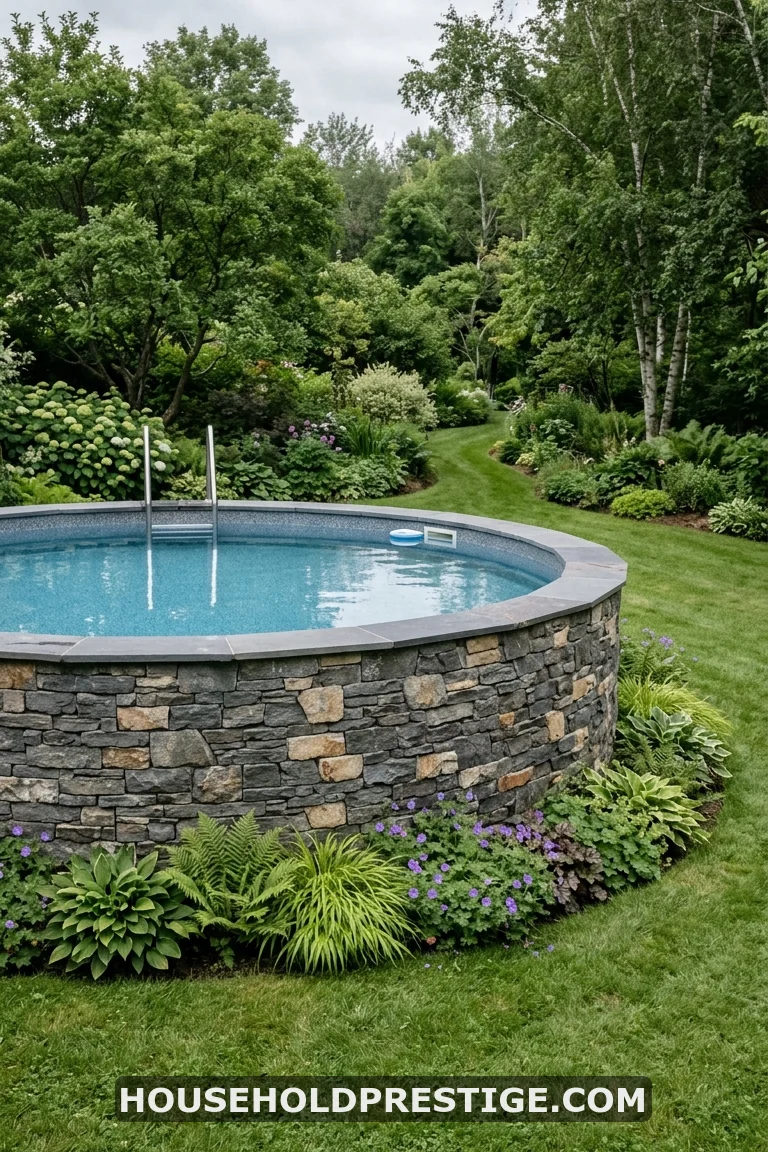
No digging. No deck. Just adhesive-backed stone veneer panels applied directly to the pool wall exterior, and your above-ground pool immediately starts reading as a built feature rather than a temporary one.
Faux stone panels (airstone, Cultured Stone, or any stacked-stone panel system rated for exterior use) cut with a jigsaw to fit around pool wall seams. Apply with exterior-grade construction adhesive. The job takes one weekend for two people and costs $400–$900 in panels for a standard 18–24 ft round pool.
The visual effect is dramatic. Where you had exposed beige or blue metal, you now have what looks like a low stone wall surrounding the pool. Add coping stones at the rim and low ornamental grasses at the base, and the whole thing reads as deliberately designed.
Installation note: Clean the pool wall thoroughly with degreaser first. Adhesion to galvanized steel or painted pool walls requires scuff sanding before applying panels. Use a minimum of 3 adhesive lines per panel.
7. The Boxwood Hedge Frame
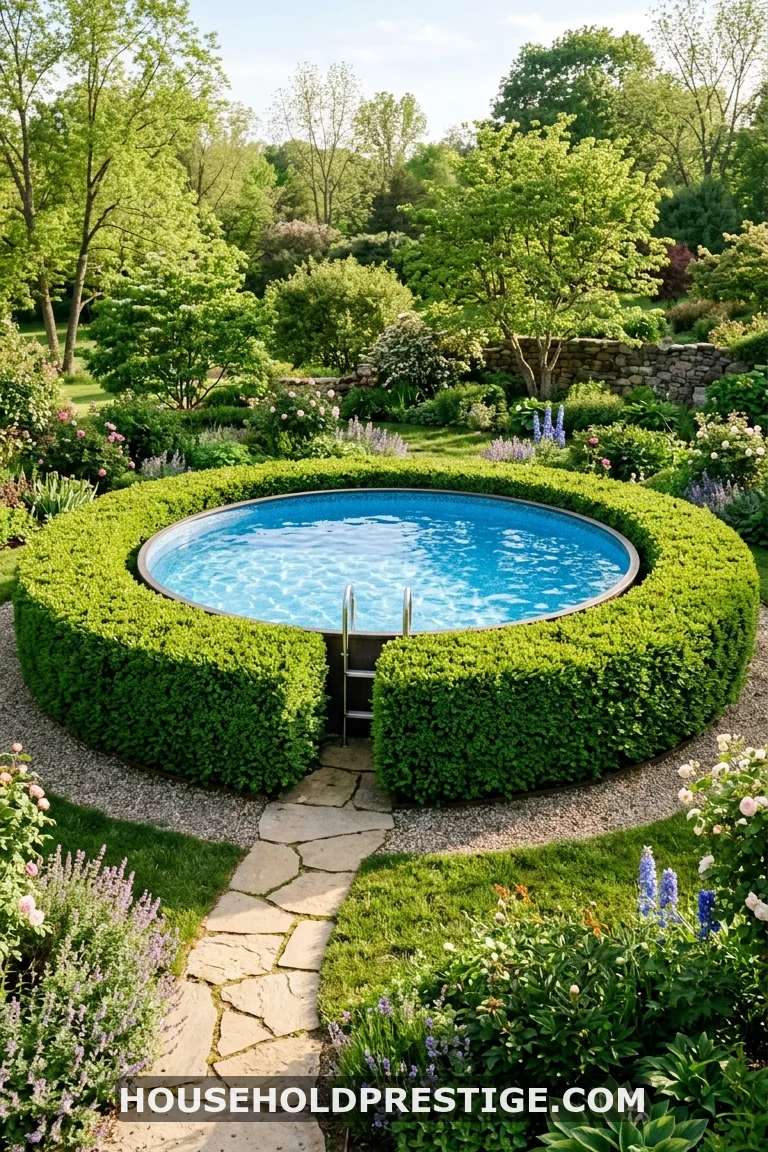
Trim boxwood hedges to pool rim height. Plant them 8–10 inches from the pool wall, tight enough to read as a solid green wall.
Pool disappears. What’s left is a pool surrounded by what looks like a formal garden enclosure. No one is walking around thinking “above ground.” They’re thinking about whether they can jump the hedge to get in faster.
This works best with English boxwood (compact, dense, slow-growing) or Japanese holly for warmer climates. Total cost for a 24-ft pool perimeter: $600–$1,200 in established 18-inch nursery plants. Water them the first two seasons and they require almost nothing after that.
8. Concrete Paver Patio Flush-Cut to Pool Wall Height
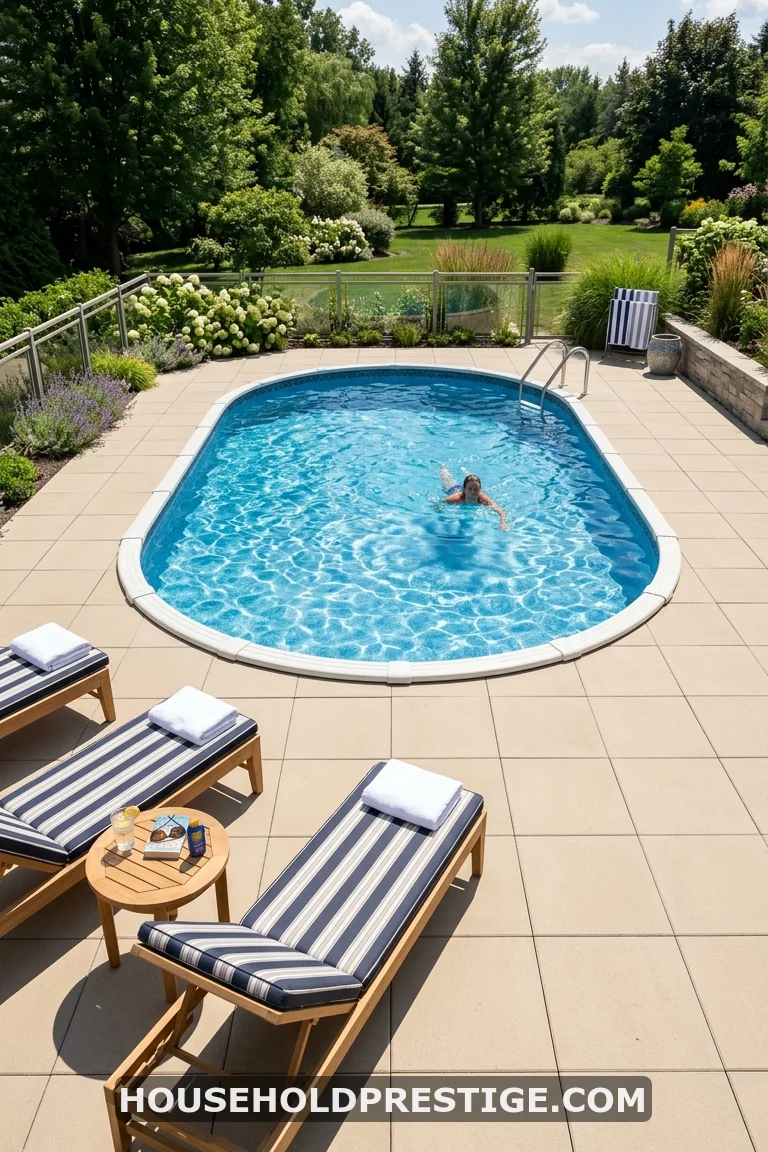
A paver patio that climbs up to pool rim height — rather than staying flat at grade level — pulls off the sunken look by essentially burying the pool wall in hardscape rather than soil.
You’re building up the patio to meet the pool, not cutting the pool into the ground. Concrete pavers get compacted-gravel base and sand setting bed, then build up in courses around the pool perimeter. Use a landscape block or Belgian block border to create a clean edge where patio meets pool.
The patio gives you a usable hard surface, hides the pool wall, and the whole thing looks like a pool that emerged from the paving rather than landed on top of it. Budget for a 400–500 sq ft patio: $3,000–$7,000 installed, depending on your paver choice and site prep.
9. Horizontal Cedar Slat Privacy Screen
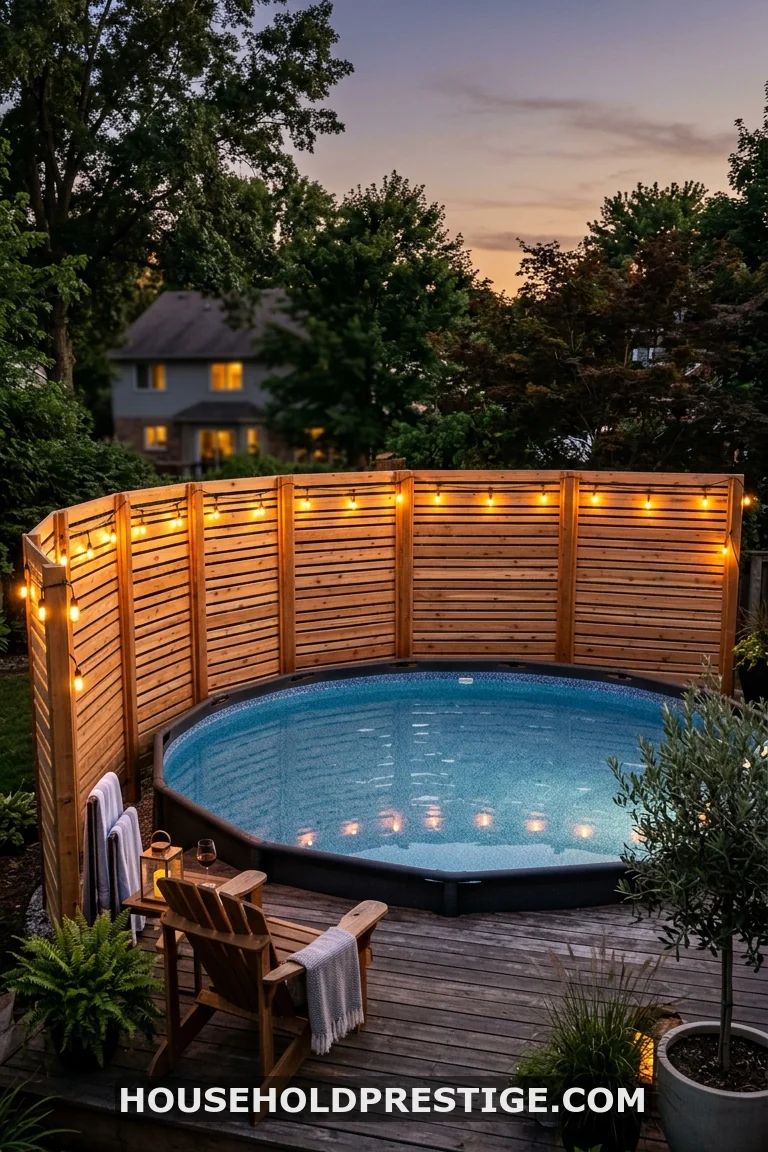
Four posts in concrete footings. Cedar boards screwed on horizontally with 1-inch spacing. Done in a Saturday. The pool wall disappears behind clean horizontal lines.
Horizontal slat screens don’t read as pool privacy fencing — they read as modern outdoor design. The 1-inch gaps give you airflow and partial visibility while obscuring the pool wall entirely. Cost for 40 linear feet: $300–$600 in materials if you DIY. Build it in sections so you can remove panels for pool access and maintenance.
10. Built-In Bench Surround That Conceals the Walls
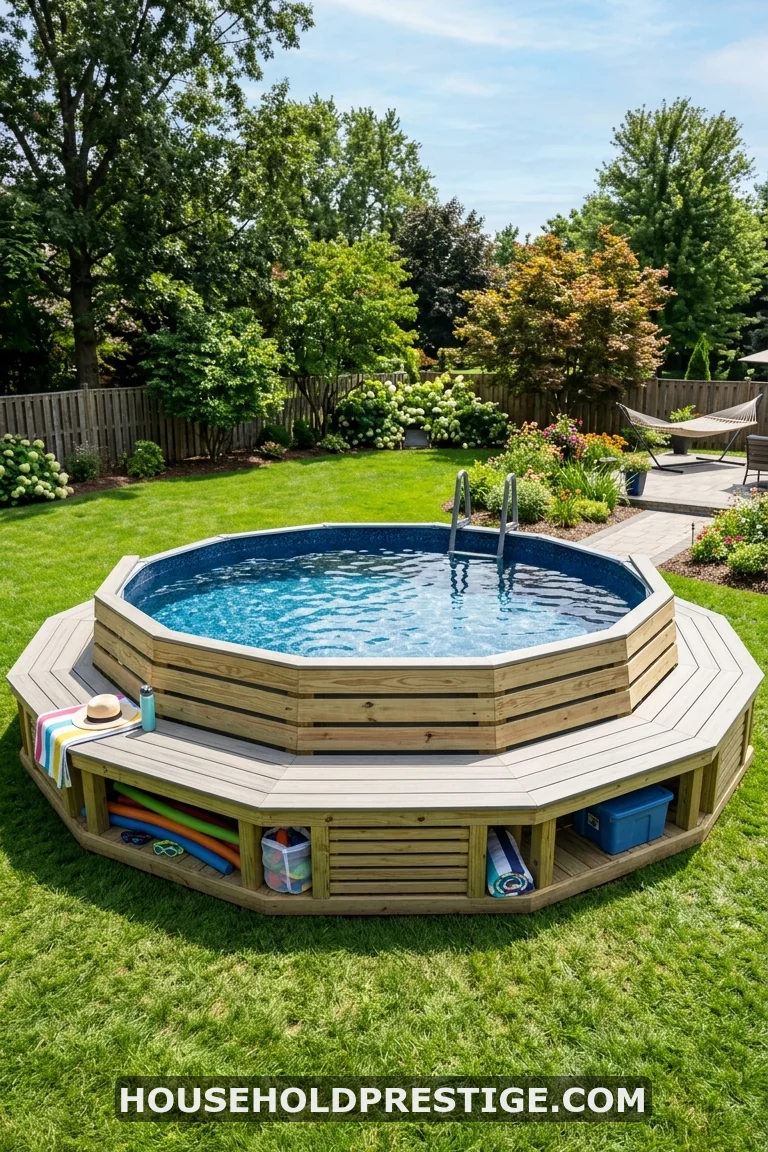
A built-in bench that rings the entire pool perimeter does three things: gives you seating, gives you storage under the seat, and fully hides the pool wall. The back of the bench sits flush against the pool wall exterior; the backrest top aligns with the pool rim. From a distance, the bench is the pool — the wall is just what’s behind it.
This is particularly smart for smaller yards where you can’t sacrifice square footage to a full deck. The bench footprint is narrow — 16–18 inches wide — but it wraps the pool completely and dramatically changes how the space reads.
Bench construction: pressure-treated 2×6 frame on concrete block footings, composite decking boards as the seat surface (they handle moisture and pool splash far better than bare wood), and a hinged seat for the storage section. Materials for a full surround on a 21-ft pool: $800–$1,500.
11. Sloped Yard Advantage: Cut Into the Hill Itself
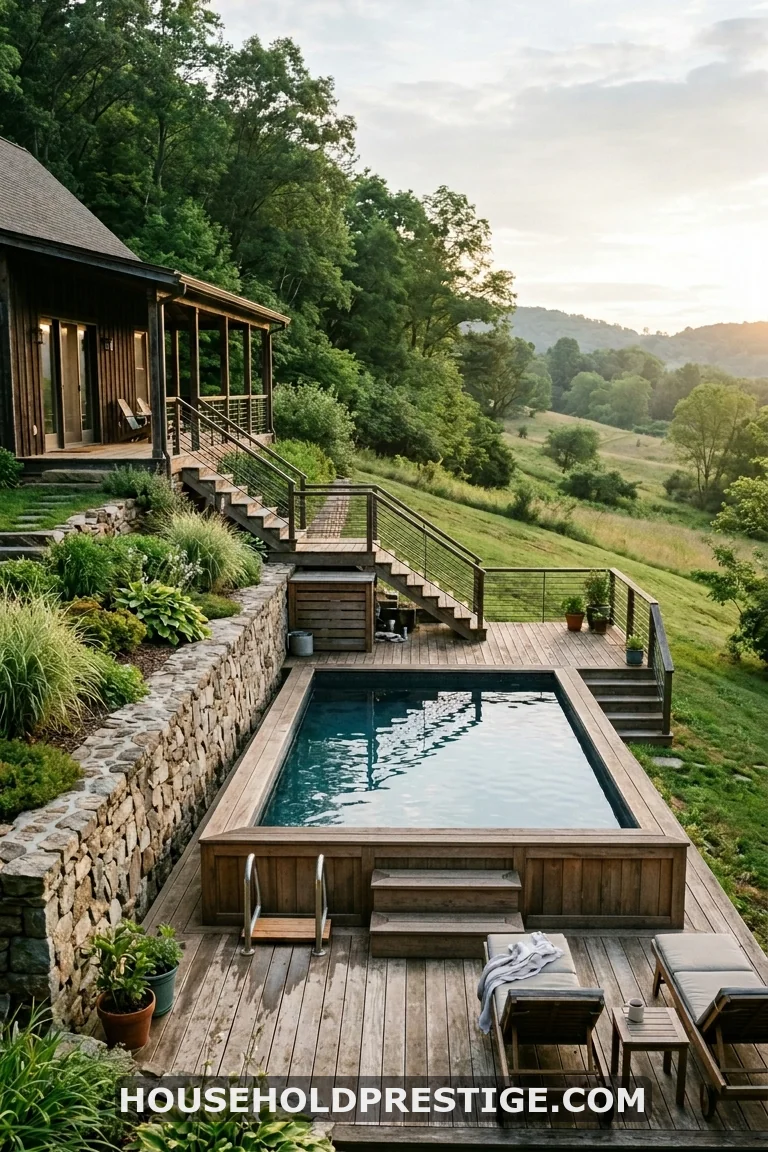
People with sloped yards think they have a problem. They actually have a head start.
When your yard drops 2–3 feet over the depth of the pool footprint, the pool naturally sits partly in the hill on the uphill side. You’re not creating artificial grade change — you’re using the grade that’s already there. Cut into the high side, set the pool so it’s level (which requires the uphill wall to be partially buried), and then build a simple retaining wall on the cut side to hold the soil back.
The downhill side stays at or above grade. A simple platform deck connects this side to the pool entry. What you end up with looks like a split-level design that took an architect to plan — and it cost you less than a mid-grade retaining wall project because the excavation is half what it would be on a flat lot.
One detail that matters: make sure your pool’s buried side has drainage built in. Hillside yards concentrate water runoff toward the buried wall. A French drain running uphill from the pool, intercepting runoff before it reaches the buried section, is non-negotiable for any cut-in-hill installation.
When it’s worth it: If your yard drops more than 24 inches over 15 feet, this approach essentially does the sunken work for free. The grade difference does most of the hiding for you.
12. What Most People Think vs. What’s Actually True: Pool Burial Safety Myths
Let’s settle the arguments you’ve been reading in Facebook pool groups.
What most people think: Any above-ground pool can be partially buried if you’re careful.
Reality: Pool wall material is the determining factor, and it matters more than burial depth, soil type, or any other variable.
Resin and polymer walls (Doughboy, Radiant, Sharkline) are designed to flex under bidirectional pressure. They’re rated for partial and in some cases full in-ground installation. Manufacturers like Radiant publish explicit depth allowances in their warranty documentation — usually 12–36 inches depending on the model.
Steel walls — which is what most entry-to-mid-range pools use — are engineered to handle only outward water pressure. When soil pushes in from outside, thin-gauge steel walls (0.016″–0.020″ gauge, common on Intex, Summer Waves, and budget brands) can buckle or collapse. Higher-gauge steel walls (0.025″+, found on Wilbar and some Doughboy models) have more tolerance, but manufacturers still rarely warranty them for burial.
What most people think: Burying a steel pool is always a safety risk.
Reality: Moderate burial (under 12 inches) on a high-gauge steel pool with proper drainage and a full backfill done in lifts — with water in the pool throughout — is practiced widely without incident. The risk isn’t zero, but it’s manageable with the right process.
What most people think: Soft-sided pools (Intex Easy Set, Coleman, etc.) can be semi-buried.
Reality: Absolutely not. Soft-sided pools rely on inflated top rings or frame pressure to hold their shape. Soil contact deforms the structure. Don’t attempt burial of any type with these pools.
The bottom line: Check your pool’s warranty documentation before digging anything. If burial voids the warranty and the pool collapses, you have no recourse. If the pool is burial-rated, you have manufacturer backing. That documentation exists for a reason.
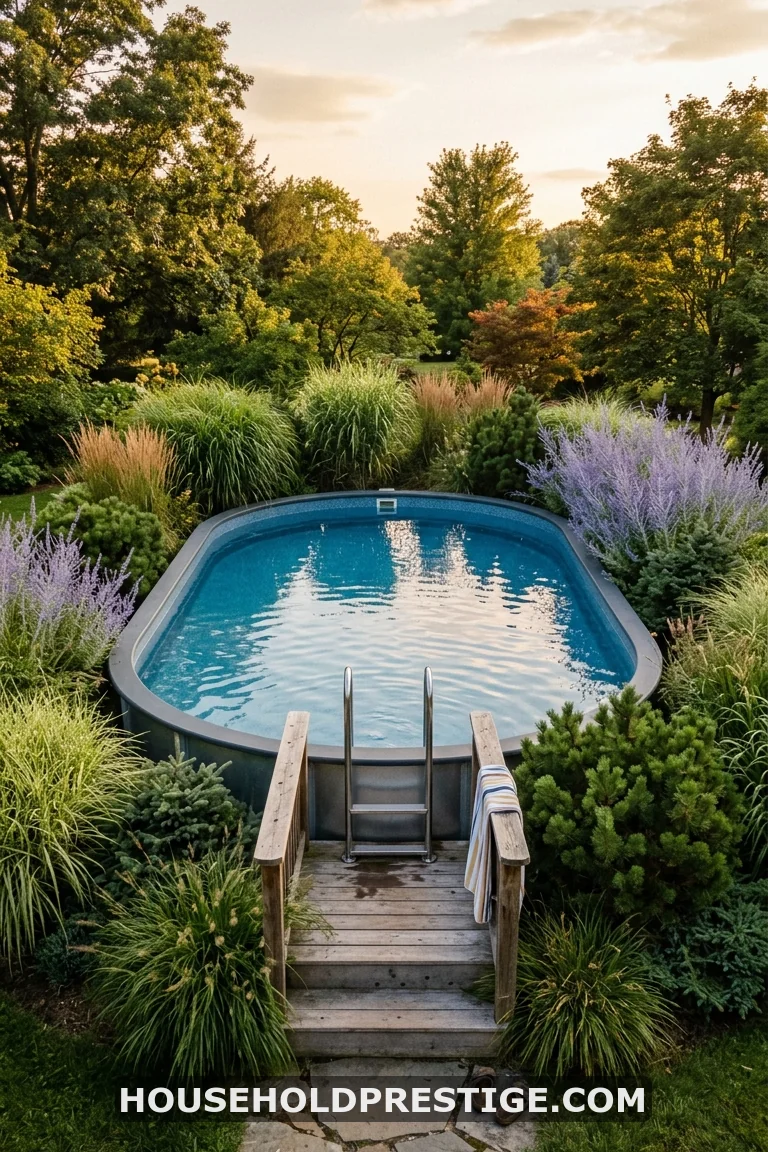
13. Split-Level Deck with Steps-as-Seating
A split-level deck with wide transitional steps gives you the sunken feel without excavating anything. The upper deck level connects to your yard or house at grade. The lower deck level drops to pool rim height. Wide steps (at least 4–5 feet deep) between the two levels double as tiered seating — people sit on the steps facing the pool, legs dangling, drinks in hand.
This design is particularly useful for rectangular or oval pools on flat lots, where straight decking looks clean and the level change creates a natural zone separation: dining up top, swimming access down below.
The perceived sunken depth is entirely optical. The pool didn’t move. The deck is just built to frame it as if it did.
14. Gravel + River Rock Collar
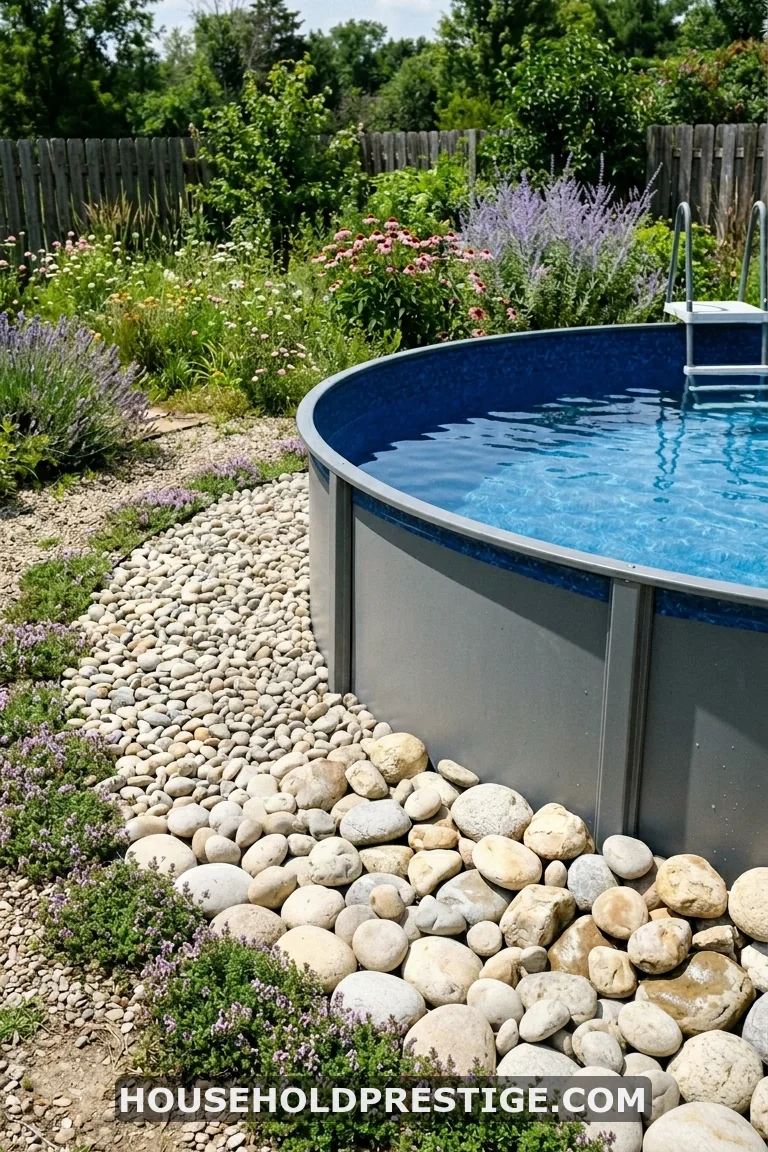
Dump river rock around the pool base. Spread it 24 inches wide. Done.
This is the $80 version of a landscaped pool surround. River rock in 40-lb bags runs $4–$6 per bag. A 24-ft round pool needs approximately 15–20 bags for a 24-inch collar. The rock hides the bottom 6–8 inches of pool wall, grounds the pool visually, and prevents grass from growing directly against the wall (which traps moisture and accelerates corrosion on steel pools).
15. Planted Berm Surround
A berm is a mounded earthwork — essentially a low hill you build around the pool to hide the wall and create a sense of the pool being set into the landscape.
Build the berm by bringing in topsoil (roughly $25–$40 per cubic yard delivered). Mound it against the pool exterior on three sides, sloping up to within 4–6 inches of the pool rim. Plant the berm densely with ornamental grasses (Karl Foerster, Little Bluestem), native perennials (Russian sage, black-eyed Susan), and low shrubs (dwarf mugo pine, dwarf arborvitae). Leave a 4-foot entry gap on the house-facing side.
By the second growing season, the berm reads as a natural rise in the yard that just happens to have a pool at its center. The pool looks like a discovery, not an installation. Budget: $400–$1,200 for soil and plants, depending on your berm size and plant selection.
When it’s worth it: Berms are ideal for irregularly shaped yards where rigid structures like decks would look forced. They’re also renter-friendly — no permits, no permanent construction, technically reversible.
16. Sunken Fire Pit Zone Adjacent to the Pool
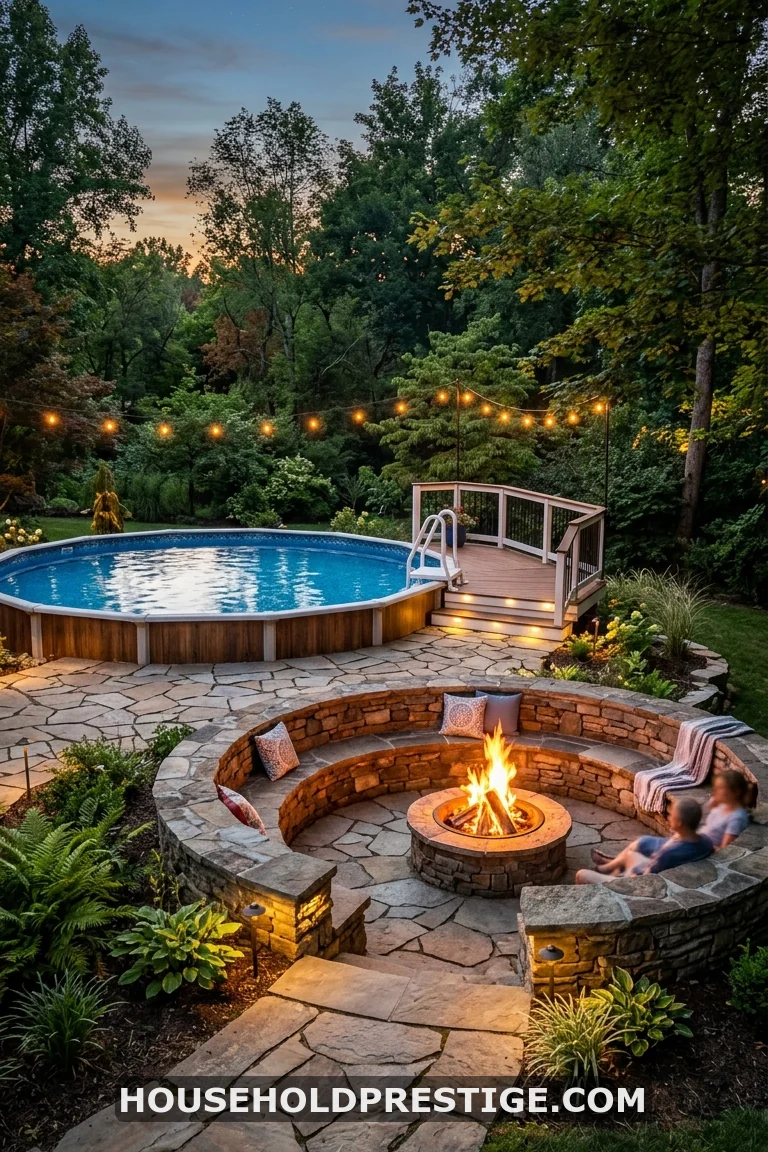
Add a sunken fire pit zone next to the pool and both features pull each other up visually. The pool looks more intentionally sited when it has a companion feature at a similar “sunken” grade level.
A simple circular fire pit recessed 18 inches into a patio or lawn, with a stone bench ring around it, costs $600–$2,000 depending on materials. Position it 8–10 feet from the pool edge — close enough for visual connection, far enough to respect fire safety clearances from combustibles (check local codes for minimums, typically 10 feet from structures).
This also solves a real problem: most above-ground pool areas have nothing for non-swimmers to do. The fire pit zone gives people a place to sit and feel like they’re part of the space without being in the water.
17. The LED Rim Lighting Upgrade
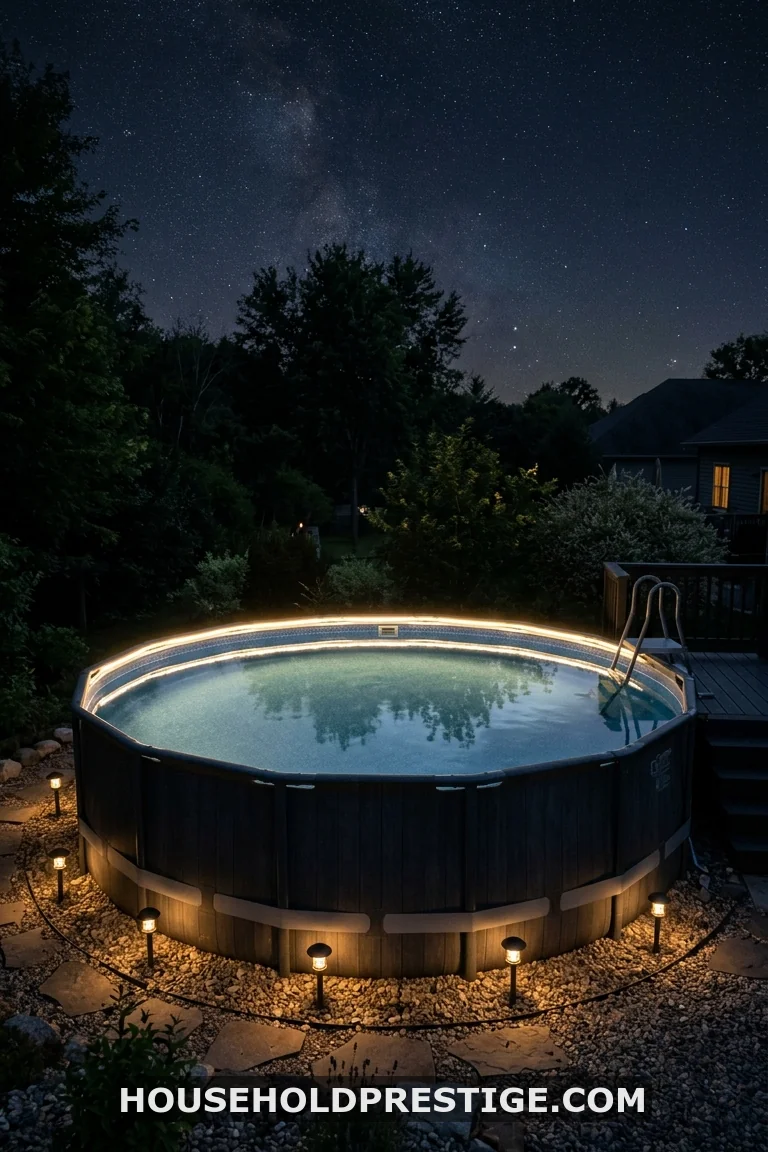
Mount waterproof LED strip lighting (IP67-rated) to the underside of the pool coping or rim rail, facing inward toward the water. At night, the pool glows from the rim line down. The metal wall disappears entirely — you just see lit water.
This upgrade runs $80–$200 in materials and takes two hours to install. Use warm white (2700–3000K) for a resort feel, or RGB if you want color control via app. Pairing rim lights with a few low-voltage base lights at the pool’s ground perimeter separates the pool from the lawn and makes the whole installation look permanent and planned.
18. Pergola + Privacy Lattice Frame
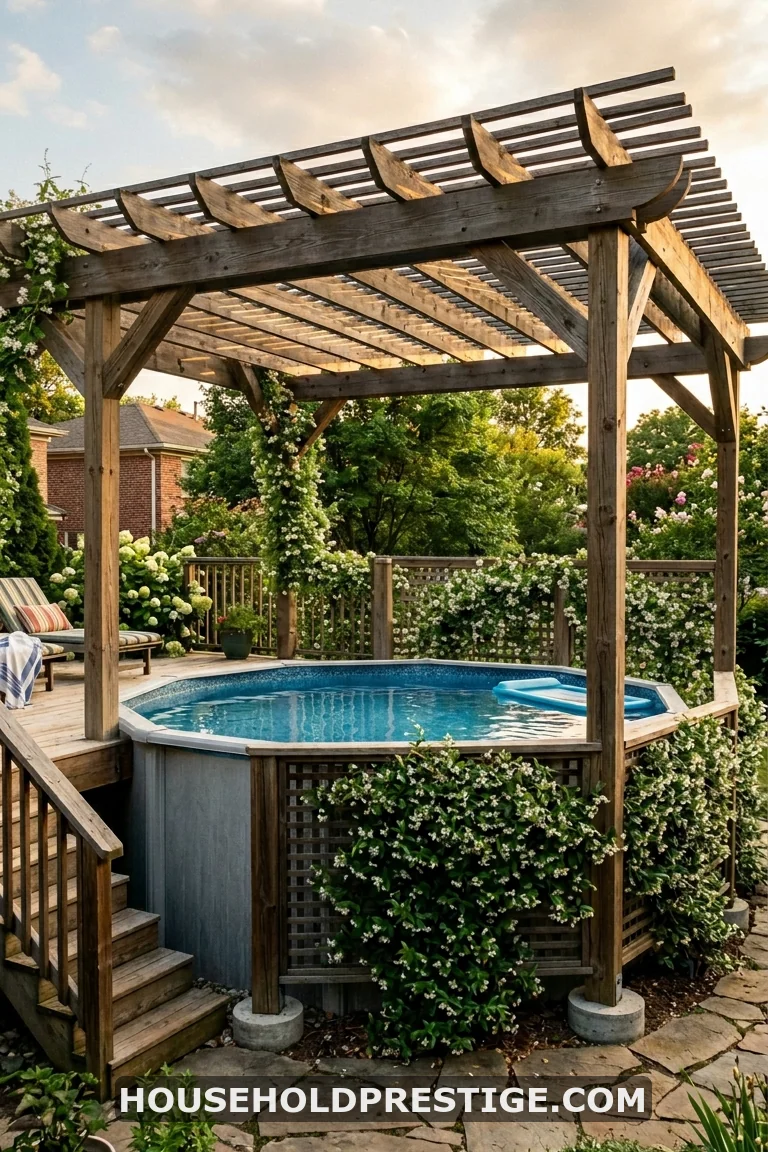
Build a pergola frame around the pool perimeter — posts in concrete footings, set 2 feet outside the pool wall. Attach lattice or horizontal slat panels between the posts at pool wall height. The pergola structure gives you overhead shade capability (add shade cloth, retractable canopy, or climbing vines). The lattice hides the pool wall completely.
What the pergola frame adds beyond wall concealment: it turns the pool area into a defined room in the yard. The post-and-beam overhead structure gives the space a ceiling reference point. The pool stops being a floating object in the yard and becomes an anchored outdoor room.
Pressure-treated pergola with lattice for a 24-ft pool: $1,800–$4,000 in materials for a capable DIYer. Add climbing jasmine or climbing hydrangea for the lattice, and the whole thing looks like it’s been there for years within two growing seasons.
19. The Stock Tank Partial Bury: High Impact on a Real Budget
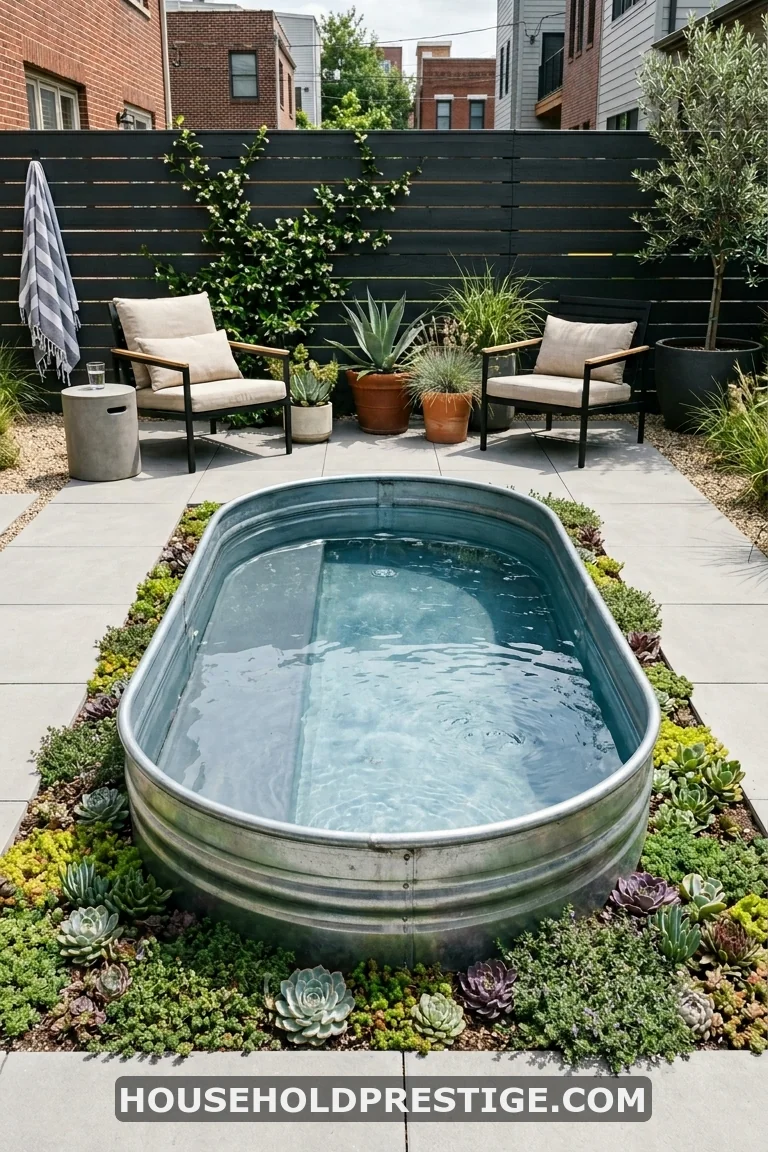
A galvanized stock tank pool — 8-ft round or 8×3 ft oval — buried 10–12 inches into the ground with concrete pavers set flush to the rim is the highest-impact sunken look for the lowest possible budget.
Stock tanks run $500–$1,200. A simple pump-and-filter conversion kit (Pentair or Hayward small pool cartridge filters work well) costs $200–$400. Dig the hole yourself in a weekend: a round tank that’s 24 inches deep needs a hole about 30 inches deep and 6 inches larger in diameter. The galvanized walls handle soil contact better than most above-ground pool walls — they’re designed to be buried on farms.
The finished result looks like a bespoke plunge pool, not a stock tank from a farm supply store. Paver surround flush to the rim, some low creeping thyme planted in the joints, and a $40 portable outdoor shower nearby — the total project can land under $2,500.
Why this works: The galvanized look at the visible 10–12 inch wall section reads as an intentional material choice, not an exposed pool wall. It’s the same reason exposed concrete and raw steel are design statements in architecture — what looks temporary when it’s accidental looks deliberate when it’s controlled.
Wrapping Up
You don’t need $60,000 and a pool crew on your lot to get the in-ground look. You need a strategy for hiding a wall.
Whether that’s burying the pool itself, building a deck that rises to meet it, wrapping it in stone or wood or hedges, or choosing a site that uses your yard’s natural grade — these sunken above-ground pool ideas all achieve the same visual goal through different means and different budgets.
The river rock collar is $80. The full partial-bury with multi-level deck can run $20,000+. Every idea in between moves your pool further from “product sitting in yard” and closer to “feature of this backyard.”
Pick the one that matches your budget, your pool type, and how many weekends you have. The water’s waiting.
Frequently Asked Questions
What is a sunken above-ground pool?
A sunken above-ground pool is an above-ground pool that has been partially or fully buried into the ground, or surrounded by structures like decks, berms, or hardscaping built up to pool rim height — creating the visual appearance of an in-ground pool. The pool itself remains an above-ground unit; only its visible height above grade is reduced.
How much does it cost to partially bury an above-ground pool?
Costs range from $2,400–$6,900 for a standard 24-ft round pool burial including excavation, drainage, and coping. A simpler no-dig approach, like a wraparound raised deck runs $2,500–$12,000+ depending on size and materials. The river rock collar option costs under $100. Your budget and desired finish level determine the approach.
Which above-ground pools can safely be buried in the ground?
Resin-wall and polymer pools (Doughboy, Radiant, Sharkline, and select Wilbar models) are designed for partial burial and often carry explicit warranty coverage for in-ground installation. Most standard steel-wall pools (Intex, Summer Waves, budget brands) are not rated for burial and may collapse under soil pressure. Always check the manufacturer’s documentation before excavating.
Do I need a permit to sink an above-ground pool?
Permit requirements vary by municipality. Most jurisdictions require permits for excavations deeper than 18–24 inches, and many require separate permits for pool safety features like fencing and gates. Contact your local building department before any excavation project. Fence and gate permits for above-ground pools are required in most states regardless of burial depth.
What are the best plants to use around a sunken above-ground pool?
Ornamental grasses (Karl Foerster, Little Bluestem, Blue Oat Grass) are excellent — they provide height, movement, and privacy without dropping significant debris into the water. Evergreen shrubs like boxwood, dwarf arborvitae, and Japanese holly provide year-round structure. Avoid trees with aggressive root systems or heavy leaf drop near any pool installation.