

You open the door. A sweater slides off the pile. Three hangers are tangled into one knot, and you still can’t find the shirt you wanted. Sound familiar? Good small closet organization isn’t about owning a bigger closet. It’s about making the one you have work twice as hard. I’ve lived in apartments where the “closet” was barely wider than my shoulders, and I learned every inch the hard way.
Here’s my promise: by the end of this list, you’ll have a clear plan to double your hanging space, stop the shelf avalanche, and do it all without drilling holes your landlord will scold you for. Most of these cost less than a takeout dinner. A few cost nothing at all. Let’s get your closet back.

1. Add a Second Hanging Rod
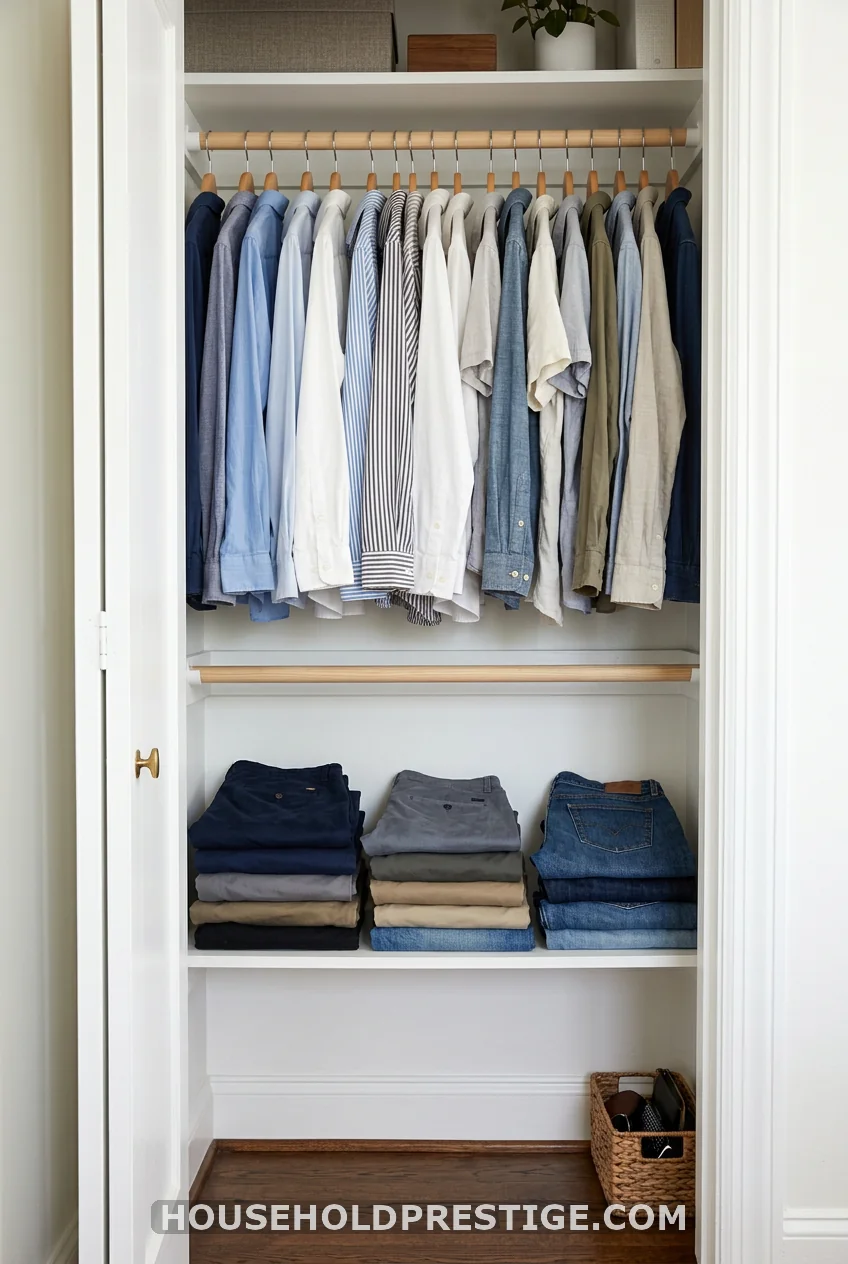
This one trick changed how I see closets. Most reach-in closets waste a huge band of dead air below your hanging shirts. Fill it. A second rod underneath turns one row of clothes into two.
You don’t need a contractor. A spring-tension closet rod runs $12 to $18 and wedges between two side walls with no screws. For deeper closets, a hang-down rod that clips onto your existing bar costs about $15 and drops a second tier below your tops. Shirts, skirts, and folded trousers go up top and down low. The math is simple: same footprint, roughly double the hanging room. If your closet holds full-length dresses on one side, split the space. Long stuff on the left, double rods on the right. You’ll be shocked how much fits.
2. Swap to Slim Velvet Hangers
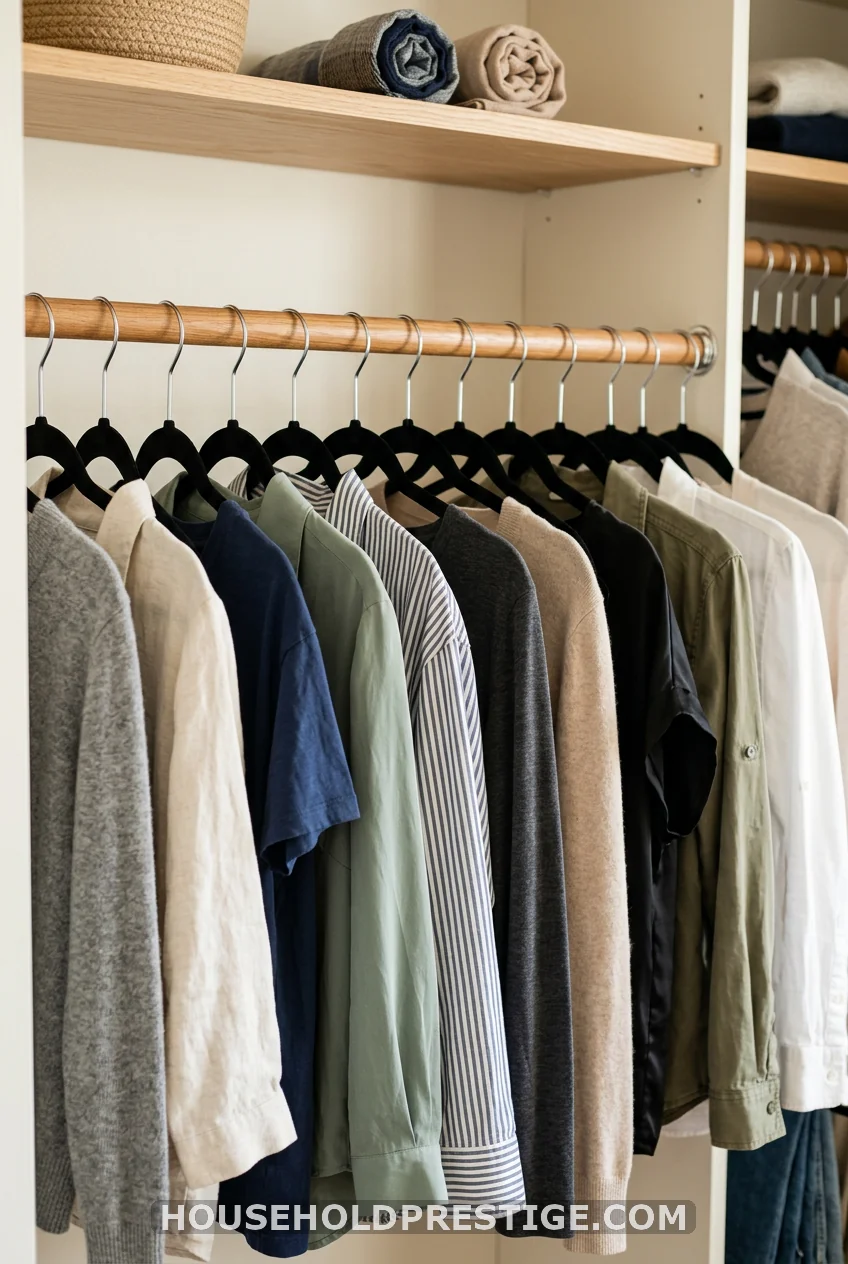
Bulky plastic hangers eat space. A 50-pack of slim velvet ones runs about $20 and shaves an inch off every garment. Clothes stop slipping. The rod holds more. Your closet looks calmer in five minutes flat.
3. Hang an Over-the-Door Organizer

The back of your closet door is prime real estate sitting empty. A pocketed over-the-door organizer ($15 to $25) holds shoes, scarves, belts, or rolled tees. Clear vinyl pockets let you see everything at a glance. Hook it over the top edge, no tools required. Renters, this one comes off without a trace when you move out.
4. Use Tiered Shelf Risers
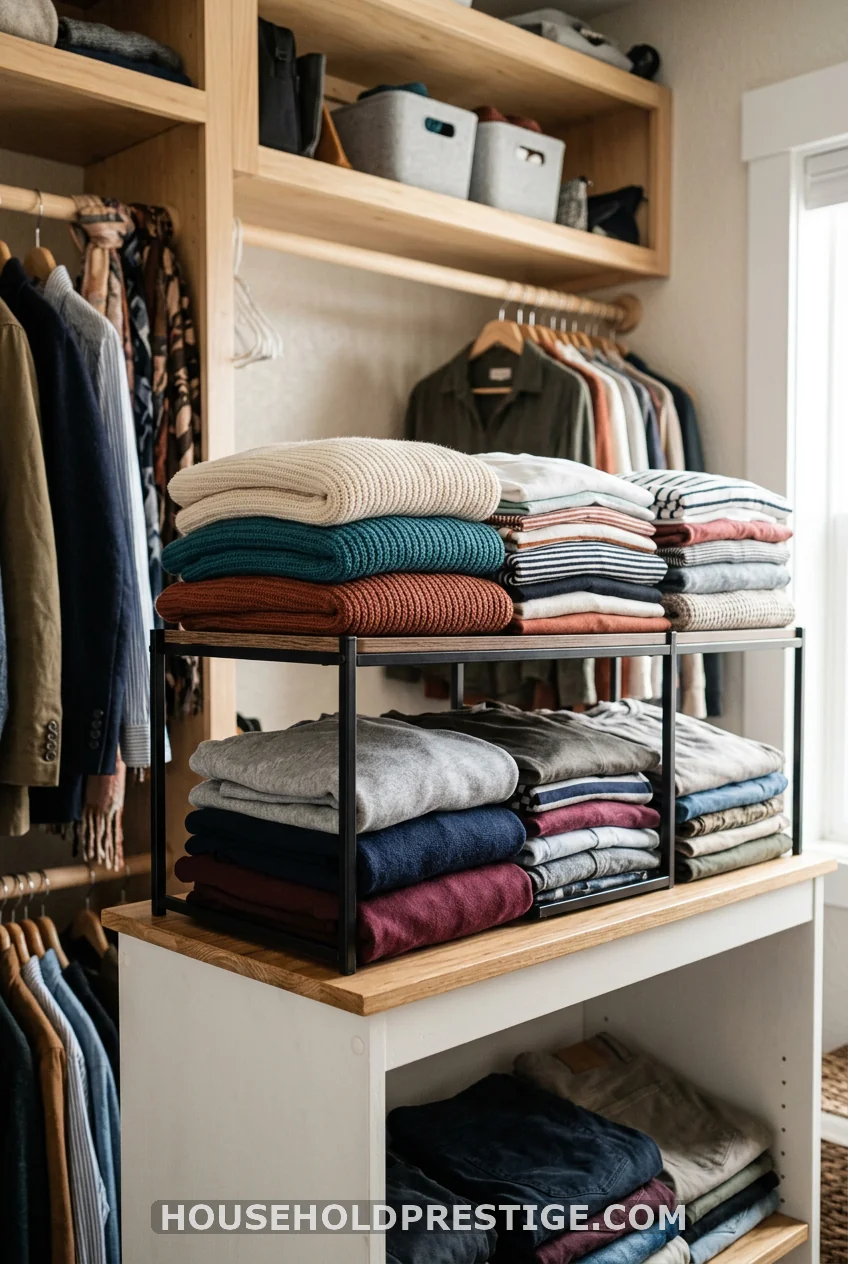
A single tall shelf above your rod usually holds one wobbly stack of sweaters. A shelf riser splits that vertical gap into two usable layers. Wire or bamboo risers cost $10 to $20 each and need no installation. Set folded jeans on the bottom, handbags on top. Suddenly the shelf that held four items holds eight. Pick a riser sized to your shelf depth so it sits flush against the back wall and doesn’t tip forward.
5. Build a No-Drill Cube and Shelf System
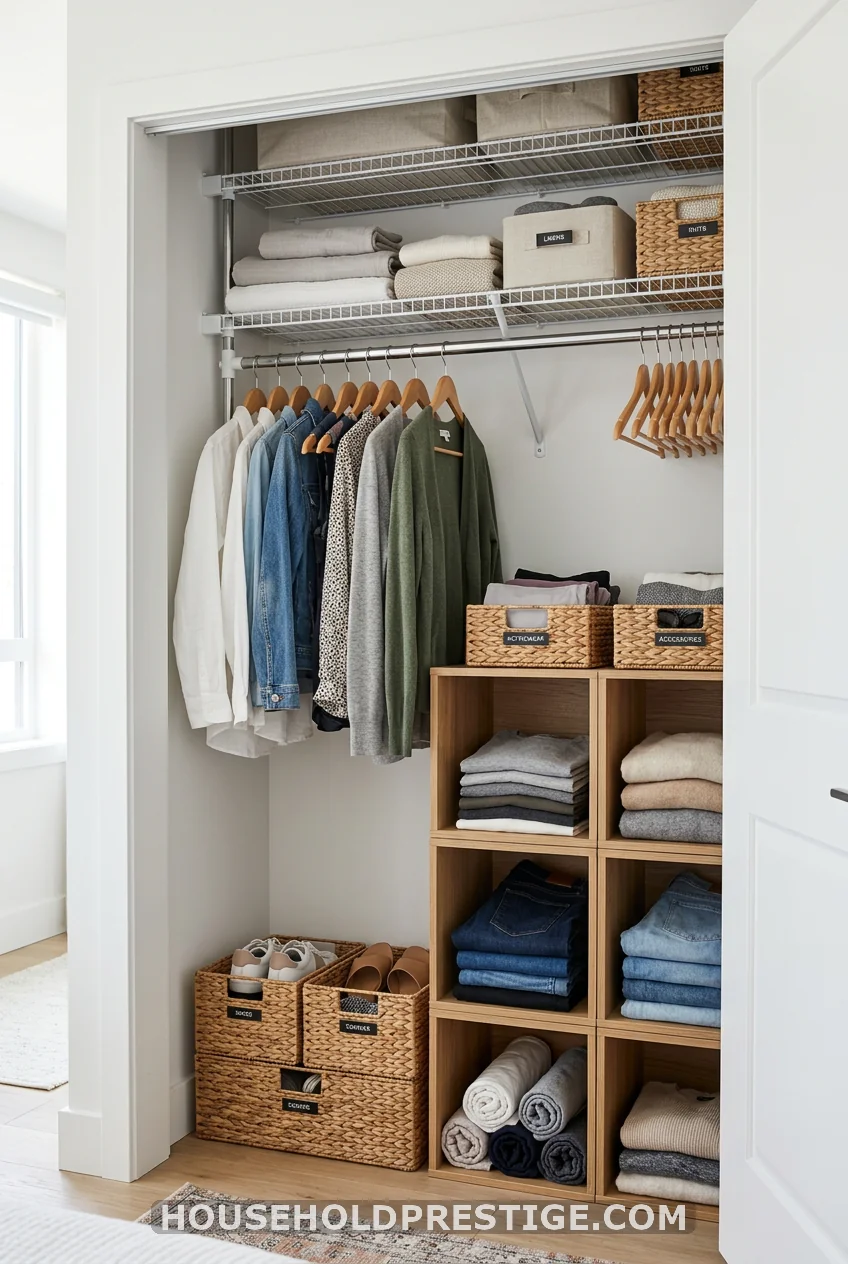
This is the project that turns a sad rectangle into a real wardrobe, and you can do the whole thing in an afternoon without putting a single screw into the wall. I built a version of this in a rental I wasn’t allowed to alter, and I took my deposit back in full.
Why This Works
A small closet fails because it’s one big open box. Clothes pile up, shoes scatter, and the floor becomes a graveyard. A modular cube tower plus a tension-mounted shelf carves that empty box into defined zones: folded clothes, shoes, bins, and hanging space each get a home. Zones stop the mess before it starts.
What You’ll Need and What It Costs
| Item | Where | Approx. Cost |
|---|---|---|
| 6-cube storage organizer (cube shelf) | IKEA KALLAX or Amazon Basics | $35 to $45 |
| Fabric drop-in bins (set of 6) | Dollar store or Target | $18 |
| Spring-tension rod (for a second hang zone) | Hardware store | $15 |
| Adhesive cable clips (to manage any cords) | Hardware store | $5 |
| Felt furniture pads (protect the floor) | Hardware store | $4 |
| Total | about $77 to $87 |
Want to stay strictly under $50? Skip the cube unit and use stackable plastic crates ($4 each) instead. Five crates run $20, and the rest of the system stays the same.
Step-by-Step
- Empty the closet completely. You can’t plan around clutter, so pull everything out first.
- Measure the floor width and the height under your lowest shelf. Write the numbers down.
- Slide the cube organizer against one side wall, standing vertically to use the height, not the floor.
- Stick felt pads under each corner so it glides and doesn’t scratch the floor.
- Drop fabric bins into the lower cubes for socks, gym clothes, and odds and ends.
- Mount the tension rod across the open side at a height that clears the cube tower.
- Hang your most-used clothes on the new rod, sorted by type.
- Stack shoes on the open top cubes or in a bin on the closet floor beside the tower.
Pro Move
Label the front of each fabric bin with a clip-on tag. When everything has a name, everything goes back in its place. This is the difference between a system that lasts and one that collapses in a week.
Common Mistakes to Avoid
Don’t overload the top of a tension rod with heavy coats. Spring rods slip under weight, and you’ll wake up to a pile on the floor. Keep heavy items on the cube shelves instead. Don’t push the cube unit flush into a corner you can’t reach. Leave a hand’s width of access. And don’t buy bins before you measure your cubes. Standard cube openings run about 13 inches square, so a 15-inch bin simply won’t fit.
6. Add Shelf Dividers
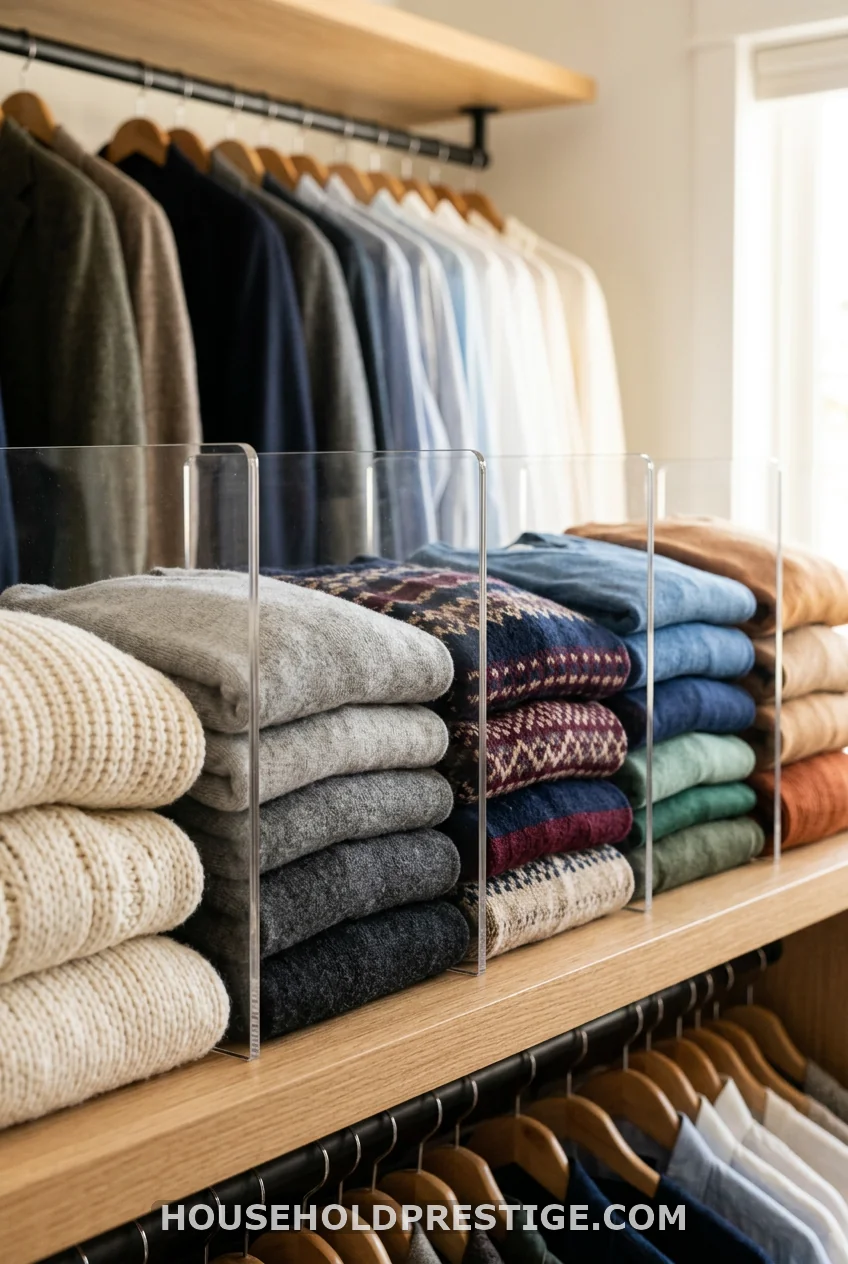
Stacks topple. Dividers stop them. Slide-on acrylic dividers cost about $12 for a set and clip onto any shelf edge. Each stack stays in its lane, and grabbing one item no longer buries the rest.
7. Switch to Stackable Clear Bins
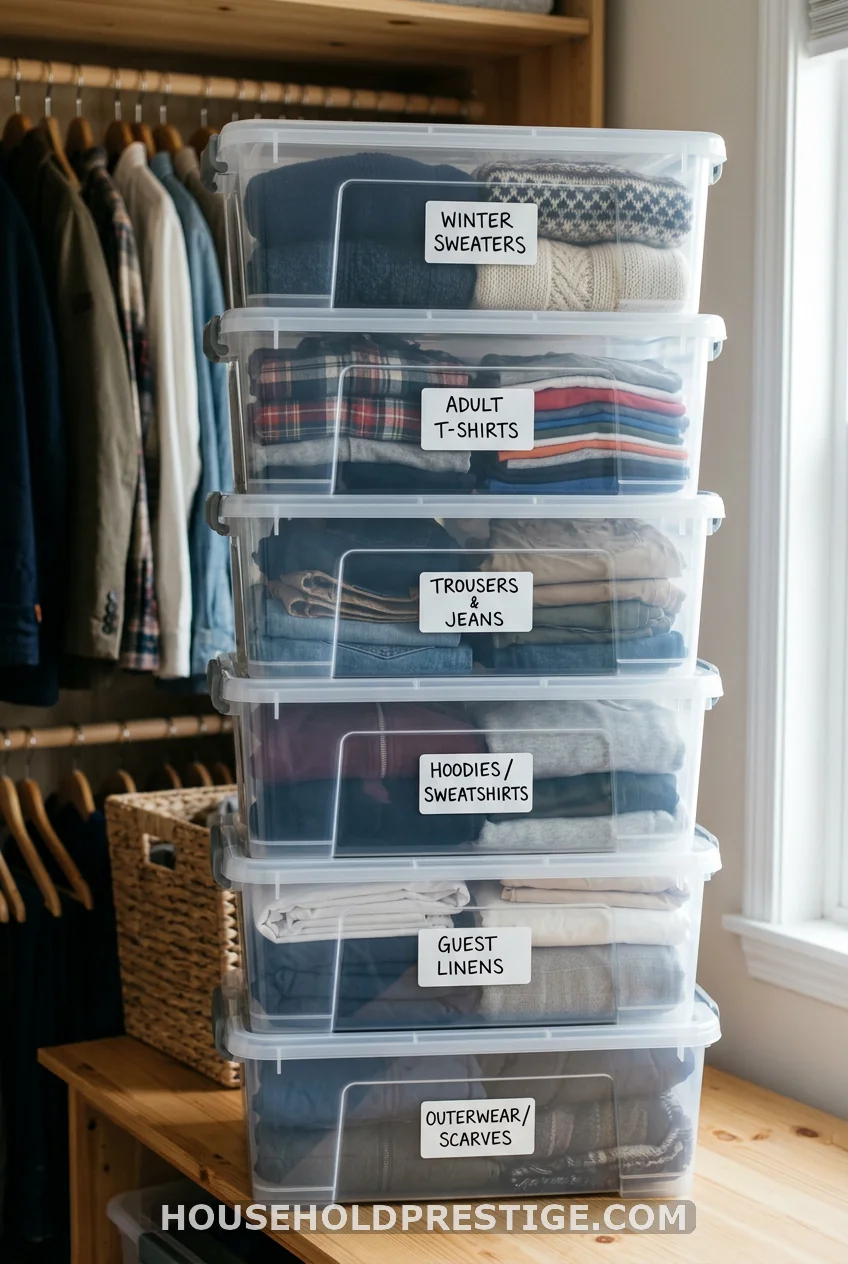
Cardboard boxes hide what’s inside and crush over time. Clear stackable bins fix both problems. You see your seasonal sweaters without opening anything, and the lids let you stack three high without a wobble.
Look for bins with a front flap or drawer-style pull, around $10 to $15 each. The flap means you grab the bottom bin without unstacking the whole tower. I keep off-season clothes in the top bins and current-season basics in the reachable ones. Rotate them twice a year. Add a strip of painter’s tape on the front and write the contents in marker. Cheap, removable, and you’ll never dig blind again.
8. Skip the Cheap Wire Rack (A Cautionary Tale)
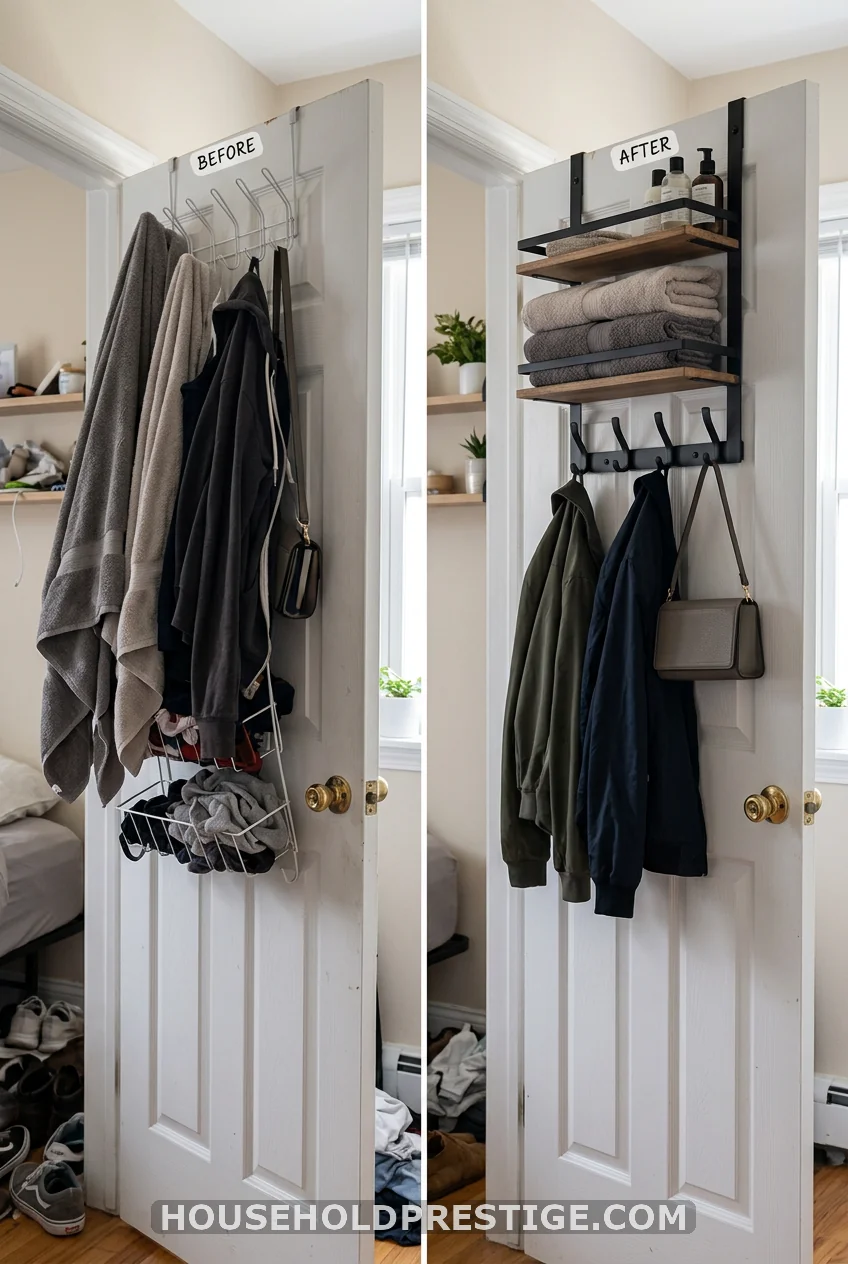
Let me save you a weekend of regret. In my first apartment, I bought the cheapest over-the-door wire shoe rack I could find. Eight dollars. I felt smart. I loaded it with boots and heels and went to bed proud of my tidy closet.
By morning, the whole thing had peeled the paint off the top of my door and sagged into a sad metal hammock. The hooks had bent. Two pairs of shoes were on the floor. The door wouldn’t close.
Here’s what I learned. Cheap wire racks fail in two ways: the hooks are too thin for the door, and the rack itself can’t hold real weight. The fix wasn’t spending more. The fix was matching the tool to the job. Over-the-door hooks need a flat, wide profile that spreads the load across the door’s top edge. And shoe storage belongs low and grounded, not dangling.
I replaced it with a $20 over-the-door organizer with reinforced hooks and a fabric body that hugged the door. Three years later, it still holds. The lesson isn’t “buy expensive.” It’s “buy the right thing once.” A bargain that breaks costs you twice.
9. Hang a Tension Rod for Bags
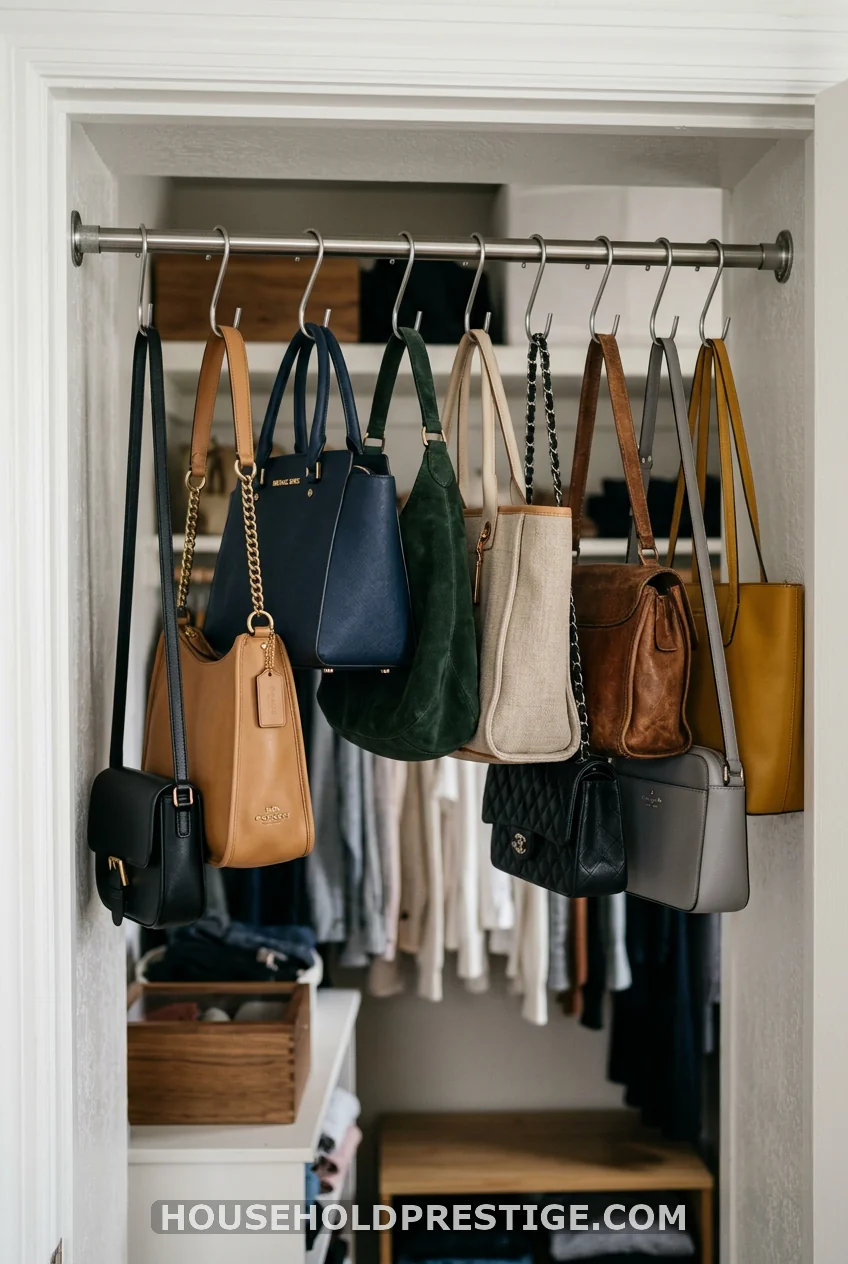
Bags slump and lose their shape on a shelf. Mount a low-tension rod and hang them with S-hooks. They keep their form, stay visible, and free up your shelves for folded clothes.
10. Mount a Vertical Shoe Organizer
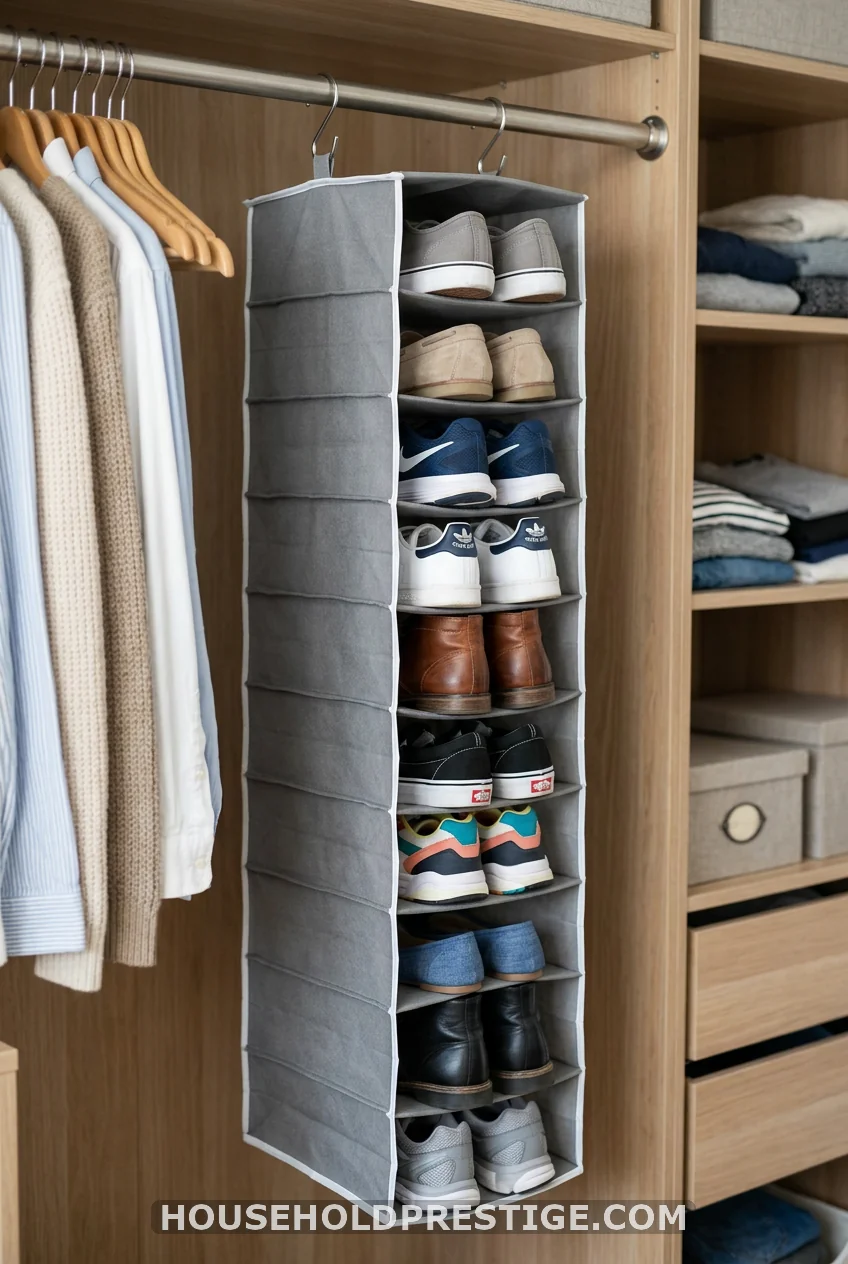
Shoes on the floor are the fastest way to lose a closet. A hanging shoe organizer reclaims that floor and uses the air instead. Fabric versions ($15) hang from the rod and hold 10 to 12 pairs in clear or breathable pockets.
If you’d rather keep the floor free entirely, a slim over-the-door version works for flats and sneakers. For boots, store them upright in a tall bin with a pool noodle cut to size inside each shaft. The noodle keeps them standing and crease-free. Small trick, big difference.
11. Put the Door to Work for Accessories
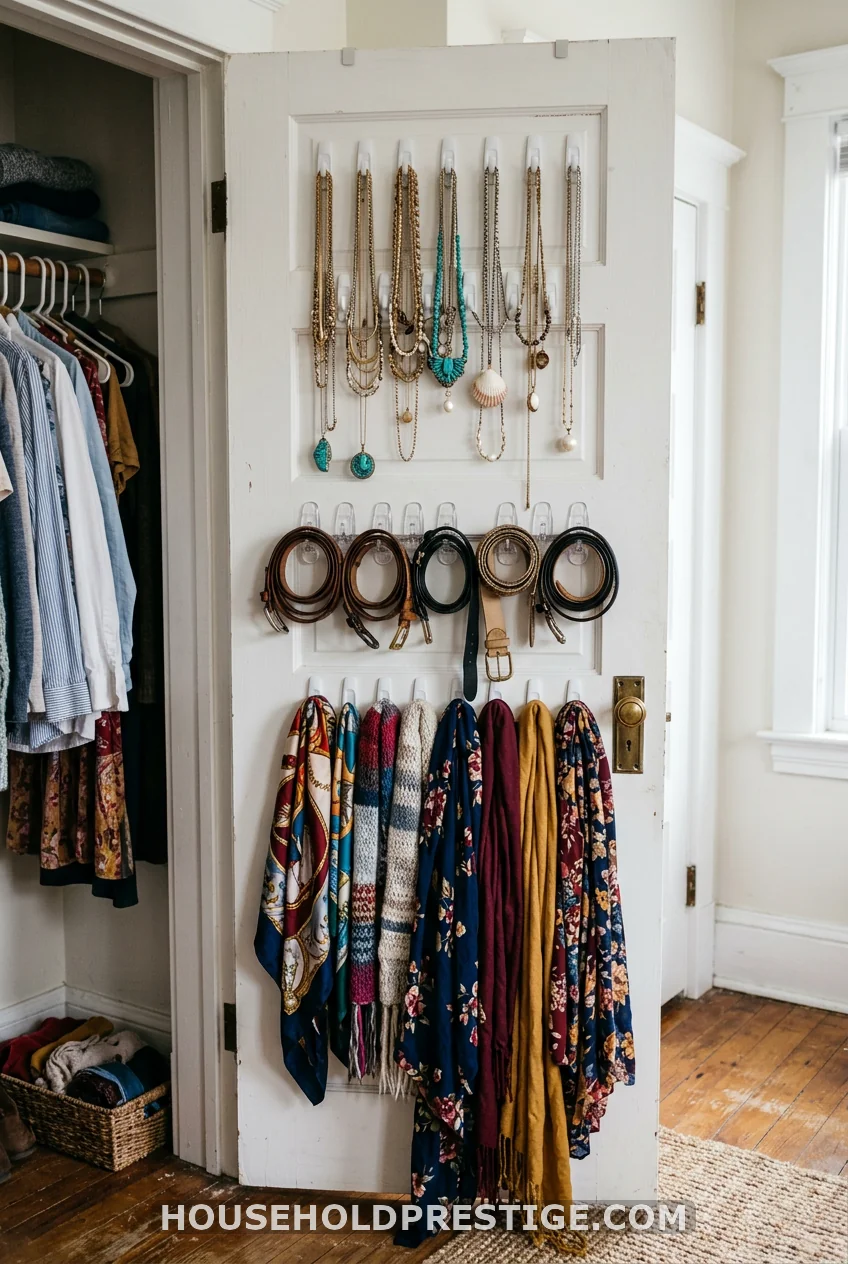
Stick-on hooks turn a bare door into an accessory wall. Necklaces stop tangling. Belts hang in a row. Scarves loop over a single hook instead of crowding a drawer. Use removable adhesive hooks ($6 for a pack) so nothing damages the paint when you leave.
12. Light It Up With Motion LEDs

A dark closet hides half of what you own, so you forget it and buy duplicates. Light fixes that. Battery or USB-rechargeable LED strips with a motion sensor run $15 to $25 and stick on with adhesive backing. No wiring, no electrician.
Pick a warm-white strip around 2700K to 3000K for a cozy glow, or a cool 4000K if you want true color when picking outfits. Run the strip along the underside of your top shelf so the light washes down over your clothes. The motion sensor flips it on the second you open the door. I added one to a windowless hall closet and finally stopped losing things in the back corner.
13. The “More Bins Equals More Organized” Myth
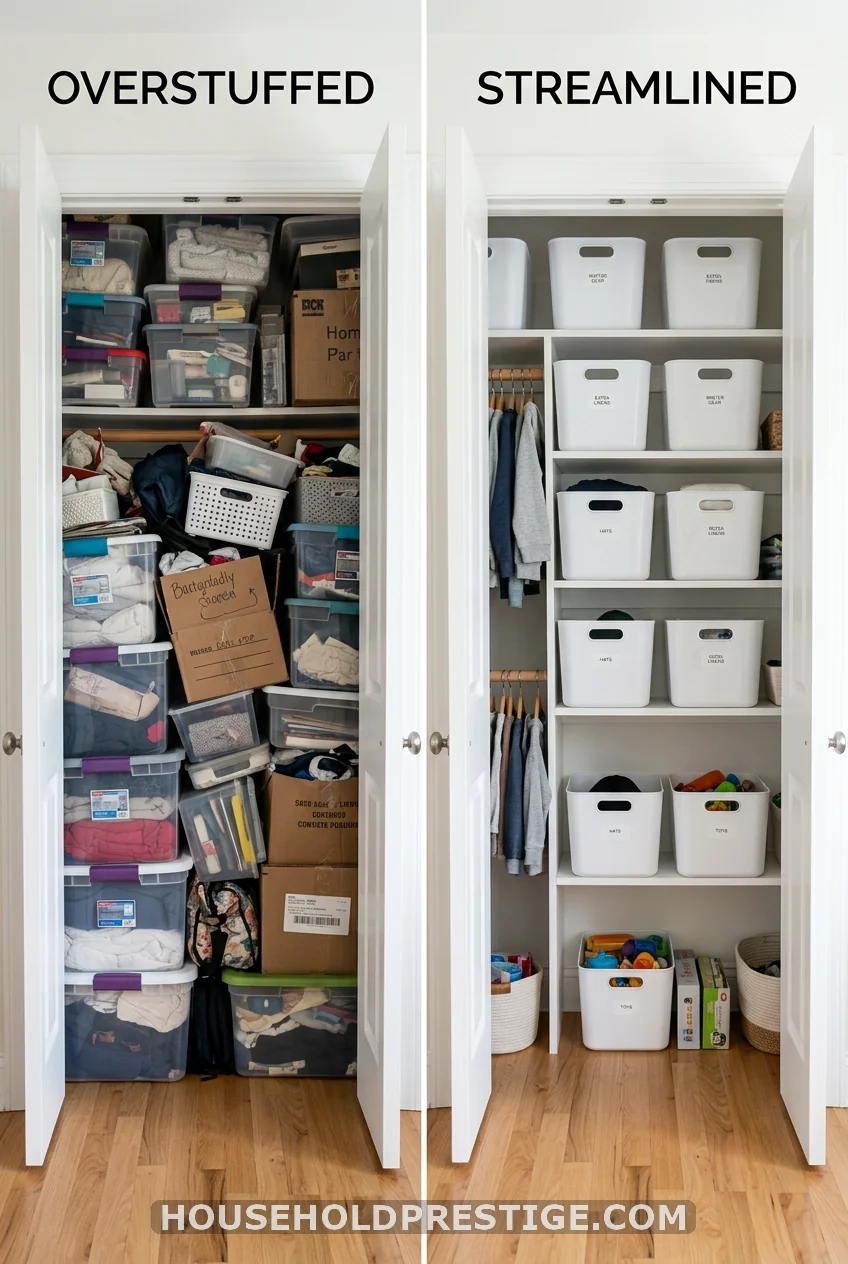
What most people think: if a few bins help, then twenty bins must be the answer to a messy closet.
The reality: bins don’t organize anything. They just relocate the chaos into smaller boxes. I’ve seen closets where every shelf held a bin, and the owner still couldn’t find a thing because nothing was labeled, and half the bins held mystery items.
Storage containers only work when they serve a decluttering decision you’ve already made. First, you decide what stays. Then you sort by category. Only then do you buy bins sized to those categories. Buy the bins first, and you’ll shop for containers to hold the clutter you should have tossed. Fewer, labeled, purpose-built bins beat a wall of pretty empty ones every time. Organization is a decision, not a product.
14. Add Under-Shelf Baskets
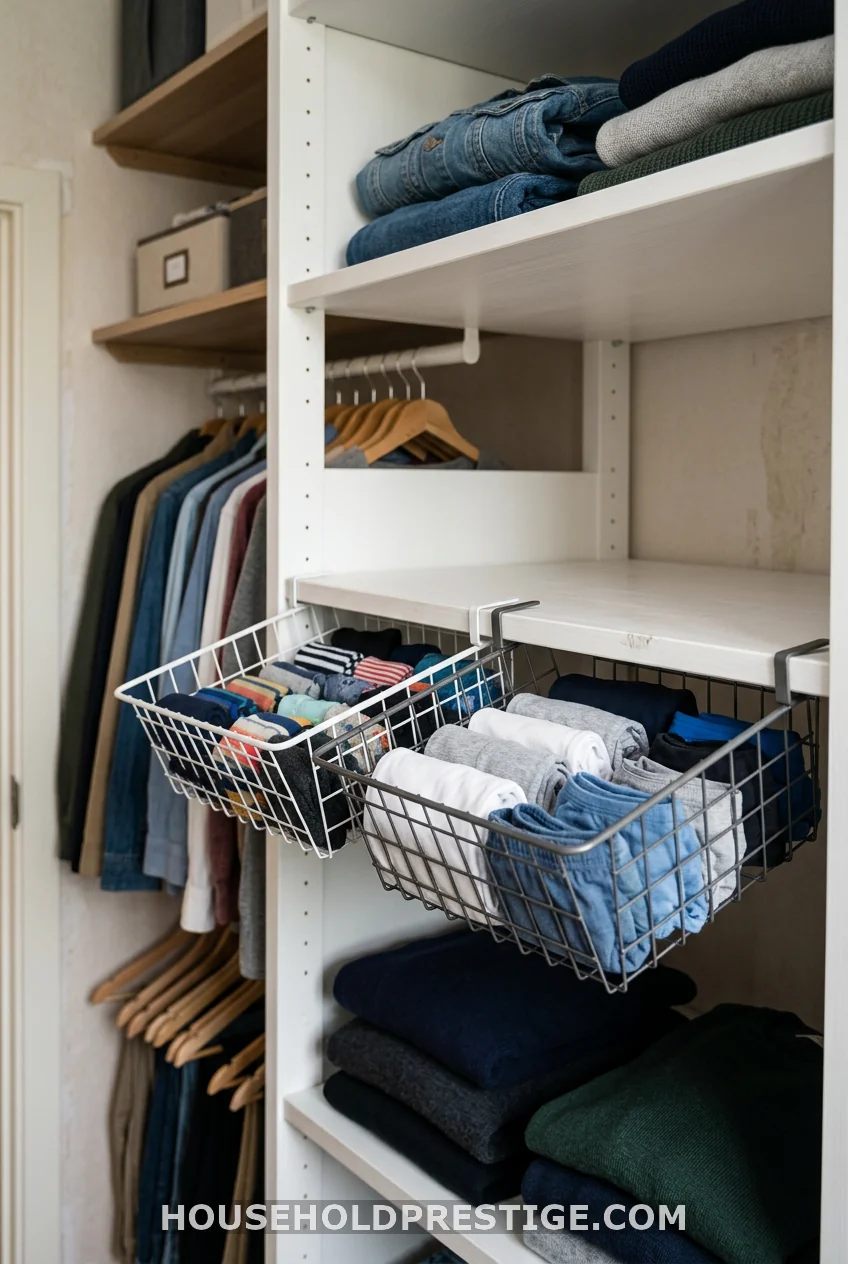
The space directly under a shelf usually goes unused. Slide-on wire baskets hook over the shelf and hang below it, creating a hidden second layer. They cost about $8 to $12 each and hold scarves, clutches, or folded tees. No tools, no holes. Just slide and load. Two or three of these find storage you didn’t know your closet had.
15. Roll Instead of Fold
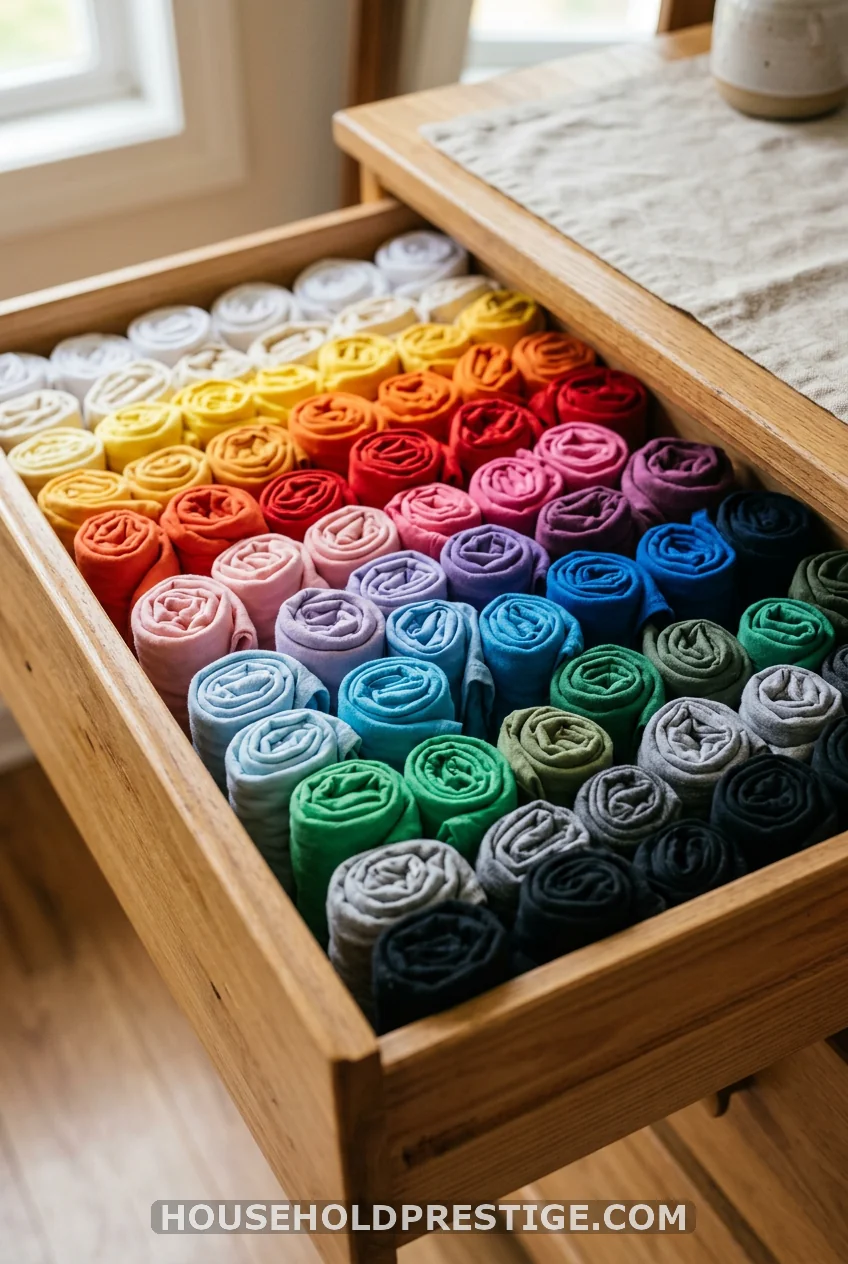
Folded clothes stack flat and bury each other. Rolled clothes stand upright, so you see every item like files in a drawer. Roll your tees, leggings, and pajamas. You’ll fit more, and grabbing one won’t wreck the rest.
16. Send Off-Season Clothes Upstairs
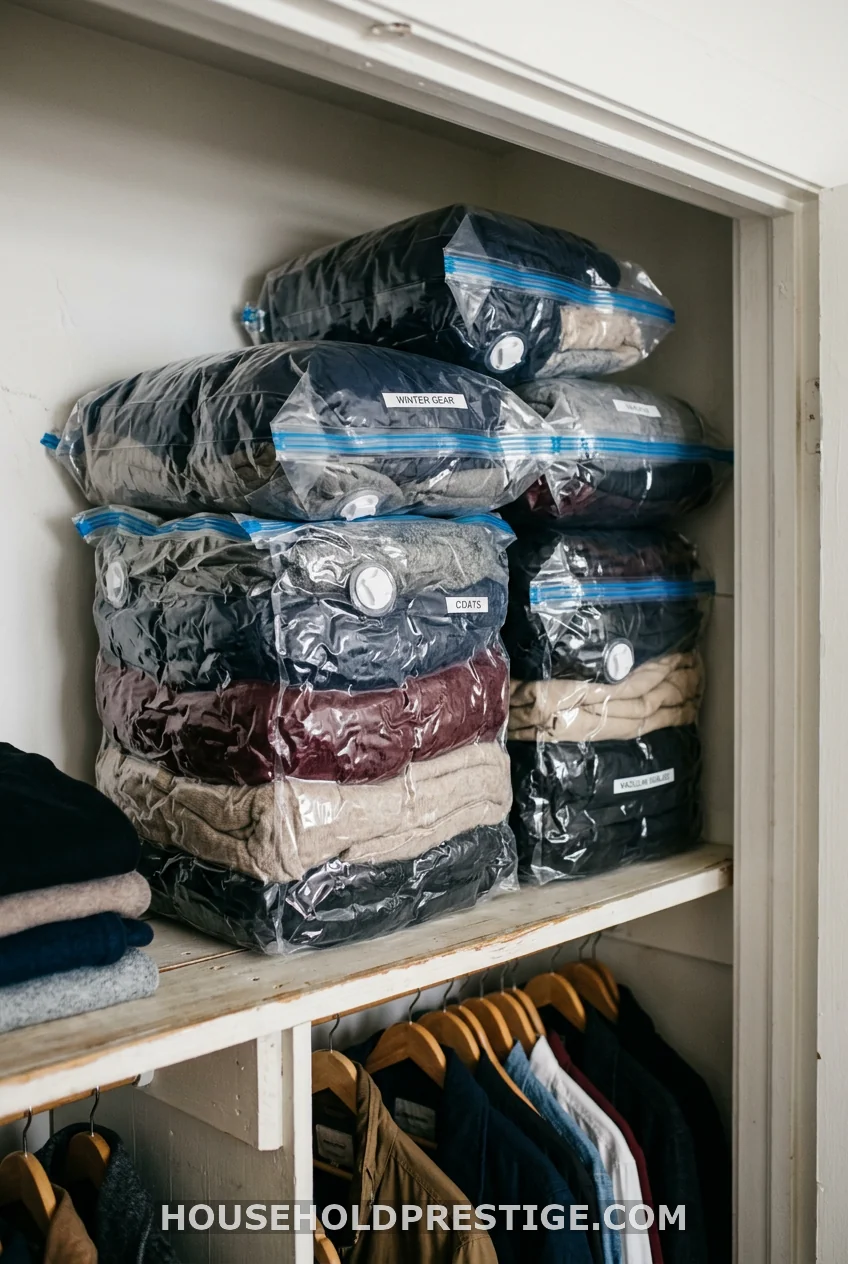
Your daily closet shouldn’t store January coats in July. Vacuum compression bags shrink bulky sweaters and puffer jackets to a fraction of their size. A set of five runs costs about $20.
Pack off-season items, suck the air out with your vacuum hose, and slide the flattened bags onto your highest shelf. That top shelf you can barely reach? Perfect for stuff you only touch twice a year. When the weather turns, you swap. Your reachable space stays free for the clothes you wear now, which is the whole point of a working closet.
17. Hang a Mirror on the Door
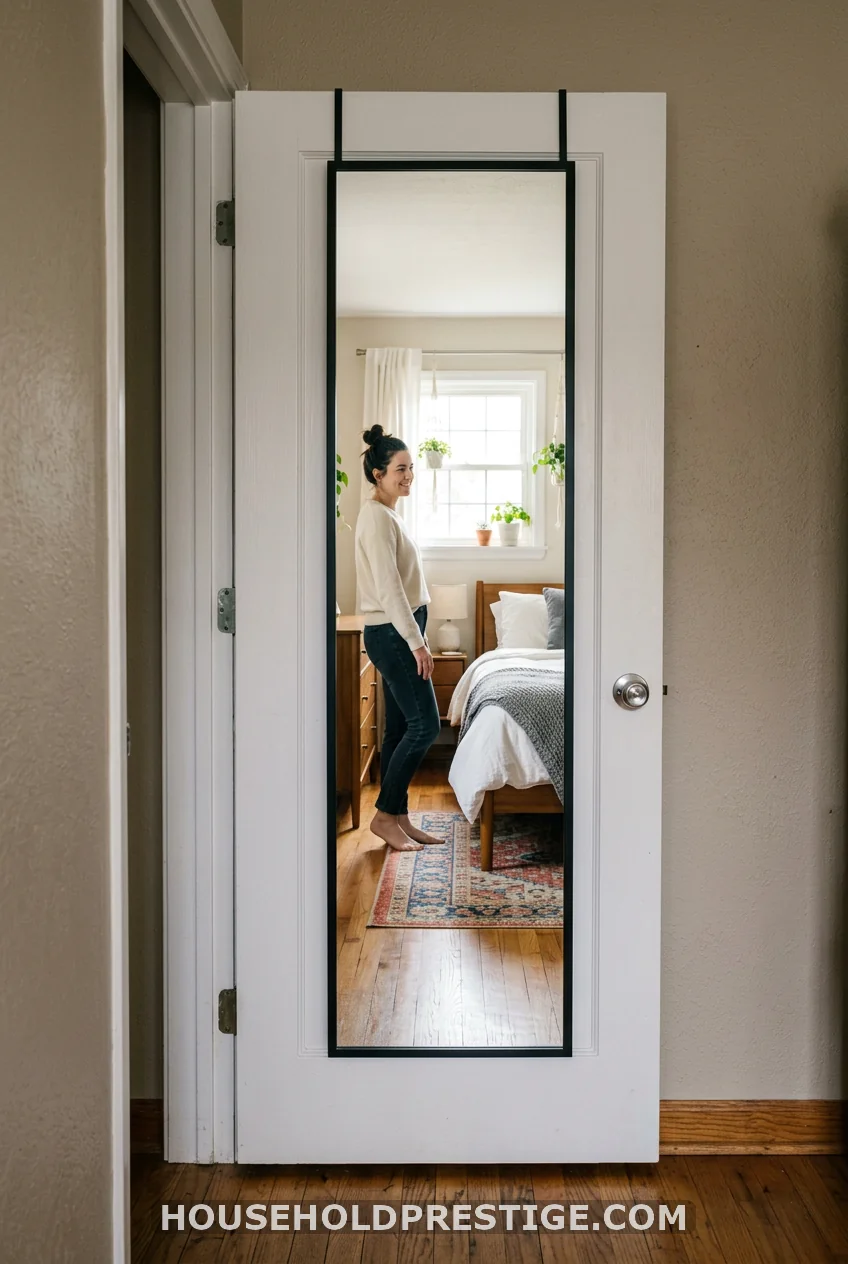
A mirror does double duty. It bounces light into a dim closet and gives you a dressing spot without a single inch of floor. Slim over-the-door mirrors hang in seconds and cost around $25. The space feels bigger, brighter, and a lot more like a closet you want to open.
Your Small Closet, Finally Working for You
A cramped closet doesn’t need a renovation. It needs a plan. Double your rods, light the dark corners, give every category a home, and decide what stays before you buy a single bin. Each idea here costs little and takes only a weekend, which makes them perfect whether you own your place or you’re counting down to a lease that ends.
Start with one. Add the second rod this weekend and watch how much breathing room shows up. You’ve got this, and your future self, the one who finds her favorite shirt in three seconds flat, will thank you.
Frequently Asked Questions
How do I organize a small closet on a tight budget?
Start with the cheapest high-impact swaps: slim hangers, a tension rod for a second hanging tier, and a few labeled clear bins. These three alone usually run under $50 and roughly double your usable space. Declutter first so you’re not buying storage for things you don’t keep.
What is the best way to maximize hanging space in a small closet?
Add a second rod below your existing one to create two tiers, and use slim velvet hangers to fit more per inch. Keep long items like dresses on one side and double-hang shirts, skirts, and folded pants on the other.
How can renters organize a closet without drilling holes?
Lean on no-damage tools: spring-tension rods, over-the-door organizers, adhesive hooks, freestanding cube units, and under-shelf baskets. All of these install without screws and remove cleanly when you move, protecting your deposit.
Should I declutter before buying organizers?
Yes, always. Bins and racks only manage what you already own, so buying them first means you’ll store clutter you should have donated. Sort and purge, group by category, then buy storage sized to what’s left. For more Decluttering Ideas, check out our guide.
How do I keep a small closet organized long-term?
Label everything so items have a clear home, and run a seasonal swap twice a year to move off-season clothes to high shelves. A closet stays tidy when putting things back is as easy as taking them out. For more Closet Organization Ideas, explore our site.