

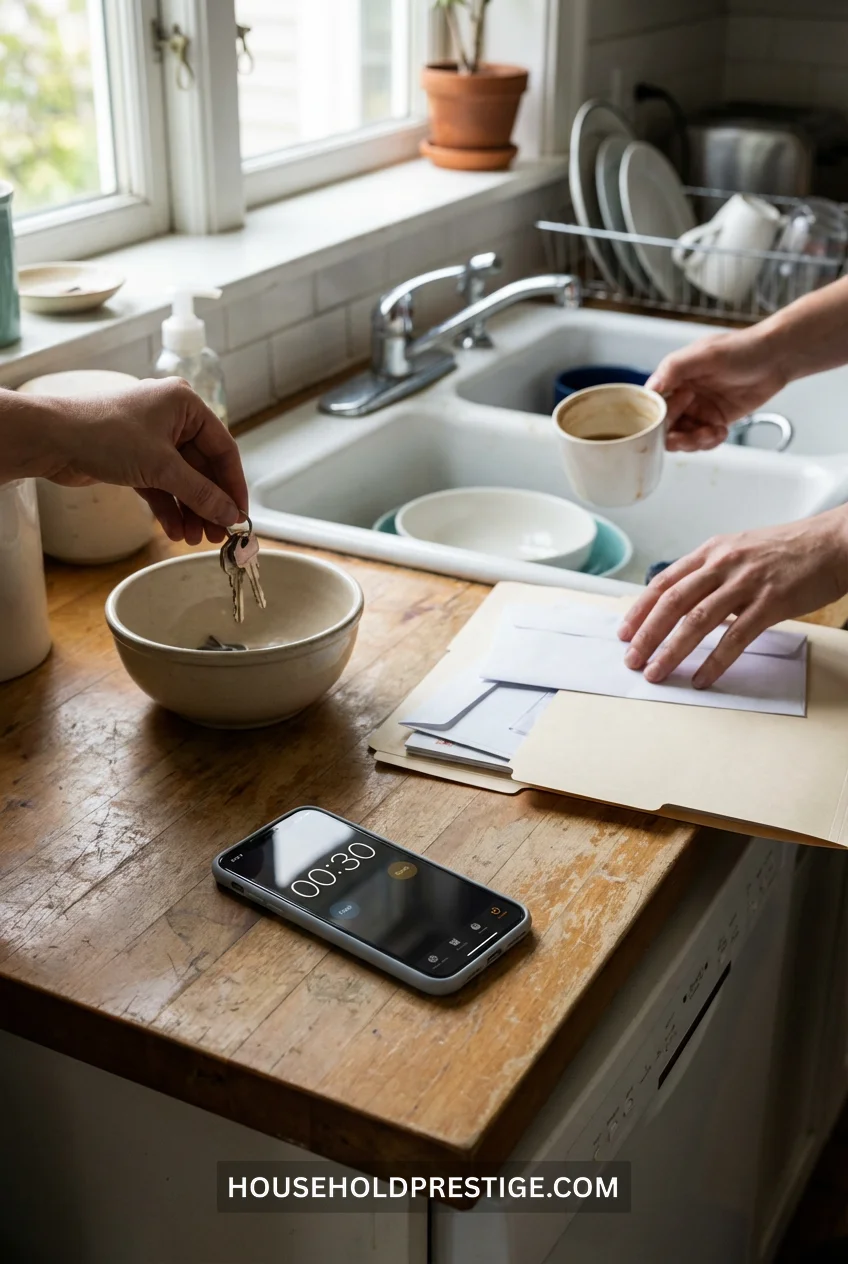
Your junk drawer just ate your phone charger. Again.
The coat closet is one mitten away from an avalanche. And that “organized” pantry you tackled last month? Yeah, it lasted exactly 11 days before every can and box staged a rebellion.
I get it. You’re not looking for Pinterest-perfect pantry porn with $800 worth of matching containers. You need systems that stick when you’re juggling work emails, grocery runs, and that mysterious sticky spot on the kitchen floor you keep meaning to clean.
That’s why I spent three months testing organization methods that actually hold up when life gets chaotic. The results? These 21 home organization hacks cut my daily “where the hell is it” searches from 30 minutes to under 5. No label maker required.
Let’s fix the mess.
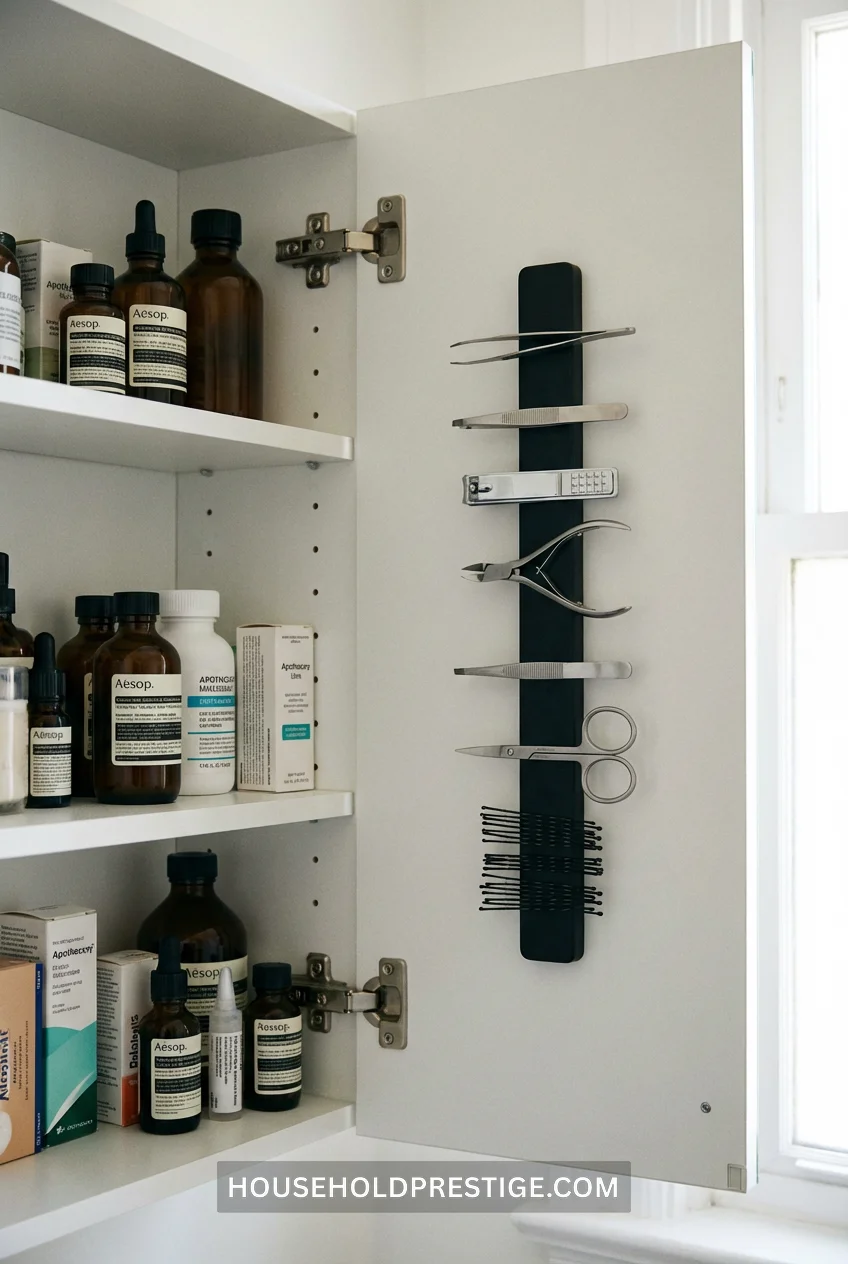
1. Magnetic Knife Strip for Bathroom Tools
Stick a magnetic knife strip inside your medicine cabinet door. Tweezers, nail clippers, bobby pins—they all click into place. Under $12 on Amazon, 90 seconds with command strips.
2. The “One In, Two Out” Declutter Rule
New umbrella enters your entryway? Two items leave. Your space has maximum capacity—respect it or drown in stuff.

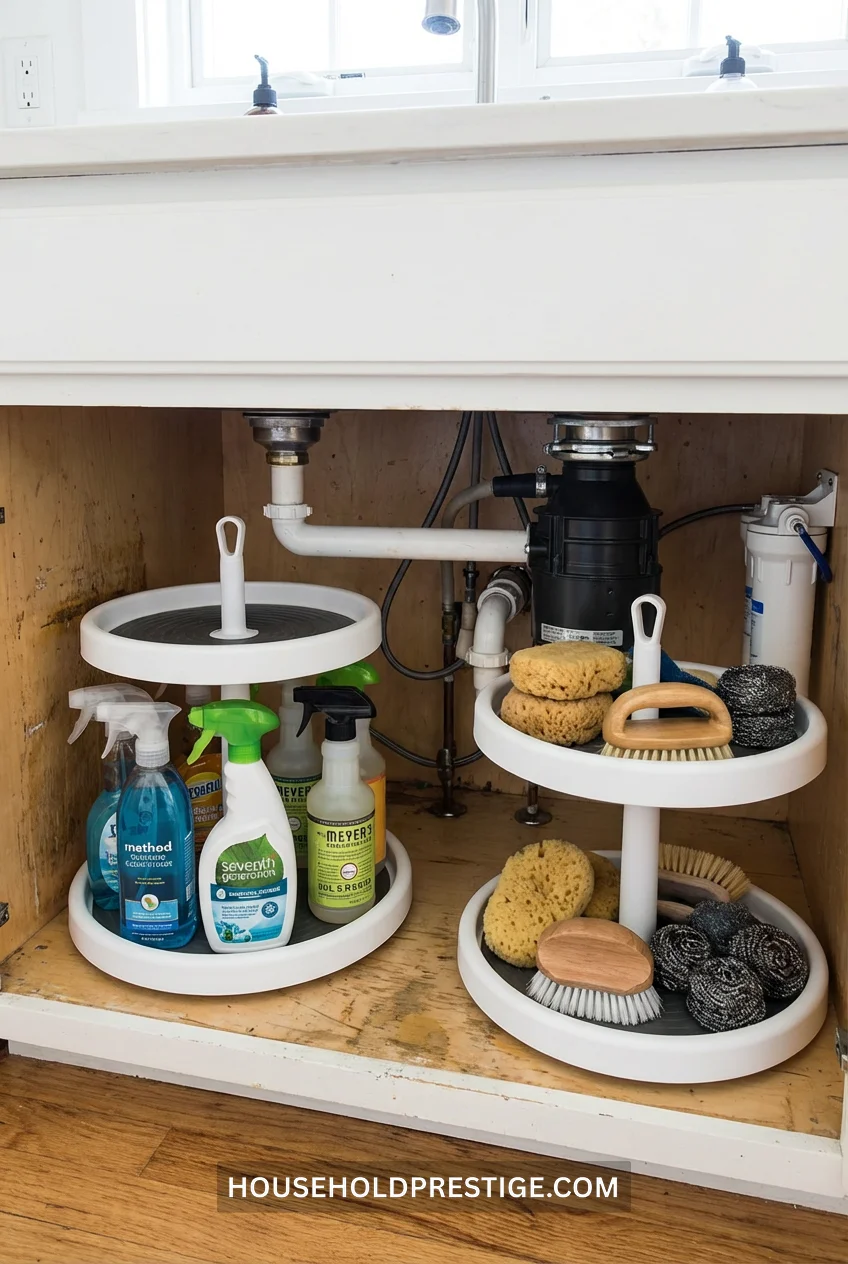
3. Lazy Susan Turntables Transform Deep Cabinet Chaos Into Functional Storage
Stop losing olive oil bottles in the black hole under your sink. Lazy Susans turn “archaeological dig required” cabinets into spin-to-find systems.
Why This Works
Deep cabinets have dead zones. Items pushed to the back become invisible. A rotating platform brings everything to the front with one motion—no more shoving half your cleaning supplies aside to grab dish soap.
What You Need
- Two 12-inch lazy Susans: $25-35 (Copco or SimpleHouseware brands hold up better than cheap versions)
- One 16-inch lazy Susan for larger cabinets: $18-22
- Non-slip shelf liner: Cut circles to prevent spinning chaos
Dimensions That Actually Work
Standard cabinet depths: 18-24 inches. Use 12-inch turntables for anything under 20 inches deep. Go 16-inch for 22+ inch depth. Leave 2-inch clearance on all sides, or you’ll scrape cabinet walls every rotation.
Cabinet under bathroom sink: 12-inch turntable handles toiletries, hair products, backup soap.
Kitchen corner cabinet: Stack two 16-inch turntables. Bottom holds mixing bowls, top holds Tupperware lids.
Under the kitchen sink: Two 12-inch turntables side-by-side. One for cleaners (spray bottles standing up), one for sponges/scrubbers/gloves laid flat.
Step-by-Step Installation
- Empty the cabinet completely. Yes, all of it. You’ll find expired products you forgot about.
- Measure cabinet depth and width. Write it down. Don’t eyeball it.
- Cut non-slip liner to match turntable diameter. This prevents the Susan from spinning when you don’t want it to.
- Place liner, then turntable. Test rotation before loading items.
- Load tallest items toward center, shorter items at edges. Physics—centrifugal force is real.
- Keep frequently-used items at “home position” (front-facing when you open door).
Cost Reality
Under-sink setup: $50 total (two Susans + liner) Per-use cost after 1 year: $0.14 per day Time saved per week: 15+ minutes (no more cabinet excavations)
The Catch
Lazy Susans don’t work for everything. Square containers waste space. Tall, narrow bottles (like olive oil) tip when spinning. Use them for short, wide items or group tall items together for stability.
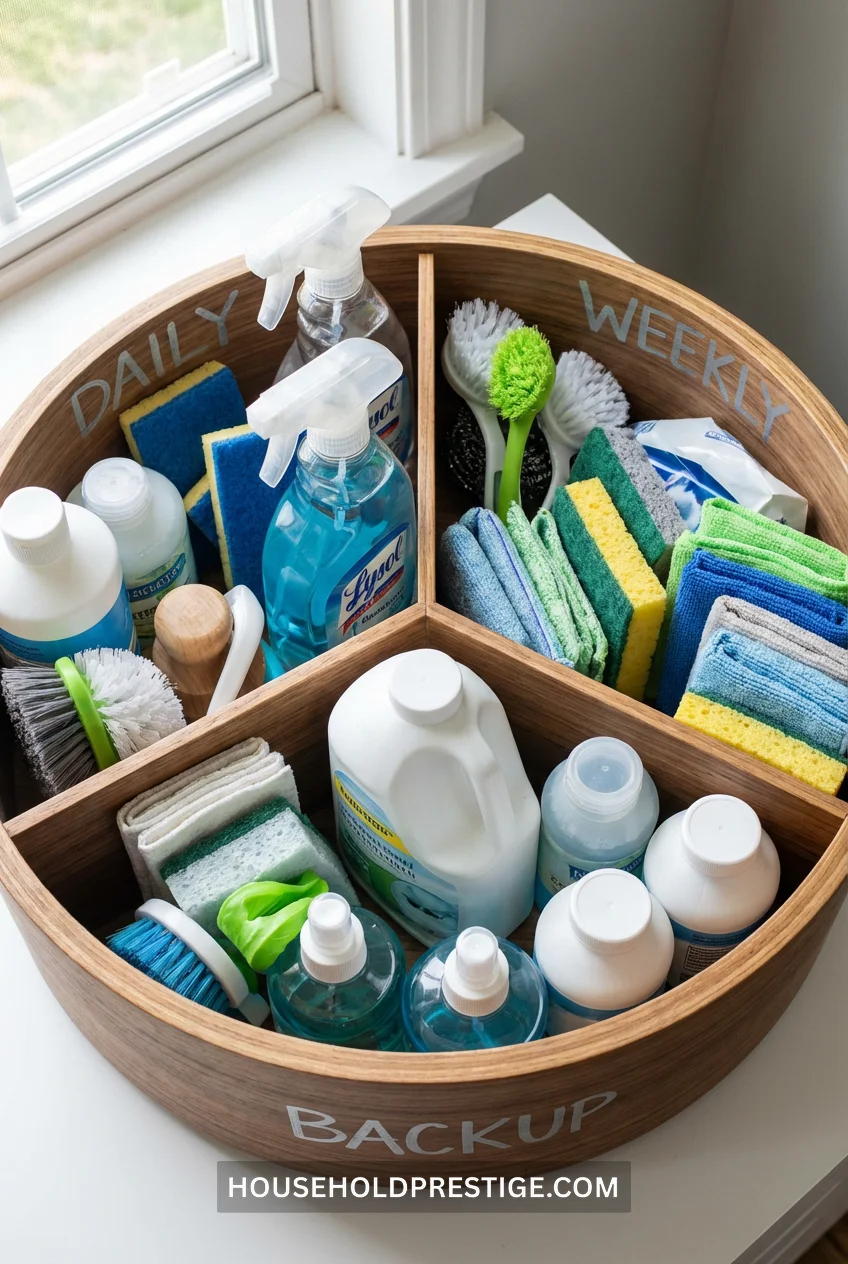
Pro Move
Label the turntable edges with a silver Sharpie: “Daily,” “Weekly,” “Backup.” Your brain categorizes faster when sections have names.
Common Mistakes to Avoid
- Don’t overload. Max 8-10 items per 12-inch Susan, or it becomes a spinning junk pile.
- Don’t mix categories. Cleaning supplies with food storage = confusion. One category per turntable.
- Don’t skip the liner. You’ll regret it when everything slides into a heap mid-spin.
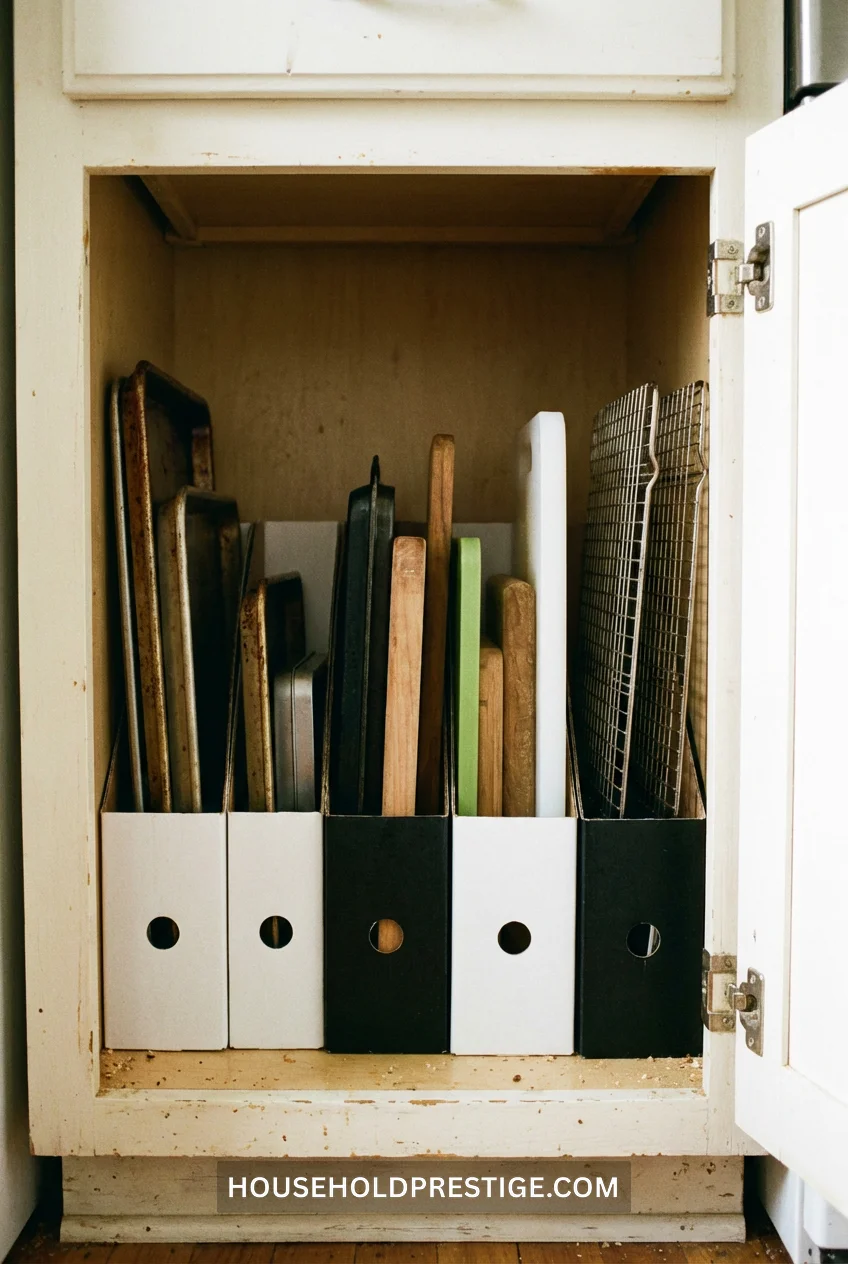
4. Magazine Files Flip Sideways to Store Sheet Pans Vertically
Turn magazine files on their side inside cabinets. Slide in sheet pans, cutting boards, and cooling racks. No more avalanches. IKEA’s KVISSLE costs $4 each—grab 3-4 for a standard base cabinet.
5. Tension Rods Create Instant Vertical Dividers for Literally Everything
Shove a tension rod vertically between cabinet shelves. Boom—instant dividers for cutting boards, baking sheets, even pot lids.
Mount them horizontally under sinks to hang spray bottles by their triggers. The bottles dangle, freeing up floor space for bins and cleaning caddies underneath.
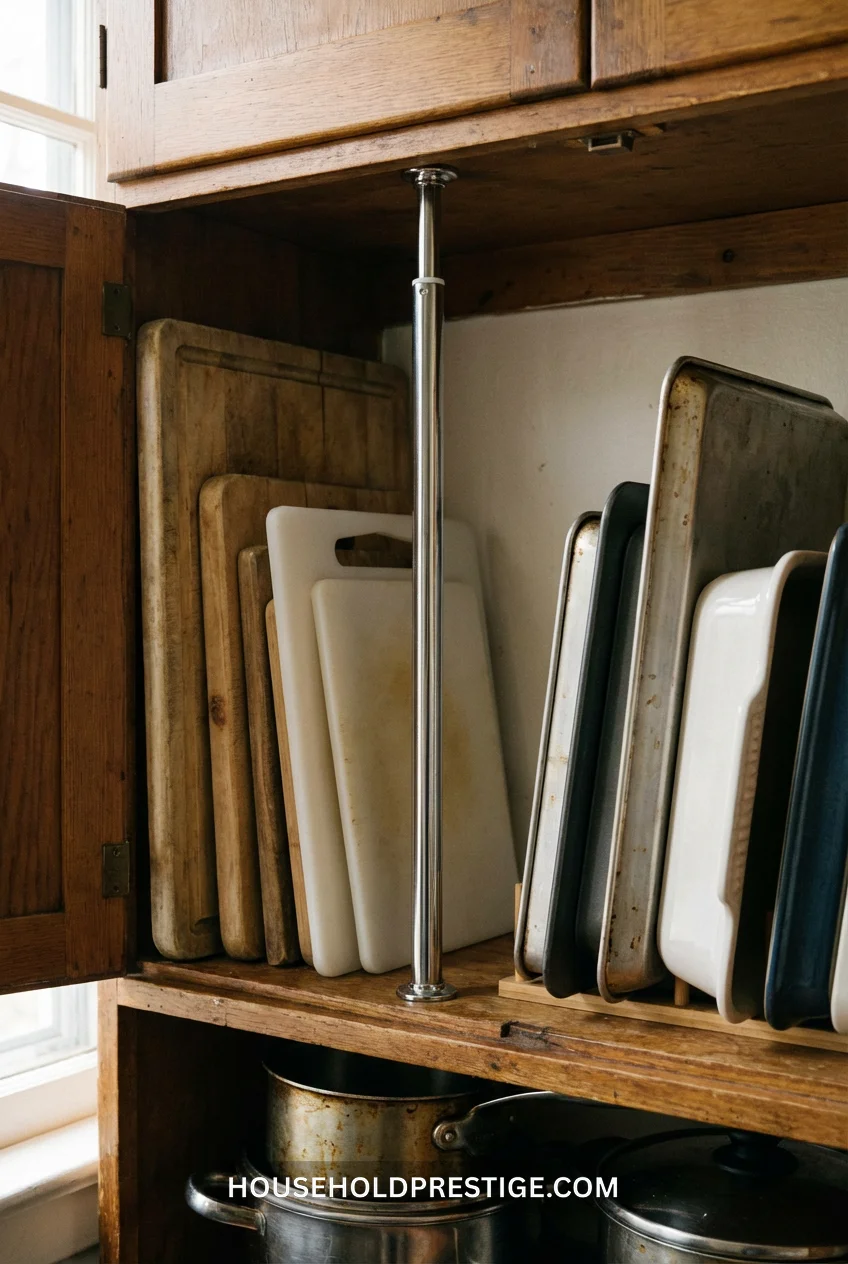
In closets, install a second rod lower than your main hanging rod. Hang pants on the lower rod, shirts up top. You just doubled your hanging capacity without buying new furniture.
Skip the cheap $7 tension rods that slip after two weeks. Spend $15 on Moen or Interdesign brands. They grip properly and hold actual weight without sliding down mid-use.
6. The 12-12-12 Speed Declutter Method
Set a timer for 12 minutes. Find 12 items to trash, 12 to donate, 12 to relocate. Your brain handles finite tasks better than “declutter everything.” Run it weekly—that’s 144 items sorted monthly.

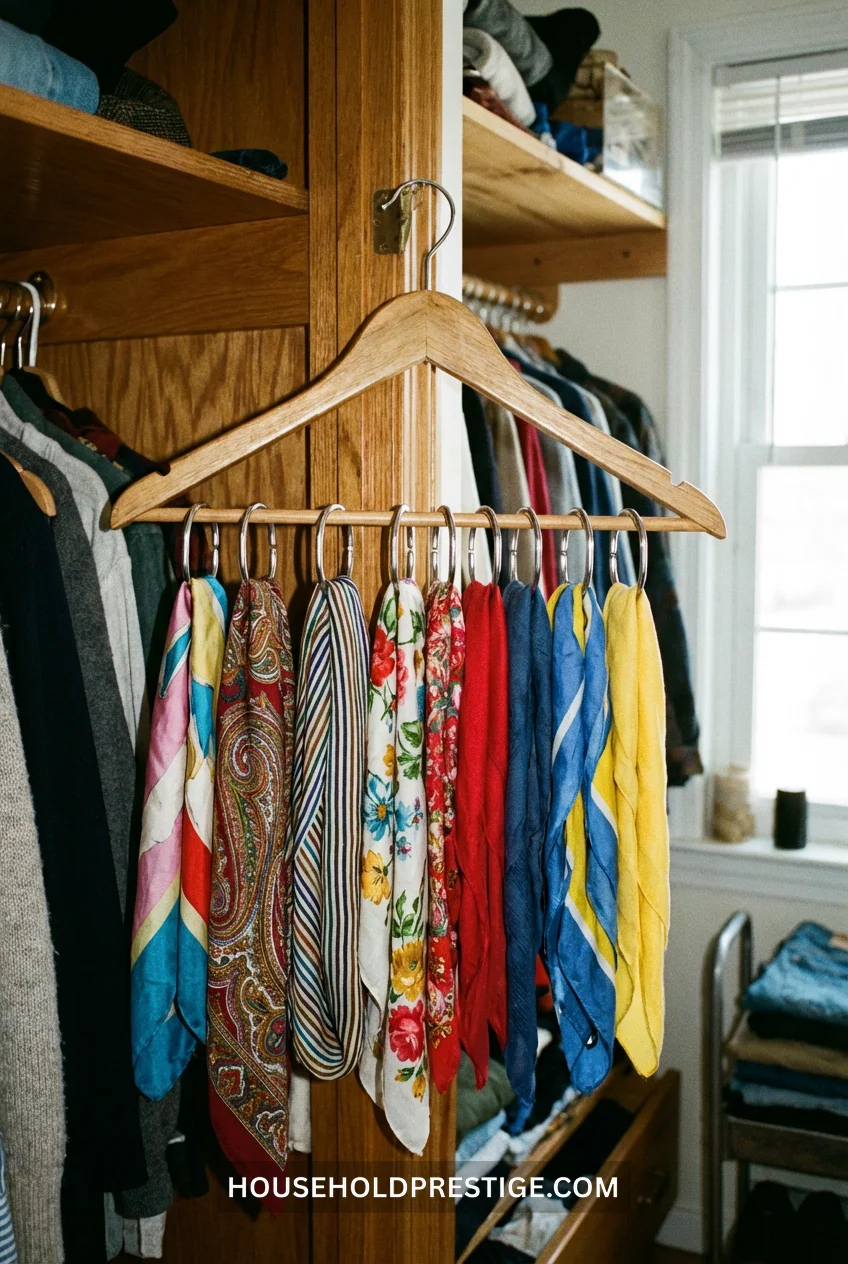
7. Shower Curtain Rings Turn Any Hanger Into a Scarf/Belt Organizer
Clip 10-12 shower curtain rings onto a single hanger. Loop scarves or belts through each ring. Costs $3, frees up 11 hangers, and shows you what you own instead of hiding it in drawer piles.
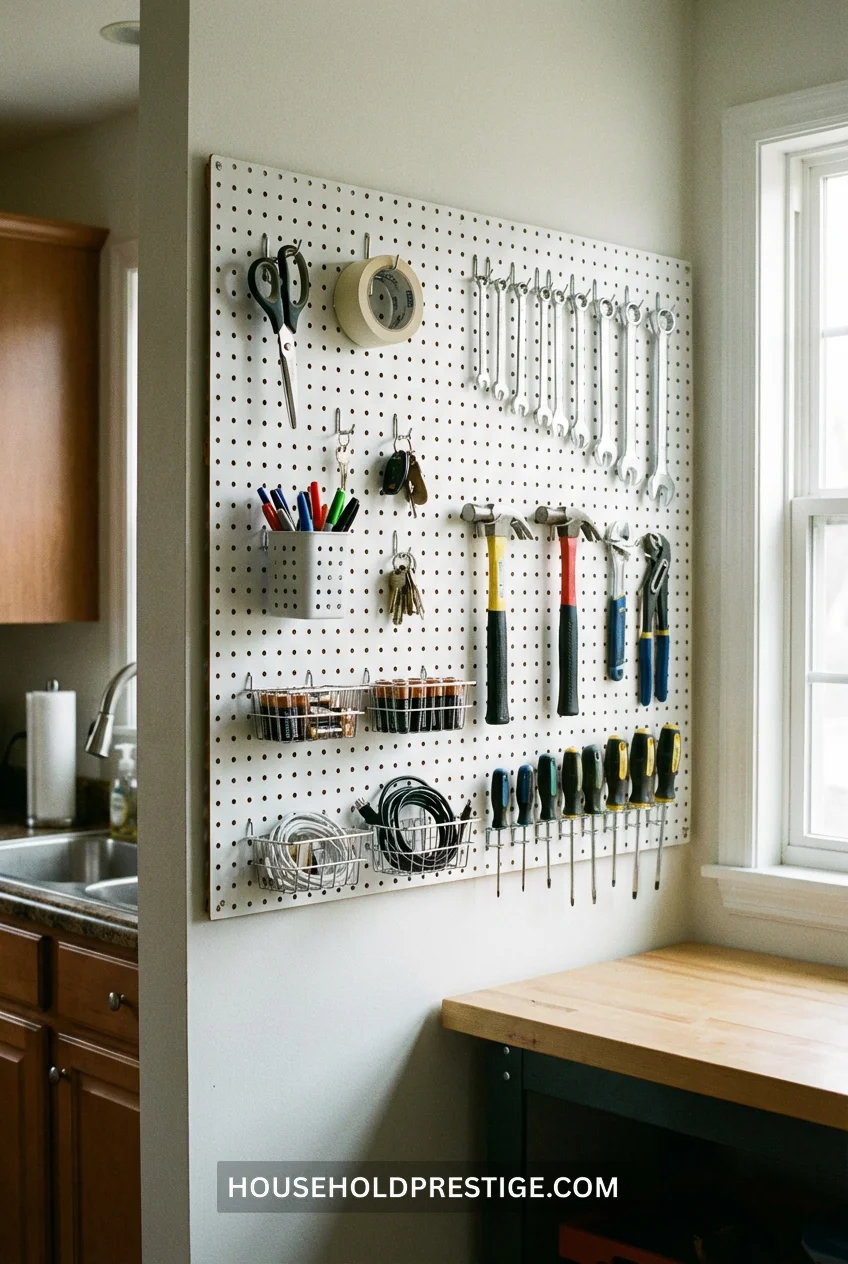
8. Pegboards With Shelf Brackets Eliminate “Junk Drawer” Syndrome Permanently
The Core Problem
Junk drawers exist because small, frequently-used items have nowhere logical to live. Pens, scissors, tape, batteries, keys—they’re homeless, so they pile into one chaotic drawer where you’ll never find them when you need them.
Why Pegboards Win
Pegboards make items visible and accessible simultaneously. You see what you own. You grab what you need. No digging, no dumping the drawer out on the counter.
What You Actually Need
Materials & Costs:
- 24″ x 48″ pegboard panel: $22-28 (white or natural wood finish)
- Pegboard hooks variety pack (50+ pieces): $18-25 (get the pack with different hook types—straight, curved, basket holders)
- Two shelf brackets with integrated pegboard mounting: $30-40 (Rubbermaid or Gladiator brands)
- Wall anchors if not hitting studs: $8 (toggle bolts rated for 50+ lbs)
- Pegboard bins: $15-20 for 4-pack (shallow bins for small items)
Total cost: $95-120
Installation Walkthrough
Step 1: Find Your Wall Space
Best locations: Inside pantry door, garage wall near entry, laundry room, inside coat closet.
Measure available space. Pegboards come in standard sizes: 24″x24″, 24″x48″, or 48″x48″. For junk drawer replacement, 24″x48″ is the sweet spot.
Step 2: Locate Studs
Use a stud finder. Mark stud locations with painter’s tape. Pegboards need support—drywall anchors alone will sag under weight.
If no studs align: Use heavy-duty toggle bolts rated for 50+ pounds. Install at least 4 anchors for a 24″x48″ board.
Step 3: Mount Shelf Brackets First
These act as your pegboard support. Install brackets 20-24″ apart horizontally. Level them—if they’re crooked, your entire board tilts.
Use 3-inch screws into studs or toggle bolts into drywall. Each bracket should hold 30+ pounds without flexing.
Step 4: Attach Pegboard to Brackets
Pegboard hooks need space behind the board to fit through holes. Brackets with standoffs create this gap automatically.
Secure the board to the brackets with screws at the top and bottom. Test wobble—if it moves more than 1/4 inch, add more mounting points.
Step 5: Add Spacers If Needed
No shelf brackets? Use 1/2″ wood spacers behind the pegboard. Cut wood strips, screw them to wall, then screw pegboard to strips. Tedious but effective.
Step 6: Organize by Frequency
Eye level (prime real estate): Daily items—scissors, pens, charging cables, keys.
Upper section: Weekly items—tape, staplers, extra batteries.
Lower section: Monthly items—specialty tools, backup supplies.
Zone Your Pegboard
Writing zone: Hooks for pens, pencils, markers. Bin for sticky notes.
Tech zone: Charging cables on curved hooks. Bin for adapters and earbuds.
Fix-it zone: Screwdriver, hammer, tape measure on dedicated hooks.
Key zone: One hook per family member. Label with Sharpie on the pegboard.
What Goes On It vs What Doesn’t
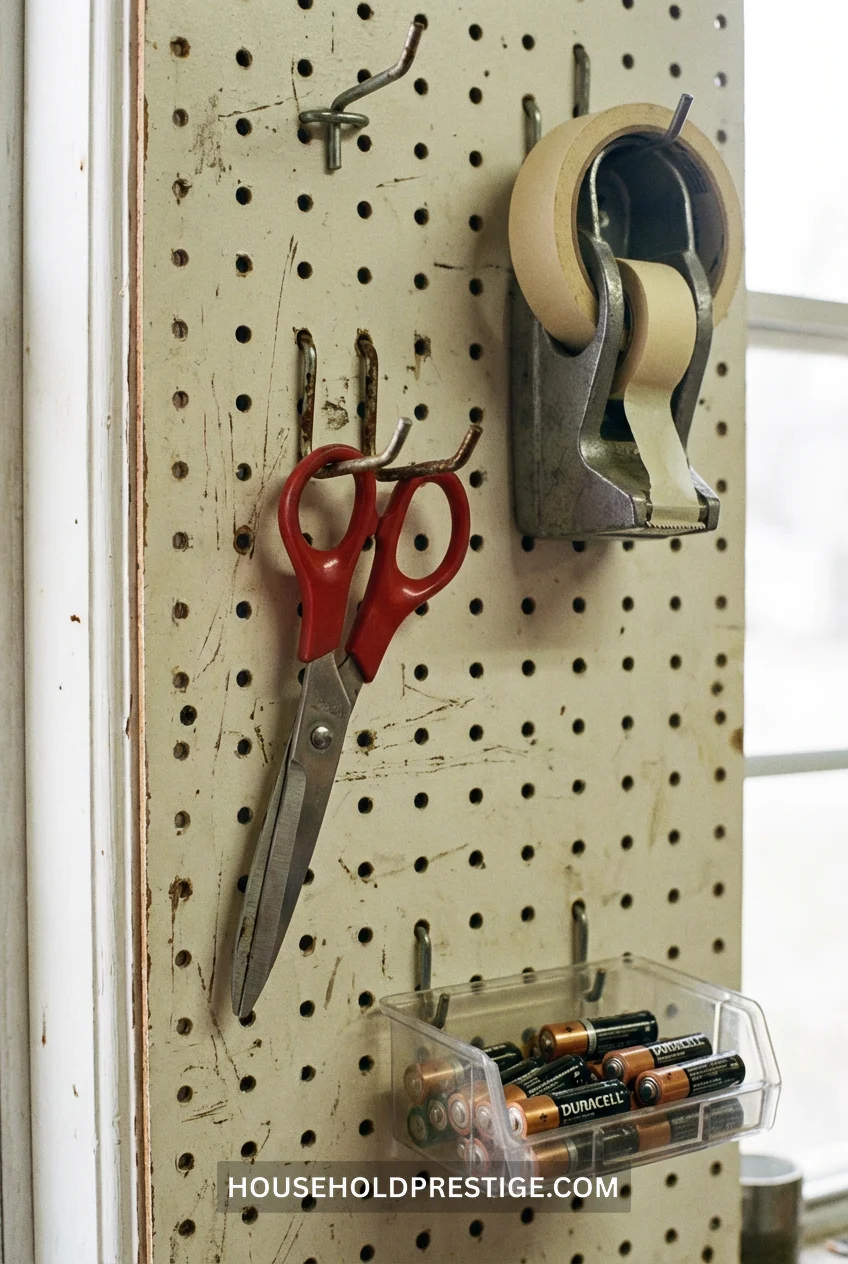
Perfect for pegboards:
- Items used daily but small (keys, scissors, tape)
- Things that disappear in drawers (charging cables, earbuds)
- Tools you grab quickly (screwdrivers, measuring tape)
Don’t put on pegboards:
- Heavy items over 5 lbs (pegboard hooks bend)
- Anything embarrassing (this is visible storage)
- Items you only use twice a year (they’re taking up prime space)
Maintenance Reality
Weekly: Return items to their hooks. Takes 60 seconds.
Monthly: Reassess hook placement. If you’re constantly reaching for the tape, move it to eye level.
Yearly: Audit what’s on the board. If it hasn’t been used in 6 months, it doesn’t deserve pegboard real estate.
The Numbers
Time to install: 45-90 minutes (depending on wall type and your skill level)
Time saved per week: 20-30 minutes (no more “where did I put that?” searches)
ROI timeline: 4-5 months (after that, it’s pure time savings)
Pro Move
Trace around pegboard items with a silver Sharpie. You’ll instantly see if something’s missing. And everyone knows where to put it back.
Common Installation Mistakes
Mounting too close to wall: Hooks won’t fit through pegboard holes. Need minimum 1/2″ gap.
Not leveling properly: Your board looks drunk. Items slide sideways.
Overloading hooks: Pegboard hooks hold 3-5 lbs max. Hang your hammer somewhere else.
Using cheap hooks: They bend the first time you hang something. Spend $20 on quality hooks, not $8 on junk.

9. Clear Shoe Boxes Stack Better Than Regular Bins for Seasonal Items
Cardboard boxes disintegrate after one basement summer. Fabric bins hide what’s inside, forcing you to unstack and unzip every single one hunting for winter gloves in November.
Clear plastic shoe boxes from Container Store ($3 each) solve both problems. They stack perfectly—same size means no Jenga tower collapses. You see contents at a glance—no mystery bins.
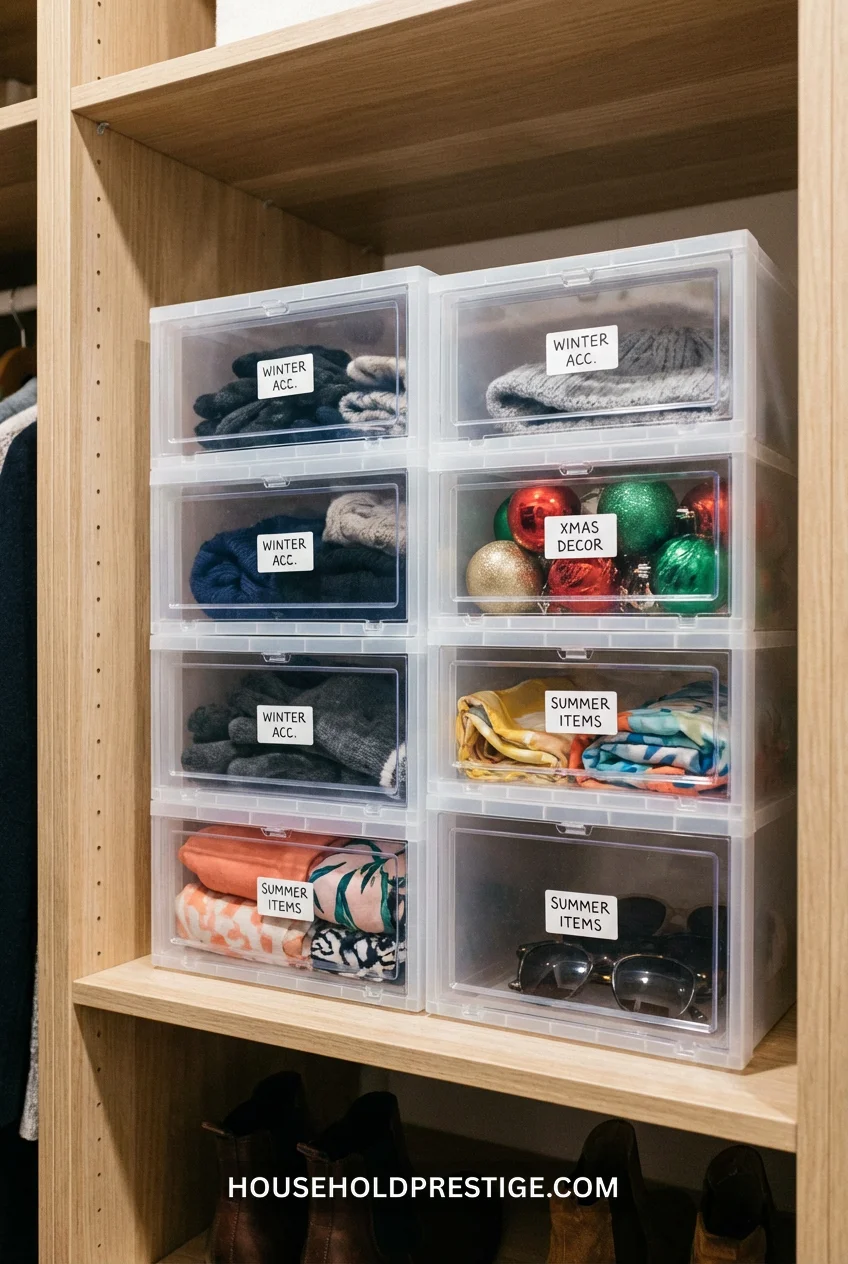
Label the short ends, not the long sides. When boxes are stacked, you read labels without pulling everything down.
Use them for scarves, gloves, holiday decorations, beach accessories, and craft supplies. Anything seasonal that disappears for 8 months at a time deserves a clear box so future-you doesn’t forget it exists.
10. The “Touch It Once” Rule Cuts Daily Clutter by 70%
Mail arrives? Sort it now. Groceries? Away immediately. Jacket? On the hook, not the chair. “Touch it once” stops items from becoming clutter piles.
11. Over-the-Door Shoe Organizers Store Way More Than Shoes
24 pockets = 24 storage solutions. Stop limiting them to footwear.
Bathroom: Toiletries, hair tools, makeup brushes, and first aid supplies. Each pocket becomes a category.
Kitchen pantry: Snack packets, sauce bottles, sandwich bags, seasoning packets. No more avalanches when you open the cabinet.
Craft room: Scissors in one pocket, tape in another, markers sorted by color family across six pockets.
Cleaning closet: Sponges, gloves, rags organized by type and usage frequency.
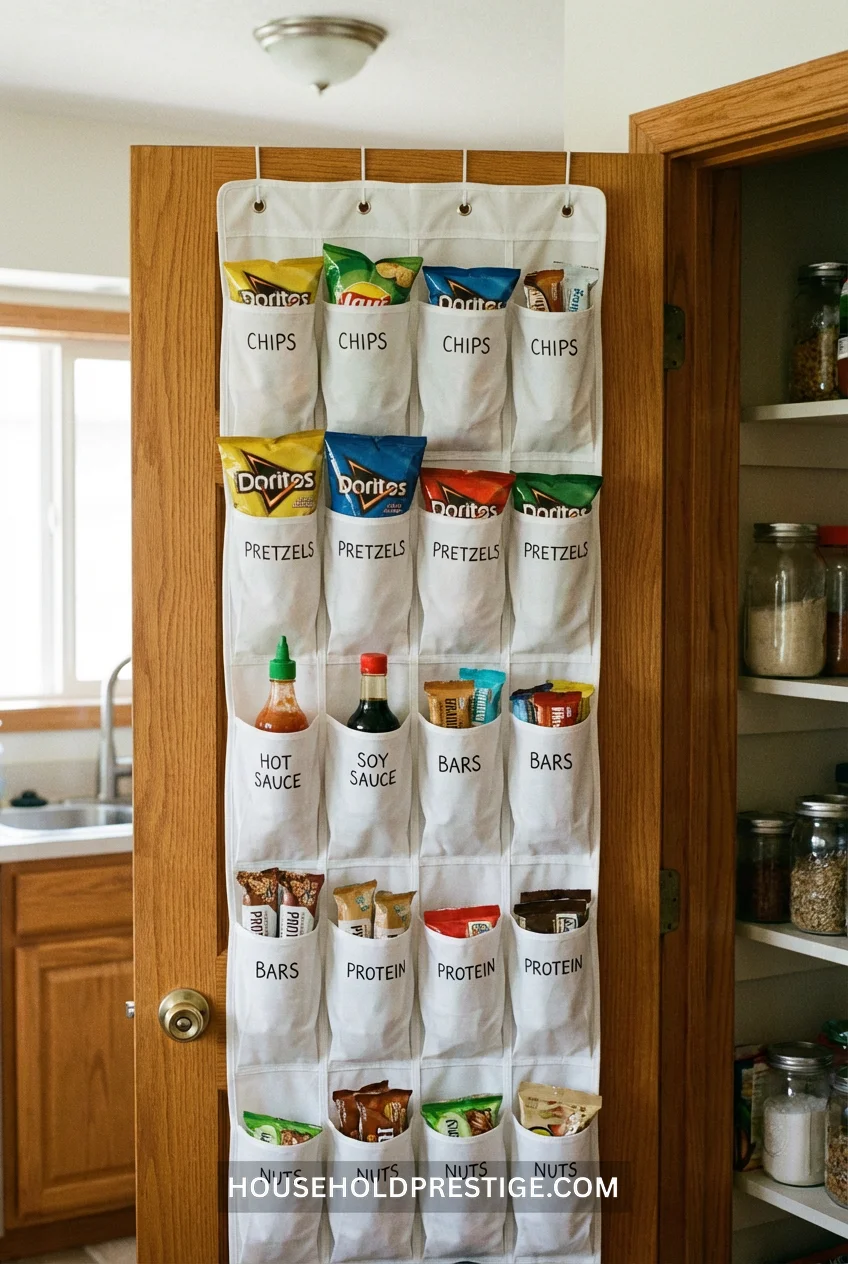
The $12 clear-pocket version from Amazon beats the $40 fabric ones. You see what you own, grab what you need, skip the digging. Mount it on any door and instantly gain 24 organized storage spots.
12. Binder Clips Hang Inside Cabinet Doors to Hold Trash Bags
Clip large binder clips to the inside of your under-sink cabinet door. Fold trash bag boxes and slide them through the clip handles. Bags dispense one at a time.
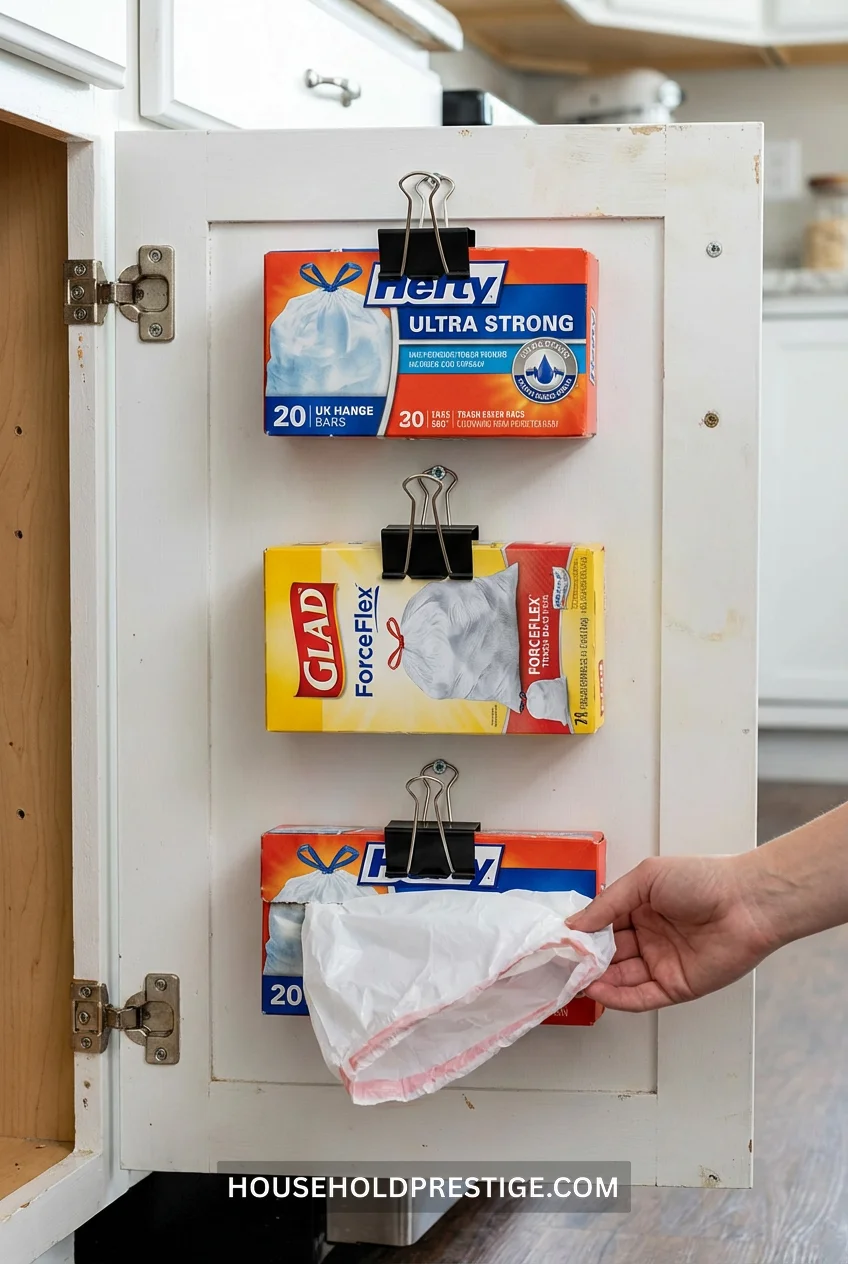
Works for plastic grocery bags, too. Clip them to the clip, pull through one at a time.
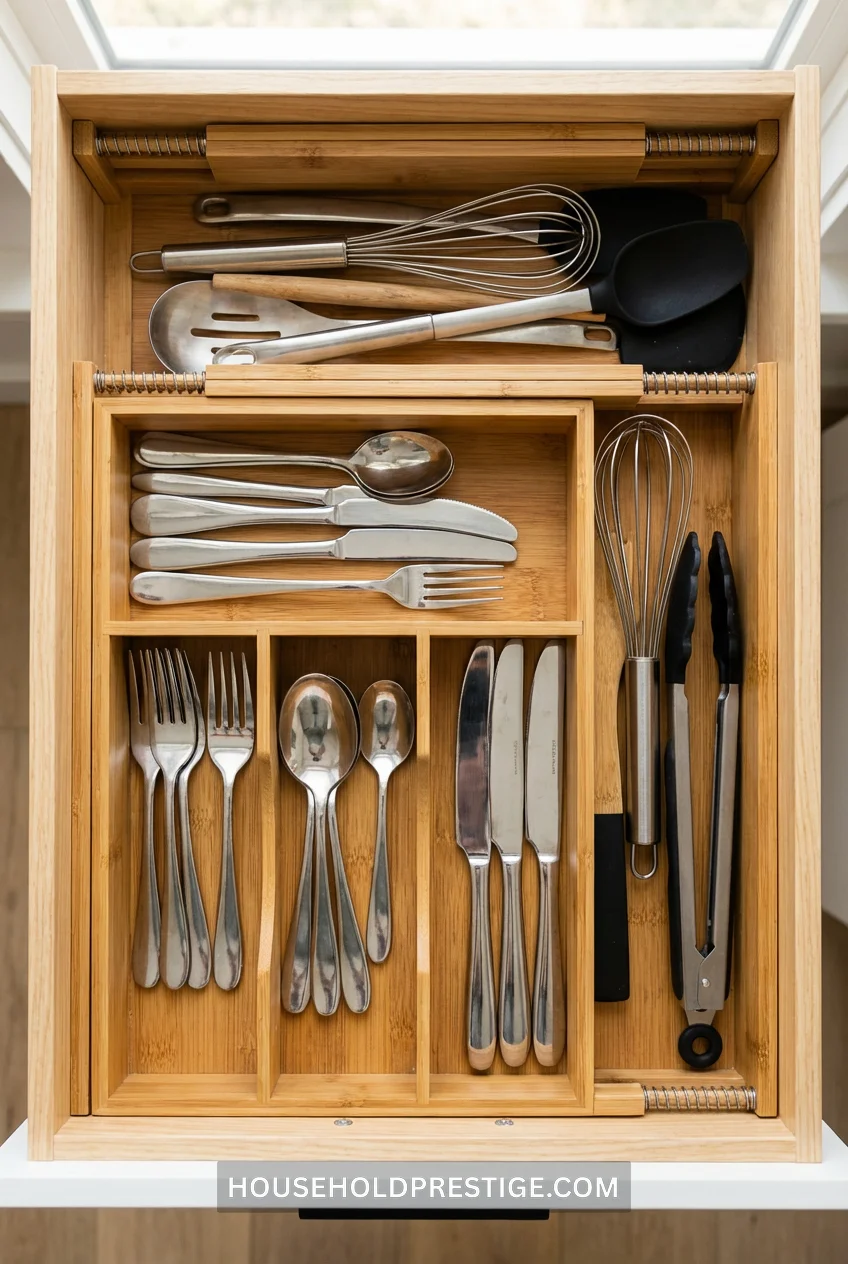
13. Drawer Dividers From Bamboo Expandable Organizers Create Custom Sections for Utensils and Tools
The Junk Drawer Reality Check
Most drawer organizers fail because they’re fixed-size rectangles. Your drawer isn’t a perfect grid. You need flexibility.
Why Bamboo Expandable Organizers Win
They adjust to your drawer’s exact width. Spring-loaded ends press against drawer sides, creating sections that actually fit your space and your stuff.
What You Need
- 4-6 bamboo expandable dividers: $25-35 for a set (mDesign or YouCopia brands last longest)
- Drawer liner (optional): $8 for non-slip grip
Drawer Types That Work
Kitchen utensil drawer: 2-3 dividers create sections for forks, spoons, knives, serving utensils, cooking tools
Bathroom vanity drawer: 3-4 dividers separate makeup, hair accessories, skincare, tools
Office desk drawer: 2-3 dividers for pens, sticky notes, paper clips, charging cables
Junk drawer transformation: 4-5 dividers with labeled sections: “Batteries,” “Tools,” “Tech,” “Keys,” “Misc”
Installation Is Stupid-Easy
- Measure drawer width. Dividers extend from 12″ to 22″ typically.
- Compress divider and place in drawer. Release—it locks into position.
- Adjust spacing. Slide dividers to create sections sized for your items.
- Test stability. Open/close drawer. If dividers shift, add liner underneath for friction.
Time investment: 3 minutes per drawer.
Organizing Strategy
Don’t organize by item type alone. Organize by usage frequency.
Front of drawer = daily items (eating utensils, everyday pens) Middle = weekly items (serving spoons, specialty pens) Back = monthly items (meat thermometer, label maker)
Cost Breakdown
Per-drawer cost: $6-9 (if buying a 4-pack for $35) Time saved per week: 5 minutes (no digging for the right utensil) Lifespan: 3-5 years of daily use
The Catch
Expandable dividers don’t work in drawers narrower than 12″ or wider than 22″. Measure first or you’ll be returning them.
Pro Tips
For deep drawers: Use two dividers stacked perpendicular. Creates a grid instead of just sections.
For shallow drawers: Single row of dividers works perfectly. Don’t overthink it.
For odd-shaped items: Create one “junk” section for things that don’t fit categories. Limit it to 1/4 of the drawer.
What Works vs What Doesn’t
Perfect for dividers:
- Utensils (forks, spoons, knives)
- Pens and pencils (lay flat)
- Makeup brushes (stand upright)
- Small tools (screwdrivers, scissors)
Terrible for dividers:
- Large pots/pans (too tall)
- Flexible items like bags (they flop over dividers)
- Round items that roll (balls, batteries in bulk)
Common Mistakes
Buying fixed-size organizers: Your drawer is 15.5″ wide. The organizer is 14″ or 16″. It rattles or doesn’t fit. Expandable fixes this.
Creating too many sections: 8 tiny sections = 8 micro-messes. Stick to 3-5 sections per drawer.
Not securing in deep drawers: Dividers slip when drawer opens fast. Add liner or museum putty under divider ends.
14. Command Hooks Under Shelves Double Hanging Space for Mugs
Stick command hooks under floating shelves. Hang mugs by their handles. Frees up shelf surface for plates or bowls.
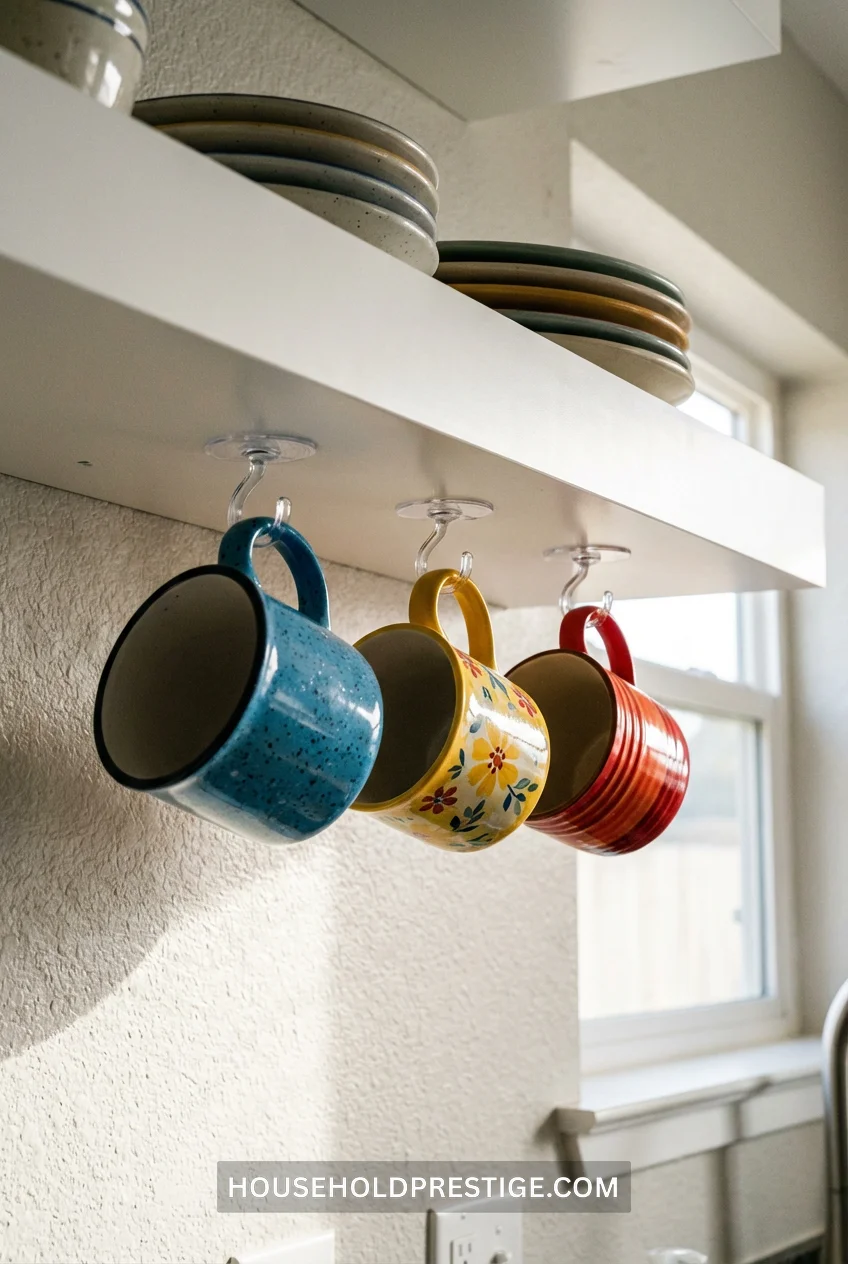
Under bathroom shelves? Hang loofahs, hairbrushes, or travel toiletry bags.
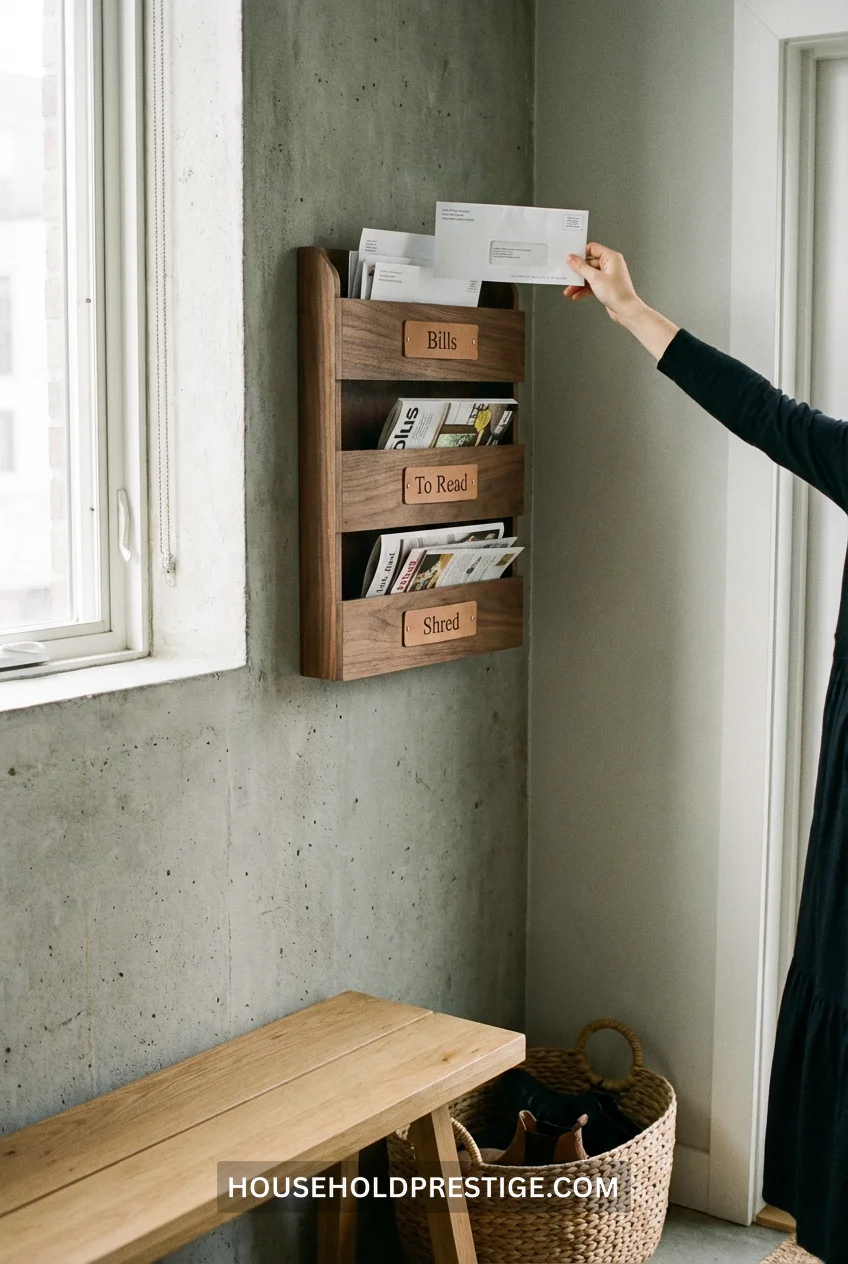
15. File Folders Stored Vertically in Drawers Beat Stacking for Paper Organization
Stop stacking papers. You’ll never look at the bottom pile. File folders in drawer organizers let you flip through papers like a Rolodex.
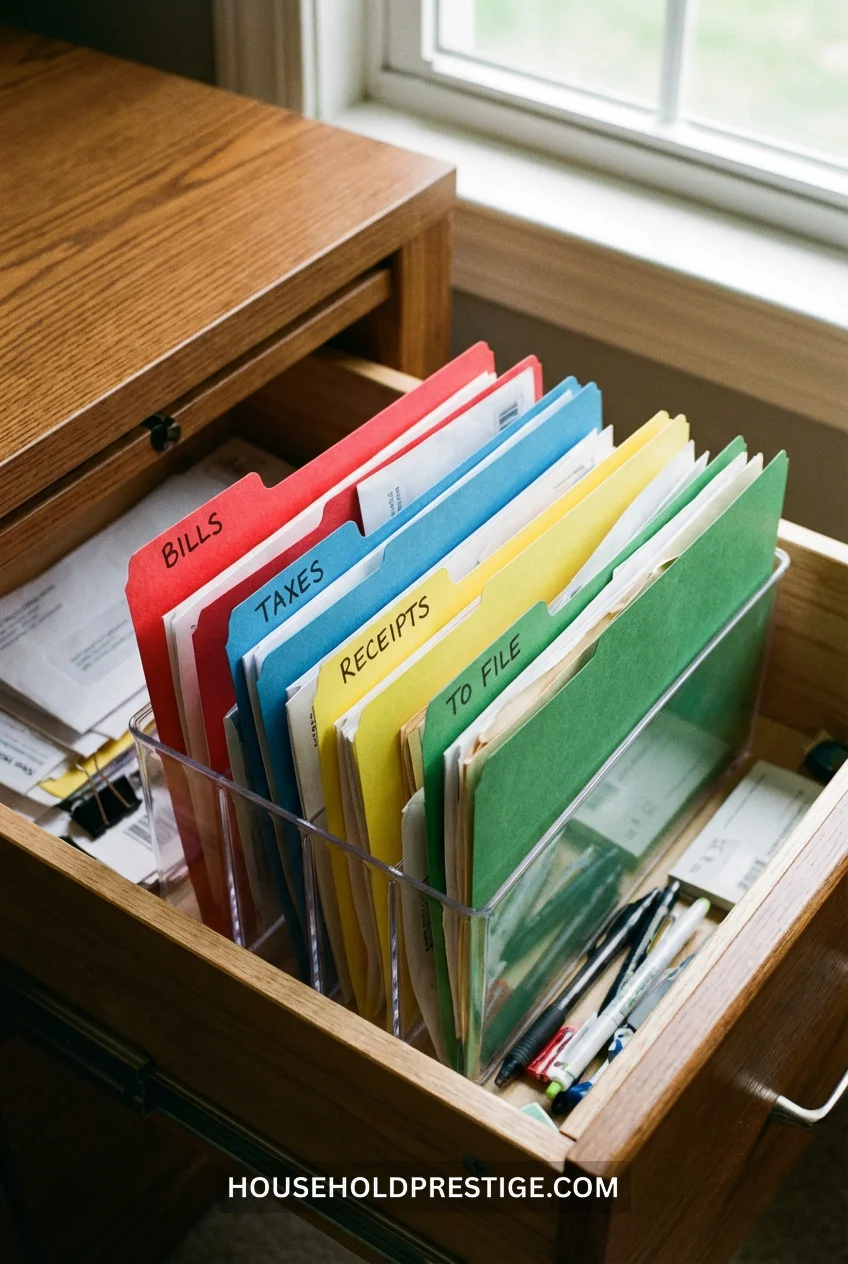
Use colored folders. Red = urgent bills. Blue = receipts. Green = filed/done.
16. Velvet Hangers With Clips Turn One Hanger Into a Five-Item System
Clip velvet hangers hold pants without creasing. But here’s the actual hack: stack multiple items vertically on a single hanger instead of using one hanger per item.
Five pairs of jeans normally need five hangers. With clip hangers, hang one pair, clip a second pair’s waistband below it, repeat. Now those five pairs live on two hangers instead.

This works for skirts, shorts, lightweight pants—anything with a waistband. Don’t try it with heavy denim, or you’ll snap the clips.
Your closet rod holds a fixed number of hangers. This method triples capacity without adding rods or buying furniture. Perfect for small closets or when you’ve hit physical space limits.
17. The 30-Second Reset Timer Prevents Mess Accumulation
Before bed, set a 30-second timer. Speed-clean one surface—kitchen counter, coffee table, bathroom sink. That’s it.
30 seconds isn’t enough time to procrastinate. Your brain just does it. After 30 days, you’ll have 30 surfaces that never pile up.
18. Stackable Wire Shelves Create Two Levels in One Cabinet Space
Slide a wire shelf riser inside cabinets. Plates on bottom, bowls on top. Or canned goods on bottom, boxes on top.
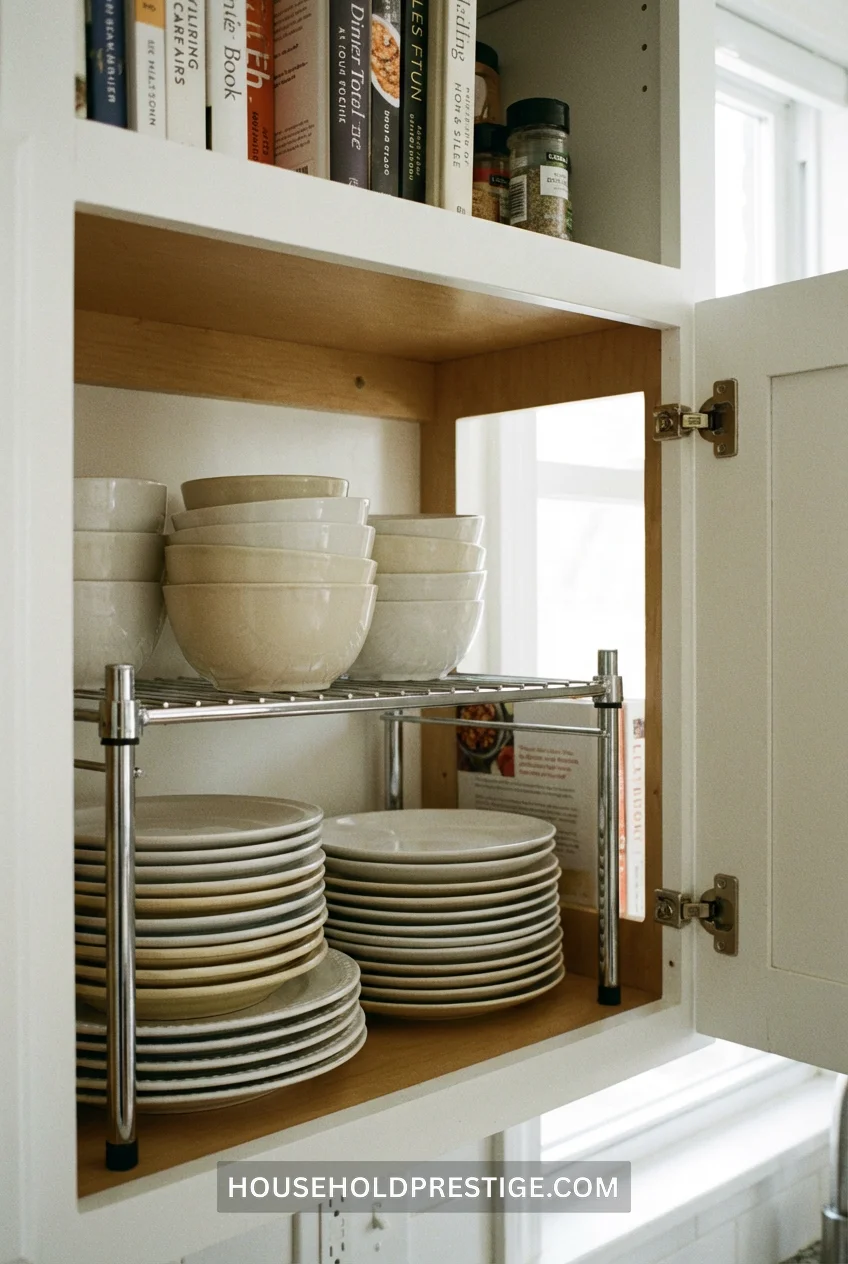
Target sells them for $10. Doubles your vertical space instantly.
19. Toilet Paper Rolls Organize Charging Cables Without Tangling
Fold cables. Tuck them inside empty toilet paper rolls. Label rolls with Sharpie (iPhone, USB-C, Micro-USB). Store in drawer or bin.
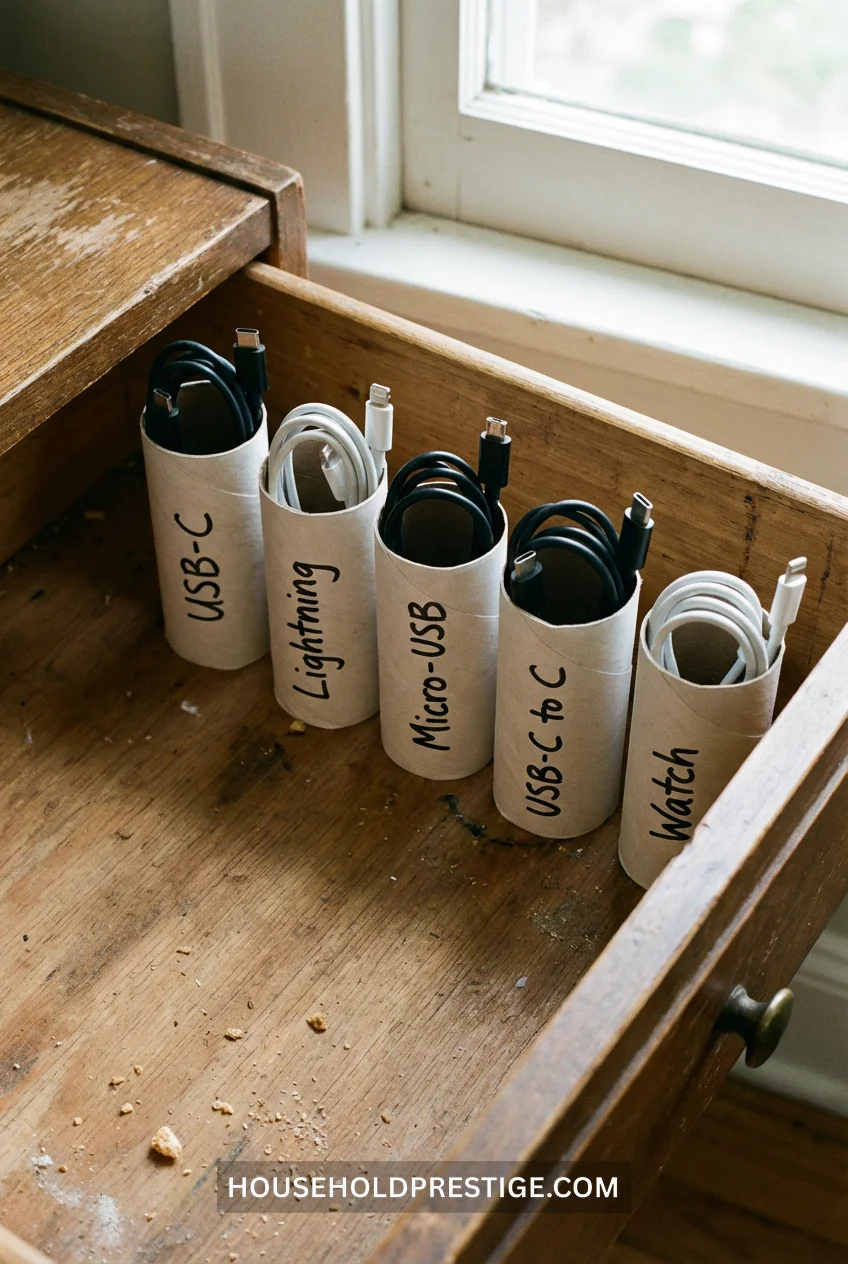
Cables don’t tangle. You see which is which. Costs zero dollars.
20. The “One Shelf, One Category” Rule Stops Kitchen Cabinet Chaos
Each shelf holds exactly one category. Not “food items.” Not “kitchen stuff.” One specific category only.
Top shelf: Baking supplies—flour, sugar, baking powder, chocolate chips. Second shelf: Breakfast items—oatmeal, cereal, granola bars, coffee. Third shelf: Dinner plates and bowls only. Bottom shelf: Snacks and nothing else.
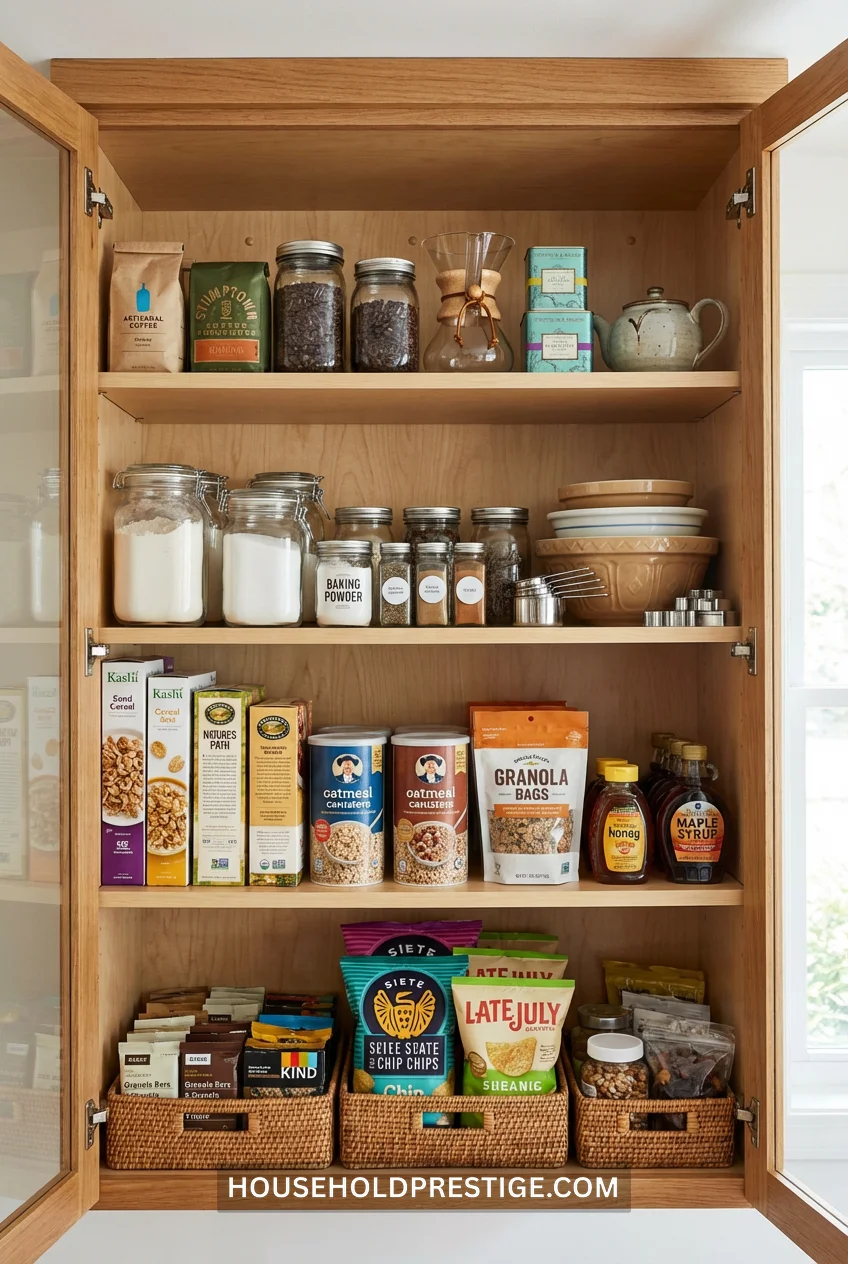
No mixing. When baking supplies and breakfast items share a shelf, your brain processes slower. You scan, search, filter mentally. Dedicated categories mean your hand goes directly to the right shelf, grabs the item, done.
Studies show organized spaces reduce decision fatigue by 60%. Your brain doesn’t waste processing power on “where is it?” searches.
21. Duplicate Cleaning Supplies in Each Bathroom Save 200+ Steps Per Week
One set of cleaning supplies per bathroom. Stop carrying spray bottles from room to room.
Under each sink: all-purpose cleaner, toilet bowl cleaner, microfiber cloths, toilet brush.
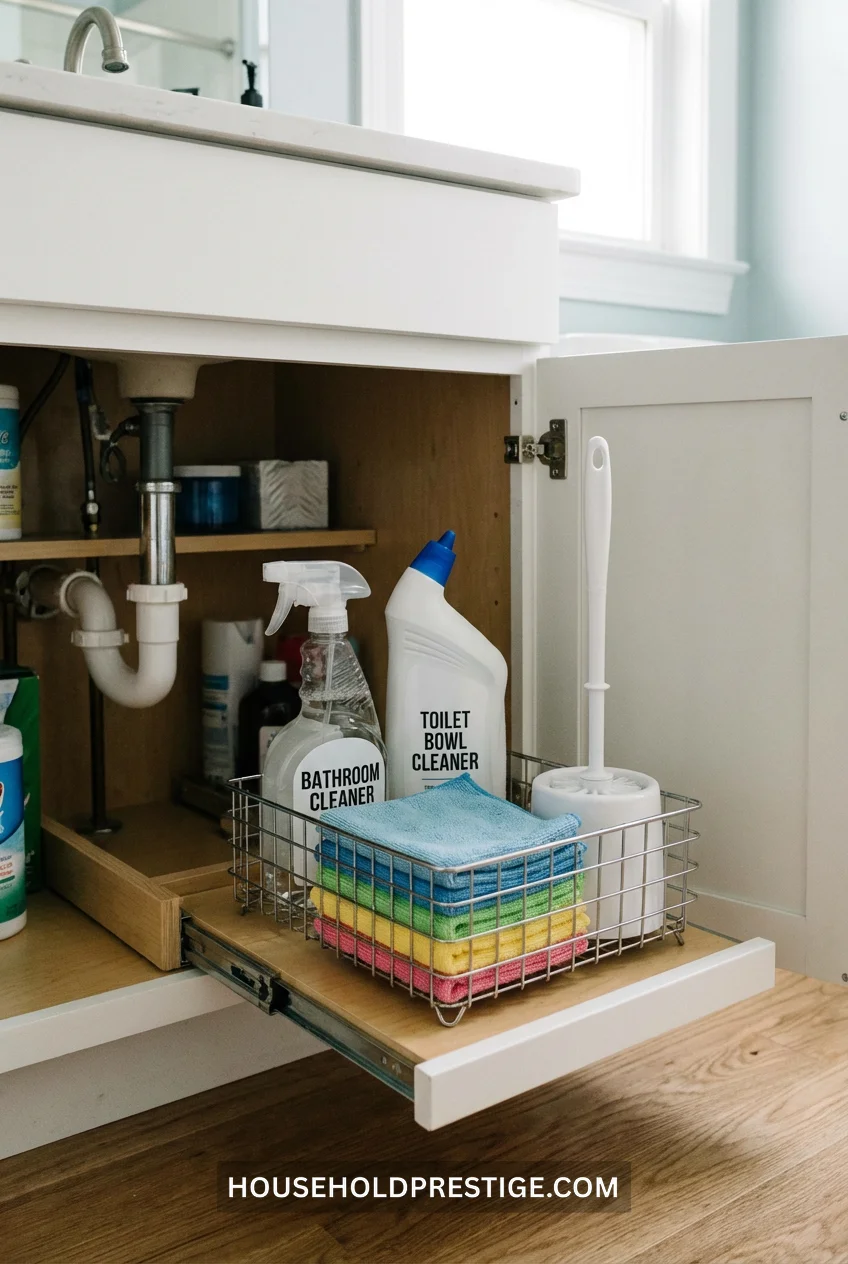
Costs $30 to duplicate supplies. Saves you from walking to the other bathroom 15 times per week. That’s 200+ steps saved weekly.
The Reality Check
None of these home organization hacks requires a full weekend. Most take under 10 minutes to implement.
The difference between “organized people” and everyone else? They don’t have more time or discipline. They just use systems that work with chaos instead of fighting it.
Pick three from this list. Install them this week. Notice how much mental space you reclaim when you stop searching for scissors.
Your charger will still disappear occasionally. But at least you’ll know exactly where to look.
FAQ
Q: How do I maintain these organizational systems when my family doesn’t cooperate?
Make it easier to do it right than do it wrong. If your kid won’t hang up their coat, the hook is too high or too far from the door. If your partner won’t sort the mail, the sorting system is too complicated. Simplify until compliance becomes the path of least resistance.
Q: What’s the best order to tackle home organization if everything’s a mess?
Start with high-traffic, high-frustration zones. Kitchen junk drawer, entryway, under bathroom sink. These give immediate daily relief. Don’t organize the basement while your daily spaces are chaos—you’ll burn out before you feel results.
Q: How do I know if I need more storage or less stuff?
If you haven’t used an item in 6 months and don’t have a specific future plan for it, you don’t need storage for it—you need to let it go. Storage organizes what you use. If you’re storing things you don’t use, that’s not organization, that’s expensive clutter with a label on it.
Q: What’s the fastest way to declutter without getting overwhelmed?
The 12-12-12 method (covered in #6). Set a timer for 12 minutes. Find 12 items to throw away, 12 to donate, 12 to return to their proper location. Finite task, visible progress, no paralysis. Run it once a week, and you’ll process 144 items per month without marathon sessions.
Q: Are expensive organizing products worth it, or should I DIY?
Spend money on items you touch daily that directly impact function: drawer dividers ($25), lazy Susans ($30), quality hangers ($20). DIY works for decorative/aesthetic stuff like labels and bins. Don’t pay $60 for a “system” when $15 of supplies from Target does the same job. But don’t cheap out on structural organizers that will bend, break, or slide around after two weeks.