

Somewhere between your third load of laundry and the mystery stain on the kitchen counter, you probably wondered if everyone else knows house cleaning tips you don’t. They don’t. Most adults are winging it with the same half-empty bottle of all-purpose cleaner and a prayer.
But here’s what separates a house that stays clean from one that only looks clean on Instagram: knowing the right house cleaning tips — the ones that cut your scrubbing time without cutting corners. Not the Pinterest-perfect routines that require four hours every Saturday morning. The real ones. The ones that work when you’ve got 20 minutes between meetings or a toddler on your hip.
I tested dozens of methods over the years. Some flopped. A few changed my whole routine. These 27 are the ones that stuck.
1. Clean Top to Bottom, Every Single Time

Gravity is doing half your work. Use it.
Start with ceiling fans, light fixtures, and top shelves. Work your way down to counters, then floors. Cleaning in the opposite direction means dust and crumbs from high surfaces land on areas you already cleaned. That’s double the work for zero reason.
2. The Two-Bucket Mop Method
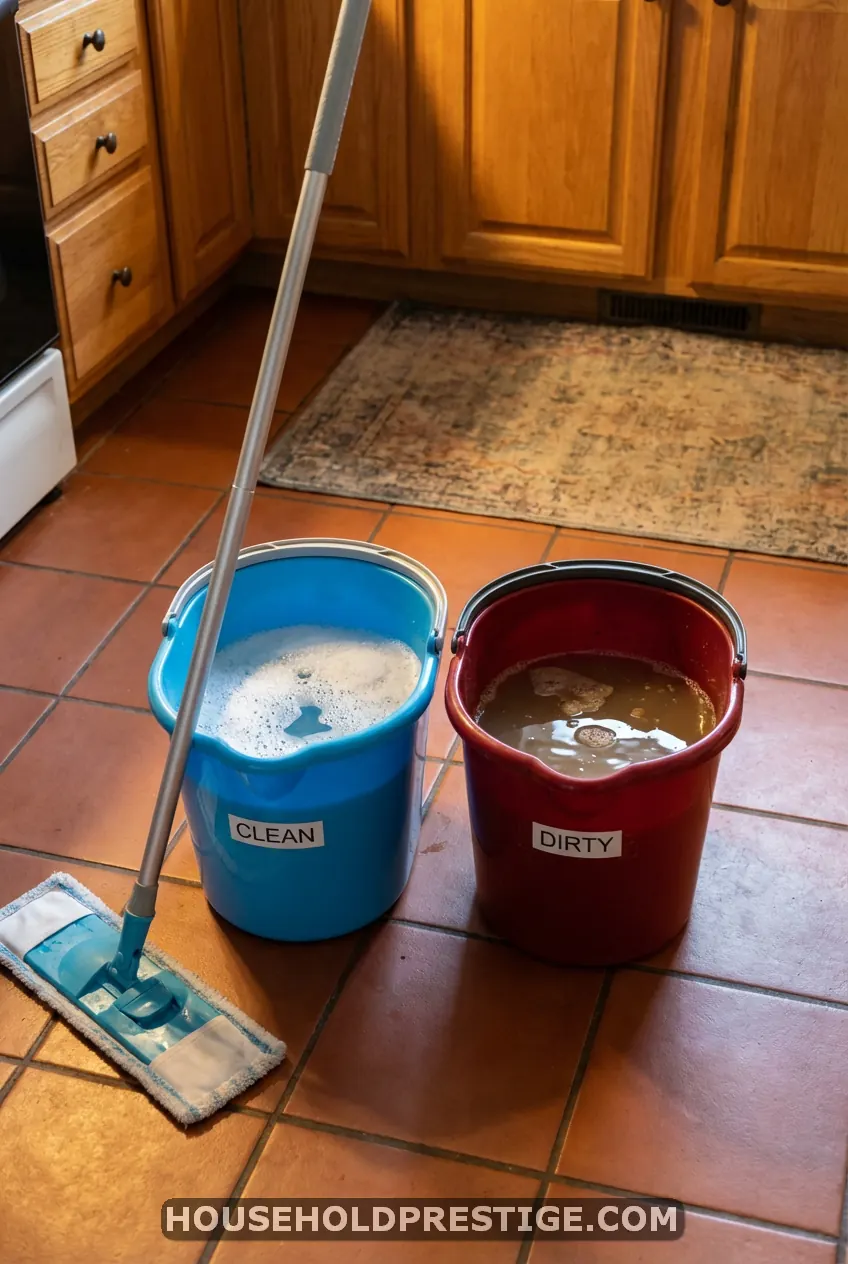
If you mop with one bucket, you’re spreading dirty water around your floor and calling it clean. Harsh? Maybe. True? Absolutely.
The fix is embarrassingly simple: use two buckets. One holds your cleaning solution. The other is just water for rinsing.
How It Works
- Dip your mop in the clean solution bucket.
- Mop a 4×4-foot section.
- Rinse the mop in the dirty water bucket.
- Wring it out thoroughly.
- Dip back into the clean solution.
- Repeat.
Why This Matters More Than You Think
Your “clean” water stays clean. No gray, murky mess by the third room. The difference is visible — floors actually dry without a film. You know that haze on tile or laminate that won’t go away, no matter what product you spray? This is usually why.
Cost Reality
Two basic 3-gallon buckets: $8-12 total at any hardware store. The O-Cedar EasyWring Spin Mop ($30-35) comes with a built-in wringer that makes this even faster. Libman’s Wonder Mop ($12) works too if you prefer a traditional style.
The Catch
You’ll use about 30% more water overall. Worth it. The floors dry streak-free and actually feel clean when you walk barefoot.
Common Mistakes
- Using too much soap in the clean bucket. A tablespoon per gallon is plenty for most hard floors.
- Not wringing out thoroughly between buckets. A soaking mop pushes water into grout lines and under baseboards.
- Forgetting to change the rinse water. If it looks like chocolate milk, dump it and refill.
Pro Move
Add a capful of white vinegar to your rinse bucket. It neutralizes soap residue on the mop head before it goes back into the clean solution. Your floors will feel completely different.
3. Microfiber Cloths Beat Paper Towels — Always
A 12-pack of microfiber cloths costs $8-14 and lasts for years. A 12-pack of paper towels costs $15-20 and lasts a month. Do the math.
Microfiber picks up 99% of bacteria with just water. Paper towels smear it around. Stop buying paper towels for cleaning.
4. Spray and Walk Away
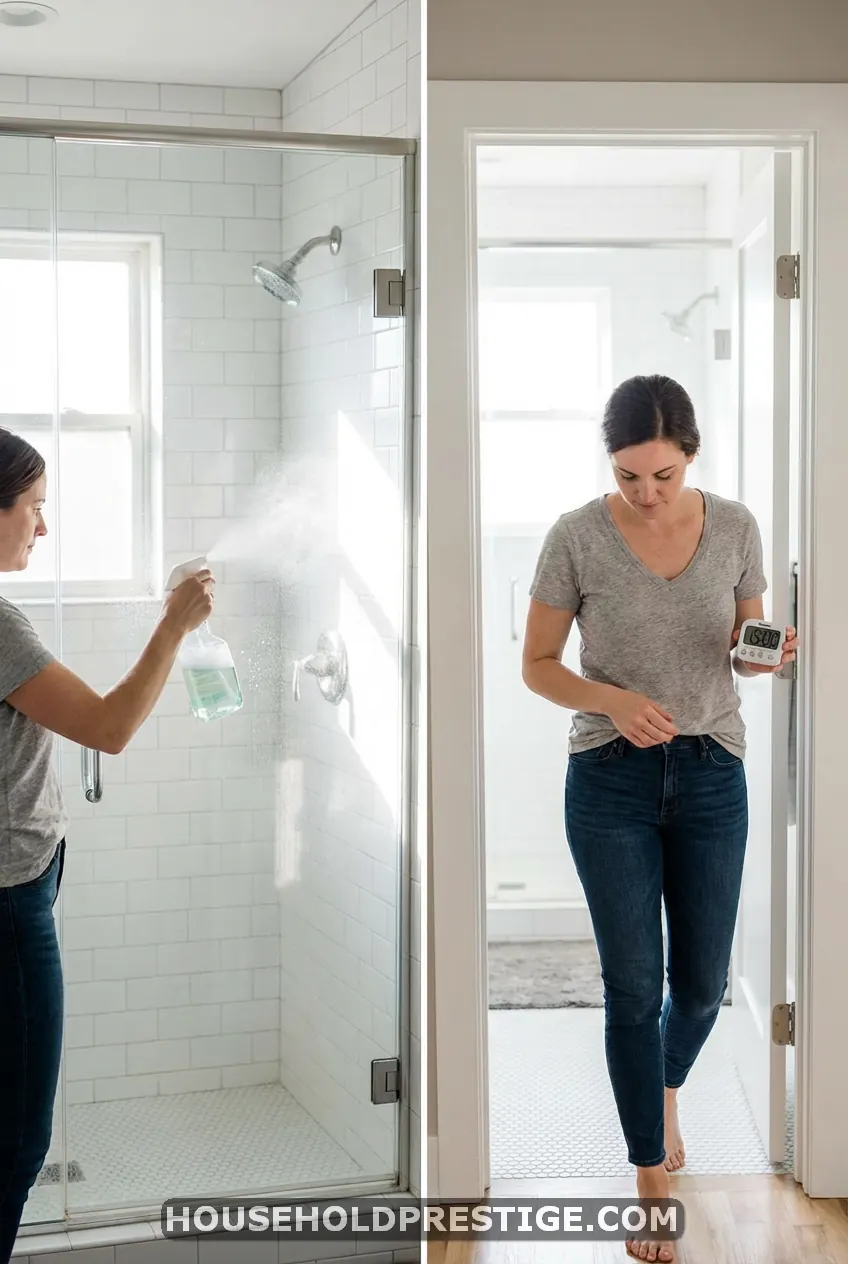
Most people spray and immediately start scrubbing. That’s backward.
Spray your shower, counters, or stovetop. Set a timer for 5-10 minutes. Go do something else. Come back. The product did 80% of the work while you were folding socks. A light wipe handles the rest.
This single habit cut my bathroom cleaning time from 40 minutes to about 15.
5. Keep a Cleaning Caddy Under Every Bathroom Sink
Walking to a supply closet, gathering products, walking to the bathroom, cleaning, then putting everything back? Nobody does that on a Tuesday night.
A small caddy with the basics — glass cleaner, all-purpose spray, two microfiber cloths, a scrub brush — stays under each bathroom sink. Cleaning happens more often when everything is right there.
Cost per caddy: about $15-20 total with store-brand products.
6. Clean Your Vacuum (Yes, Really)
A vacuum clogged with hair, dust, and mystery fibers doesn’t vacuum. It pushes debris around while making motor-straining noises.
Once a month: cut tangled hair off the brush roll with scissors. Wash or replace the filter (check your model — most are washable). Empty the canister when it hits the fill line, not when it overflows. A Dyson V15 with a full bin loses 30-40% of its suction power. Same goes for budget models.
7. Dish Soap Handles More Than Dishes
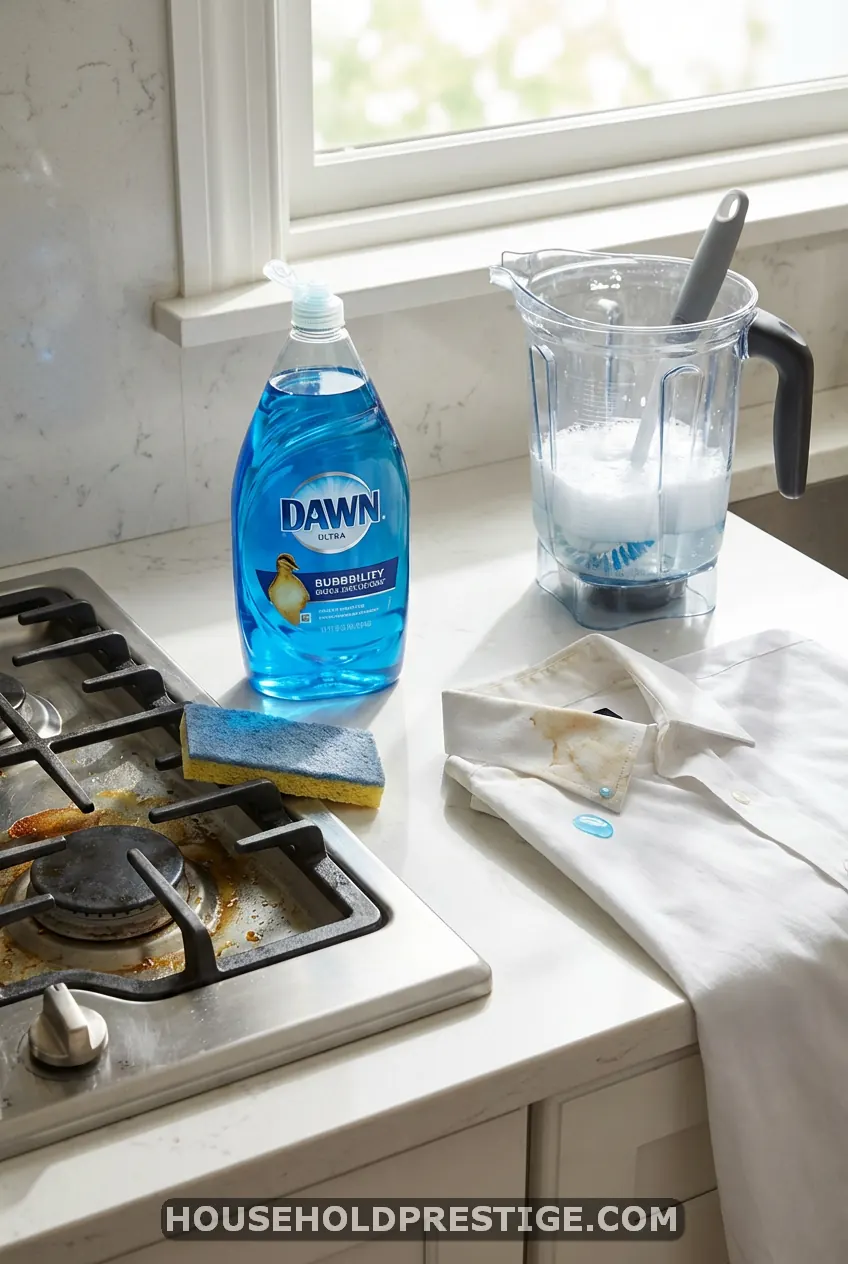
Dawn dish soap (the blue original) is the Swiss Army knife of house cleaning tips.
Grease stain on your shirt? Dab Dawn directly, let it sit 10 minutes, wash normally. Greasy stovetop? Dawn and warm water. Stuck-on residue in a blender? Fill halfway with warm water, one drop of Dawn, run for 30 seconds. Ring around the bathtub? Dawn on a scrub brush.
A 19-oz bottle costs about $4. You’ll use it everywhere.
8. The “One In, One Out” Rule Prevents Clutter Before It Starts
New coffee mug comes in. Old coffee mug goes to the donation bin. New throw pillow? One existing pillow leaves.
It sounds rigid. It works. Clutter is the reason cleaning takes so long. Less stuff means less to clean around, under, and behind. This isn’t a cleaning hack — it’s a cleaning prevention strategy.
9. Why Your “Clean” Kitchen Sponge Is Making Things Worse (A Cautionary Tale)
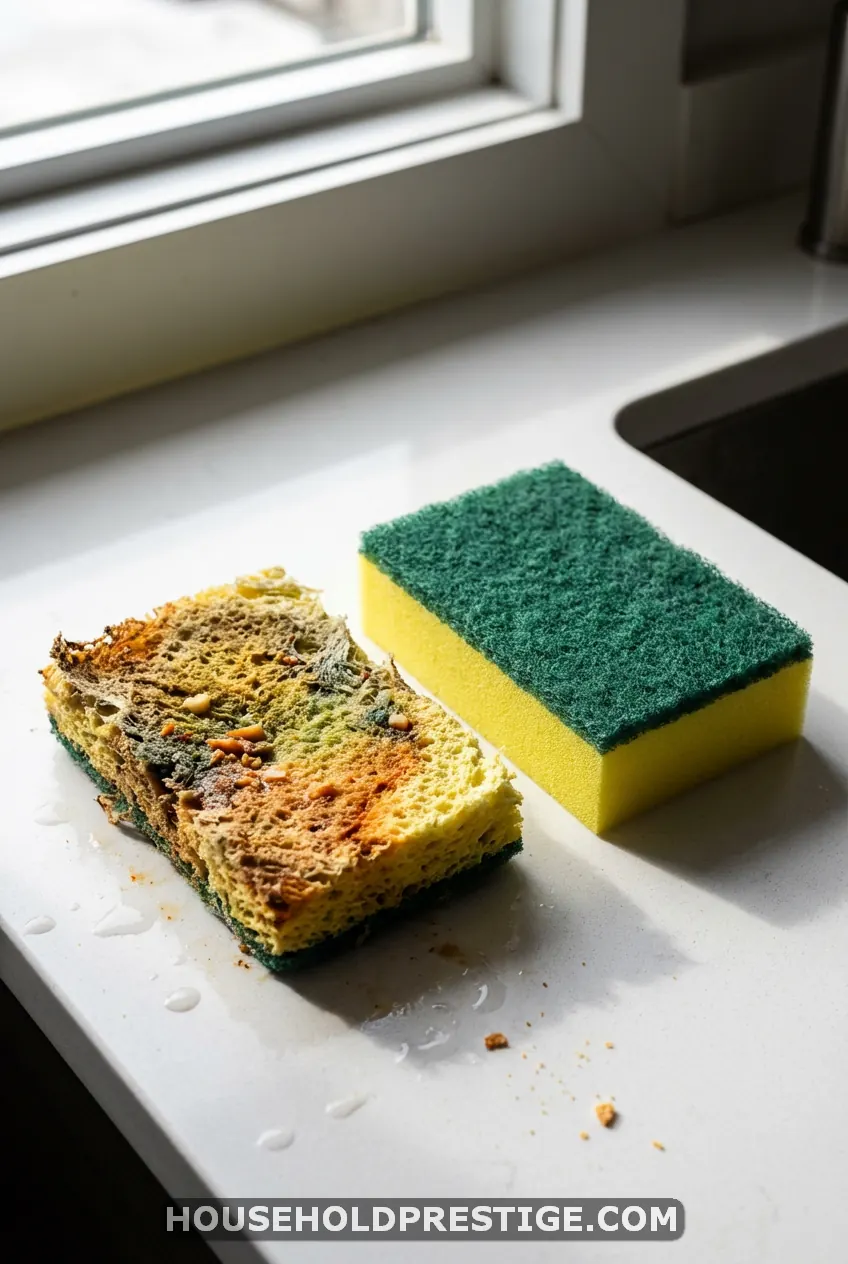
I used to microwave my kitchen sponge to “disinfect” it. Saw it on a blog somewhere. Felt productive about it.
Then I read the 2017 study from Scientific Reports that tested 14 used kitchen sponges. The findings made me throw mine out immediately. The researchers found 362 different species of bacteria per cubic centimeter. For perspective, that density rivals what you’d find in a fecal sample. Microwaving? It killed the weaker bacteria and gave the nastier, more resistant strains room to spread.
My sponge was basically a bacteria hotel, and I was wiping it across every plate my family ate off of.
I switched to dishcloths. A fresh one every day. Toss the used one in the laundry. Seven cloths in rotation costs about $10 and lasts for years. If you insist on sponges, replace them weekly — not monthly, not “when they smell.” Weekly.
The grossest part? That “clean” smell after microwaving a sponge is just heated bacteria. Not cleanliness.
10. Vinegar and Baking Soda Don’t Work Together
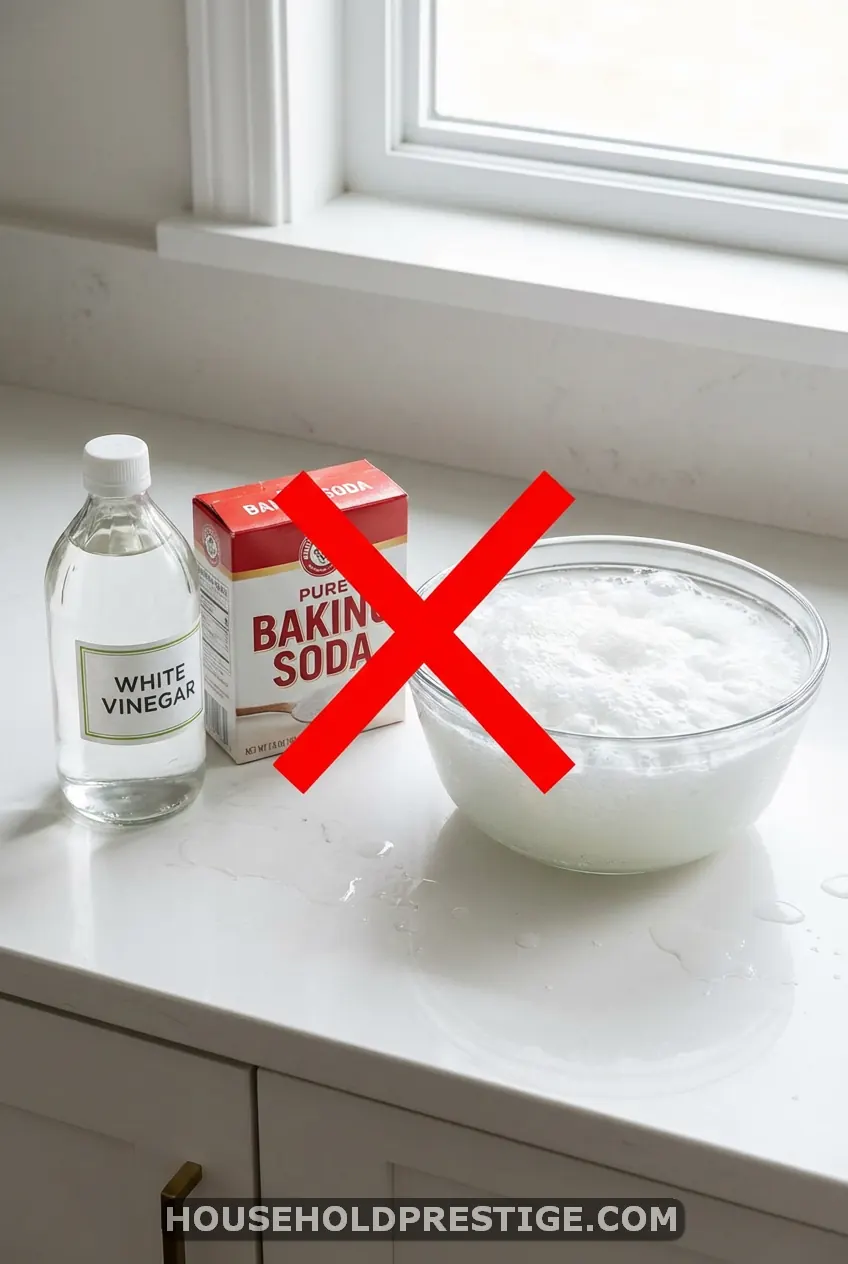
What Most People Think
Mixing vinegar and baking soda creates a powerful cleaning reaction. The fizzing means it’s working. Every “natural cleaning” blog recommends it.
The Reality
That impressive fizz? It’s an acid-base reaction. Vinegar (acetic acid) reacts with baking soda (sodium bicarbonate) and produces… carbon dioxide, water, and sodium acetate. In plain terms: salt water. You’re watching the cleaning power of both ingredients cancel each other out in real time.
Separately, they’re both useful. Vinegar cuts grease and dissolves mineral deposits (hard water stains, showerhead buildup). Baking soda is a mild abite that scrubs without scratching. Together, they neutralize into nothing.
Use them for different jobs. Never in the same bucket.
11. Squeegee Your Shower After Every Use
Sixty seconds. That’s all it takes.
A $10-15 shower squeegee (OXO’s stainless steel model sticks to tile with a suction cup) prevents 90% of water spots and soap scum buildup. The stuff that makes you spend 30 minutes deep-cleaning every week? It starts with water droplets that dry in place.
Squeegee the glass and walls. Done. Your “deep clean” becomes a five-minute wipe-down instead.
12. Declutter Before You Clean
Cleaning around clutter is rearranging mess. Spend 5 minutes clearing surfaces first. Put items where they belong. Then clean the actual surface.
You’ll finish twice as fast and the room will look 10 times better.
13. The Full Kitchen Deep-Clean Protocol (Under 90 Minutes)

Your kitchen collects grease, crumbs, and bacteria faster than any room in your house. Most people spot-clean daily but never tackle the deeper layers. Here’s the system that handles everything in one focused session.
What You Need
- Degreaser spray (Krud Kutter or Zep Heavy-Duty, $5-8)
- Dish soap
- Baking soda
- White vinegar in a spray bottle
- 4 microfiber cloths
- Old toothbrush
- Trash bag
The 90-Minute Sequence
Minutes 1-10: Pre-treat everything.
Spray degreaser on the stovetop, range hood filter, and any greasy backsplash areas. Spray the inside of the microwave with a vinegar-water mix (50/50). Open the oven door and spray the inside if it needs it. Close everything and walk away. The chemicals need contact time.
Minutes 10-25: Empty and wipe cabinets.
Pick two cabinets per session (rotating monthly means you hit them all in 3-4 months). Remove everything. Toss expired items. Wipe shelves with a damp cloth and mild soap. Replace items organized by category. Pro move: line shelves with washable liner ($6 per roll) so next time you just swap the liner.
Minutes 25-40: Tackle the appliances.
Wipe down the microwave interior — the vinegar loosened everything. Pull the oven racks and scrub in the sink with baking soda paste (3:1 baking soda to water). Wipe the stovetop — the degreaser did the heavy lifting. Use the toothbrush around burner rings and knobs.
For the range hood filter: soak in a basin of very hot water with a tablespoon of dish soap and a tablespoon of baking soda. Let it sit 15 minutes. Grease slides right off. Air dry on a towel.
Minutes 40-55: Counters, backsplash, and sink.
Clear counters completely. Spray with all-purpose cleaner. Wipe in long strokes, not circles (circles redistribute grime). Hit the backsplash — grease splatters land higher than you think. For the sink, sprinkle baking soda, scrub with a wet cloth, rinse, then spray vinegar to disinfect. Use the toothbrush around the drain and faucet base.
Minutes 55-70: Floors.
Sweep or vacuum first. Always. Mopping over crumbs makes paste. Use the two-bucket method from Tip #2. Start at the farthest corner from the exit. Work backward. Don’t mop yourself into a corner.
Minutes 70-90: Details and finish.
Wipe cabinet fronts (especially near the stove — grease film builds up invisibly). Clean light switch plates with a disinfecting wipe. Wipe the fronts of small appliances. Empty and reline the trash can. Replace dish towels and sponges.
Why This Works
Batch processing. Instead of cleaning one thing at a time start to finish, you pre-treat multiple surfaces and let chemicals work while you handle other tasks. The degreaser does most of your stovetop work for you. The microwave softens itself. You’re working smarter.
Common Mistakes to Avoid
- Scrubbing the stovetop immediately without degreaser soak time. You’ll scratch the surface and exhaust yourself.
- Forgetting the range hood filter. It recirculates grease vapor when clogged. That invisible film on your cabinets? This is the source.
- Using the same cloth for the counter and the floor. Color-code your microfiber: one color for counters, another for floors, a third for bathrooms.
14. Line Your Trash Cans
Put 5-6 extra bags at the bottom of the can. When you pull one bag out, the next one is already there. No more dripping garbage juice down the hallway while you fumble for a new bag.
15. Use a Lint Roller on Lampshades
Fabric lampshades attract dust like magnets. A damp cloth pushes dust into the fabric. A vacuum hose is too aggressive. A lint roller peels dust off in clean strips without damaging the shade.
Takes 30 seconds per lamp. Do it monthly.
16. The 10-Minute Nightly Reset

This replaced my marathon Saturday cleaning sessions. Every night, 10 minutes, same routine:
- Load the dishwasher or hand-wash anything in the sink.
- Wipe kitchen counters.
- Put stray items back where they belong (shoes, jackets, mail, toys).
- Quick sweep of the kitchen floor if needed.
- Lay out anything you need for tomorrow.
That’s it. The house never hits “disaster zone” because you’re preventing the snowball. Saturday mornings went from 3-hour scrubbing marathons to 45-minute maintenance sessions. The compound effect of this single habit is massive.
17. Hydrogen Peroxide Beats Bleach for Grout
Bleach works on grout but damages it over time. The chlorine breaks down the calcium compounds in grout, making it porous and weaker — which means it gets dirty faster, which means you bleach it more. Cycle continues until the grout crumbles.
Hydrogen peroxide (3% from the drugstore, $1-2 a bottle) whitens grout without degrading it. Pour it directly on grout lines. Let it sit 10 minutes. Scrub with an old toothbrush. Rinse.
For stubborn stains, make a paste: hydrogen peroxide plus baking soda. Apply, wait 15 minutes, scrub, rinse. Works on floor grout, shower grout, and countertop grout.
18. Dryer Sheets Are Multi-Taskers You Didn’t Know About
Used dryer sheets. Don’t throw them out after one cycle.
Run one along baseboards — the anti-static coating repels dust for weeks. Tuck one inside smelly shoes overnight. Wipe your TV or computer screen gently to reduce static dust cling. Scrub soap scum off glass shower doors (seriously, it works).
Free. Because you already paid for them once.
19. Pillowcases Clean Ceiling Fans Without the Mess

Slip an old pillowcase over each fan blade. Press gently and slide it off. All the dust stays inside the pillowcase instead of raining down on your bed or furniture.
Shake the pillowcase out outside. Wash it. Done.
20. Stop Using Glass Cleaner on Everything
Glass cleaner is for glass. Not countertops (it leaves residue on granite and marble). Not stainless steel (it streaks). Not wood (it dries out the finish).
Granite and marble need a pH-neutral cleaner or just warm water with a drop of dish soap. Stainless steel needs a dedicated stainless spray or olive oil on a microfiber cloth. Wood surfaces need a damp cloth followed by a dry one.
Using the wrong product on the wrong surface is why things look worse after you clean them.
21. Wash Your Washing Machine Monthly
Your washing machine smells. You’ve probably noticed.
Front-loaders are worse because the rubber gasket traps moisture and mildew. Run an empty hot cycle with 2 cups of white vinegar once a month. Then run another empty hot cycle with half a cup of baking soda. Wipe the gasket and door with a dry cloth after every load.
Top-loaders: same vinegar cycle, but also wipe the top rim and underside of the lid where gunk collects.
A machine that smells clean produces laundry that smells clean. Logical, but most people never do this.
22. Invest in a Good Doormat — Not a Cute One
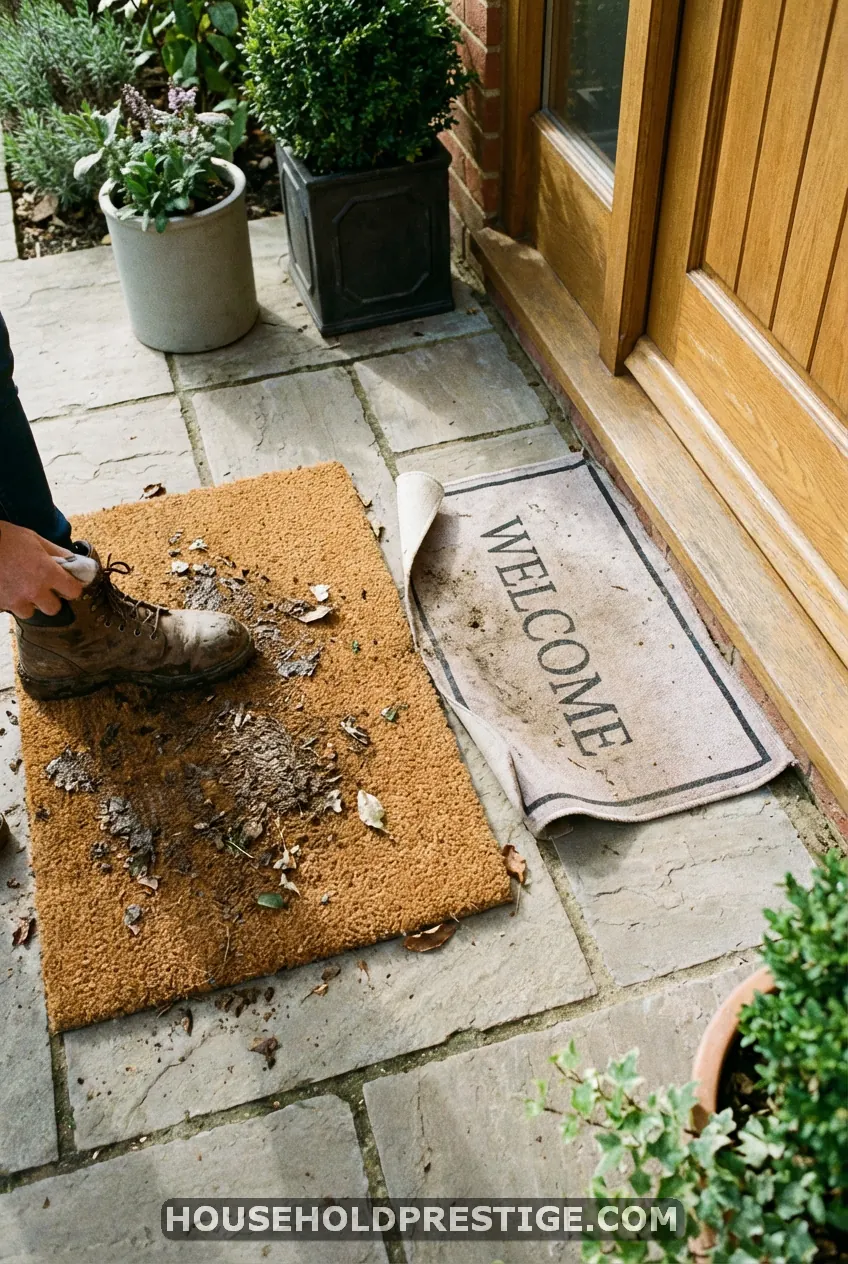
80% of the dirt in your house enters through your front door. A thin decorative mat does nothing.
Get a coarse coir or rubber-backed commercial-grade mat. At least 24×36 inches. The Gorilla Grip Original ($20-25 on Amazon) handles heavy traffic and washes with a garden hose. Pair it with an interior mat for a two-stage wipe.
Your vacuum will thank you.
23. Clean As You Cook
Waiting until after dinner to clean the kitchen is why people hate cleaning the kitchen.
While the pasta boils, wash the cutting board and knife. While the sauce simmers: wipe the counter where you prepped. While food cools: load the dishwasher with mixing bowls and measuring cups.
By the time dinner is over, you have plates and utensils to clean. Five minutes, tops. Instead of a counter full of crusted pots and a sink piled high.
This habit alone saves 15-20 minutes of post-dinner dread every single night.
24. Baking Soda Paste Fixes Stainless Steel Scratches
Mix baking soda with a few drops of water until it forms a thick paste. Apply in the direction of the steel grain (look closely — you’ll see faint lines). Rub gently with a soft cloth. Wipe off with a damp cloth. Dry immediately.
Minor scratches disappear. Deeper ones become much less visible. A $2 box of baking soda versus a $50 stainless steel repair kit.
25. Keep a Donation Box Permanently Open
In a closet. Always open. Always there.
See something you haven’t used in six months? Toss it in. Shirt that doesn’t fit? In the box. Kitchen gadget collecting dust? Box.
When it’s full, drop it off. Start a new one. No big decluttering weekend needed. The process becomes automatic, and your house stays lighter without a single Saturday sacrifice.
26. Rubber Gloves Pick Up Pet Hair Better Than Lint Rollers
Dampen a rubber kitchen glove. Run your hand across upholstery, carpet, or fabric surfaces. The friction and static grab pet hair into satisfying clumps you can just pick up and toss.
Faster than a lint roller. Cheaper than a fabric shaver. Works on car seats too.
27. The Five-Minute Bathroom Rule
Every morning when you brush your teeth, spend the brushing time doing one tiny bathroom task. Wipe the mirror with your free hand and a cloth. Or wipe the faucet. Or spray the counter and wipe it down.
Two minutes of brushing. Two minutes of cleaning a single surface. One minute to rinse your hands and move on.
Your bathroom never needs a “deep clean” because it never gets deep-dirty. Small, consistent effort beats a monthly scrubbing marathon every time.
Your Home Doesn’t Need Perfection — It Needs a System
These 27 house cleaning tips aren’t about spending more time cleaning. They’re about spending smarter time. The two-bucket method, the nightly reset, the cooking cleanup — they all share one principle: prevent the mess from compounding.
Pick three that fit your routine this week. Master those. Add more when they feel automatic. A clean home isn’t something you achieve once and maintain forever. It’s a series of small decisions made on repeat.
Your Tuesday-night future self will be grateful you started today.
Frequently Asked Questions
How often should I deep clean my whole house?
A full deep clean works well on a quarterly cycle if you maintain daily habits like the 10-minute nightly reset and clean-as-you-cook approach. High-traffic areas like the kitchen and bathrooms benefit from monthly attention to grout, appliance interiors, and cabinet surfaces. If you’re following these house cleaning tips consistently, deep cleans become shorter each time.
What’s the minimum cleaning supply kit I need?
You can clean an entire house with five products: an all-purpose spray, white vinegar, baking soda, dish soap (Dawn or similar), and microfiber cloths. That’s roughly $15-20 in supplies. Everything else is marketing. Specialty products have their place (granite cleaner, stainless spray), but these five handle 90% of household jobs.
How do I get my family to help with cleaning?
Assign specific, short tasks rather than vague instructions. “Wipe the kitchen counter after dinner” works. “Help clean the kitchen” doesn’t. Kids as young as 3 can put toys in a bin. Teens can manage their own bathroom if they have a caddy with supplies under the sink. The key is making the task obvious and the tools accessible.
What’s the fastest way to clean before guests arrive?
Focus on the three rooms guests will see: the living room, kitchen, and guest bathroom. Declutter surfaces first (toss everything into a laundry basket and hide it in a bedroom). Wipe kitchen counters and stovetop. Quick-clean the toilet, sink, and mirror. Vacuum or sweep visible floors. Skip everything else. Total time: 20-25 minutes.
Is it worth hiring a professional cleaner?
For deep cleans, yes. A professional team with commercial-grade equipment handles things like carpet extraction, window tracks, and behind-appliance cleaning faster and more thoroughly than most homeowners can. Expect $150-300 for a standard 3-bedroom home. For weekly maintenance, it depends on your budget and time — but nothing replaces daily habits for keeping a baseline.