

You know that sinking feeling when you open a closet, and stuff tumbles out? When your kitchen counter disappears under appliances you use twice a year? When guests arrive, and you frantically shove things into the bedroom because there’s nowhere else for them to go?
Your house isn’t too small. You’re just working against it instead of with it.
I’ve lived in 650 square feet with a partner, a dog, and what felt like a thousand hobbies. The breaking point came when I couldn’t find my car keys for the third time in a week—they were buried under mail on a surface that was supposed to be a dining table. That’s when I stopped making excuses and started getting strategic.
These 17 hacks aren’t about buying expensive organizers or Pinterest-perfect labels. They’re about reclaiming space you didn’t know you had and making your small house work the way you need it to—without the clutter, the chaos, or the constant apologizing to guests.
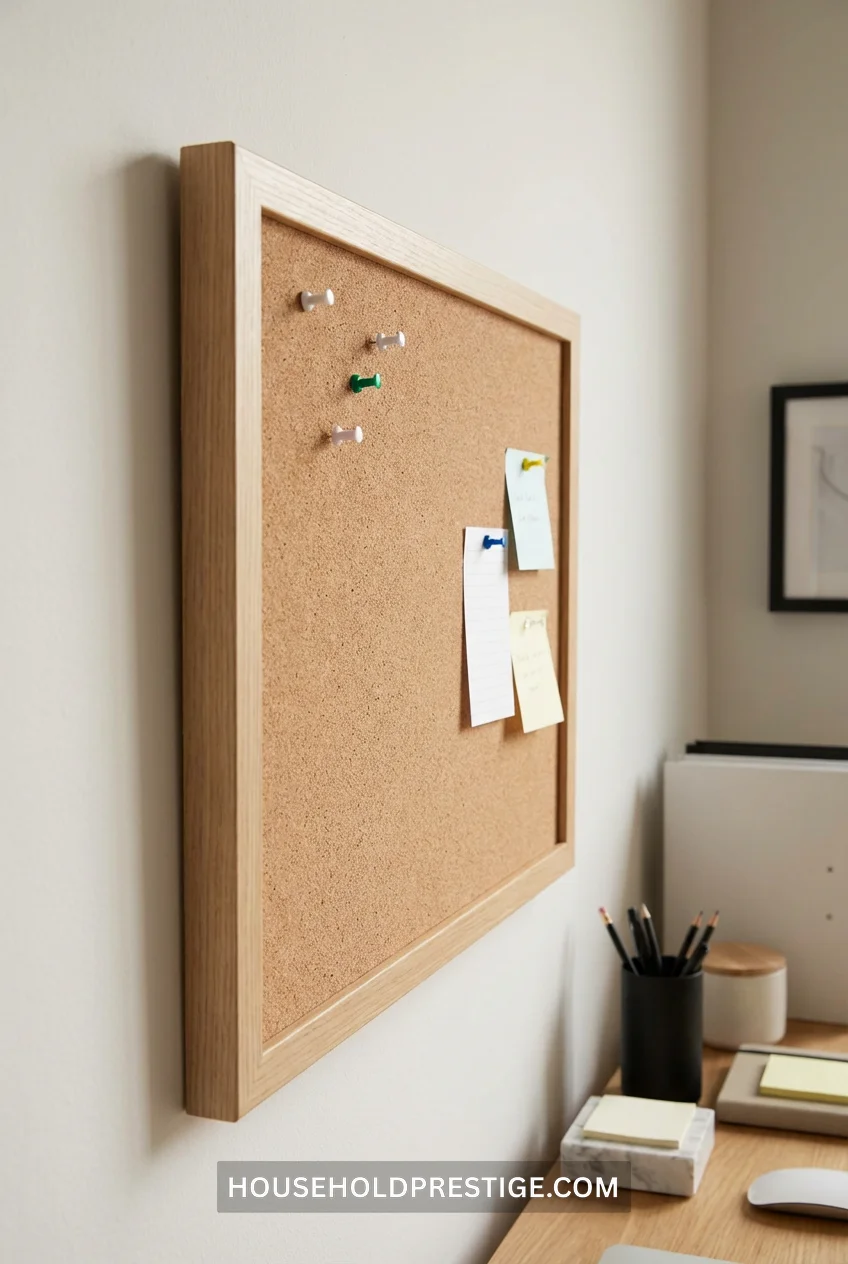
1. Install Floating Shelves 18 Inches Below Your Ceiling
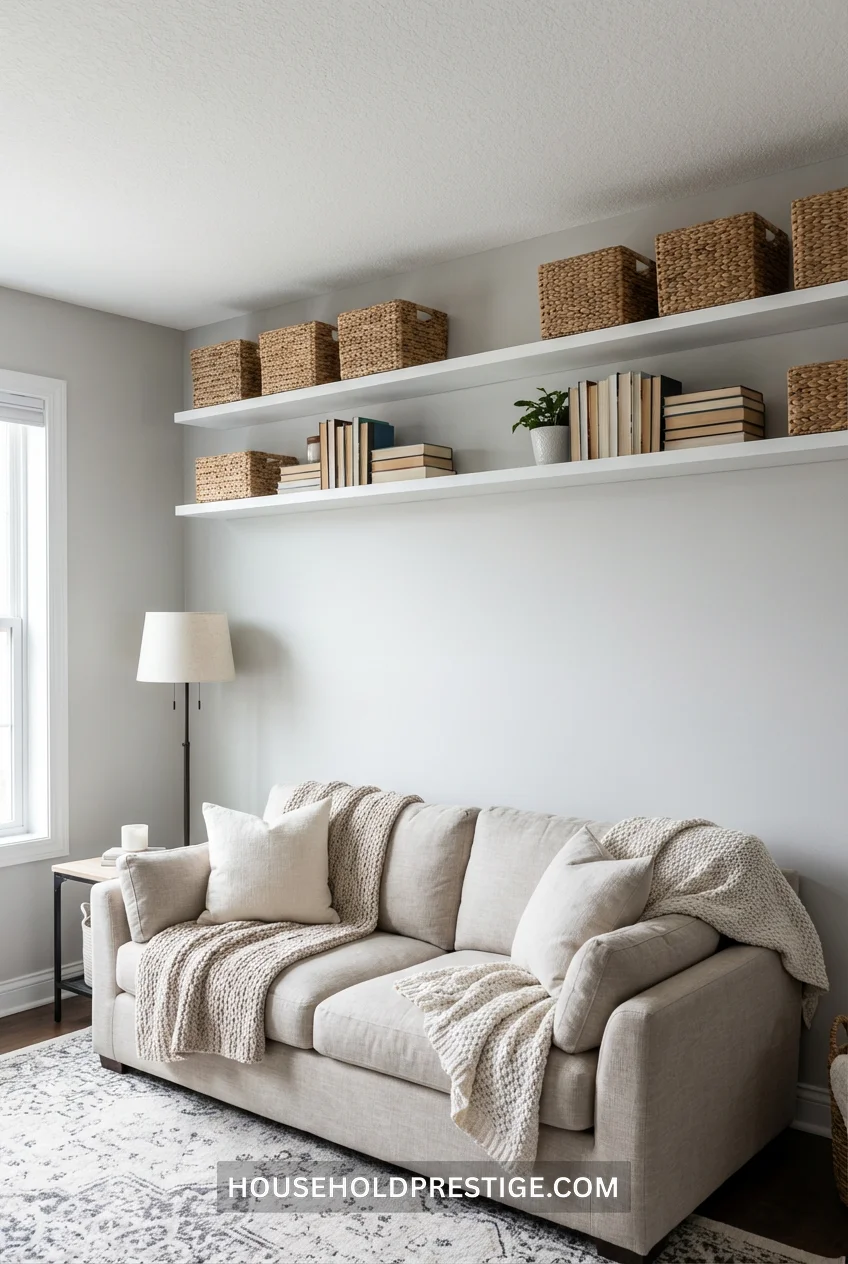
That dead space between the top of your bookshelf and the ceiling? You’re wasting 3-4 feet of storage in every single room.
Mount floating shelves 18 inches below your ceiling line and suddenly you have an entire storage layer most people ignore. This works everywhere: above doorways in hallways, over the toilet in bathrooms, spanning the length of your bedroom wall.
What to store up there: Seasonal items (holiday decor, winter blankets), books you’ve already read, photo albums, luggage, bulk pantry items in matching containers, extra linens.
Pro tip: Use a sturdy stud finder and heavy-duty anchors—these shelves need to hold 40-50 pounds each. IKEA’s LACK wall shelves run $15-20 and support up to 33 pounds when properly mounted.
Cost reality: $60-100 for three rooms (shelves + brackets + anchors).
The visual trick here matters too. Drawing the eye upward makes your ceiling appear higher than it actually is, which psychologically makes the whole room feel larger.
2. Put Your WiFi Router Inside a Decorative Box on a High Shelf
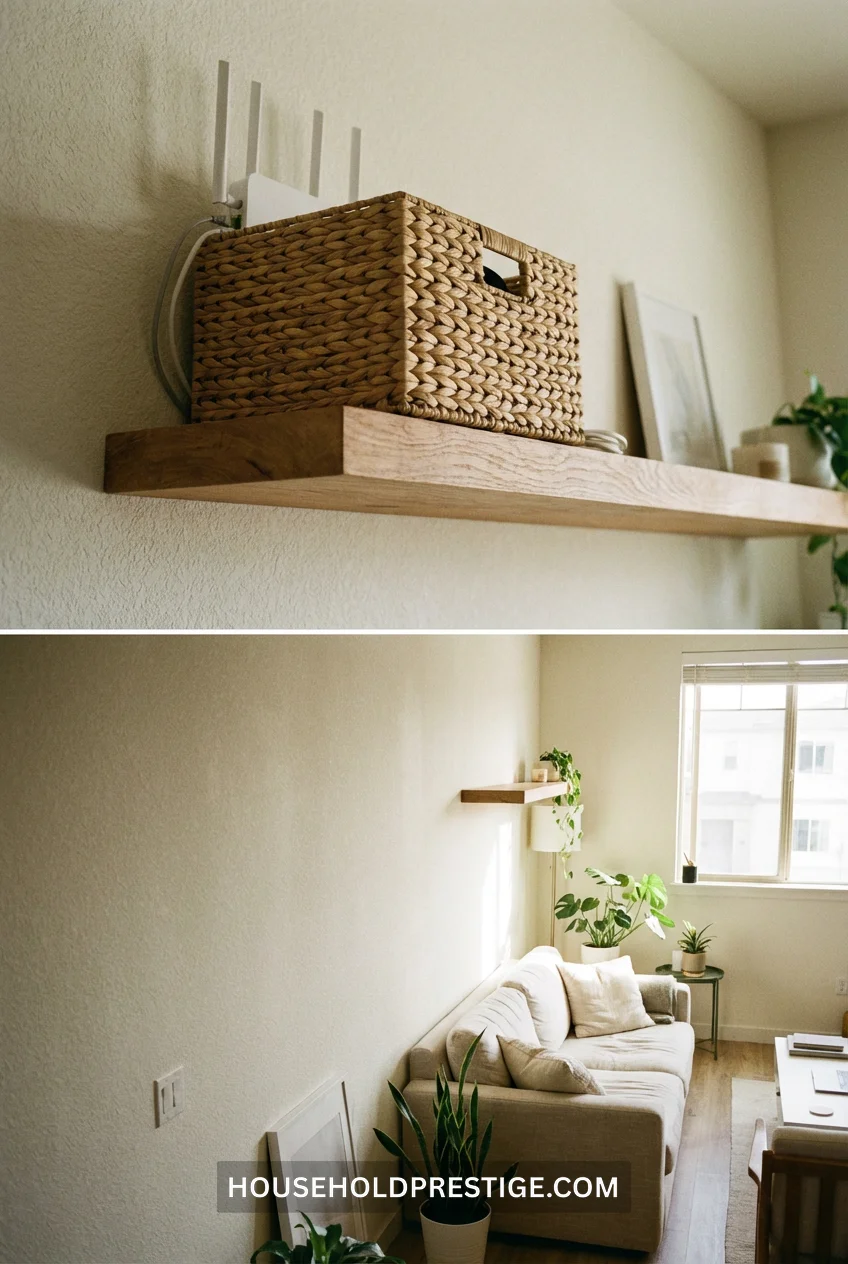
Routers, modems, and their tangle of cords eat up surface space and look terrible. Stick them in a decorative box with ventilation holes on your newly installed high shelf.
The catch: Make sure the box has adequate airflow—woven baskets or boxes with slatted sides work best. Drill a small hole in the back for cords.
3. Replace Traditional Nightstands with Wall-Mounted Swing-Arm Shelves
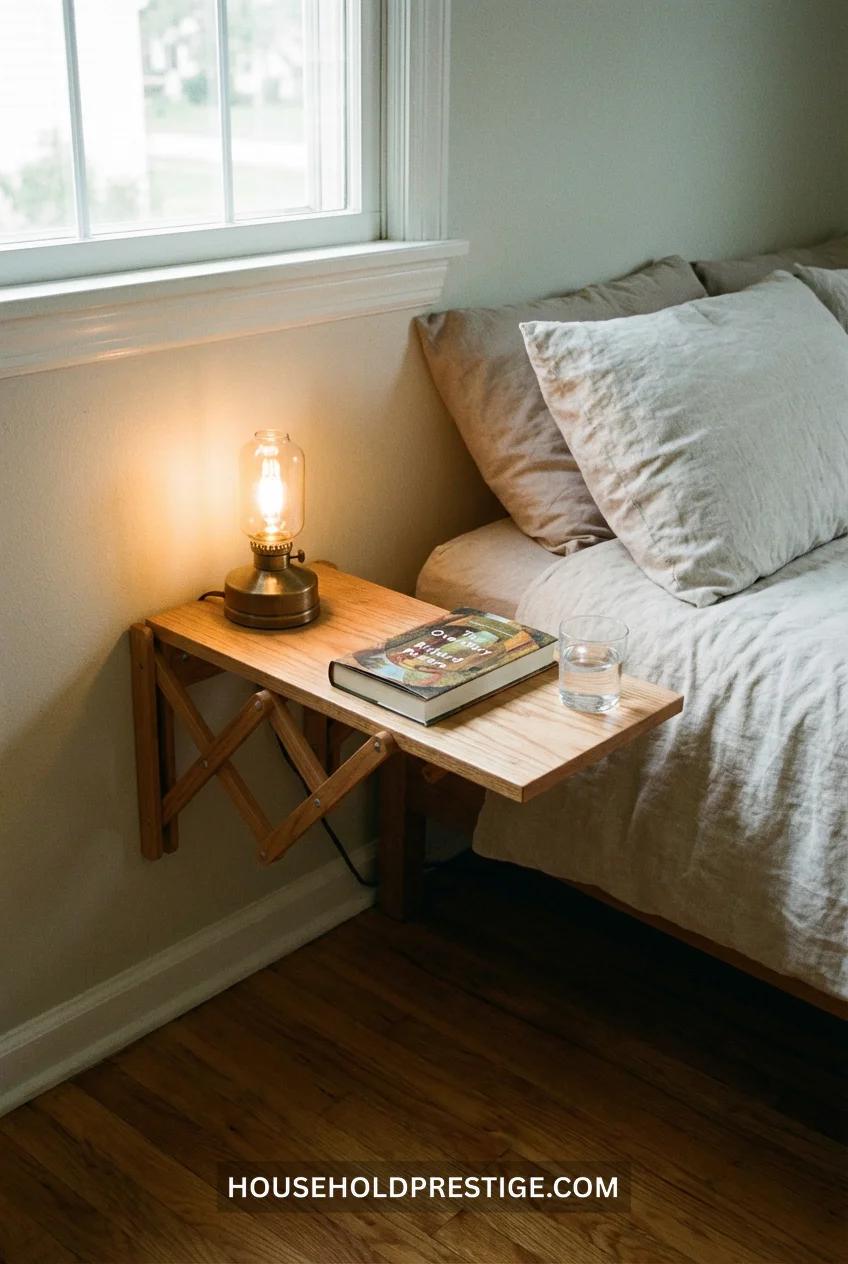
Nightstands take up 3-4 square feet of floor space per side of the bed. Swap them for wall-mounted shelves with swing arms and you gain back that entire footprint while keeping everything you need within reach.
IKEA’s BJÄRNUM series costs $10-15 per shelf and folds flat against the wall when not in use. You can layer two at different heights for more surface area without any additional floor space.
Why this works: Floor space is premium real estate in small houses. Every square foot you free up makes the room feel exponentially larger because you can move through it more easily.
4. Hang Curtains from the Ceiling, Not the Window Frame
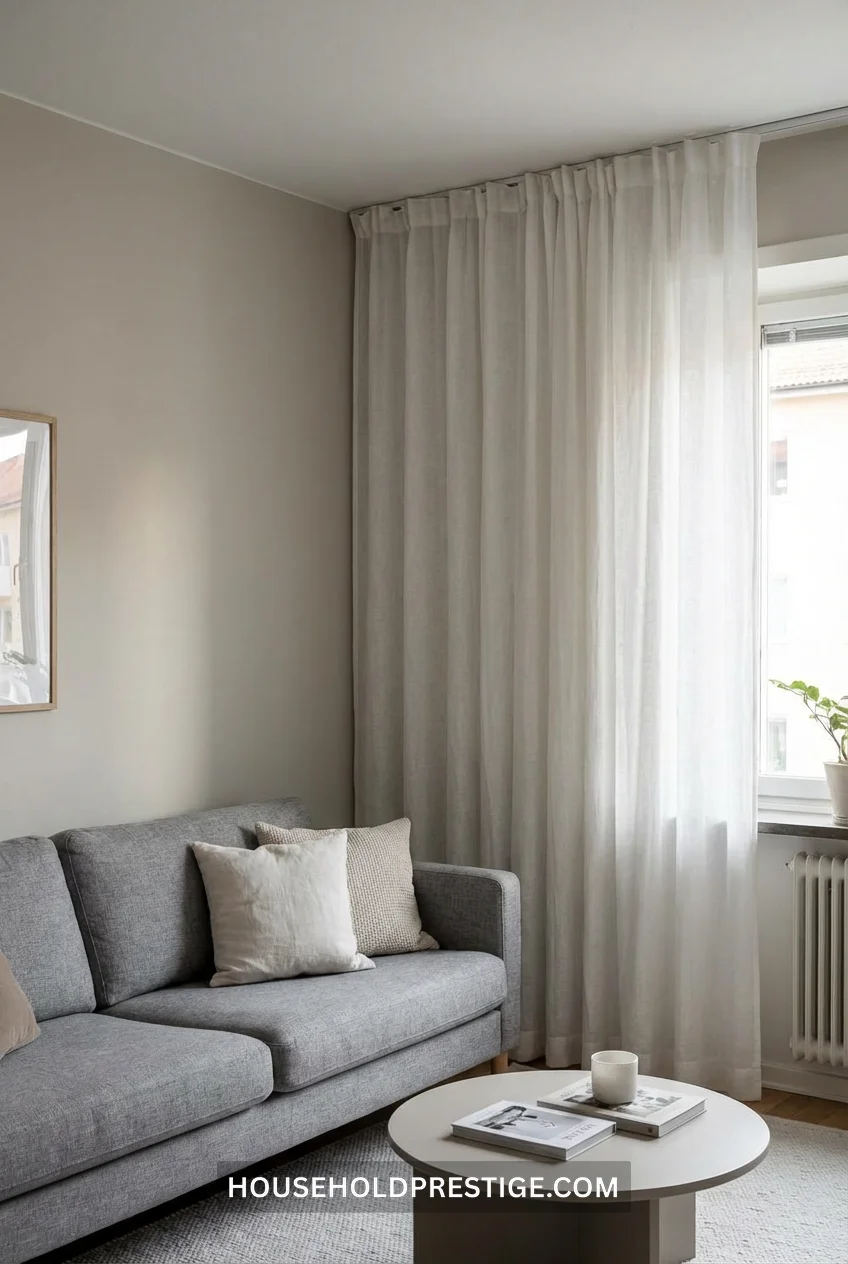
Mount your curtain rod at the ceiling line and let the fabric pool slightly on the floor.
This single change makes 8-foot ceilings read as 10 feet. The unbroken vertical line tricks your brain into perceiving more height, which translates to feeling more spacious overall.
Installation note: Use a tension rod system or ceiling-mounted brackets. IKEA’s RÄCKA system costs $8-12 and supports standard curtain panels.
5. Create a Murphy Desk That Folds Into a Picture Frame
Here’s the deep dive on the hack that saved my work-from-home sanity.
Why It Works
Traditional desks occupy 12-16 square feet permanently. A Murphy desk uses zero floor space when closed and converts a blank wall into functional workspace in three seconds.
Dimensions & Specifications
The ideal Murphy desk measures 36 inches wide by 18 inches deep when open. When closed, it should be no more than 3 inches thick—thin enough to read as wall decor rather than furniture.
Step-by-Step Build Process
Materials needed:
- 3/4-inch plywood sheet (36″ x 18″): $20
- Two heavy-duty folding shelf brackets (150lb capacity): $25 at Home Depot
- Cork board or fabric panel for decorative front: $15
- Four 3-inch wood screws for stud mounting
- Picture frame molding (optional): $12
- Wood stain or paint: $8
Total cost: $80-100
- Cut plywood to your desired dimensions
- Sand all edges smooth and round the corners slightly
- Mount folding brackets to studs at 30-32 inches from floor (standard desk height)
- Attach plywood to brackets with provided hardware
- Cover the underside (which becomes the “front” when closed) with cork board, fabric, or a painted design
- Add picture frame molding around edges for finished look
- Test the brackets with full weight before trusting them with your laptop
The Pro Move
Add a magnetic strip along the top edge to hold pens, small notebooks, and your phone when the desk is in use. When you fold it up, those items stay attached and hidden.
Common Mistakes to Avoid
Don’t mount into drywall alone—you need stud support. The brackets may claim they work with anchors, but under daily use with a laptop, monitor, and coffee cup, they’ll eventually fail.
Don’t skip the edge sanding—unfinished plywood edges catch on sleeves and leave splinters in your forearms.
Don’t forget the cord solution—drill a small hole in the back corner for charger cables, or use adhesive cord clips on the wall behind the desk.
When It’s Worth It
This makes sense if you work from home but don’t have space for a permanent desk, or if you need a workspace that completely disappears for hosting. It’s not worth it if you have a dedicated office room—just get a regular desk.
6. Use Tension Rods Inside Deep Cabinets to Create Vertical Baking Sheet Storage

Install tension rods vertically from top to bottom of deep cabinets. Slide baking sheets, cutting boards, and cooling racks between them. You just tripled your storage capacity in that space.
This takes 5 minutes and costs $8-12 for a pack of adjustable tension rods.
7. Mount a Fold-Down Ironing Board Inside a Closet Door
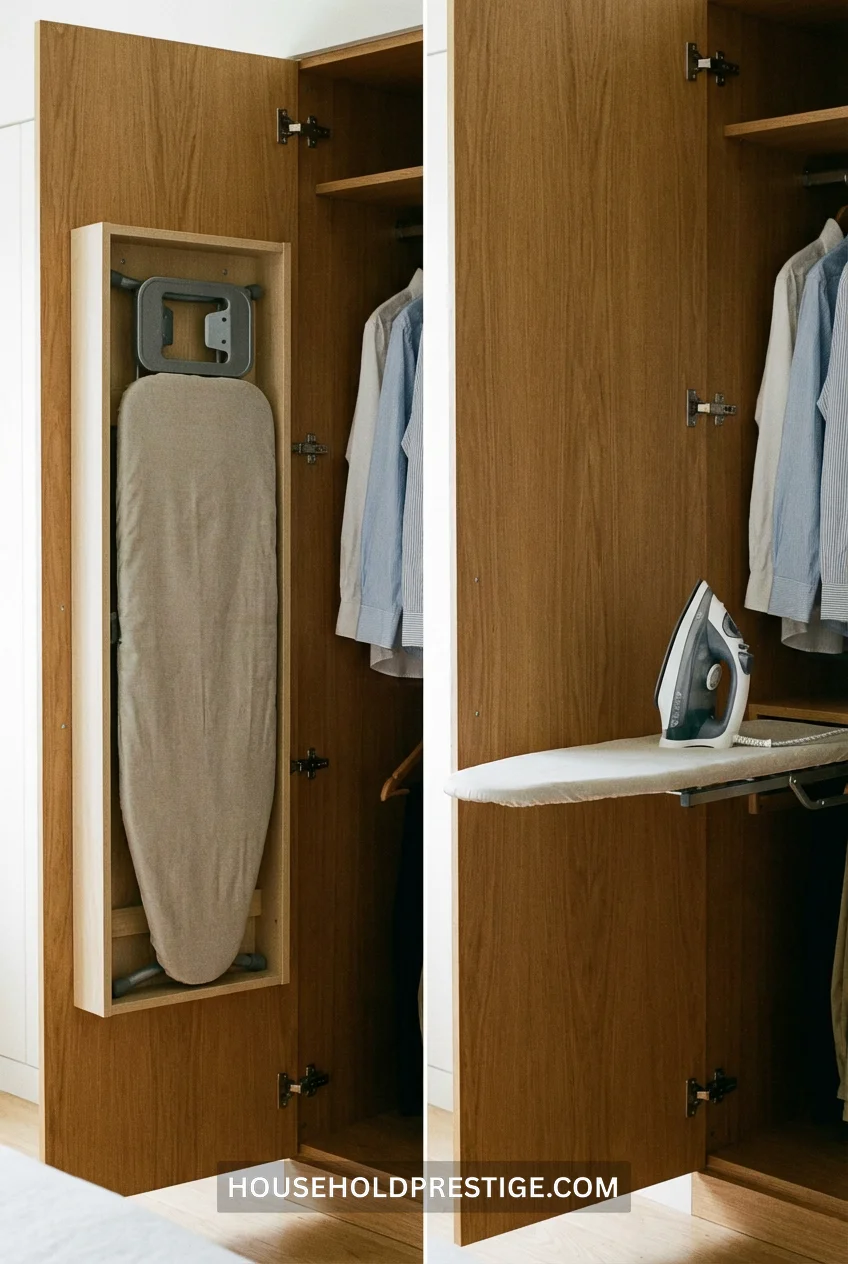
Freestanding ironing boards take up 4 square feet of closet floor space. Wall-mounted fold-down versions attach to the back of any closet door and use zero floor space when stored.
Cost: $40-60 for models that include storage for the iron itself.
8. Replace Your Coffee Table with Nesting Storage Ottomans
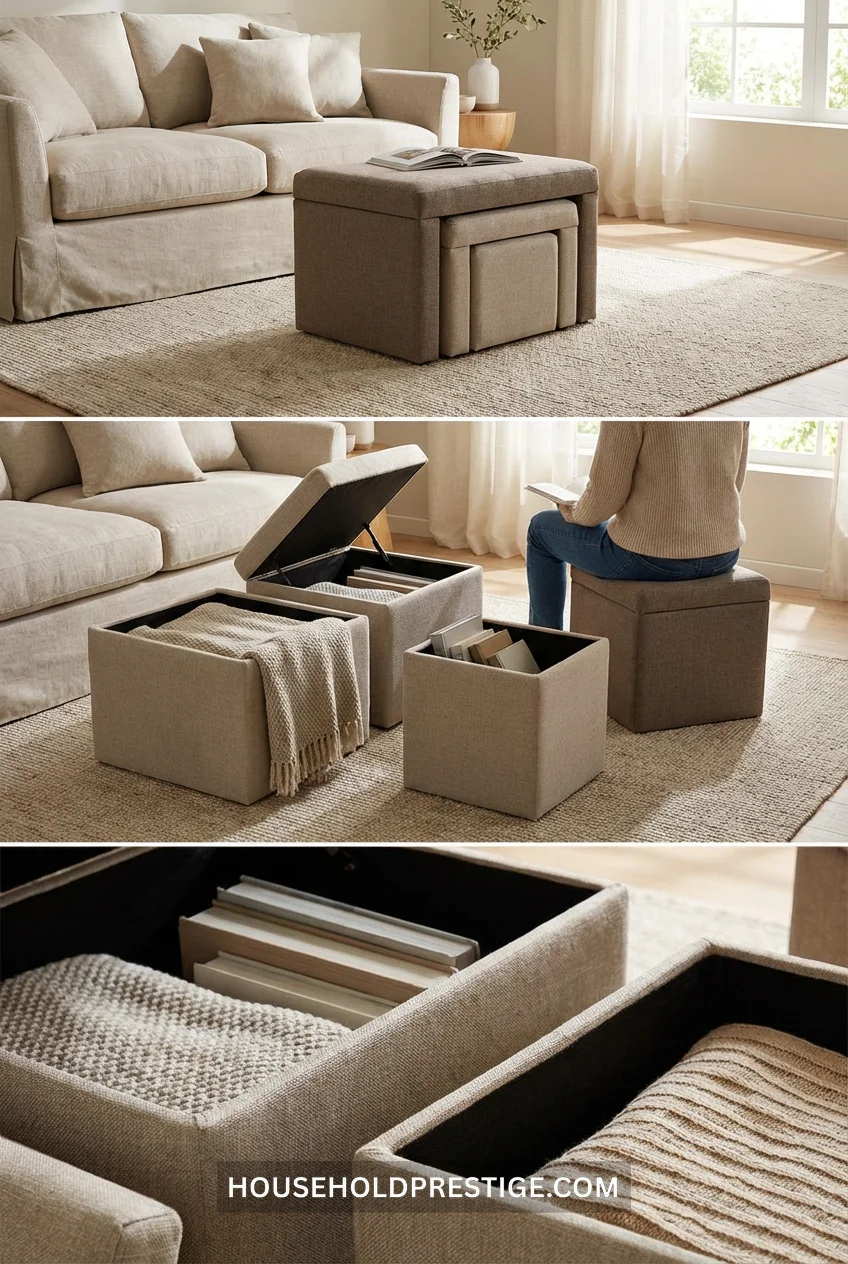
Coffee tables are dead space pretending to be furniture.
Nesting ottomans give you a footrest, extra seating when guests arrive, hidden storage inside each one, and the ability to rearrange them based on what you actually need that day. When you don’t need all three, the smaller ones tuck completely inside the largest.
Target’s Threshold collection offers sets of three storage ottomans for $80-120. Each holds approximately 50 pounds and stores blankets, remotes, magazines, or toys.
9. Install a Slim Rolling Cart in the 6-Inch Gap Between Your Fridge and Wall
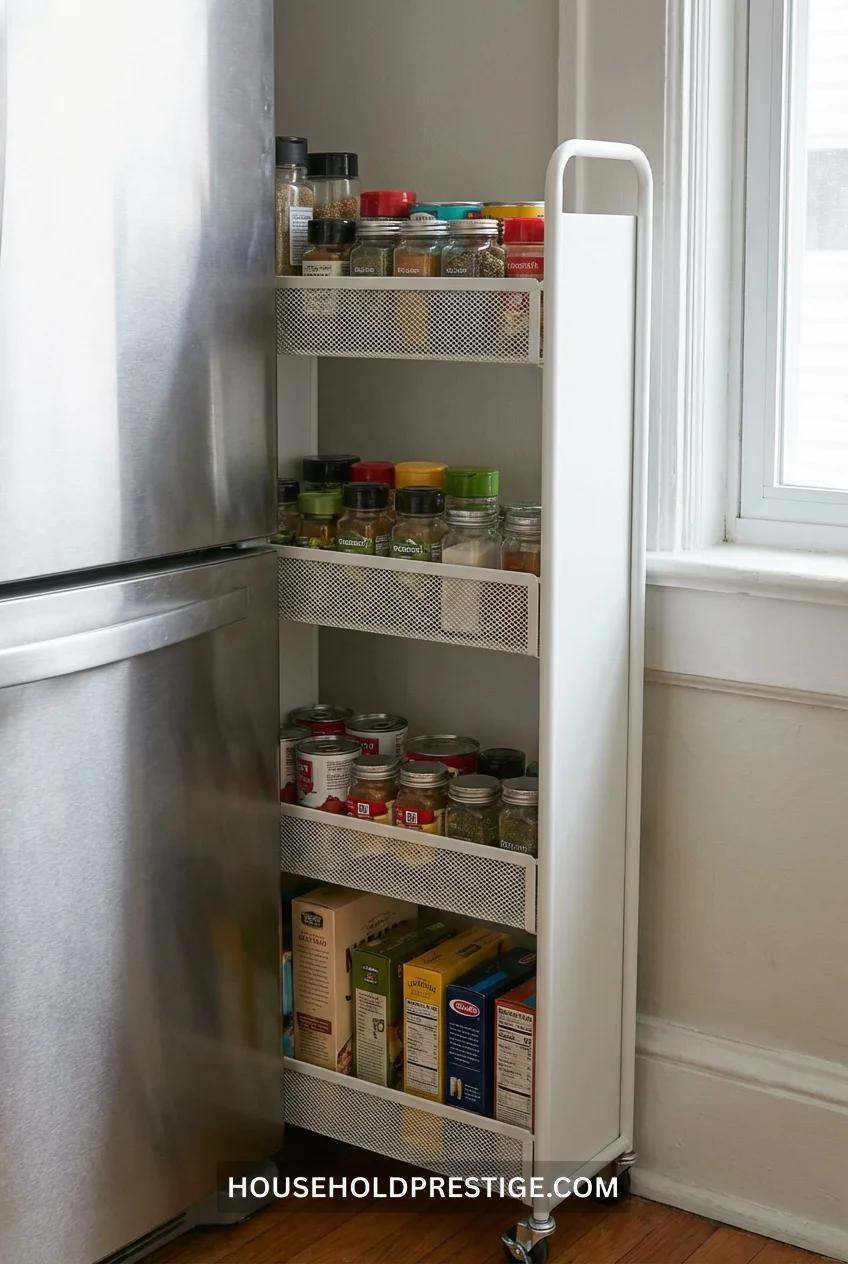
That narrow gap beside your fridge isn’t dead space—it’s hidden vertical storage.
Slim rolling carts (4-6 inches wide) slide into these gaps and typically have 3-4 tiers. Perfect for spices, canned goods, oils, or cleaning supplies.
Specific product: IKEA’s RÅGRUND cart ($30) fits 6-inch gaps and holds 22 pounds per shelf.
10. Swap Solid Closet Doors for Sliding Barn Doors or Curtains
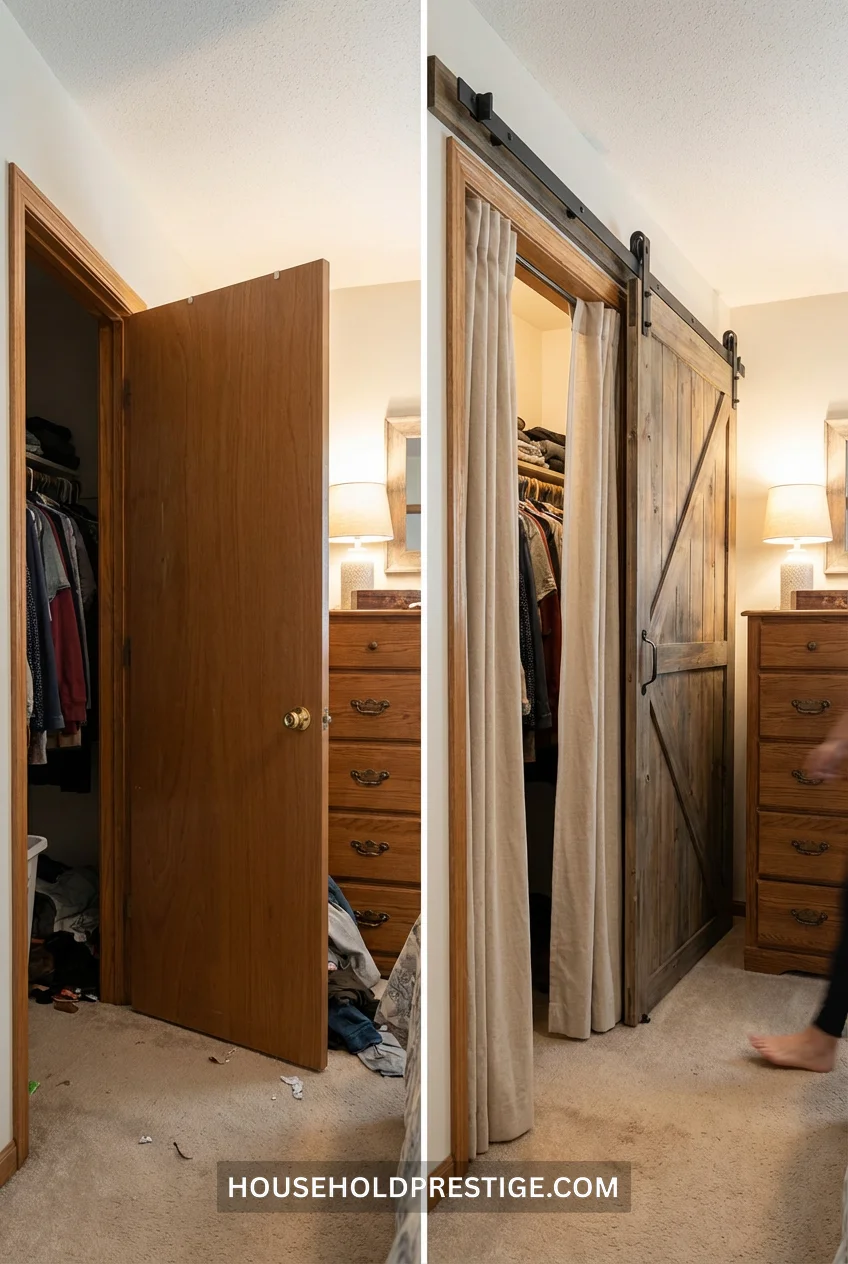
Traditional hinged doors require 3-4 feet of clearance to swing open. That’s unusable space in a small house.
Sliding barn door hardware costs $50-80 and works with your existing door. Or skip the door entirely and hang a ceiling-to-floor curtain for $20.
Installation time: 45 minutes with a drill.
Space reclaimed: 12-16 square feet per door.
11. Use Magnetic Knife Strips for Way More Than Knives
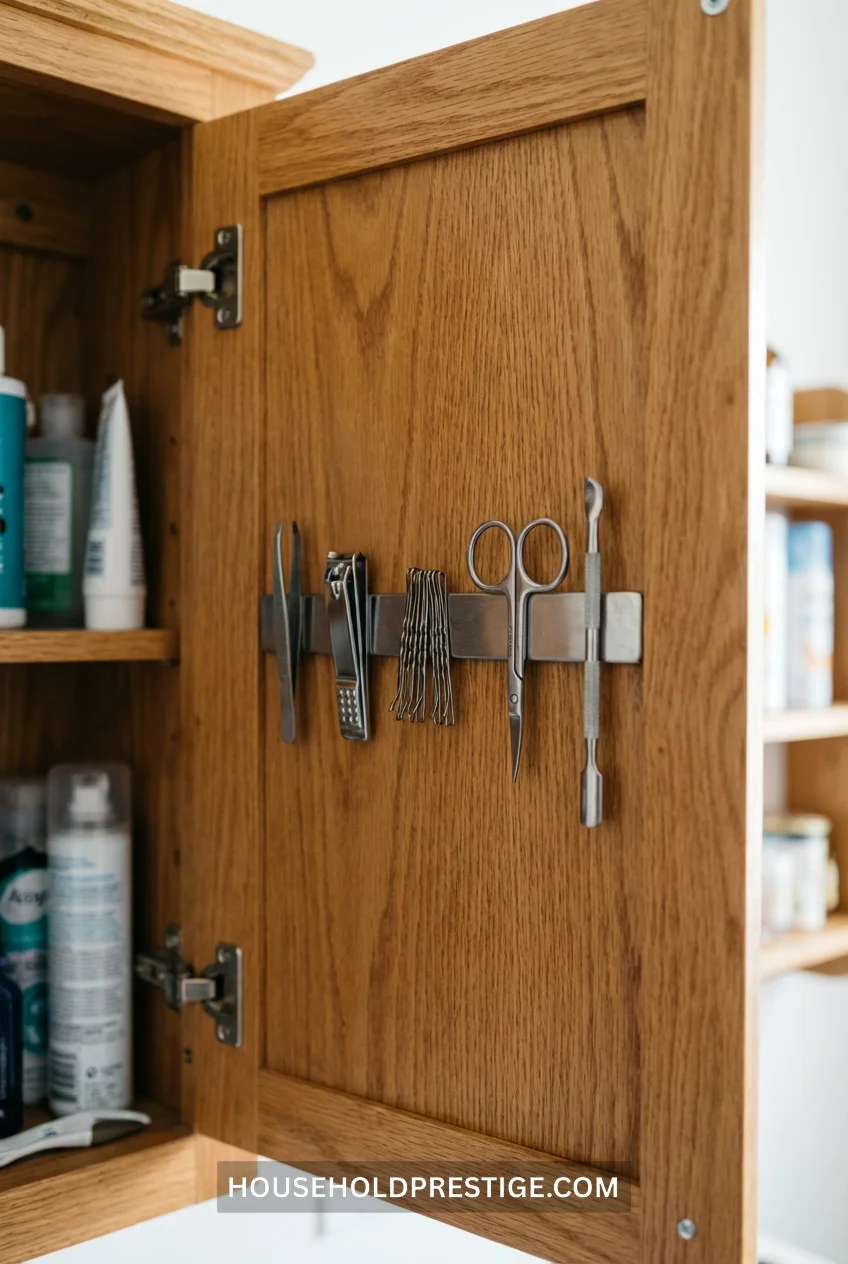
Bathroom: bobby pins, tweezers, nail clippers, scissors
Office: pens, scissors, letter openers
Kitchen: knives, but also spice tins, measuring spoons, kitchen shears
Garage/utility: screwdrivers, Allen keys, drill bits
Magnetic strips cost $8-15 and mount anywhere. They convert any vertical surface into organized tool storage.
12. Replace Your Shower Caddy with an Over-the-Door Shoe Organizer
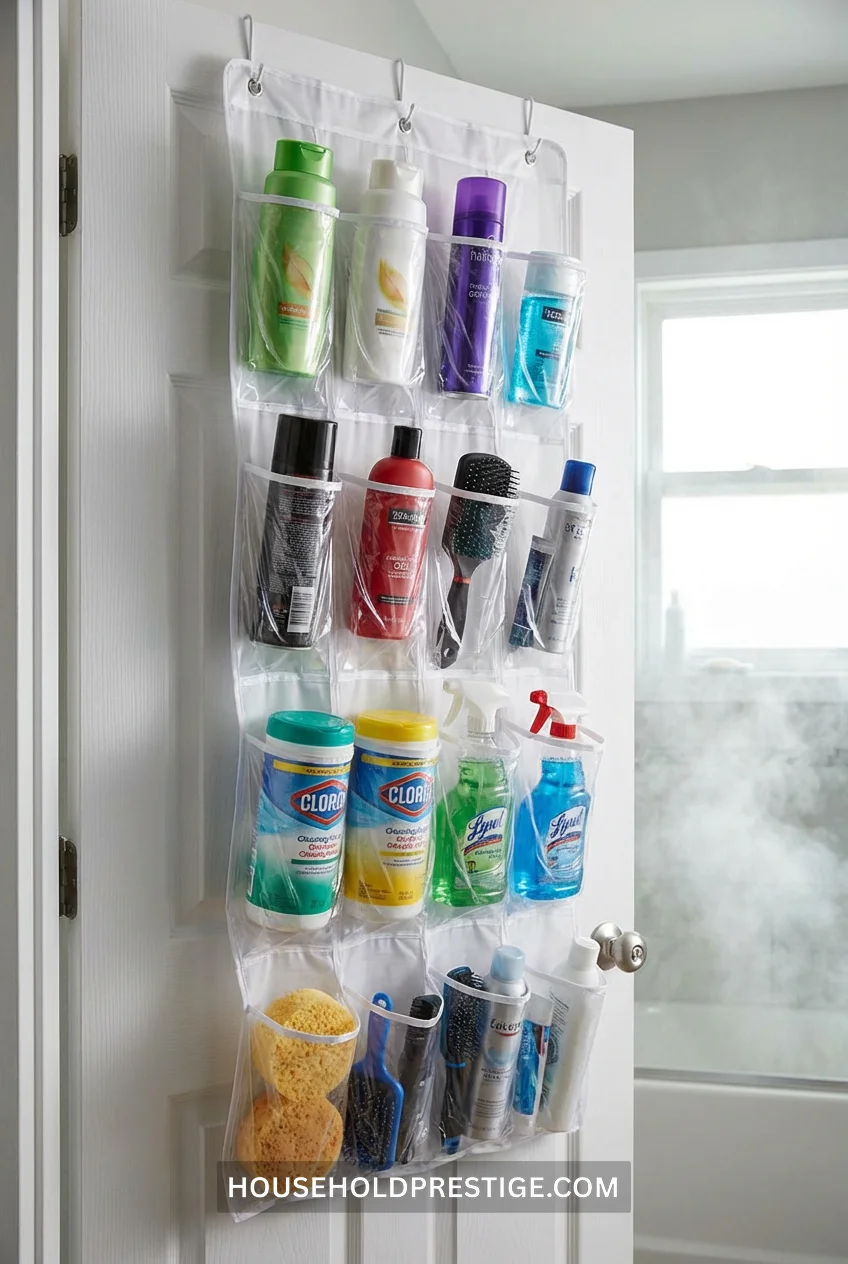
Shower caddies fall, rust, and hold maybe 6 items.
Over-the-door shoe organizers have 20-24 pockets, hang on the back of your bathroom door, and keep everything visible and accessible. Use them for toiletries, hair tools, cleaning supplies, first aid items, or makeup.
Clear plastic versions ($12-18) let you see exactly what you have without digging through drawers.
13. Build a Platform Bed with Drawer Storage Underneath
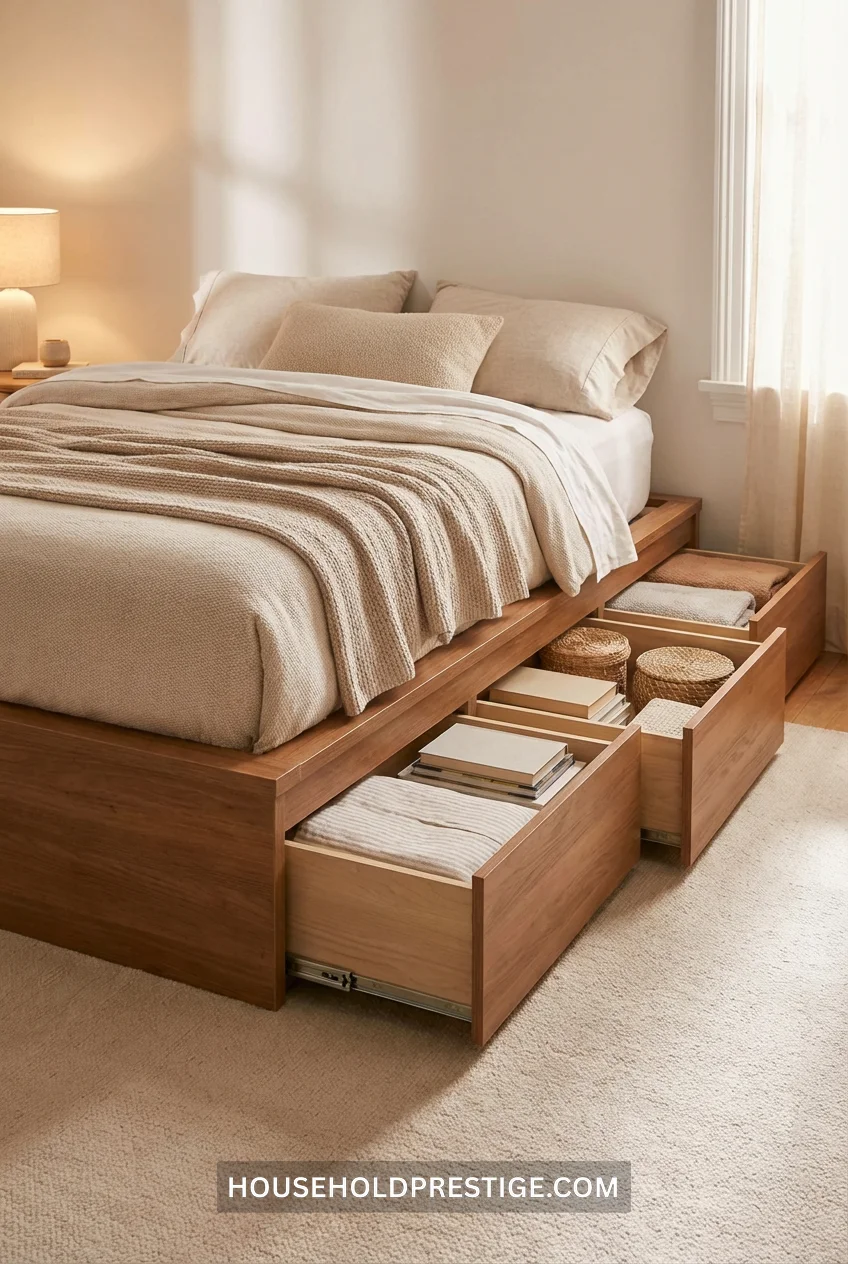
Under-bed storage bins force you to lift your mattress every time you need something. Platform beds with built-in drawers give you 12-18 cubic feet of storage that’s actually usable.
What Actually Works
IKEA’s Malm bed frame with storage ($379-449) includes four large drawers on smooth glides. Each drawer holds roughly the equivalent of three under-bed storage bins.
DIY version: Build a simple platform from 2x4s and plywood ($80-120 in materials), then add off-the-shelf rolling drawers underneath.
What to Store
- Seasonal clothing (winter coats in summer, shorts in winter)
- Extra bedding and blankets
- Luggage (flat suitcases fit perfectly)
- Shoes in boxes
- Archived paperwork or photos
- Gift wrap and supplies
Installation Note
Platform beds typically sit 18-24 inches high—measure your room’s vertical space to ensure you’re comfortable with the bed height before buying.
Pro Tip
Add risers to any existing bed frame to create 12-18 inches of clearance underneath, then use uniform storage boxes on wheels. This achieves similar results for $40-60 instead of buying a new bed.
When It’s Worth It
If you have limited closet space and you’re already considering new furniture, this is a smart investment. If you have adequate closet storage, skip it—you’ll just fill the drawers with things you don’t actually need.
14. Mount a Pegboard Inside Your Cabinet Doors
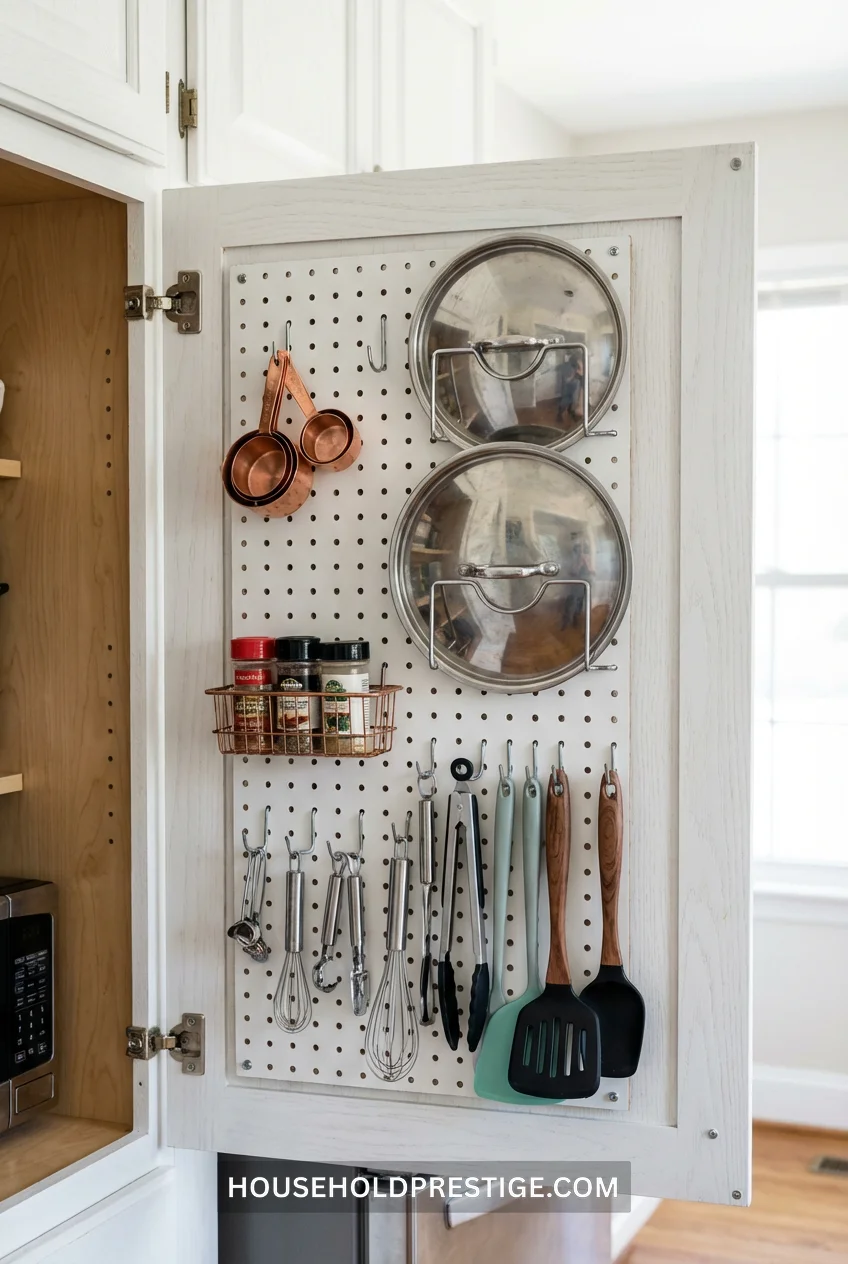
The inside of cabinet doors is wasted space. Mount small pegboards (12×12 inches) and suddenly you have customizable storage for pot lids, measuring cups, small cutting boards, and kitchen tools.
Cost per door: $8-12 (pegboard + hooks)
Time to install: 10 minutes with a drill
This works in bathroom cabinets too—mount small tools, hair ties, or jewelry organizing solutions.
15. Create a Charging Station Inside a Drawer Using a Power Strip and Velcro
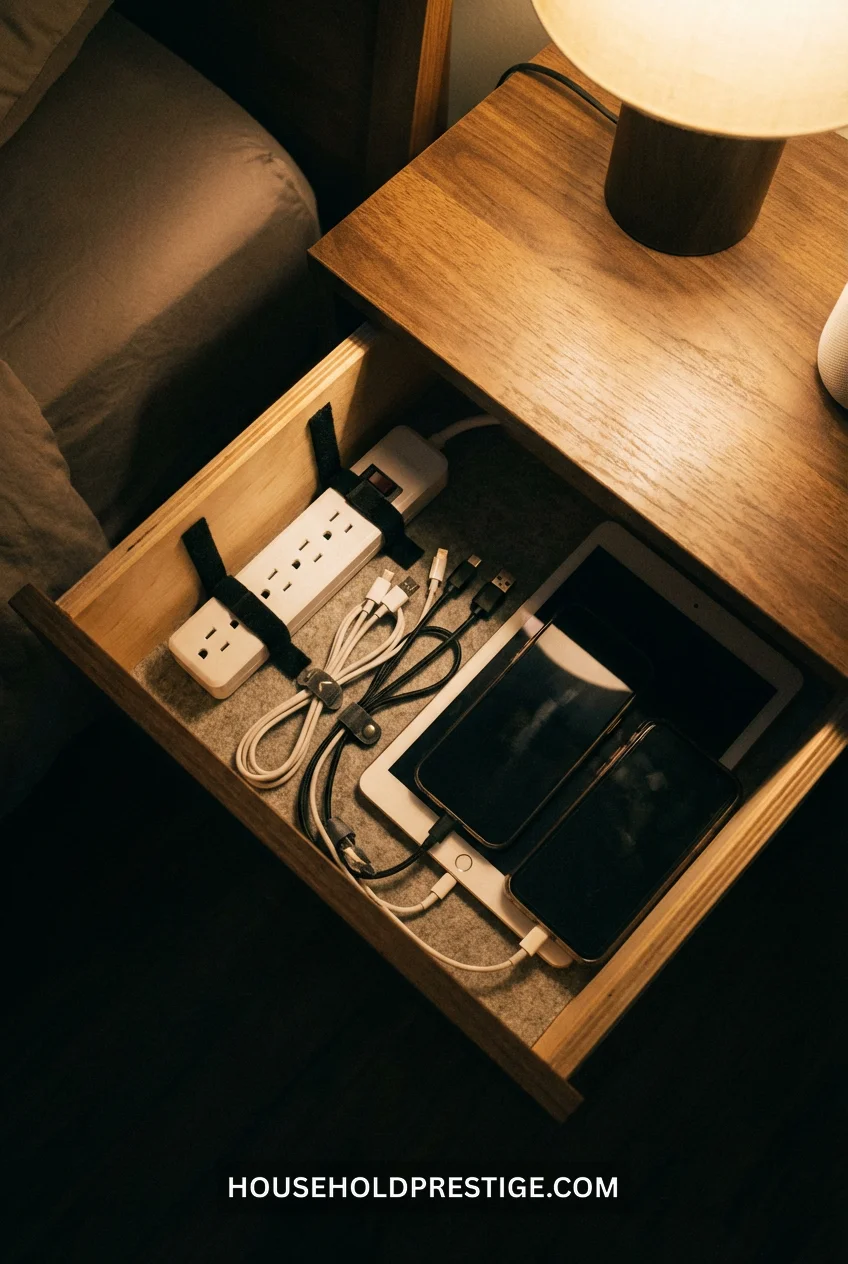
Charging cables clutter every surface. Fix this permanently:
- Mount a power strip inside a nightstand or console table drawer using heavy-duty Velcro strips
- Drill a small hole in the back of the drawer for the power cord
- Use cable clips to organize charging cables
- Close the drawer—devices charge hidden away, surfaces stay clear
Cost: $15 (power strip + Velcro + cable clips)
Time: 20 minutes
Surfaces cleared: Every nightstand, entryway table, and desk in your house
16. Use Stackable Clear Bins with Labels for Pantry Items (But Do It Right)
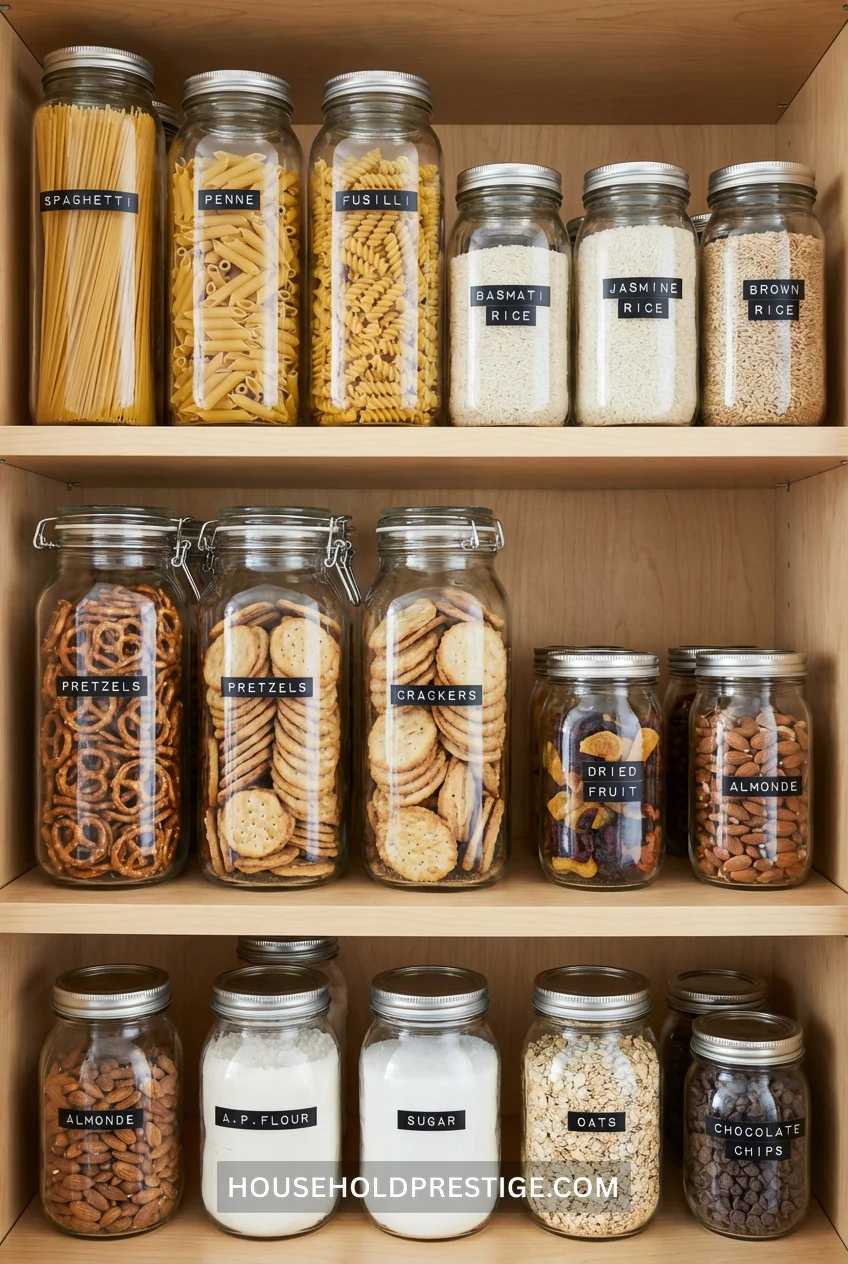
Everyone recommends clear bins. Here’s what they don’t tell you:
Buy STACKABLE MODULAR sizes—not random containers. OXO Good Grips or IKEA’s 365+ series come in coordinated sizes that nest and stack properly.
Measure your shelf depth first—most pantry shelves are 12-14 inches deep. Buy containers that are 10-11 inches to fit with clearance.
Only decant items you use frequently—flour, sugar, rice, pasta, coffee. Don’t waste time transferring items you go through quickly like chips or crackers.
Use a label maker, not handwriting—printed labels make everything look intentional and finished. $25 for a basic label maker pays for itself in how much better your space feels.
Pro move: Store the original packaging with cooking instructions inside the container or take a photo of them before decanting.
17. Install Hooks Everywhere You Hesitate for “Just a Second”
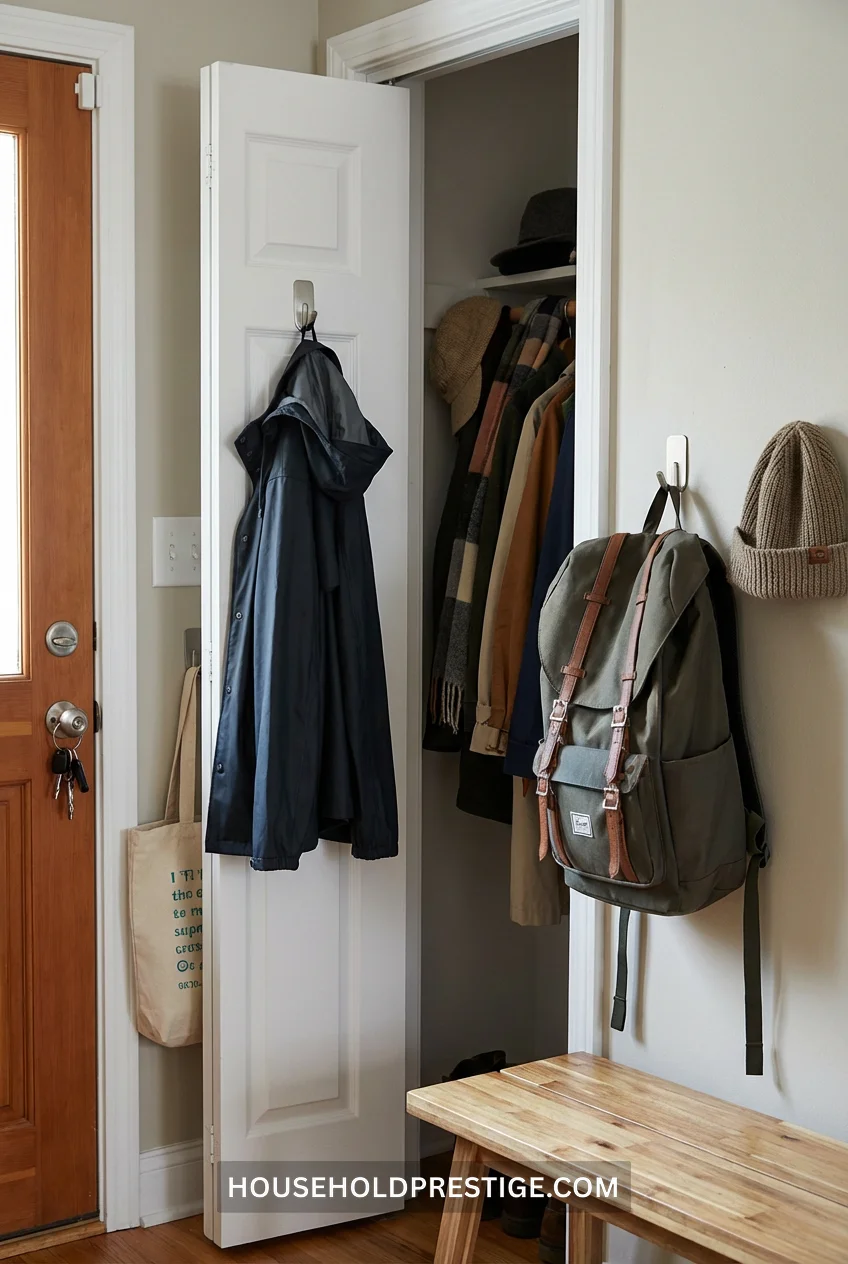
Notice where you set things down “just for a second” that turn into permanent piles? That’s where a hook belongs.
Inside closet doors: Belts, scarves, tomorrow’s outfit
Inside cabinet doors: Dish towels, oven mitts, reusable bags
Behind bathroom doors: Robes, towels, pajamas
Entryway walls: Keys, dog leashes, reusable shopping bags
Bedroom walls: Next day’s outfit, jewelry, bags
Command hooks ($8-12 for a variety pack) install without drilling and hold 3-5 pounds each. The “just a second” spots are where clutter starts—intercept it with a designated hook and the item never makes it to your counter or floor.
The Uncomfortable Truth About Small Space Living
You don’t need more space. You need less stuff and better systems for what you keep.
These 17 hacks work because they eliminate the friction between you and an organized space. They make it easier to put things away than to leave them out. They turn dead space into functional storage. They help you see what you own, so you stop buying duplicates.
But here’s what I won’t tell you: This doesn’t happen overnight. Pick three hacks from this list—just three. Do those this weekend. See how they change your daily routine. Then add three more next month.
Your small house isn’t the problem. The problem is trying to live in it the same way you’d live in a 2,500-square-foot suburban house. These hacks work with your space instead of against it.
Start with what frustrates you most. That’s where these changes will feel like magic.
FAQ
How much should I budget for organizing a small house?
Start with $100-150 for the highest-impact changes: floating shelves, tension rods, storage ottomans, and a set of stackable bins. These five investments address 80% of common small-space problems. Avoid the temptation to buy every organizational product at once—implement one hack at a time and see what you actually use before investing more.
What’s the biggest mistake people make when organizing small spaces?
Buying storage solutions before decluttering. You don’t need better bins for things you shouldn’t keep. Go through each category first—clothes, kitchen items, papers, hobby supplies—and eliminate anything you haven’t used in 12 months. Then organize what remains. Most people discover they need half the storage they thought they did.
Do I need to hire someone to install these hacks?
No. Floating shelves, tension rods, command hooks, and Murphy desks all use basic tools: a drill, level, stud finder, and screwdriver. If you can hang a picture frame, you can install these hacks. The only exception is if you’re building a custom platform bed from scratch—that benefits from carpentry experience, but IKEA’s pre-made storage beds require just an Allen wrench.
How do I make small spaces feel bigger without knocking down walls?
Focus on three things: maximize vertical space (use walls from floor to ceiling), minimize visual clutter (everything should have a designated home), and improve sightlines (swap bulky furniture for pieces with legs or transparent materials). The hacks in this article address all three: high shelves use vertical space, hidden charging stations reduce visual clutter, and nesting ottomans create flexible, open floor space.
What’s the fastest way to add storage to a rental where I can’t drill holes?
Tension rods inside cabinets, over-the-door organizers, Command hooks, and furniture with built-in storage (storage ottomans, platform beds with drawers). These require zero wall modifications but provide significant storage capacity. The magnetic strips also work if you have metal surfaces, like refrigerators or file cabinets, to attach them to.