

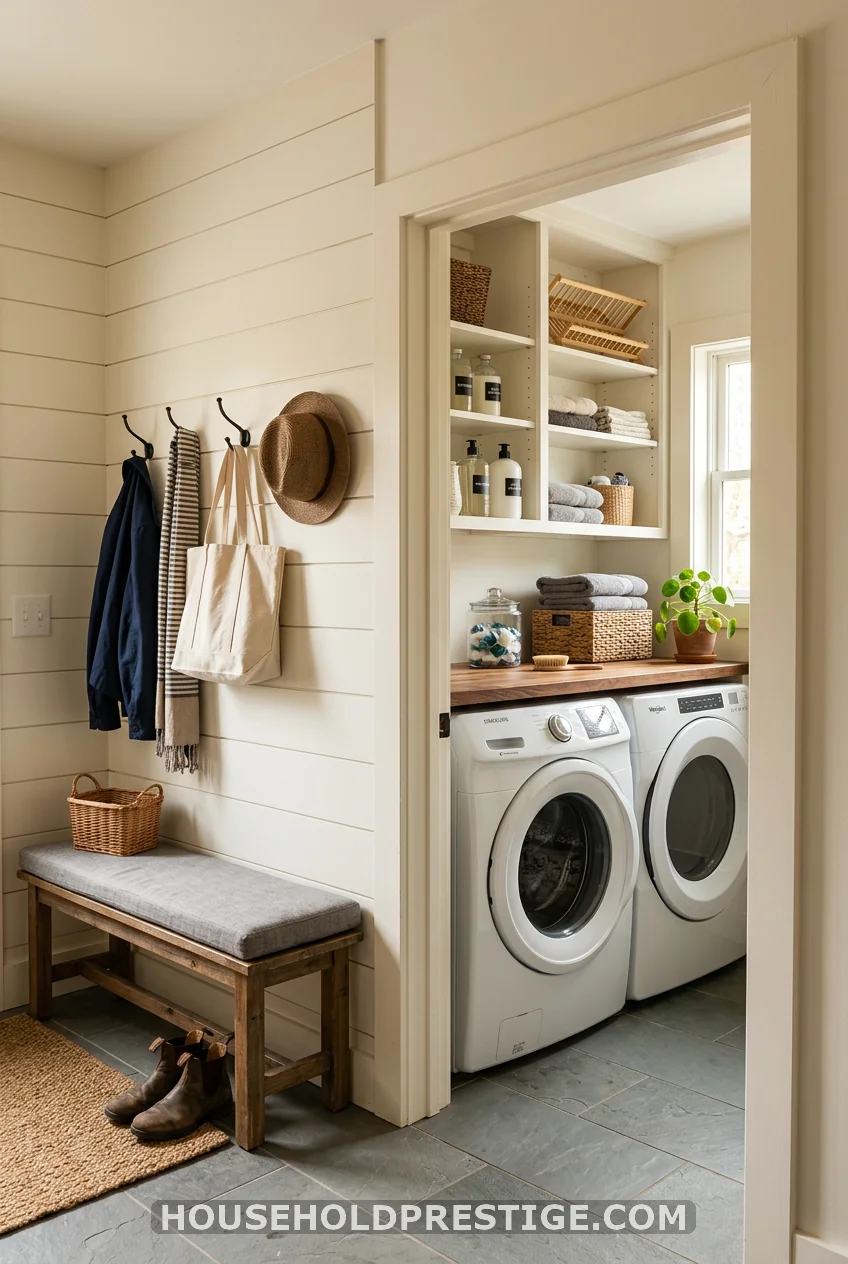
You walk in from a soggy Tuesday. The kids drop boots at the door, the dog shakes mud everywhere, and there are three wet sports uniforms in someone’s arms that need to be washed right now. And your laundry room is on the other side of the house.
Sound familiar? That exact chaos is exactly why the mudroom laundry room combo is one of the most requested home upgrades right now — and honestly, once you see how these spaces work, you’ll wonder why anyone keeps them separate. Two of the hardest-working rooms in your house become one room, and suddenly your whole family’s entry routine clicks into place.
I’ve been deep in the weeds on this one. Here are 19 ideas that go way beyond “add some hooks and call it a mudroom.” These are real layouts, real numbers, real brands — the stuff that actually helps you decide whether to call a contractor or break out the drill yourself.
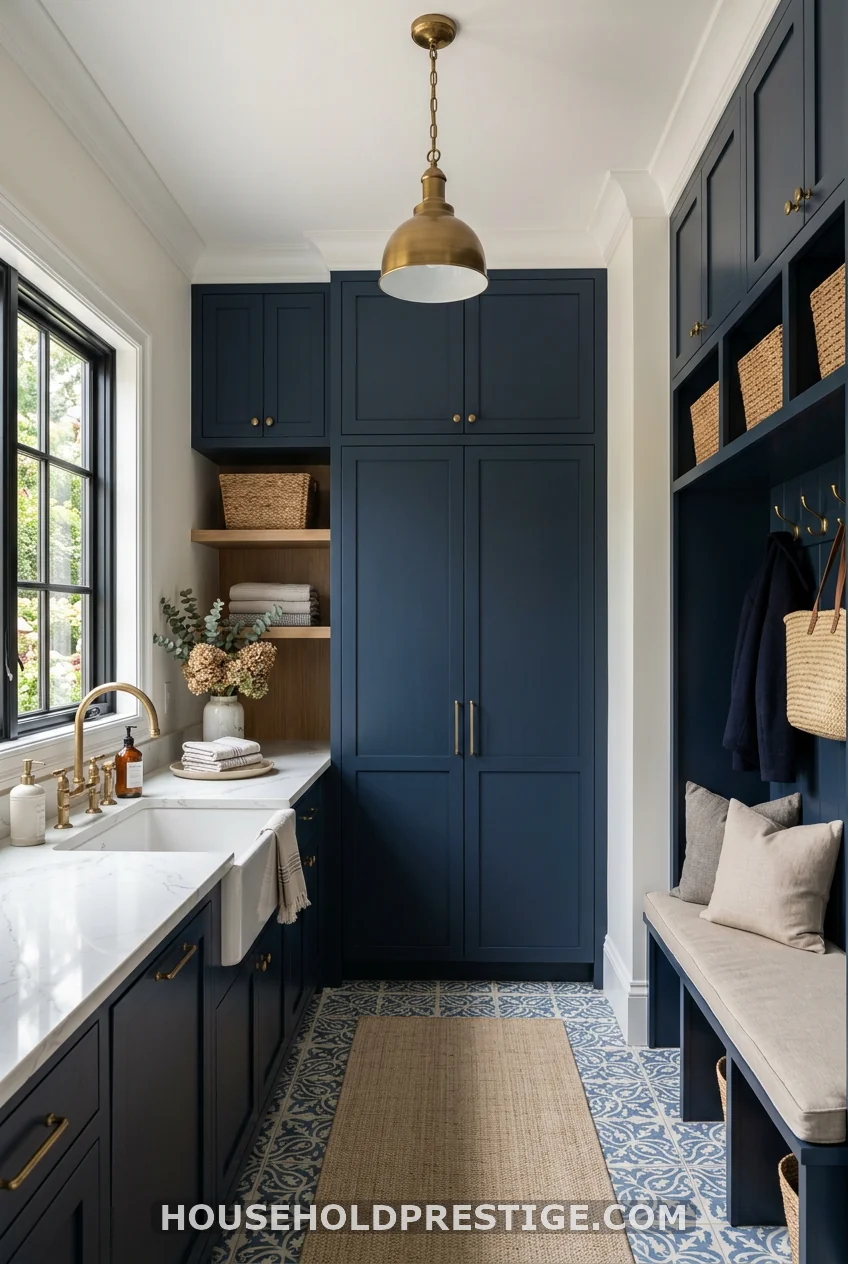
1. Stack Your Washer and Dryer — Non-Negotiable
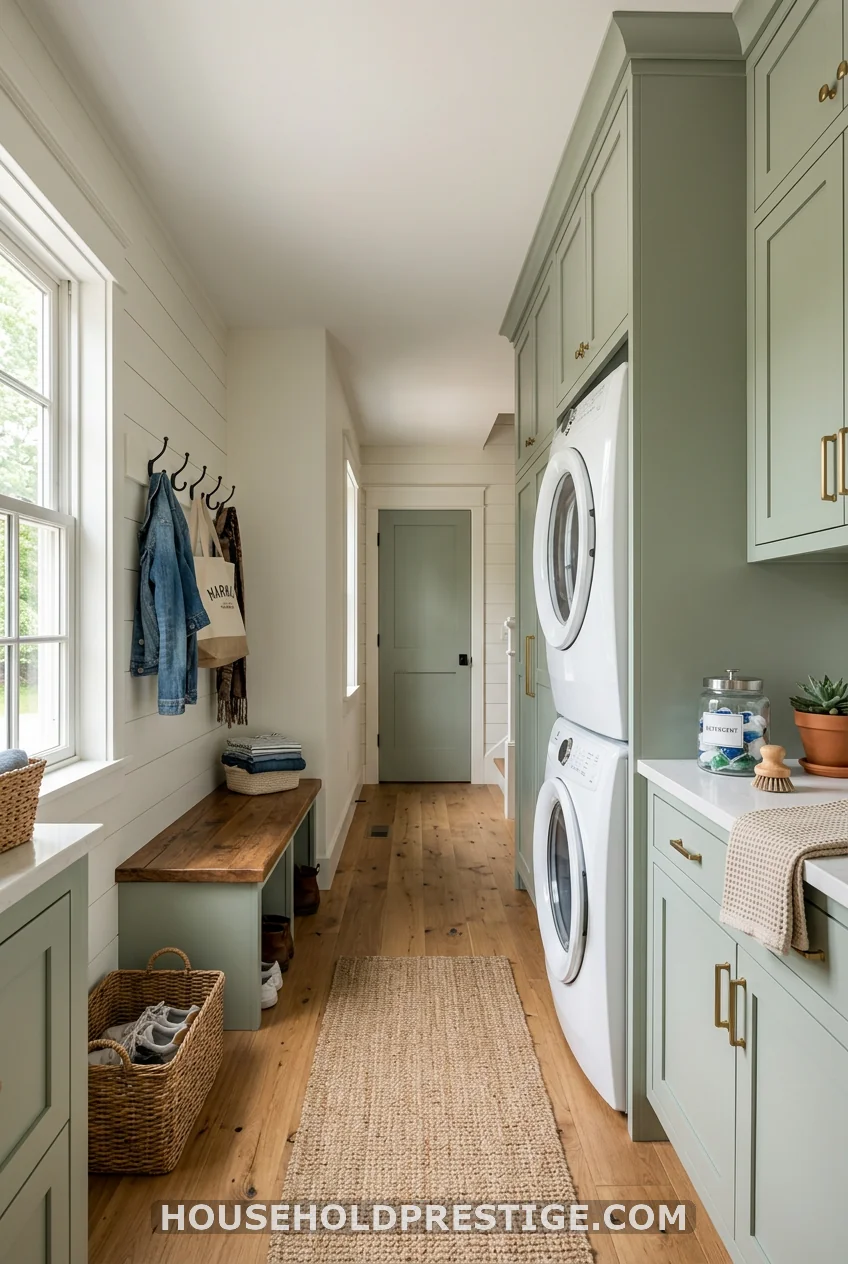
This is your first move. A side-by-side set eats 5+ feet of floor width. A stacked unit? Just 27 inches. LG’s WM3600HWA washer with the DLGX3601V dryer stacks cleanly and runs around $1,900 for the pair at Home Depot. That freed-up wall space becomes your bench, your cubby bank, your whole mudroom — without adding a single square foot to your home.
2. Build a Drop Zone Bench with Laundry Hamper Drawers
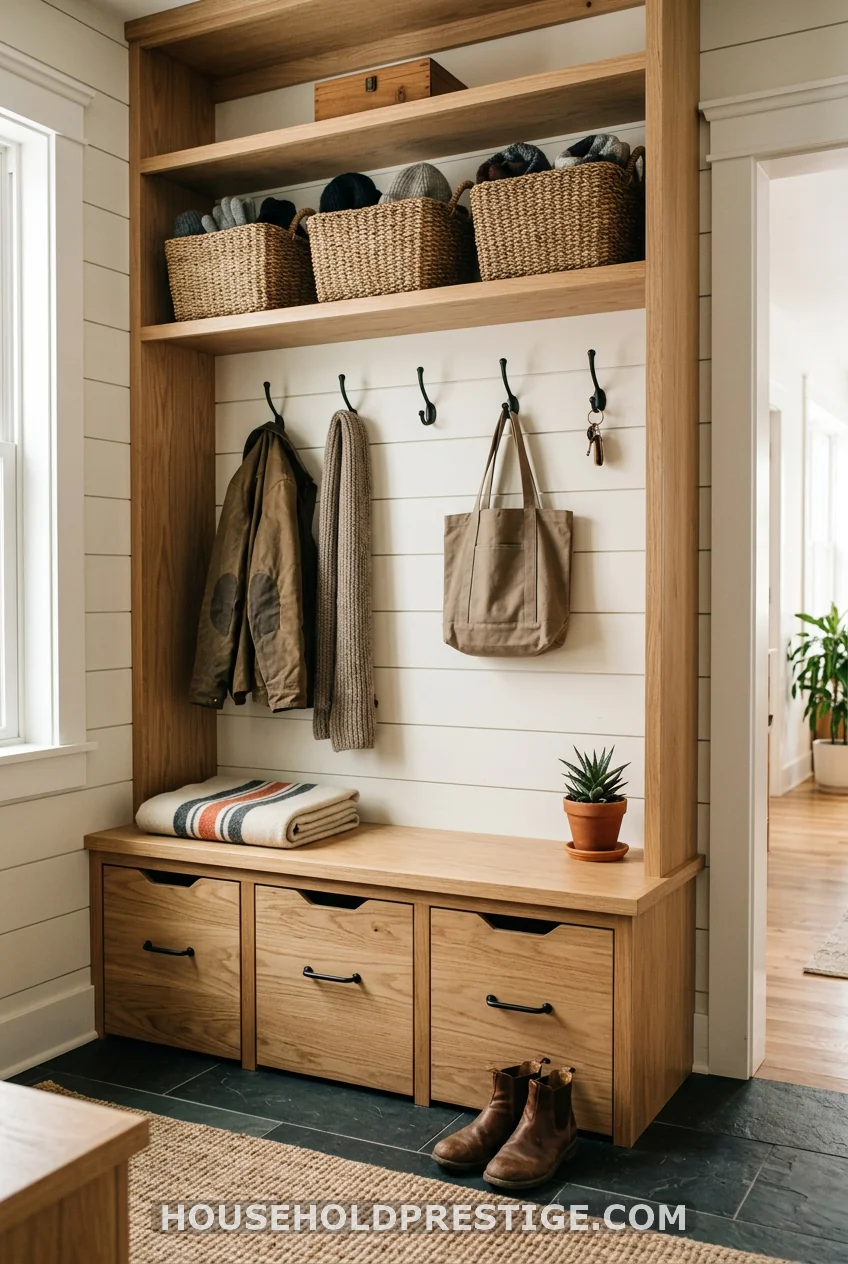
The genius of this setup is the drawer. Not a basket shoved under a bench. An actual drawer, with a ventilated hamper liner inside.
Here’s how this works in a real mudroom. You come in, kick off shoes (there’s a cubby for those), and drop the dirty jersey directly into the hamper drawer labeled “kids’ sports.” The drawer closes. The mudroom looks put-together. And when laundry day hits, you pull the drawer, grab the liner, and walk two steps to the washer. Done.
IKEA’s Hemnes series works here if you’re on a budget — around $300-400 for the bench unit with drawer inserts. Custom built-ins run $800-1,500 but give you the exact depth and hamper count your family actually needs. Aim for drawers at least 20 inches deep and 16 inches wide to fit a standard laundry liner bag.
One thing people miss: ventilation. Wet sports gear in a sealed drawer gets funky fast. Spec your drawer fronts with small routed ventilation slits, or leave a 1-inch gap at the back panel. Your nose will thank you.
3. Run the Same Floor Tile Through Both Zones
Pick one tile. Use it everywhere. That single design move makes a 100-square-foot combo room read as a planned, cohesive space instead of two awkward rooms glued together. Matte porcelain in a large format (24×24) with a COF (coefficient of friction) rating of 0.6 or higher, which is the slip-resistance standard you want near a washer. About $3-5 per square foot installed.
4. The Built-In Locker System: A Full How-To
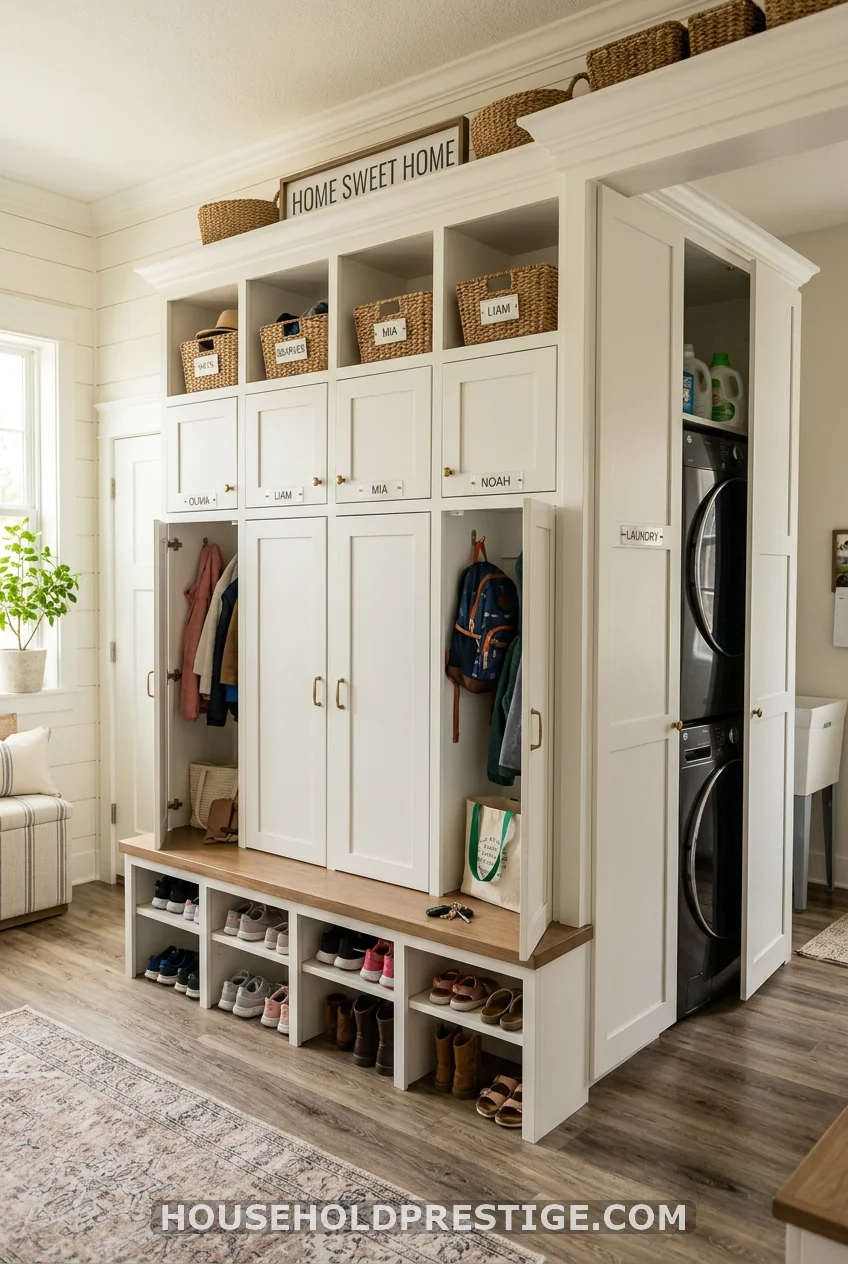
This is the project that turns a mudroom laundry room from “functional” to “that room guests always ask about.” It’s the biggest investment, but it’s also the reason families stop tripping over each other.
Why It Works
A locker system assigns each person their own vertical zone — hooks, shelf, bench, foot space, and often a lower cubby for shoes. When everyone has a designated spot, the clutter stays contained because there’s literally a box for it. The laundry side integrates into one bay so the whole wall looks intentional.
Dimensions to Know
- Standard locker width: 15-18 inches per person
- Depth: 14-16 inches for hanging coats without crushing them
- Height: Floor to 8-foot ceiling to maximize storage and look custom
- Bench height: 18 inches (standard seat height)
- Shoe cubby depth: 12 inches minimum for men’s size 12
For a family of four, you’re looking at 5-6 feet of locker width plus 2.5 feet for the stacked laundry bay — so an 8-foot wall handles it comfortably.
Step-by-Step Build (DIY with Basic Carpentry Skills)
- Plan your layout on paper first. Sketch the wall with each person’s locker, the laundry bay, and any filler panels. Mark stud locations before anything else.
- Frame the locker carcasses from 3/4-inch birch plywood. Cut side panels, top, bottom, and any middle dividers. Each locker carcass box takes about 2 hours to cut and assemble with pocket screws.
- Secure the back panels using 1/4-inch plywood. This keeps everything square and gives you a surface to paint.
- Install the carcasses by screwing directly into wall studs through the side panels. Use a level — everything downstream depends on this.
- Build the face frame from 1×3 poplar or MDF and attach it to the front of the carcasses. This covers the plywood edges and gives you that furniture-grade look.
- Install doors using soft-close European hinges (Blum 170° full overlay, around $8 per pair at Amazon). These are adjustable and forgiving.
- Add hooks inside or on the back panel — two per locker at kid height, two at adult height.
- Build the bench from 3/4-inch plywood with a top cap of 1.5-inch solid maple or MDF. Wrap the bench front with a face frame panel to match the lockers.
- Prime and paint. Benjamin Moore Advance in White Dove is the go-to for painted cabinetry — it’s a waterborne alkyd, meaning it flows out brush marks and hardens like an oil paint. One quart primer, two coats finish.
- Add hardware. Matte black cup pulls from Rejuvenation ($6-12 each) or unlacquered brass from D. Lawless Hardware for a warmer look.
Materials and Approximate Costs
| Item | Estimated Cost |
|---|---|
| 3/4″ birch plywood (10 sheets) | $350-450 |
| 1/4″ plywood back panels (4 sheets) | $80 |
| 1×3 poplar for face frame | $60-100 |
| Blum hinges (8 pairs) | $65 |
| Soft-close drawer slides if adding drawers | $15-20/pair |
| Benjamin Moore Advance paint + primer | $120 |
| Hardware (hooks, pulls) | $80-150 |
| Total DIY | $750-1,000 |
| Contractor installed (same design) | $3,500-6,000 |
Pro Move: Conceal the Laundry Bay
Build one wider bay (27-30 inches) at the end of the locker run for the stacked washer and dryer. Add a full-overlay door that matches your locker doors. When the doors are closed, no one knows there’s a washer in there. This is the detail that makes a mudroom laundry room feel like a designed room, not a utility space.
Common Mistakes to Avoid
- Forgetting the electrical and plumbing rough-in. If your laundry bay is moving into a new location, get the plumber and electrician in before you build the boxes, not after.
- Making the bench too deep. 14-16 inches is the sweet spot. Deeper, and it feels like a shelf you climb over.
- Skipping the ventilation gap. Dryers need at least 4 inches of clearance behind them for the exhaust duct. Build this into your bay depth.
- Using latex paint instead of enamel. Latex shows every scuff in a high-traffic zone. Use Benjamin Moore Advance or Sherwin-Williams Emerald Urethane trim paint — worth every extra dollar.
- Installing hooks inside doors on lockers that open outward into a tight space. Plan the door swing before you put anything in the path.
5. Mount a Retractable Drying Rack
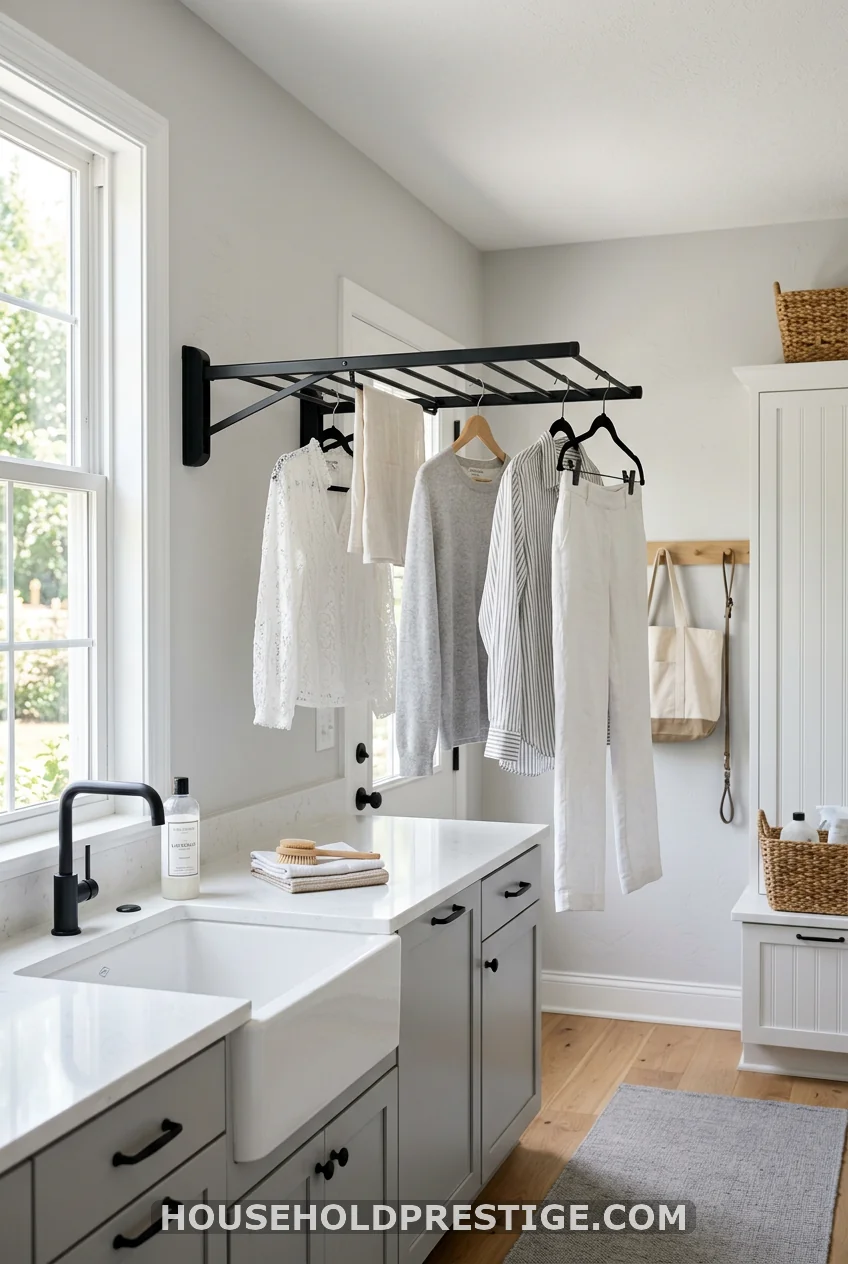
Wall-mounted retractable racks fold flat when not in use — completely flat, maybe 3 inches off the wall. Extended, they give you 5-9 feet of drying space. The Brabantia WallFix ($90-130) is the standard recommendation, but IKEA’s Grundtal series does the job for $40. Mount it on the wall above the utility sink or opposite the washer — wherever you have 18 inches of clearance when extended.
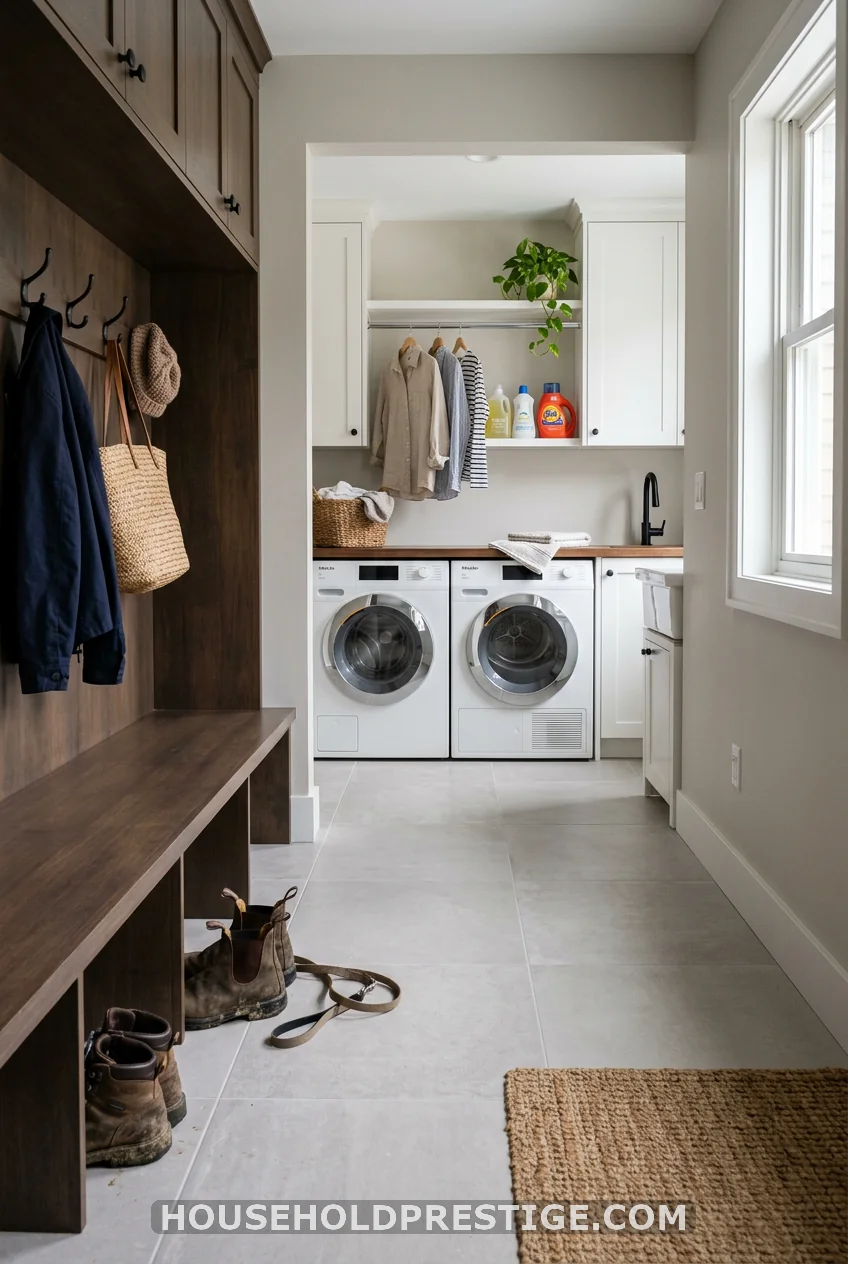
6. The Utility Sink Placement Nobody Talks About
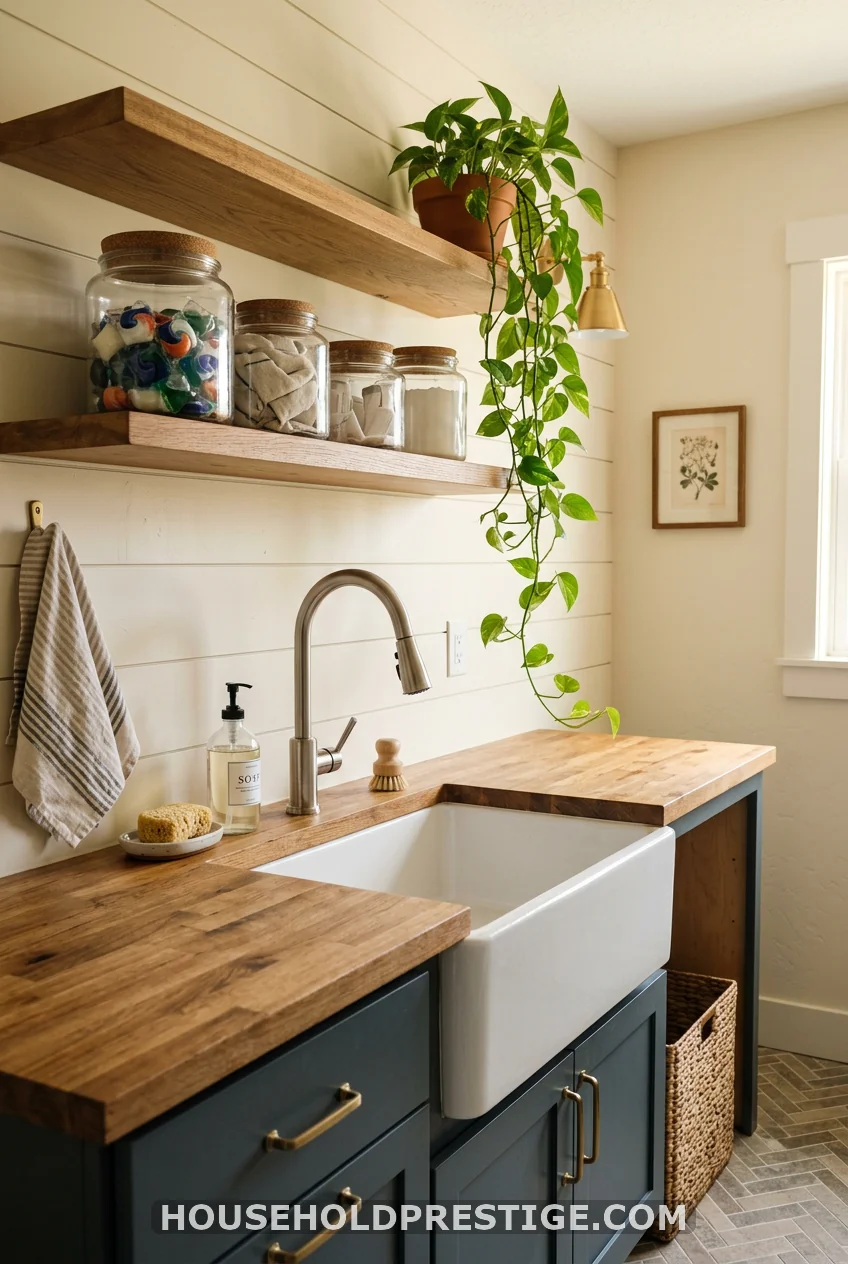
Most people stick the utility sink wherever the existing plumbing roughed in. That’s fine — until you think about what the sink actually does in a combo room. It pre-soaks stained clothes. It rinses muddy boots. It washes the dog after walks. It fills the mop bucket.
Put it where all of those activities make sense spatially. Ideally: between the mudroom entry and the laundry appliances, so dirty things get intercepted on the way to the washer, not after. A 20×24-inch deep basin sink (Swanstone SS-2020 or similar, $200-280) with a pull-down faucet gives you the flexibility to fill tall things and rinse wide ones without flooding the counter.
The detail that separates a good laundry utility sink from a great one: a separate cold-water valve on the supply line so you can fill the sink without running the washer on the same pressure.
7. Use Shiplap to Define Two Zones Without a Wall
No budget for a wall? Shiplap it. Running 4-inch shiplap on the mudroom walls and leaving the laundry side with smooth painted drywall creates a visual signal — two zones, one room. The shiplap side feels more like an entryway. The smooth side reads more like a utility space. Your brain codes them differently without a single wall or door.
Shiplap pine is $1.50-3 per linear foot. A 10×8 mudroom wall takes roughly 200 linear feet of shiplap — so $300-600 in materials, plus weekend labor.
8. Why My Open-Shelving-Only Mudroom Laundry Room Was a Disaster (And What I Did Instead)
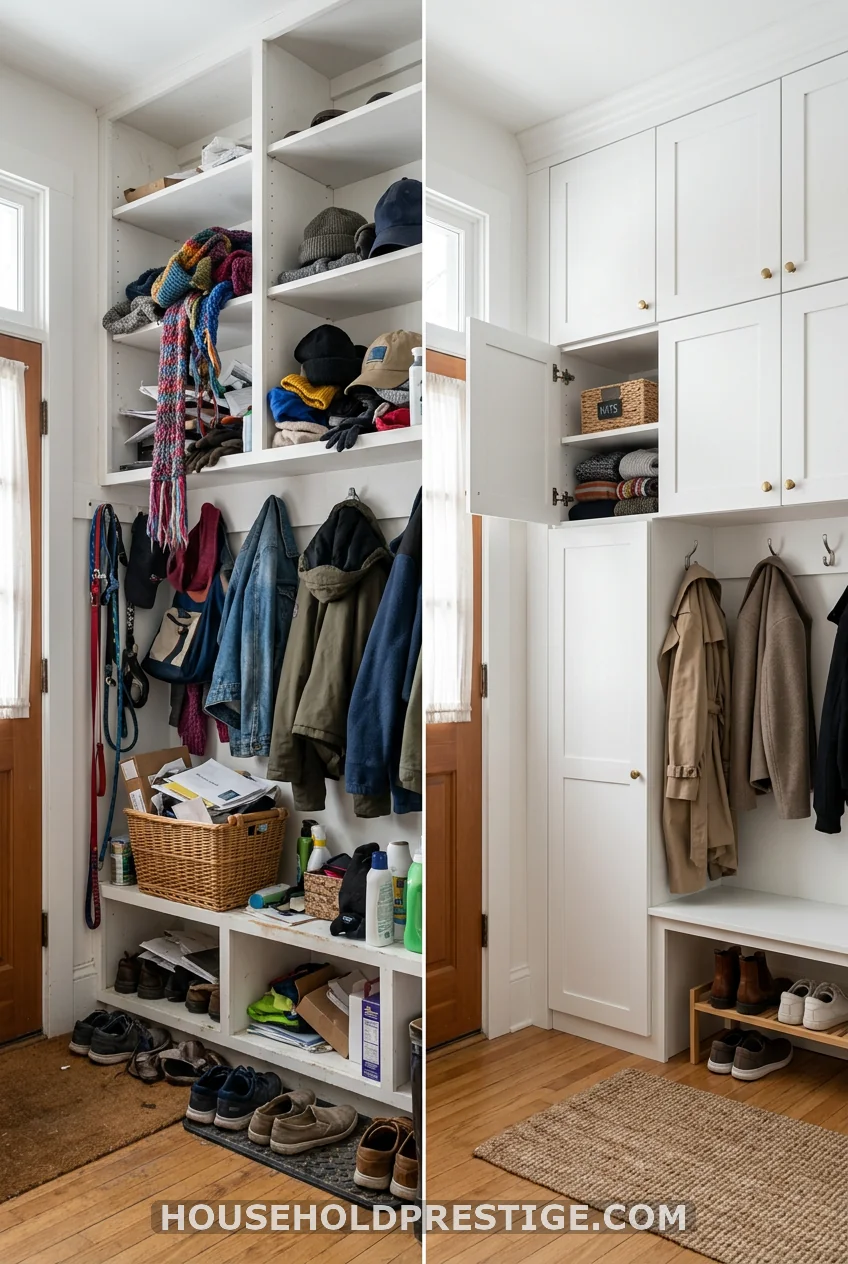
Here’s something I wish someone had told me before I pinned 47 open-shelving mudroom photos on a mood board: open shelving looks immaculate in every single photo you’ve ever seen. In real life, with real kids and real mud seasons, it looks like a Goodwill exploded.
I built my first mudroom laundry room with open floating shelves on every wall. Baskets everywhere, all labeled, all matching. It looked great for about six days. Then winter hit. Wet mittens got shoved next to the laundry pods. Sports bags got dropped in front of the shelves so nobody could reach the back. The baskets migrated. The labels became suggestions.
What I replaced it with: closed upper cabinets for anything that’s not grabbed daily — off-season gear, extra detergent, the stuff that lives in a mudroom but doesn’t need to be visible. Open lower cubbies and hooks for the daily-use items, because those you want fast access to. The rule I wish I’d started with: anything you use less than once a week lives behind a door.
The actual cost to retrofit: $400 in cabinet doors and hinges, plus a Saturday. Worth every dollar.
9. Conceal Appliances Behind Matching Cabinet Doors
Full-overlay cabinet doors on the washer and dryer bay make the appliances disappear. When doors are closed, it reads as a continuous cabinet wall. Open them, and there’s the laundry. Navy, sage green, or crisp white are the top finishes right now. IKEA’s Sektion system with custom front panels from Semihandmade ($150-300 per door pair) hits this look without custom cabinet pricing. Make sure your doors are hinged to open fully — 180 degrees if possible — or you’ll be loading laundry sideways.
10. The Three-Height Hook Rule
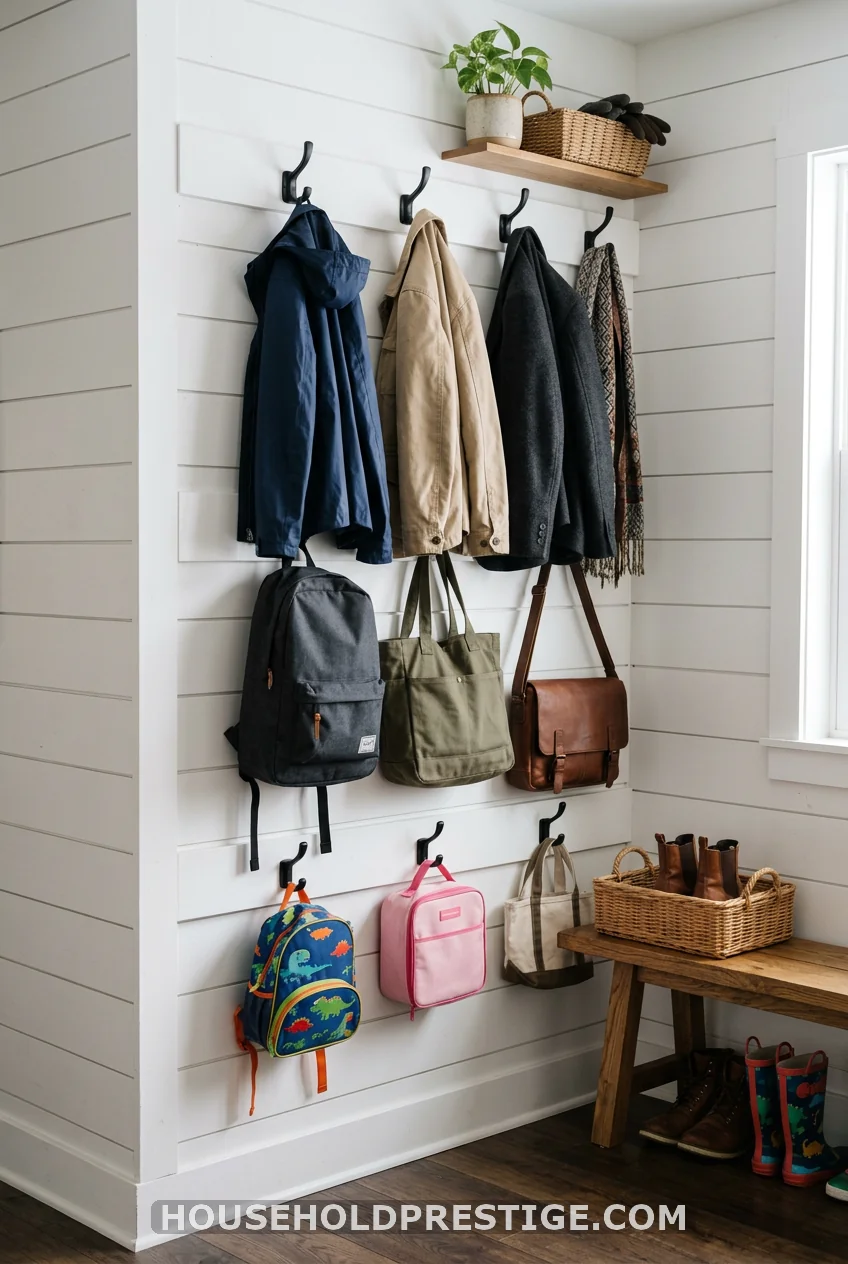
Adults’ coats: 66-72 inches from the floor. Backpacks and bags: 48-54 inches. Kids’ hooks: 36-42 inches. Three heights, clearly spaced. Assign each hook to a specific person and item type, or you’ll end up with a pile of coats on the floor because the only hook available is the one nobody can reach.
11. Porcelain Tile vs. Luxury Vinyl Plank — The Honest Comparison
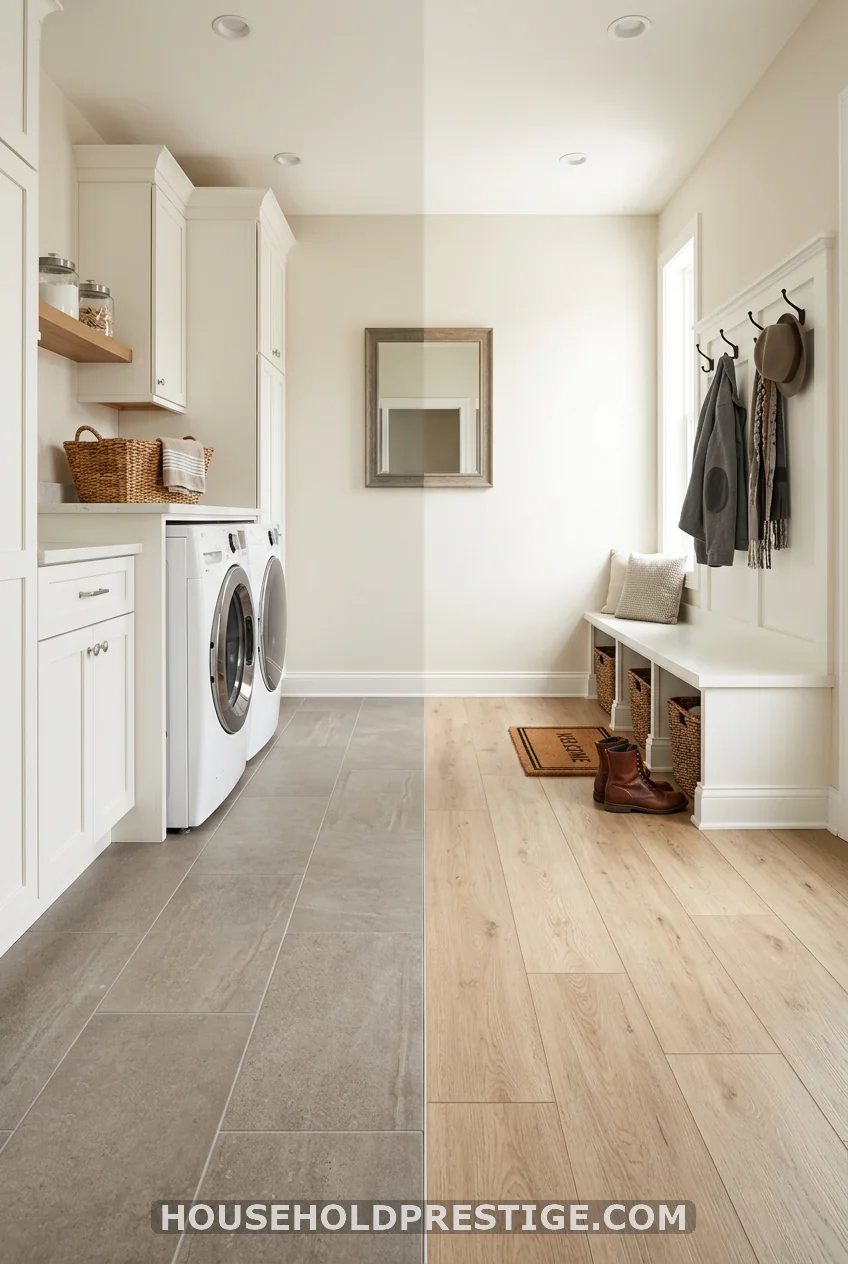
This question comes up every single time someone starts planning a mudroom laundry room combo, so let’s settle it.
What Most People Think: “Vinyl plank is the budget-friendly option that’s almost as good as tile.”
The Reality: For a mudroom and laundry room in the same space, they serve different needs — and vinyl plank fails at one of them.
| Porcelain Tile | Luxury Vinyl Plank | |
|---|---|---|
| Water resistance | 100% waterproof | Waterproof surface, seams can leak |
| Mud/heavy dirt | Wipes clean easily | Can stain grout lines… wait, no grout lines. Actually fine. |
| Washer leak protection | Excellent — water goes nowhere | Depends on core; SPC core (rigid) is better than WPC |
| Comfort underfoot | Cold, hard | Warmer, slightly cushioned |
| Cost installed | $8-15/sq ft | $4-9/sq ft |
| Durability in high traffic | 25-50 years | 10-20 years |
| Slip resistance | Choose 0.6+ COF rating | Most pass, check specs |
The call: if your mudroom laundry room has any chance of a washer leak (they all do, eventually), porcelain is your real-world answer. The waterproof core on even the best luxury vinyl can fail at seams over time if there’s standing water. Porcelain won’t. If budget is the constraint, use LVP in the mudroom entry zone only and porcelain under and around the appliances.
12. Fold Over Your Front-Loaders

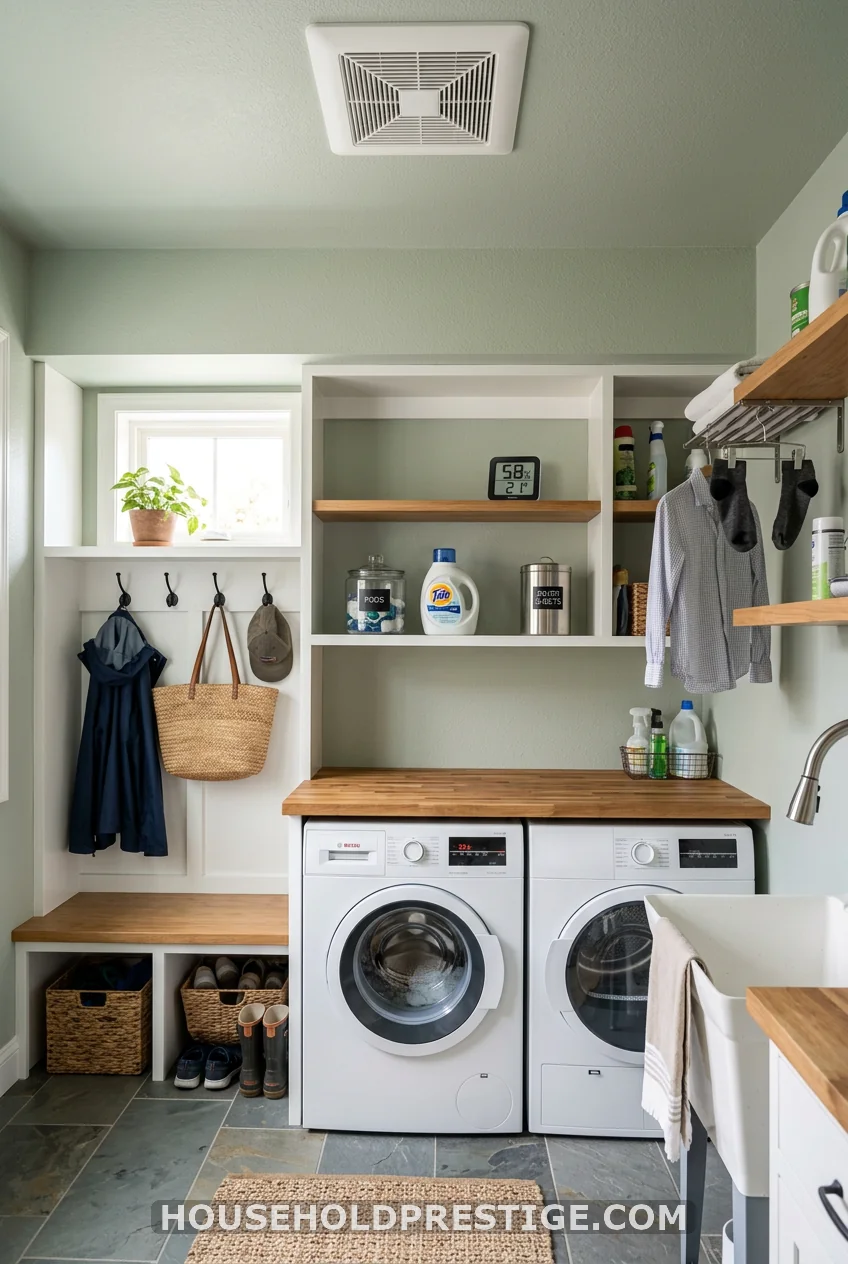
A countertop over the front-load washer and dryer gives you back about 8 square feet of horizontal surface — which is genuinely transformative in a small combo room. That’s your folding station, your staging area, the place you set things while loading. Use quartz (durable, waterproof, heat-tolerant) or butcher block (warmer look, requires annual sealing). Extend the counter 4-6 inches past the appliance bay on each side to get a usable overhang. Depth: 25-26 inches to clear the washer door swing on most front-loaders.
If your machines are top-loaders, this doesn’t work — but a fold-down wall-mounted table on the opposing wall does.
13. Ceiling-Height Cabinets for the Seasonal Stuff

The top 18 inches of a wall cabinet is dead space in most kitchens. In your mudroom laundry room? It’s prime seasonal storage. Build or buy cabinets that run to the ceiling and use the upper section for anything that rotates by season: ski gear, pool towels, holiday bins, camping equipment. Label the bins clearly — don’t trust your future self to remember what’s up there.
IKEA Pax wardrobe frames ($150-250) work here with custom doors; they hit 93 inches tall and use every inch.
14. Create a Dog Wash Station in the Corner
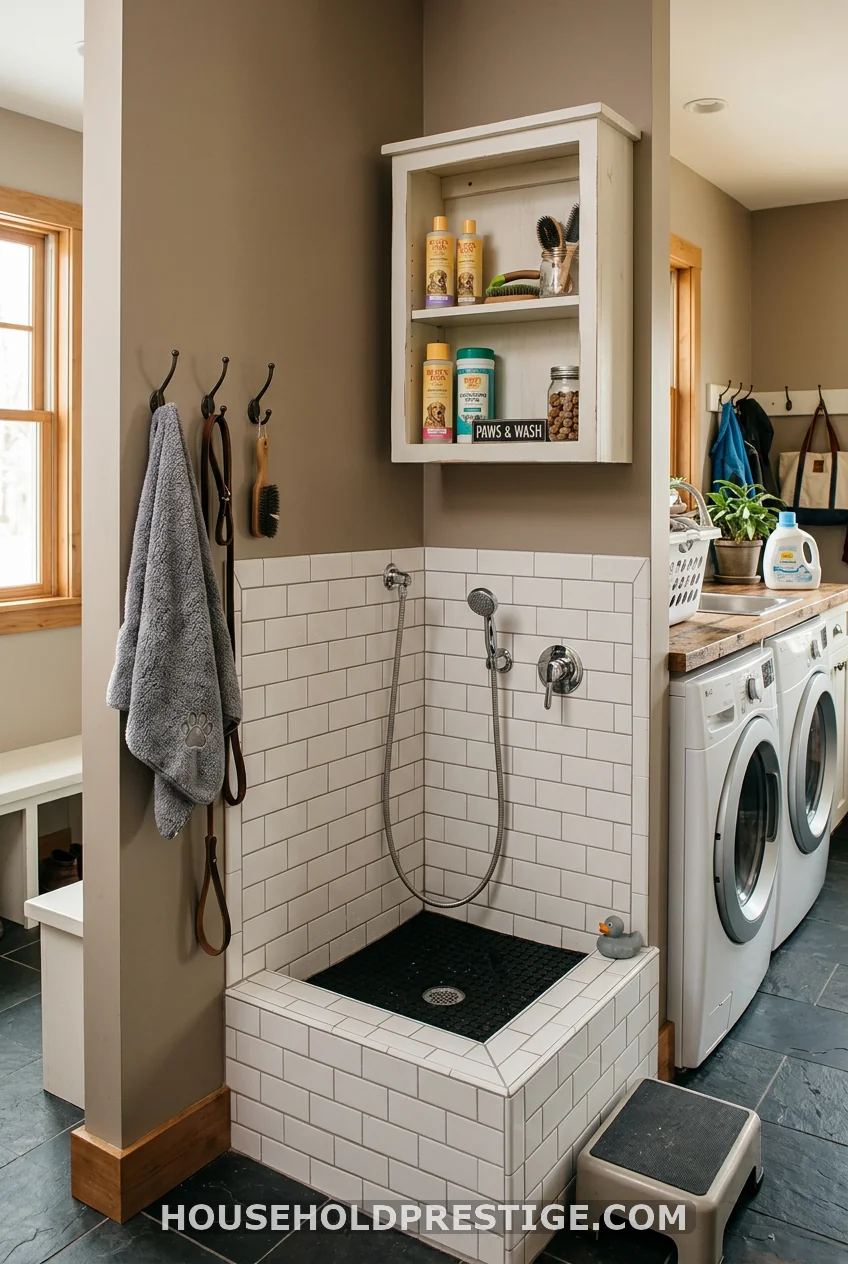
If you have a dog, this is the feature that makes you fall in love with your house all over again. A low, tiled wash station — roughly 36 inches wide, 24 inches deep, 12-16 inches tall — lets you hose off muddy paws before the dog sets foot in the rest of the house. A handheld sprayer on a flexible hose, a rubber mat for grip, and a shelf above for shampoo. The key: keep it in the corner nearest the entry door, so the dog intercept happens before the mud spreads.
A basic DIY station runs $500-800 in materials (tile, custom basin form, faucet). A plumber will add $300-500 for the drain rough-in if you’re adding a new drain location.
15. Labels That Stay Put
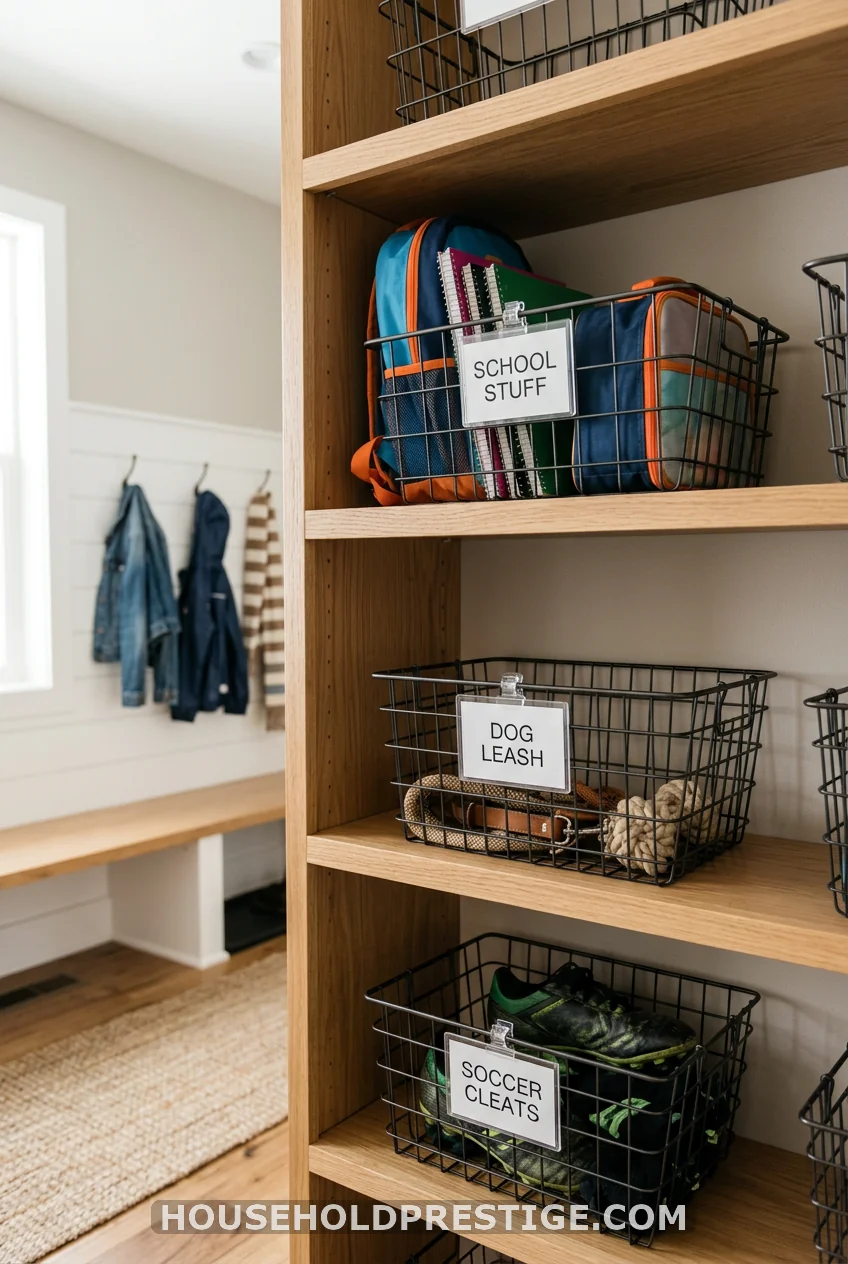
Acrylic label holders over wire baskets. That’s it. Not a Pinterest-worthy chalkboard wall. Not handwritten tags. Acrylic holders from Amazon ($15 for 30) that slip over the front wire of any standard bin. You can update the labels in five minutes when your kid switches sports or the baby gear gets replaced with school stuff.
16. A Pocket Door Changes Everything

A standard door into a laundry room eats 7-9 square feet of usable floor space when it swings open. A pocket door uses zero. It slides into the wall. For a mudroom laundry room combo where you might want the option to close off the laundry noise during a party or hide the overflowing hampers, a pocket door is a $500-900 investment (kit + installation) that pays back in space immediately.
17. Dryers Are Humidity Bombs — Plan for It
This is the detail nobody includes in their design Pinterest board, but it determines whether your mudroom laundry room smells like fresh linen or mildew in six months.
A dryer running a full load releases roughly a quart of water vapor per cycle — directly into your combo room if the duct is even slightly undersized or leaky. In a shared mudroom, that moisture lands on your shiplap, your painted MDF lockers, and your stored winter coats.
Fix it before it’s a problem. Your exhaust duct needs to be: 4-inch rigid metal (not the accordion foil that’s included with most dryers — that collapses and traps lint), under 25 feet total length from appliance to exterior vent, with no more than two 90-degree bends. Add a bathroom exhaust fan rated for at least 80 CFM on a separate circuit — this handles ambient humidity during and after cycles. A $30 humidity gauge on the shelf tells you if the room is creeping above 55% RH regularly, which is your warning sign that something needs fixing.
18. Color-Zone Your Two Functions
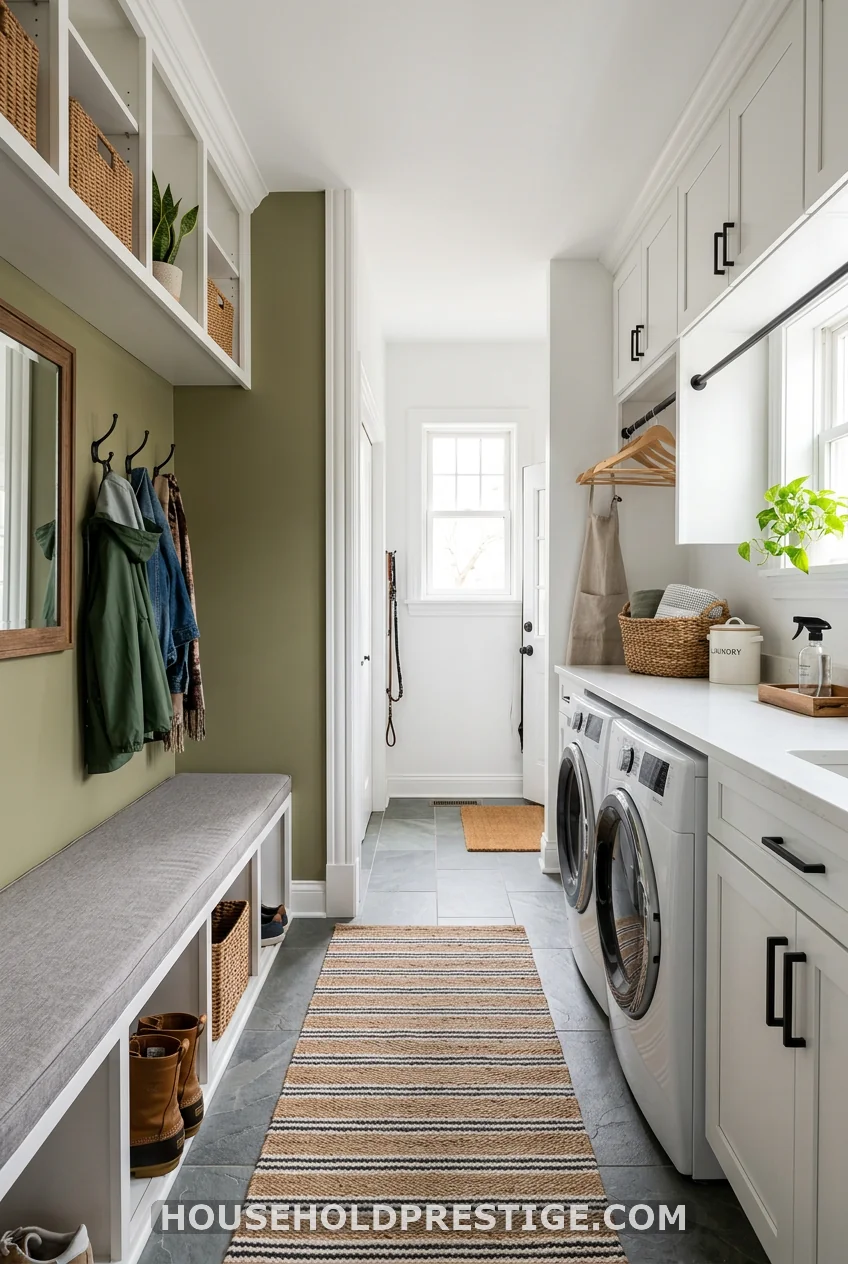
Paint the mudroom zone one color, the laundry zone another. Use the same trim color throughout to keep the room unified. This is the zero-budget way to give each function its own identity without adding walls or doors. Sage green on the mudroom side (Benjamin Moore HC-122 Aganthus Green reads warm and grounded) into bright white on the laundry side. The visual break tells your brain: entry zone ends here, utility zone starts. It works.
19. Magnetic Charging Strip at the Drop Zone
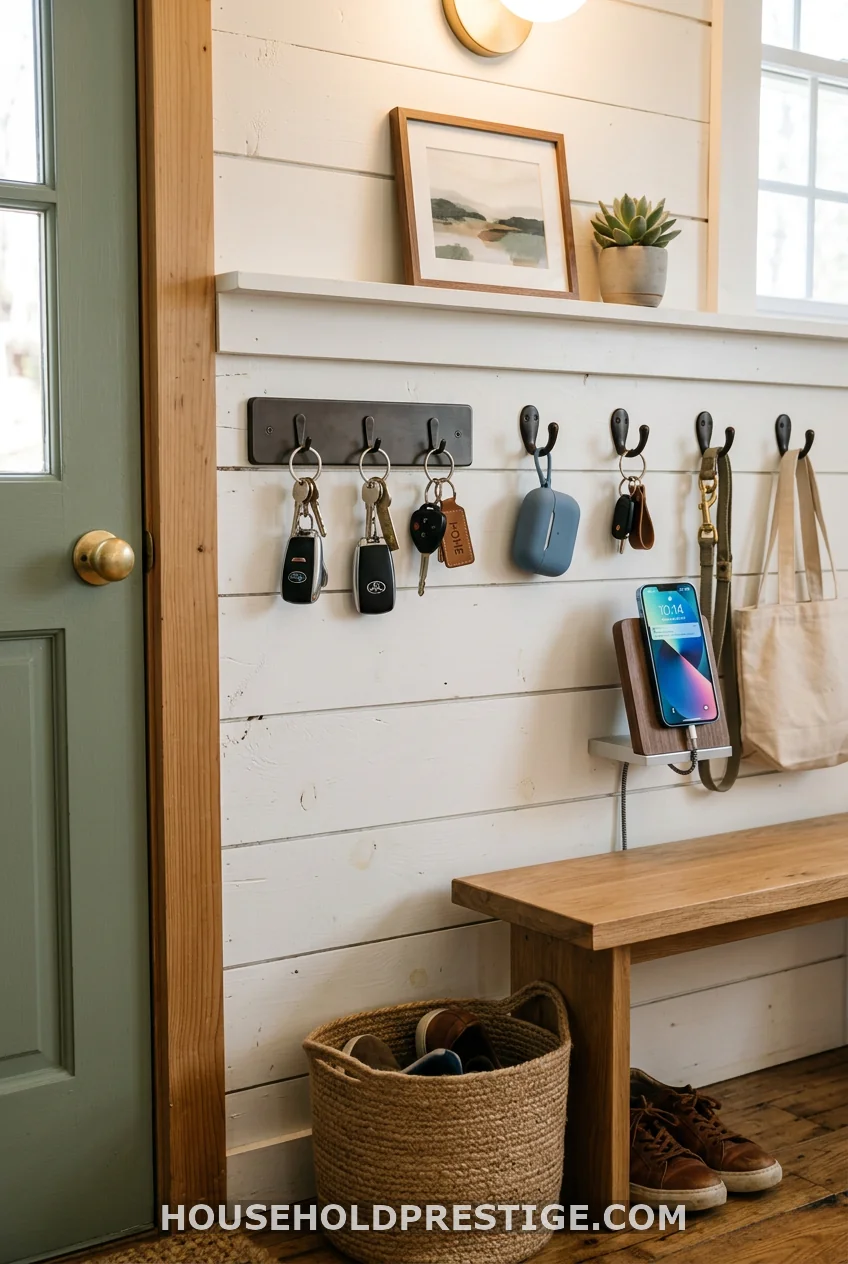
Phones, keys, earbuds — all the things that get lost in a mudroom go here. A $25 magnetic strip mounts to the wall at the drop zone. Add a small wireless charging pad on the counter below it. Everything goes there the moment you walk in. It’s a two-minute installation that eliminates the “where are my keys” problem every single morning.
The Bottom Line
The best mudroom laundry room combo doesn’t happen by accident. It happens because someone sat down and mapped the actual workflow: person comes in the door → boots come off → wet clothes go to wash → bags get hung → everything has a home. Every idea in this list serves that sequence. Pick the ones that map to your family’s daily chaos, not the prettiest photos on someone else’s renovation account.
Start with the stacking appliances and the flooring — those two decisions shape everything else. Then build the storage around how your family actually moves through the space.
You’ve got this.
Frequently Asked Questions
How much does a mudroom laundry room combo cost to build?
The range is wide — a simple DIY refresh with new hooks, a bench, and paint runs $500-1,500. A full built-in locker system with custom cabinetry runs $3,500-8,000 installed. A gut renovation that moves plumbing and adds a dog wash station can hit $15,000-25,000. Most families see the best return on the $3,000-6,000 range, where you get functional built-ins without moving structural elements.
What is the minimum size for a mudroom laundry room combo?
You can make a functional combo room in as little as 70-80 square feet (roughly 8×9 feet). The non-negotiable is width — you need at least 36 inches of clear passage between any storage element and the opposite wall so people can pass while the washer door is open. Anything under 6 feet wide gets uncomfortable fast.
Can I add a mudroom laundry room combo to a garage entry?
Yes — and this is actually one of the most common configurations. A garage entry naturally becomes a mudroom because it’s where the family enters daily. Adding laundry appliances here usually means running a 240V electrical line for the dryer and extending water supply and drain lines from the nearest utility connection. Budget $1,500-3,000 for the mechanical rough-in alone, before any cabinetry or finishes.
What flooring works best in a mudroom laundry room?
Matte porcelain tile (24×24, 0.6+ COF rating for slip resistance) is the most durable choice for a space that sees mud, water, and laundry drips. Large-format tiles also mean fewer grout lines to scrub. If budget is the issue, use rigid-core SPC luxury vinyl plank (not WPC) — it’s genuinely waterproof and handles the traffic, though it won’t outlast good porcelain.
Do I need a utility sink in a mudroom laundry room?
Not required, but the utility sink is the one thing people who have it say they can’t live without, and people who skipped it say they regret most. If the combo room is near the garage entry where kids come in muddy, and dogs need rinsing, the answer is almost always: add the sink.