

You know that specific kind of dread — standing in the doorway of your laundry room, looking at the detergent cap sitting in a puddle on top of the dryer, the three-week-old lone sock on the floor, and a shelf so crammed it launches a bottle of fabric softener at you every time you open the cabinet. Yeah. That’s not your problem. That’s a space problem.
Good news: DIY laundry room organization doesn’t require a gut renovation or a contractor. It requires a drill, a free Saturday, and the right ideas. I’ve pulled together 21 of the most effective space-saving builds I’ve tried or tested — most of them cost between $8 and $40 in materials. A few of them take under 20 minutes. Some will make you feel like you’ve doubled the size of your room without moving a single wall.
Let’s fix this room.
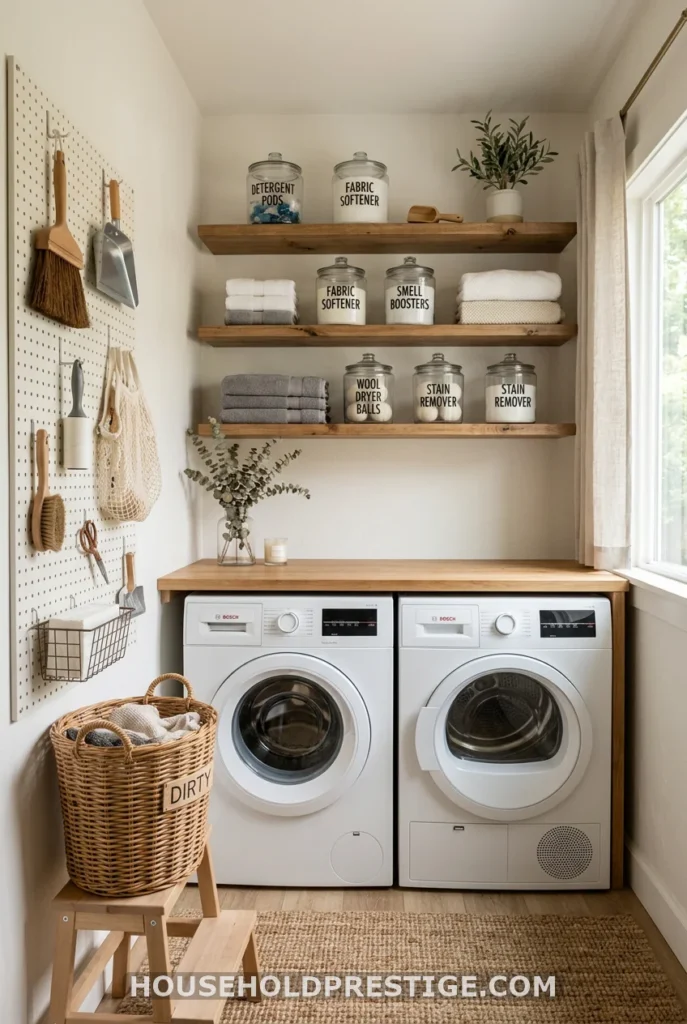
1. Build a Floating Shelf Bridge Between Your Machines

This is the single most impactful DIY you can do in a laundry room. If you have a front-load washer and dryer sitting side by side, the top of each machine is wasted real estate. A single shelf spanning both creates a proper folding counter — and it costs about $35 in materials if you use pine.
Why This Works
Front-load machines sit at roughly 34–36 inches high, which is counter height. The gap between a standard pair is usually 1–3 inches. A shelf that bridges both eliminates that gap and creates a seamless surface. You gain a place to fold, a visual anchor for the room, and a spot to keep the supplies you reach for constantly.
Dimensions to Use
Measure the exact width of both machines combined, including the gap. Standard dryer width is 27 inches; washer is usually the same. Two side-by-side gives you roughly 54–58 inches total. Add 2 inches overhang on each side. For depth, use 24 inches — this aligns with the front of the machine and gives you full counter clearance. Thickness: 1.5 inches (standard 2x lumber) is sturdy enough without feeling chunky.
Materials and Costs
| Item | Source | Approximate Cost |
|---|---|---|
| 1x 2″x24″x60″ pine board (custom cut) | Home Depot | $18–22 |
| 2x floating shelf brackets (8-inch) | Amazon | $12–15 |
| Wall anchors + screws | Hardware store | $3 |
| Sandpaper (120 grit) | On hand | $0 |
| Polyurethane or wood stain | Hardware store | $8–10 |
| Total | $33–50 |
Step-by-Step Build
- Measure twice. Get the exact combined width of both machines, plus your desired overhang (I do 2 inches on each side). Write the number down and take it with you to the hardware store. Most Home Depot locations will make one free cut.
- Find your wall studs. Use a stud finder behind the space above the machines. Laundry rooms often have thinner walls and studs at 16-inch intervals. Mark each stud location in pencil at shelf height (aim for 6–8 inches above the machine surface, so you can actually use both surfaces independently).
- Sand and seal the board. Give the wood two passes with 120-grit sandpaper. Apply one coat of polyurethane with a foam brush, let it dry 4 hours, sand lightly again, apply a second coat. This protects against detergent splashes and water vapor from the machines.
- Mount your brackets into studs. This is non-negotiable — if you’re resting laundry on this shelf, it needs to be in studs, not drywall anchors. Use 2.5-inch wood screws. Level each bracket individually before tightening fully.
- Rest and secure the board. Set the board on the brackets and check for level across the full span. If there’s any bow, shim it with a thin piece of cardboard under the low end. Secure the board to each bracket with the included screws from underneath.
- Add finishing trim (optional). A piece of 1×2 pine attached to the front edge with wood glue and finishing nails gives it a polished, built-in look. Paint or stain to match.
Common Mistakes to Avoid
- Skipping the stud check. Drywall anchors will hold for a week, then slowly pull out. Into studs only.
- Going too deep. If your machines are pushed close to the wall, a 24-inch deep shelf will block you from reaching the controls. Measure the machine depth first.
- Forgetting the polyurethane. Raw wood in a laundry room absorbs moisture and warps within 6 months. Seal it.
- Using particle board. It sags. Use solid pine or MDF with a hardwood veneer at a minimum.
Pro Move
Once the shelf is in, mount two small S-hooks to the underside at each end. Hang a hand towel on one side and a mesh bag for delicates on the other. You’ve just created an organization system on top of your organization system.
2. Hang a Tension Rod Under the Cabinet Sink
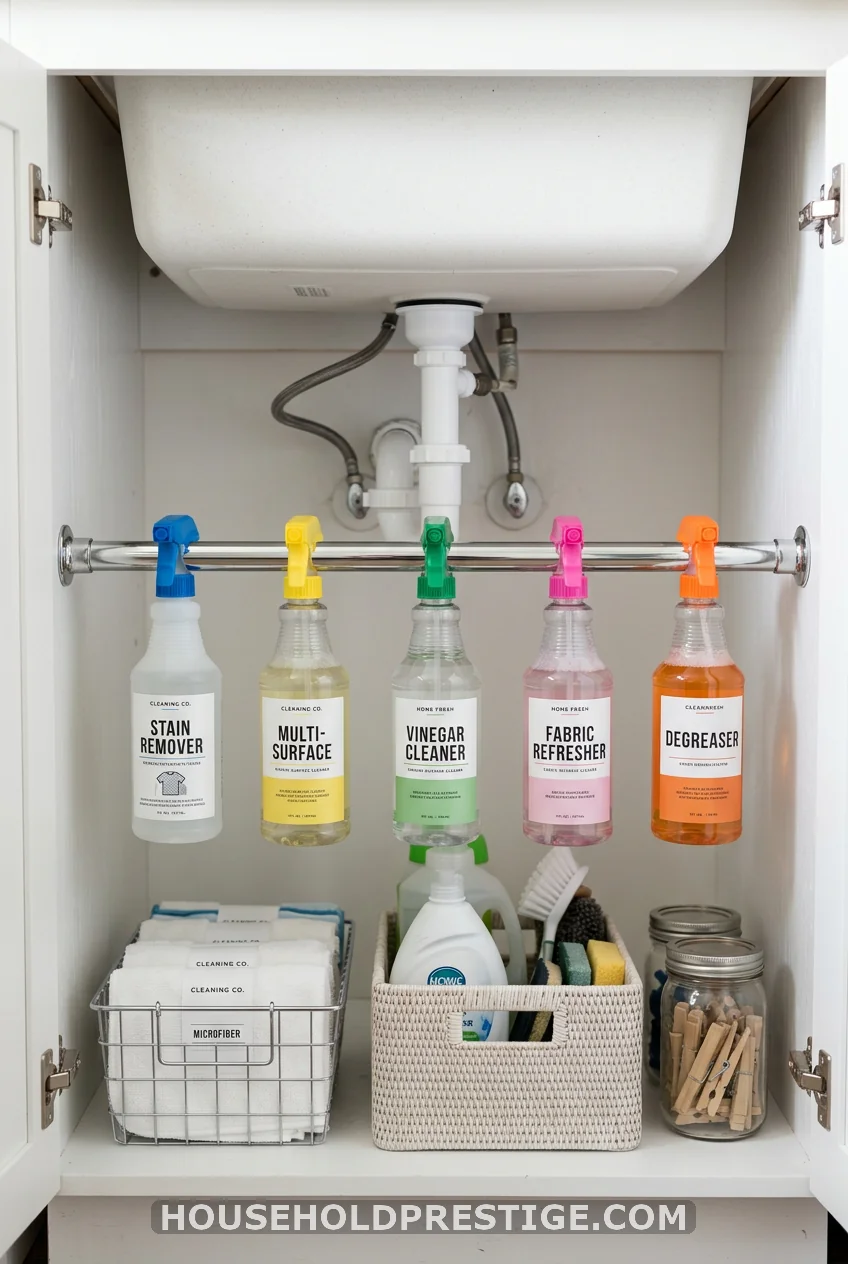
Your under-sink cabinet is probably a graveyard of falling spray bottles. Fix it in five minutes. Buy a tension rod ($6–8 at any dollar store or Target), expand it to fit the interior width of the cabinet, and lock it in place about 8 inches below the shelf. Hang your spray bottles directly from the rod by their trigger handles — they stay upright, visible, and easy to grab. The rest of the shelf clears for actual storage. No drilling. No damage. Renter-approved.
3. Mount a Pegboard Wall
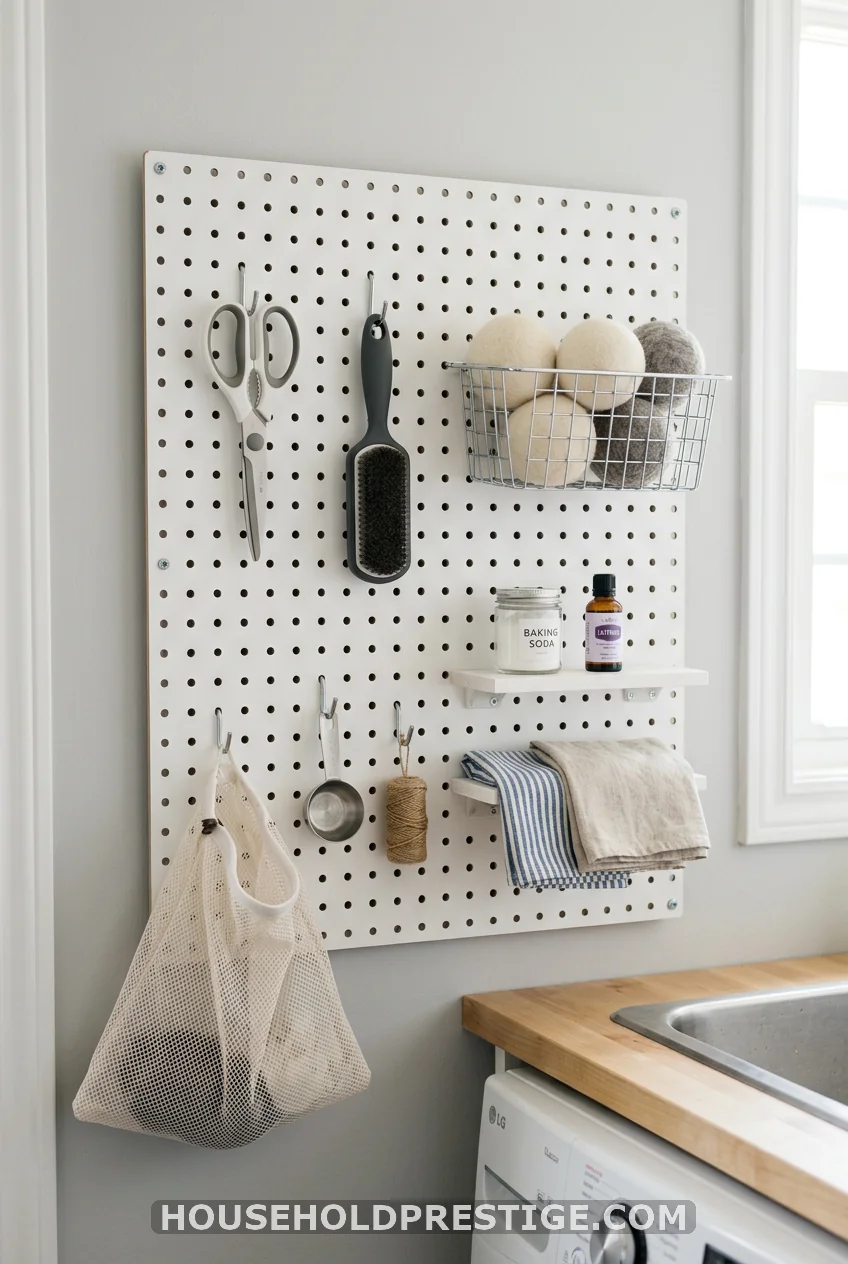
A pegboard is the most flexible storage you can add to any room, and in a laundry room, it’s especially good because your needs change — ironing spray, lint rollers, stain sticks, scissors for tags — all the oddly shaped things that don’t fit in a drawer.
Buy a 2×4-foot sheet of 1/4-inch pegboard from Home Depot ($12–15). The key is mounting it with 1.5-inch spacers between the board and the wall so the hooks have room to seat properly. You can buy pegboard mounting kits or use 1.5-inch PVC pipe cut into short segments as spacers.
Install into wall studs with 2.5-inch wood screws through the spacer and into the stud. Once it’s up, arrange your hooks however you need them. The beauty of pegboard is that you rearrange in seconds — no holes, no replanning. Add a small pegboard shelf ($5–8) to hold a row of jars for clothespins or dryer sheets.
Total cost: $20–30
4. Build a Slim Roll-Out Cart for the Gap Beside the Machines
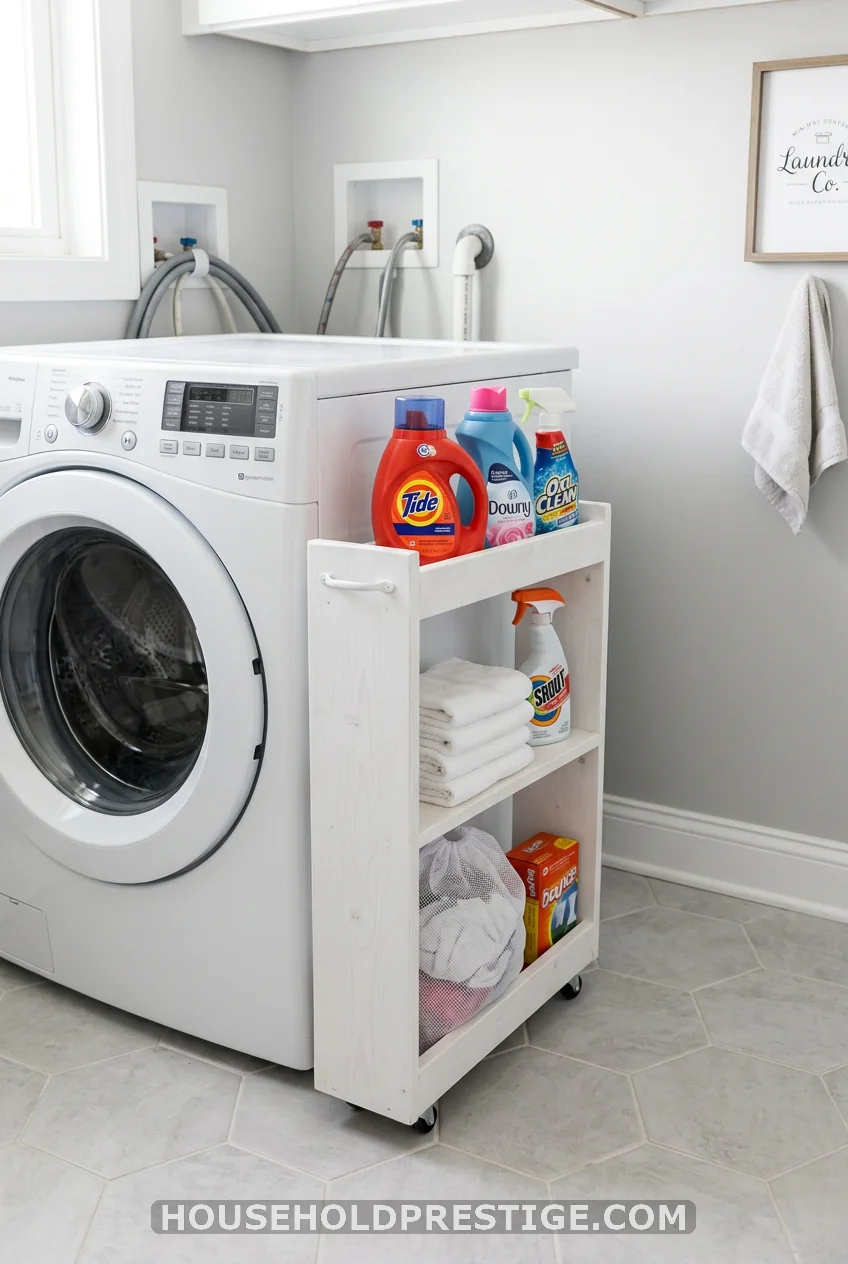
Most laundry rooms have a 4–8 inch gap on one side of the washer or dryer. That strip of space is enough to hide a surprisingly useful roll-out cart.
You can buy pre-made laundry gap carts on Amazon for $25–40, but building one takes an afternoon and costs $15–20. Use 1/2-inch plywood for the sides and shelves. Cut your side panels to height minus 3 inches (for the casters). Install 4 fixed casters rated for 30+ lbs on the bottom. Add 2–3 internal shelves with dadoes or pocket screws.
Measure your gap width precisely before you cut — 4 inches of actual clearance needs a cart that’s 3.5 inches wide so it actually rolls out without binding. Sand smooth, prime, and paint with semi-gloss white so it wipes clean easily.
Total build cost: $15–22
5. Make a PVC Pipe Laundry Sorter
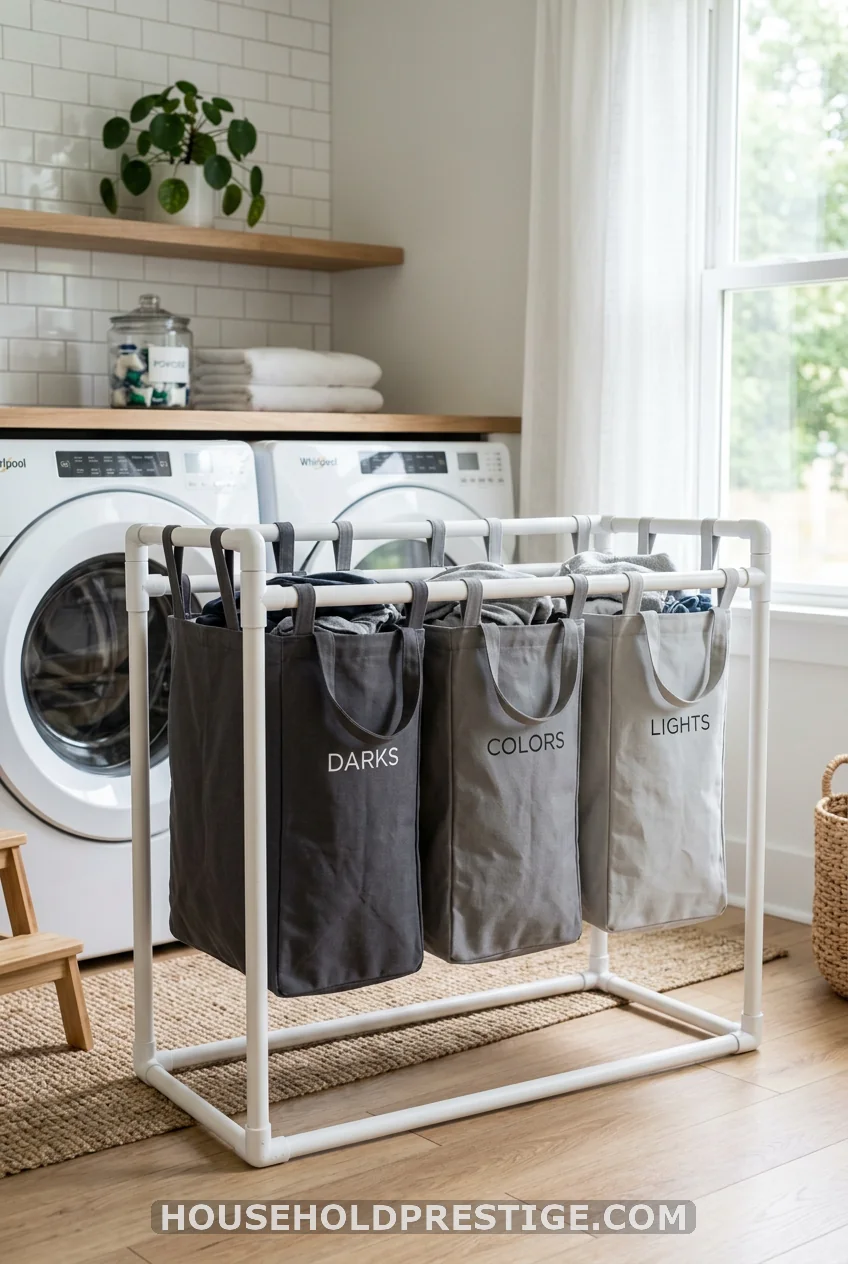
Sorting laundry before it piles into one massive heap is one of those habits that sounds obvious, but almost nobody actually does. The reason? Most laundry sorters either collapse, take up too much space, or look like something from a hospital break room.
Build your own from 3/4-inch PVC pipe and three fabric canvas bags. The pipe frame stands about 36 inches tall, 36 inches wide, and 14 inches deep — enough for three 12-inch-wide compartments. You’ll need about 20 feet of 3/4-inch PVC pipe ($12 at most hardware stores), 12 elbow joints, and 6 T-joints. The canvas bags can be basic IKEA FRAKTA bags cut and hemmed to fit, or purpose-sewn. Total materials: about $20–28.
Label each compartment — whites, darks, colors. When a compartment is full, that load is ready to go. No pre-sort step, no pile on the floor.
6. Mount a Fold-Down Ironing Board on the Wall
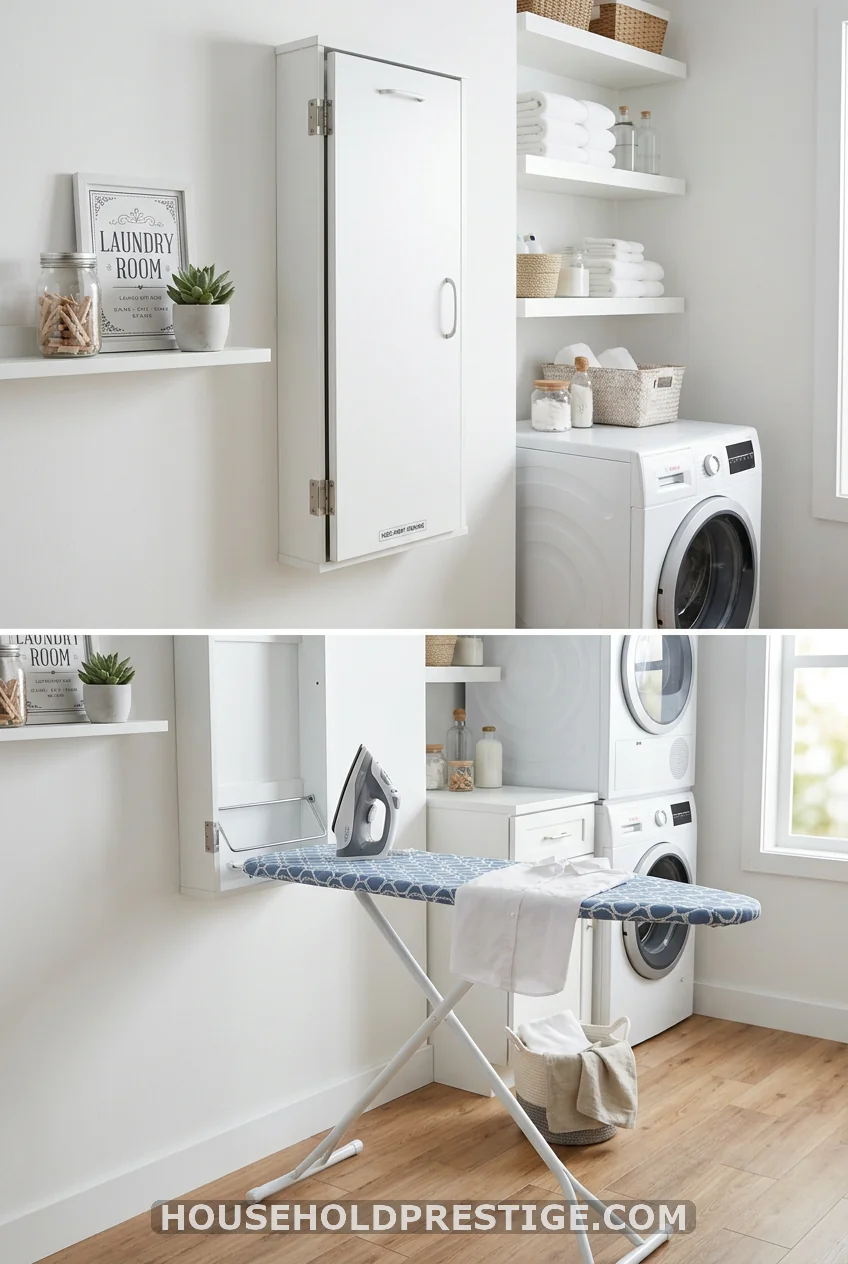
A freestanding ironing board takes up roughly 18 square feet of floor space when open, and roughly 8 square feet when folded and leaning against something. In a small laundry room, that’s not okay.
A wall-mounted fold-down ironing board ($35–55 on Amazon for basic models like the Brabantia Wall Fix) mounts with 4 screws into studs and folds completely flat — under 4 inches deep — when not in use. Open it when you need it. Fold it back. Done. This alone can free up enough floor space to comfortably turn around in a tight room.
If you want to build one instead, the Sawdust Girl website has free plans for a wall-mounted ironing board cabinet that also hides the board behind a cabinet door. Materials run about $40. The build takes a full Saturday, but the finished product looks custom.
7. Screw Plastic Crates to the Wall as Open Shelves
These have been around for decades because they work. Buy stackable plastic milk-crate-style bins from a discount store ($3–5 each). Drill a fender washer through the upper interior corner of each crate, then screw directly into a wall stud. They lock in place, hold a surprising amount of weight, and can be spray-painted any color. Total cost for six crates: about $25.
8. Stick a Magnetic Strip to the Side of Your Dryer
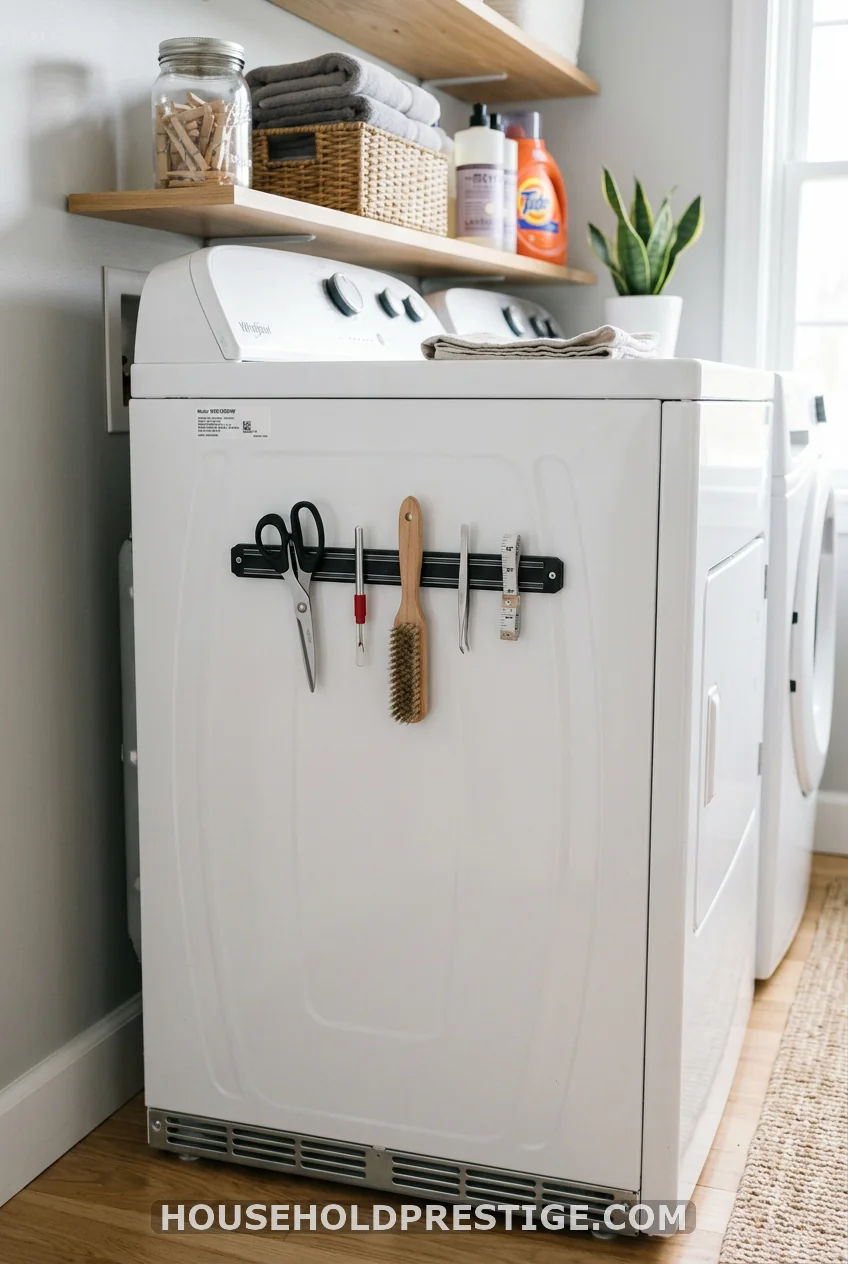
The side panel of your dryer is magnetic. Most people don’t use it. A magnetic tool strip ($8–12 on Amazon) sticks right to the surface with no mounting hardware required, holds scissors, a seam ripper, a lint brush, and a small magnetic cup for spare change pulled from pockets. Takes 30 seconds to install.
9. Build Behind-the-Door Shelves
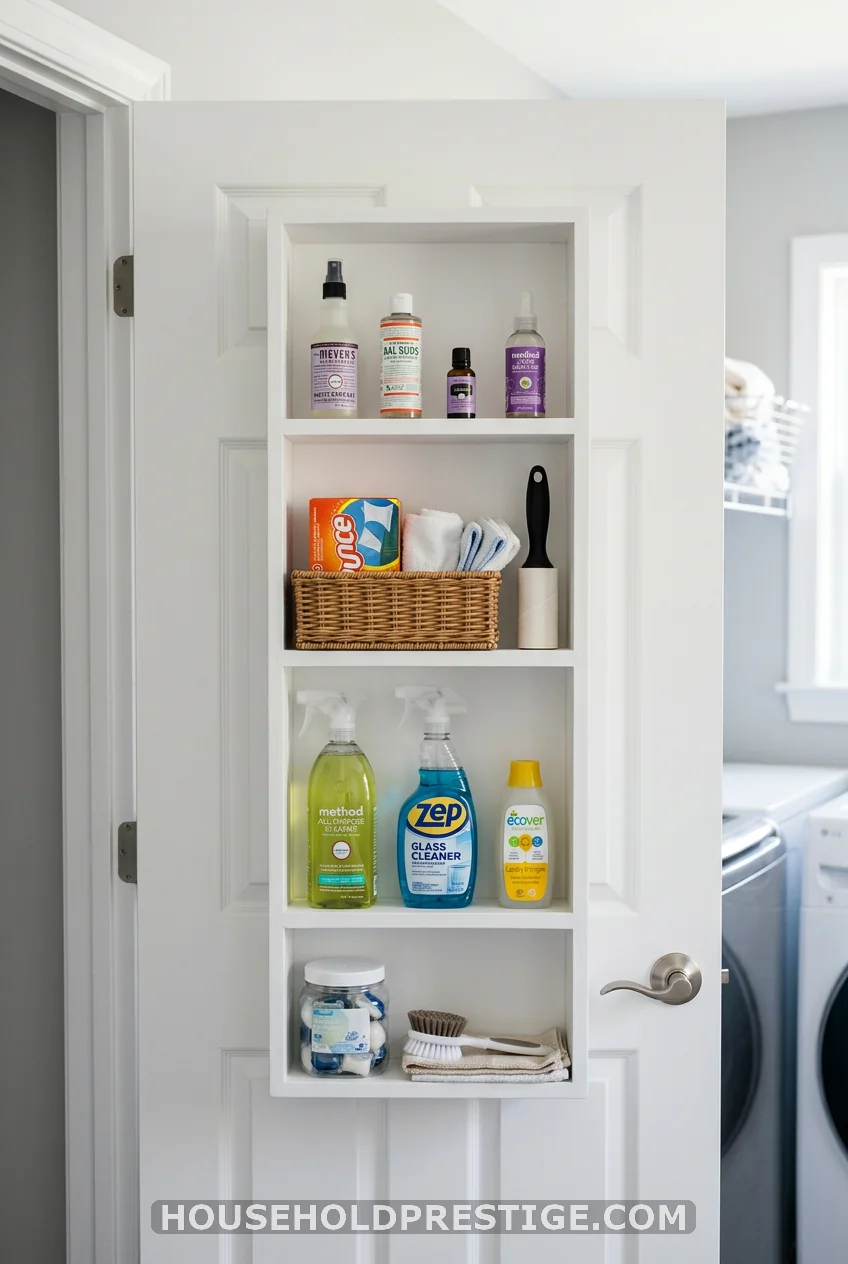
The back of your laundry room door is typically blank wall space that gets ignored. A shallow shelf unit — 3.5 inches deep, same height as the door — fits without interfering with the door swing and gives you 3–4 additional shelves.
Family Handyman has full plans for this, but the basics are: use 1×4 pine boards for the frame sides and shelves. Mount to the door itself using 2.5-inch screws through the door frame (not the door panel — you’ll strip the thin door skin). Build the unit first, then mount. Materials are roughly $30 for a 6-foot tall unit with four shelves.
Add a rubber bumper to the outer edge so the shelf doesn’t mark the wall when the door opens fully. The whole thing takes about 3 hours including drying time for paint.
Total cost: $28–35
10. Use a Dry-Erase Marker on the Washer Lid
The enamel finish on most top-loading washing machine lids behaves exactly like a whiteboard. Before switching a load, write which items shouldn’t go in the dryer directly on the lid — the items themselves, in plain text. Whoever moves the laundry reads it. No separate notes, no miscommunication, no shrunken sweaters. Dry-erase marker wipes off with a dry cloth in one swipe. Free if you already own a marker.
11. Build a DIY Pedestal with a Laundry Basket Slot
Reaching into a front-load washer from floor level is rough on your back, and the pedestal drawers sold by appliance brands run $200–300 per machine. You can build a cleaner, more functional version for about $40.
Use 3/4-inch plywood for the box structure. For a standard 27-inch wide machine, cut the platform to 28 inches wide, 30 inches deep, and 10–12 inches tall. Use pocket screws to join the sides. Cut a 14×18-inch opening on one end for a laundry basket to slide in.
Important: before building, check your machine’s weight (most are 150–200 lbs) and make sure your plywood is at minimum 3/4 inch thick. Add a horizontal support piece across the center span to prevent any flex. Prime and paint with semi-gloss. Roll your machine onto the platform — two people and an appliance dolly make this a five-minute job.
Total cost: $35–45
12. Why Your “Organization System” Keeps Falling Apart (And What Actually Fixes It)
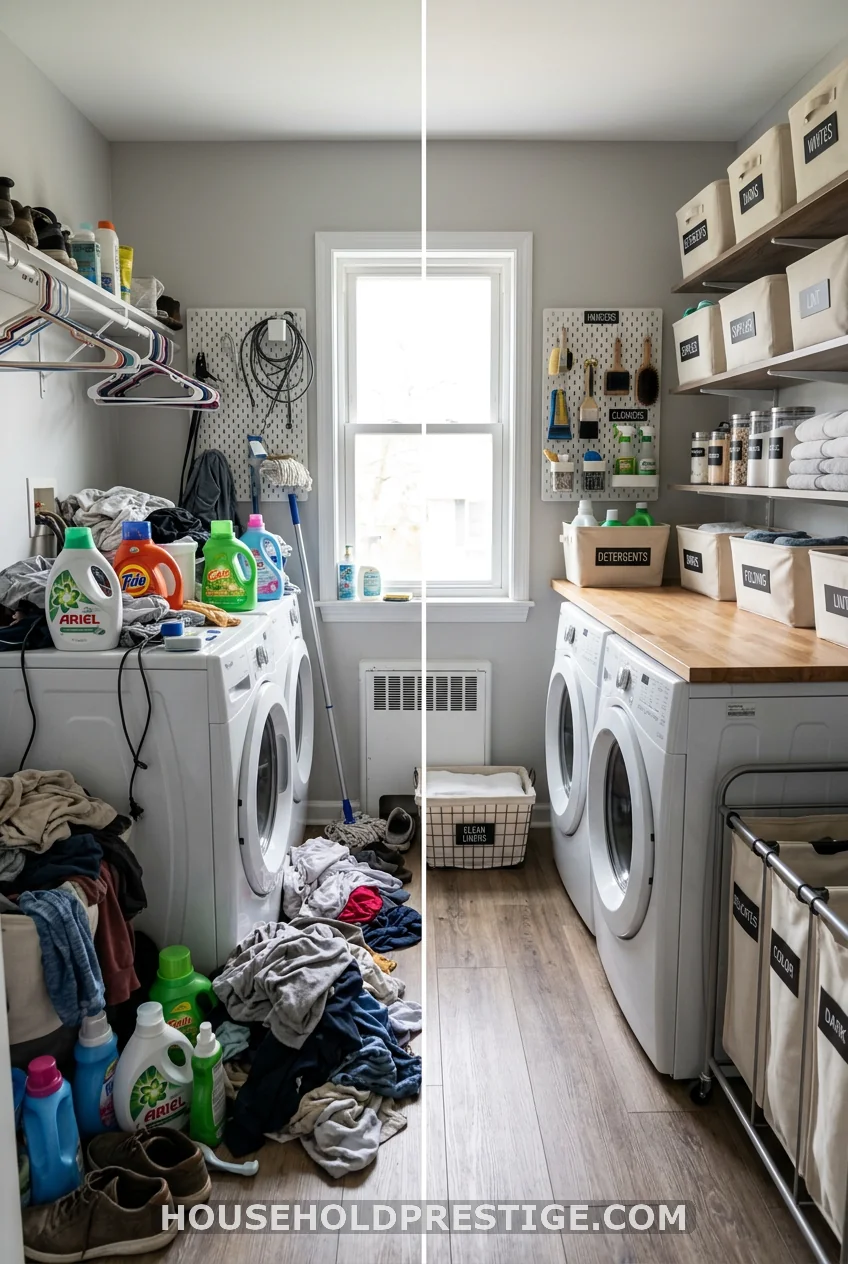
Here’s the thing most laundry room organization content won’t say: the pretty bins and labeled jars don’t actually solve the problem. Friction does.
If your laundry room stays messy within two weeks of every organizational overhaul you do, the problem isn’t the containers — it’s that you haven’t reduced the friction of putting things away. Open bins work better than lids. One designated spot per item beats a “general supply area.” And the most important rule: if you have to make two moves to put something away, it won’t get put away.
What most people get wrong: They buy matching jars, fill them beautifully, then find themselves leaving the detergent scoop on the edge of the dryer because the lid is annoying to open with one hand covered in laundry. Three weeks later, the jars are decorative and the scoop is back on the dryer.
What actually works: Measure how you actually use each item. Detergent that gets used every day? It lives open, on the counter, front and center. Dryer sheets? Wall-mounted dispenser at eye level. Stain remover? On a hook on the pegboard, uncapped. The items you use least go in the labeled bins.
The goal isn’t a laundry room that looks organized in photos. It’s one that stays organized when you’re tired at 9 p.m. and have a basket of wet laundry in your arms. Build for that person, not for the Instagram version of yourself.
13. Install Pull-Out Sweater Drying Racks Above the Machines
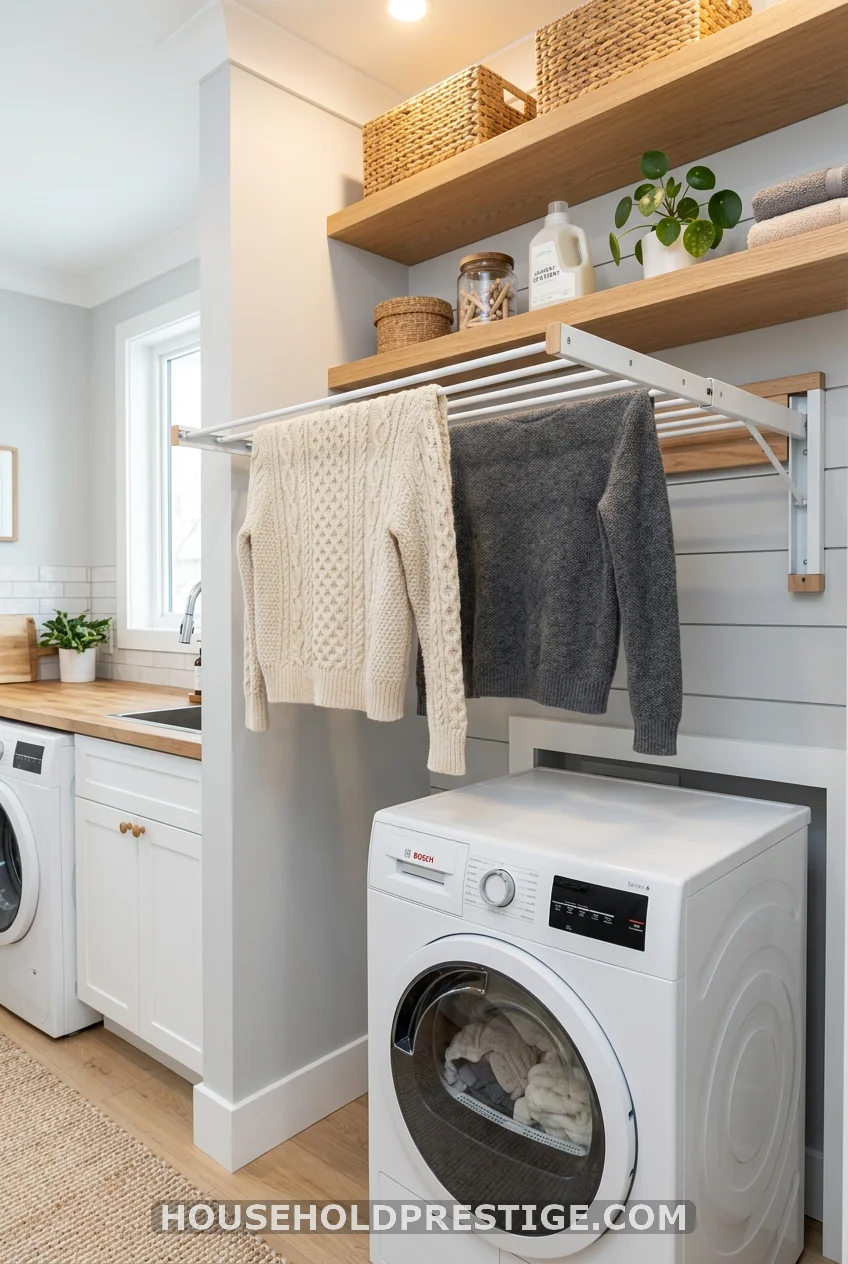
Air-drying flat items — sweaters, delicates, athletic gear — is impossible in a small laundry room without blocking everything else. Pull-out drying racks solve this by living inside a cabinet or shelf enclosure and extending outward only when needed.
Sawdust Girl has free woodworking plans for DIY versions that mount inside a shelf cavity above your machines. The rack is essentially a series of dowel rods (5/8-inch diameter) mounted in a sliding frame. When extended, it creates a flat grid surface about 24 inches by 36 inches — enough for two or three sweaters. When not in use, it slides back in and looks like a closed shelf.
Materials: 8 feet of 5/8-inch wood dowel, 1×4 pine for the frame, drawer slides ($12–15 for a pair rated for 60 lbs). Total cost about $25–30 for the rack, not counting an enclosure cabinet if you don’t have one already.
14. Decant Supplies into Labeled Glass Jars
Bulk detergent pods, dryer sheets, stain powder, and clothespins all look like visual clutter in their original packaging. Pour them into wide-mouth Mason jars ($2–4 each at any grocery or hardware store), add a label with a label maker or chalkboard label, and line them on your floating shelf. Same amount of stuff — completely different visual impact. The transparency also tells you at a glance when you’re running low.
15. Make a Lost-Sock Board
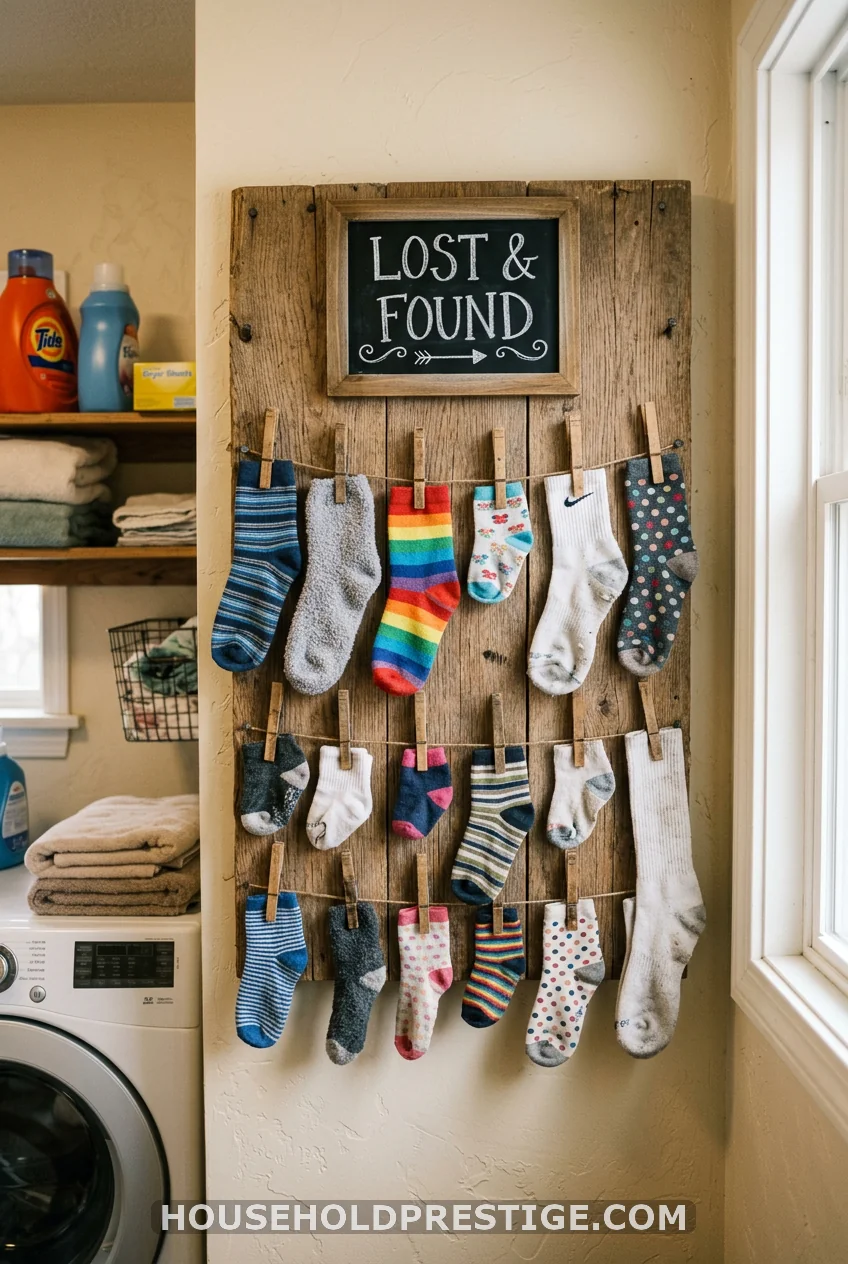
Cut a 12×18-inch piece of scrap wood or thin plywood. Sand the edges, give it a coat of chalk paint, and screw 8–10 wooden clothespins in two rows across the surface. Mount it to the wall beside the dryer. Every lone sock gets clipped here instead of disappearing. When the mate shows up, both socks come off the board together. It takes about 25 minutes to make and costs practically nothing if you have scrap wood on hand. It also makes guests laugh, which is a bonus.
16. Build an Industrial Pipe-and-Wood Hanging Rod
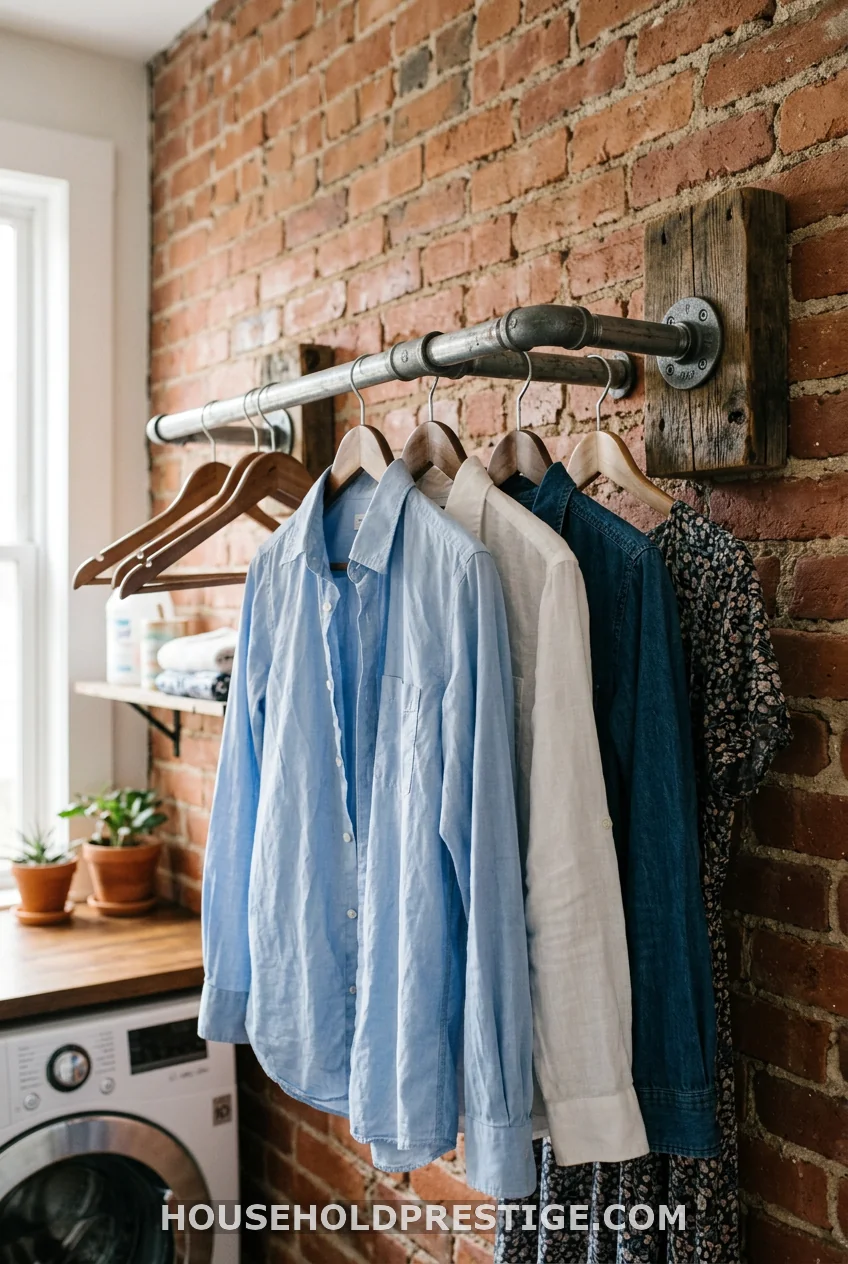
Most laundry rooms have zero dedicated hanging space, which means shirts go from the dryer to a wrinkled pile somewhere else. A wall-mounted hanging rod changes that.
Use 3/4-inch galvanized pipe fittings — two floor flanges, two 4-inch nipple pipes, two 90-degree elbows, one long center pipe cut to your desired width. Screw the floor flanges into wall studs, assemble the pipes by hand-tightening, then snug with a pipe wrench. The whole system costs about $25–35 in pipe fittings from any hardware store plumbing section. It holds 50+ lbs without flex, looks intentional, and doesn’t require painting or finishing.
For a renter-friendly version: mount the floor flanges into a piece of 2×6 pine, then use picture-hanging strips (the large Command version rated 16+ lbs per strip) to mount the wood block to the wall. Not permanent, but holds well for light use.
17. Hang a Clear Shoe Organizer on the Back of the Door

An over-the-door shoe organizer ($8–15 on Amazon) fits more laundry room supplies than you’d expect. Dryer sheets, stain remover sticks, a lint roller, a tape measure, sewing kit, spare buttons, and three-pocket mystery items with nowhere else to go. Clear pockets mean you can see everything without opening anything. Hangs over any standard door in 10 seconds.
18. Build a Laundry Room Command Center
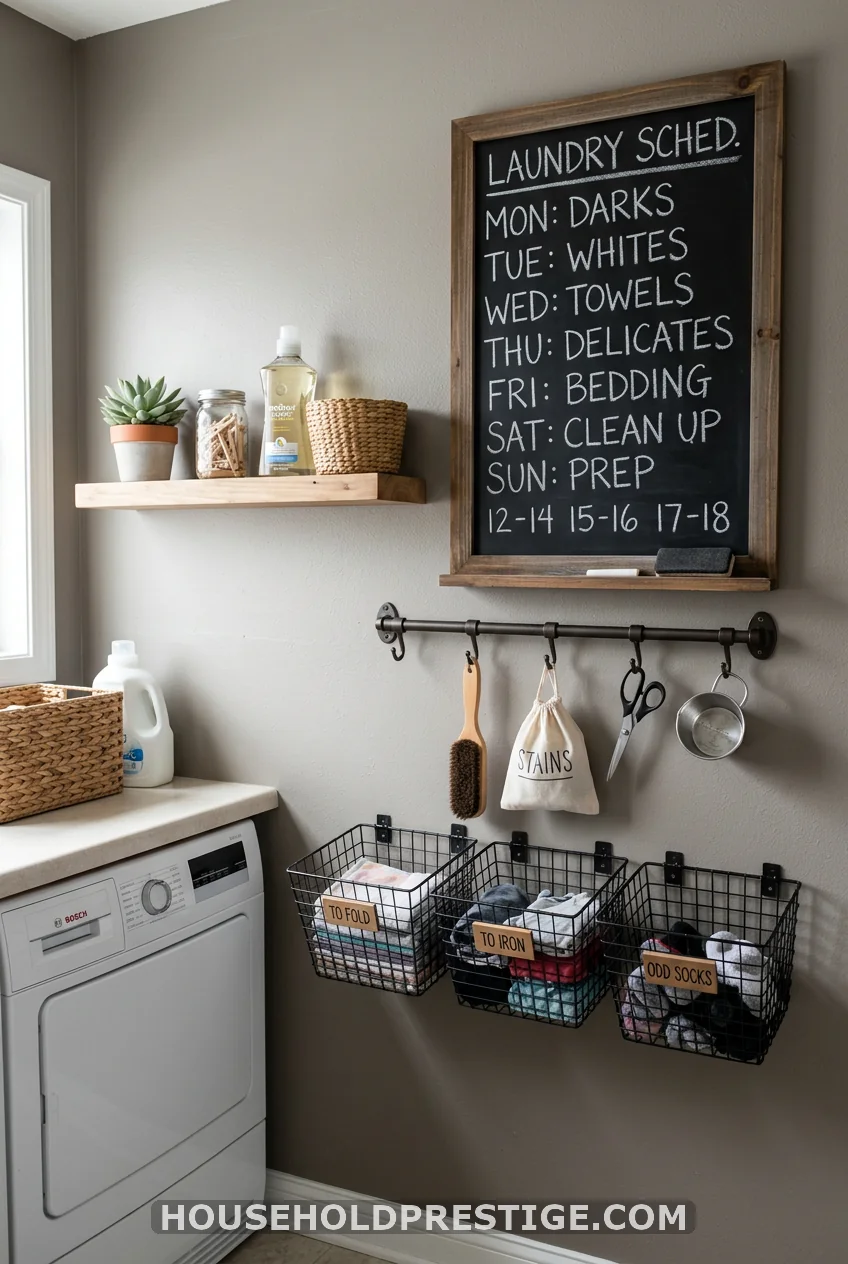
A command center sounds complicated, but it’s just a dedicated wall section that handles communication and logistics — a small calendar or dry-erase board (laundry schedule, who does what, what needs hand-washing), a hook rail for mesh bags, and a small basket for receipts or tags cut from new clothes.
You can buy a pre-made wall organizer panel ($20–35) or assemble one from individual components: a 24×12-inch cork or chalkboard panel, a 4-hook rail, and one small wall basket. Mount them all on a single 1×8 board first, then mount the board as a unit — it goes up faster, stays level, and looks intentional rather than random.
19. Build a Laundry Basket Pedestal with Two Slots
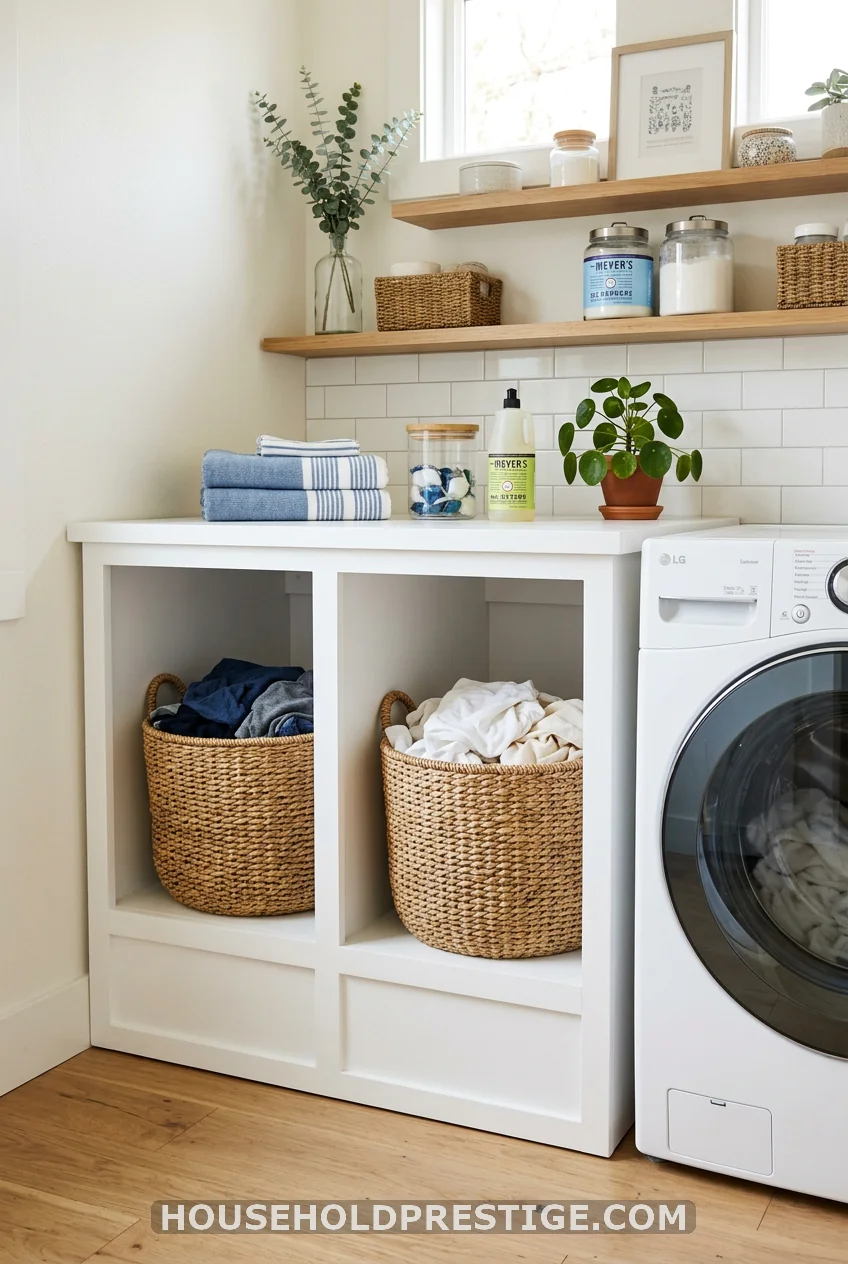
Two laundry baskets — clean and dirty — sitting on the floor get kicked, tripped over, and generally create chaos. Build a low platform (10 inches tall) with two open-front cubbies sized to your exact baskets.
Measure your laundry baskets first. Standard round baskets are 18 inches wide and 14 inches tall — which means your cubbies need to be 19 inches wide and 15 inches tall at the opening. Build the box from 3/4-inch plywood: two side panels, a back panel, a top panel, and two internal dividers. No doors — open-front for zero friction. Add a flat top surface so you have a folding zone above the baskets.
Materials cost: $30–45 depending on your plywood grade.
20. Install a Wall-Mounted Fold-Flat Drying Rack
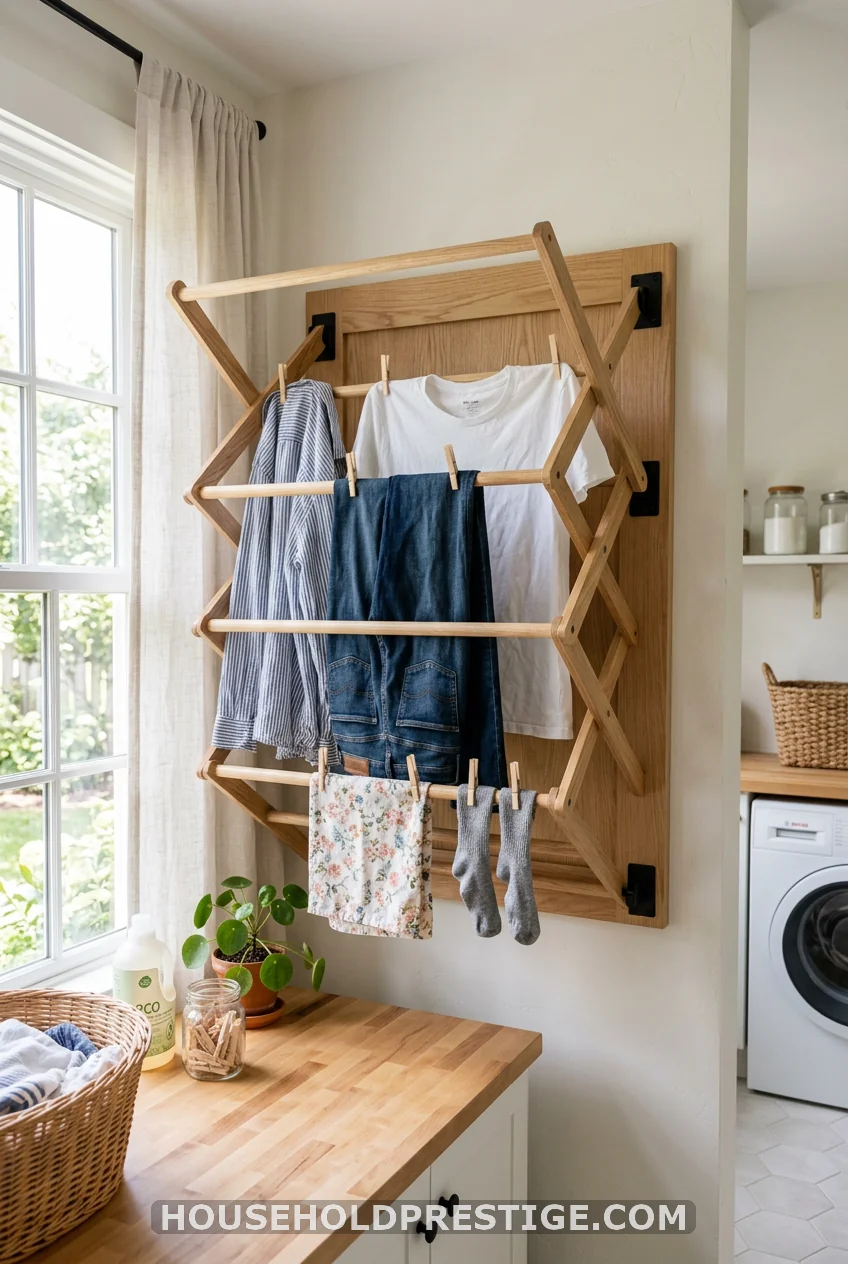
This is different from the ironing board — it’s specifically for air-drying clothes, and the best versions fold completely flat against the wall when not in use. You can buy the IKEA Frost wall-mounted drying rack for about $30, or look for the Leifheit brand at Bed Bath & Beyond (usually $35–55 with greater arm count).
For a DIY version, the build uses 1×2 pine slats hinged to a wall-mounted backing board with inset piano hinge. When folded out, the slats rest on small wooden peg stops at a roughly 45-degree angle, creating a row of 6–8 sturdy drying arms. When folded closed, the arms lie flat against the backing board. Total thickness when closed: about 2.5 inches.
21. Use Tension Rods to Hide the Machines Behind a Curtain
Mount two tension rods — one at the top of the alcove where your machines sit, one slightly in front — and hang a linen or canvas curtain from the front rod. When you’re done with laundry, pull the curtain closed. The machines disappear. The room looks like a closet or pantry, not a utility room. Works especially well in open-plan areas where the washer and dryer are visible from the kitchen or hall. Two tension rods plus a fabric drop cloth cut to size: under $20.
Wrap-Up
Here’s the truth: none of these ideas is magic. The floating shelf doesn’t clean itself. The pegboard doesn’t stop the sock problem permanently. What these 21 builds actually do is remove the excuses — the lack of storage, the missing surfaces, the awkward gaps — that make it easy to let things pile up.
Pick two or three that match your biggest pain points. Build them this weekend. Then see how it feels to walk into that room without dreading it.
Your laundry room is small, but it doesn’t have to feel that way.
FAQ
Q: What’s the best DIY project for an extremely small laundry room — like a closet with a stackable washer and dryer?
A: The over-the-door shoe organizer and the behind-the-door shelf are your two best friends in a closet configuration. Both use the door’s back surface, which is the only wall you actually have access to when the door is open. Pair those with a magnetic side-panel organizer on the dryer, and you’ve maximized every available surface without adding bulk to the room.
Q: How do I organize a laundry room when I’m renting and can’t drill into walls?
A: Several of these builds are renter-friendly by design. The tension rod under the sink, the over-the-door shoe organizer, the magnetic strip on the dryer, and the tension rod curtain all require zero drilling. For the pegboard, you can lean it against the wall secured by furniture straps rather than mounting it. If your landlord allows it, Command strips rated at 16+ lbs per strip can handle lightweight shelves as well.
Q: What should I buy first if I only have $20 to spend on DIY laundry room organization?
A: Spend $8 on a tension rod for under the cabinet sink, $6 on four 1-quart Mason jars with lids, and save the remaining $6 for chalkboard labels or a label maker roll. These three things cost under $20 combined, take 20 minutes to set up, and address the two biggest complaints in most laundry rooms — falling bottles and cluttered supplies. Start there, then build from the list once you see the impact.
Q: How do I make a laundry room look bigger without renovating?
A: Light, height, and clear floor space. Paint the walls white or a very light warm gray (Benjamin Moore White Dove or Sherwin-Williams Alabaster both work). Mount shelves as high as you can comfortably reach — vertical lines draw the eye up. Get everything off the floor: baskets in cubbies, ironing board on the wall, supplies on shelves. A room where the floor is clear reads dramatically larger than the same room with the same square footage but stuff on every surface.
Q: How long does DIY laundry room organization actually take — including shopping?
A: The quick wins (tension rod, shoe organizer, magnetic strip) take under an hour, including a trip to the dollar store. The mid-level builds (pegboard, behind-the-door shelf, lost-sock board) run 2–4 hours, including drying time. The heavy hitters — the floating shelf bridge, the pedestal, the roll-out cart — are Saturday projects. Plan for 4–6 hours for each if you’re working alone, 2–3 hours with a second set of hands.