

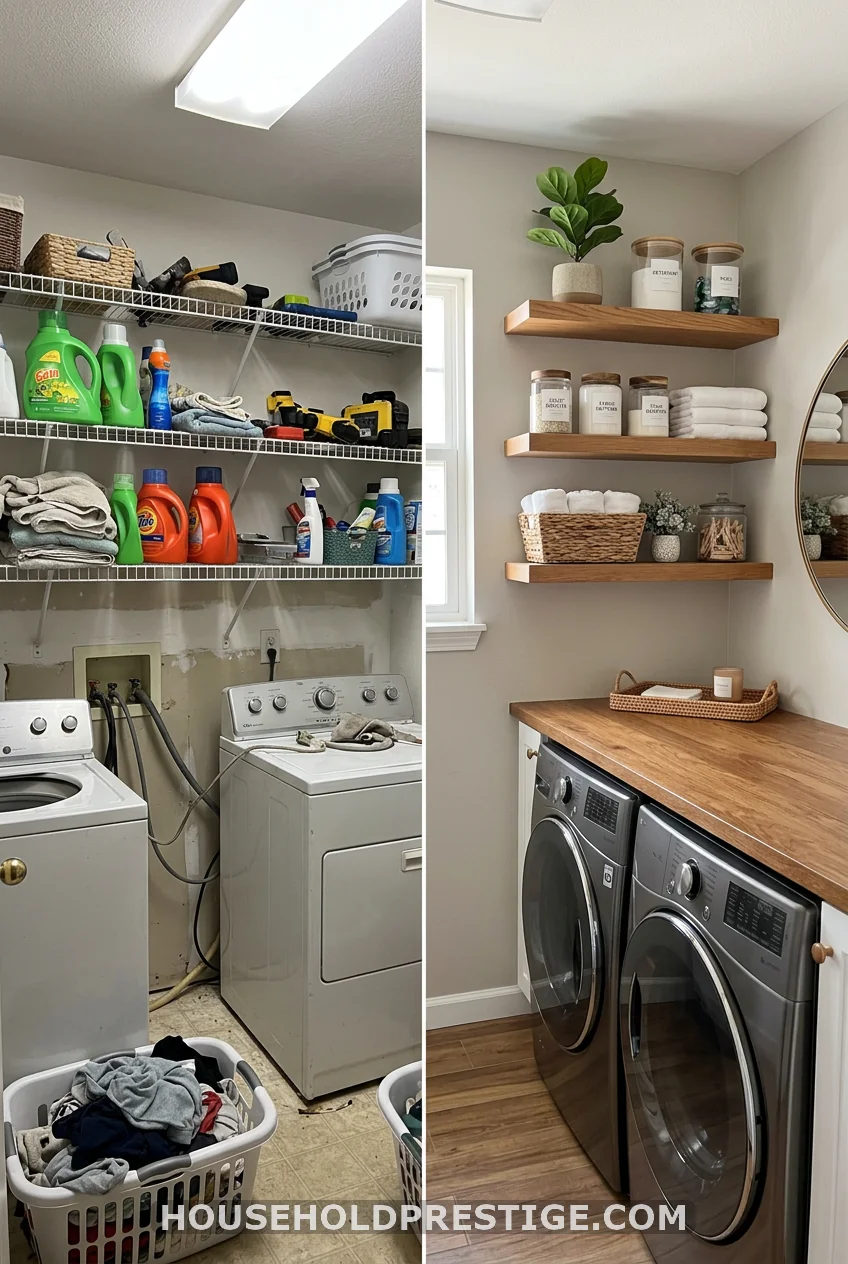
There’s a special kind of frustration that comes with a tiny laundry room. You’re doing a small laundry room makeover in your head every time you squeeze past the dryer, knock a detergent bottle off the shelf, or fold shirts on top of the washing machine because there’s nowhere else to put them. I’ve been there. I spent three years treating my laundry closet like a storage unit that happened to have appliances in it — until I finally got strategic.
These 27 ideas come from real research into what moves the needle. Some cost $8. Some cost $300. All of them are worth knowing before you touch a single wall.
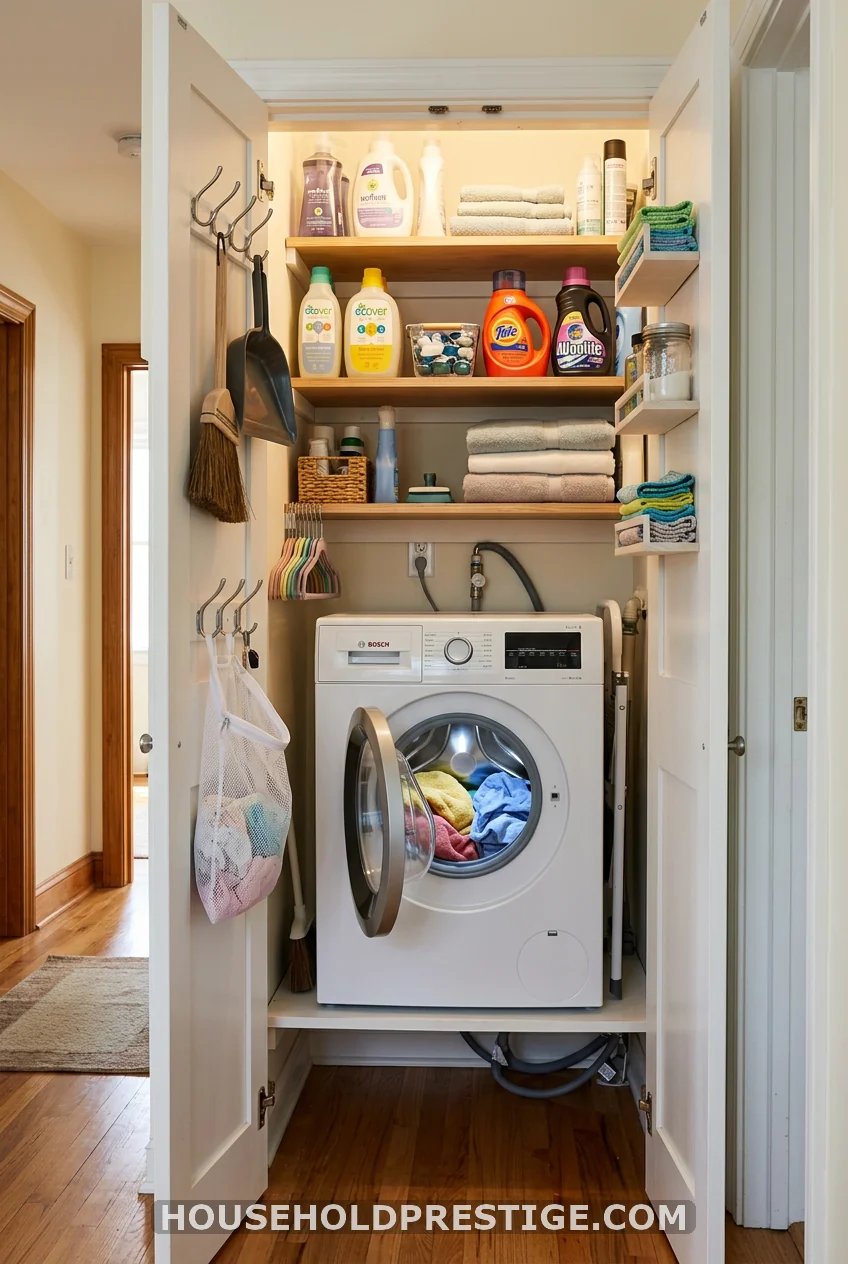
1. Stack Your Machines If You Haven’t Already
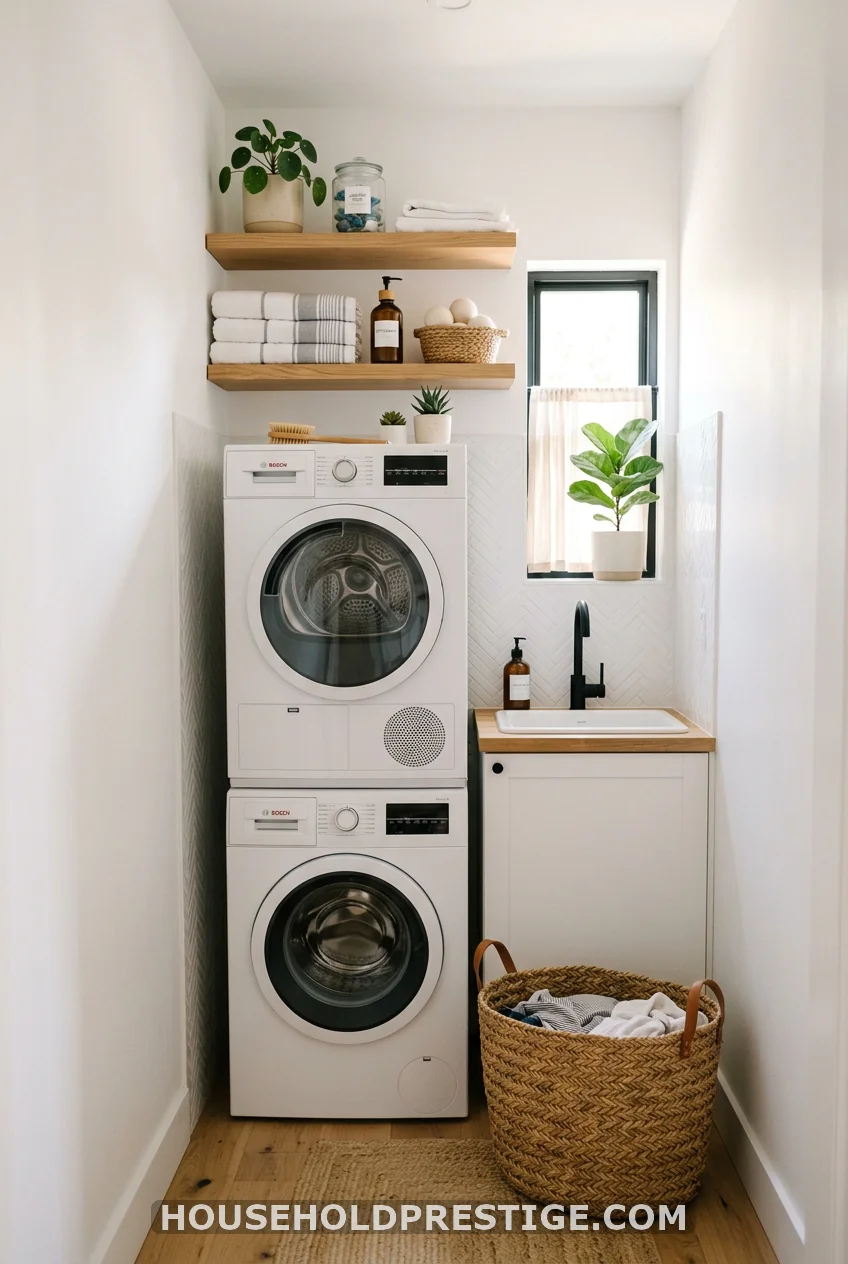
If your washer and dryer sit side-by-side and your room is narrow, this is the single highest-impact change you can make. Stacking frees up roughly 30 inches of horizontal floor space — enough for a slim storage tower, a wall-mounted folding station, or just breathing room.
You need a front-loading washer and dryer for this to work. Top-loaders can’t be stacked. Universal stacking kits run $20–$60 on Amazon (the Whirlpool W10869845 is a reliable option at around $55). If your machines are different brands, buy a universal kit rather than a brand-specific one. Installation takes about 30 minutes with two people and a socket wrench.
One caution: make sure your floor can handle the combined vibration load. A laundry mat on the floor beneath the units (like a Vibrationless anti-vibration pad, $18 for a pair) cuts noise and prevents the “walking” issue that plagues stacked machines on slick tile.
2. Floating Shelves Above the Machines
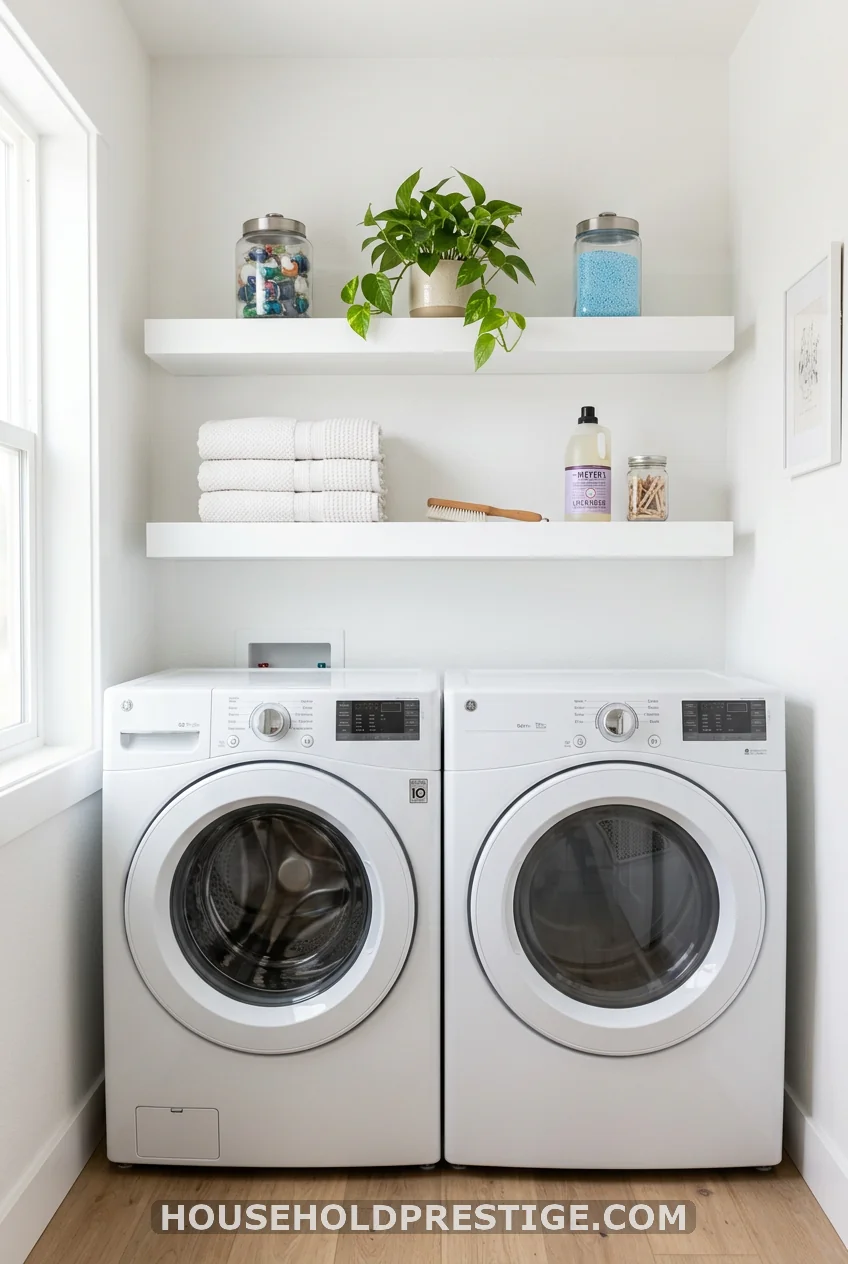
This is the most common advice for a reason: it works. But most people install one shelf, leave six inches of space above it, and wonder why they still feel cramped.
Install two or three shelves, starting 18 inches above the dryer (enough clearance to pull the door fully open). Space them 12–14 inches apart vertically. Use IKEA’s Lack shelves at $13 each for a budget approach, or go for solid wood floating shelves from Amazon Basics (~$30 for a 24-inch shelf) if you want something that looks less flat-pack.
Anchor into studs. A full basket of detergent pods, a fabric softener bottle, and a box of dryer sheets add up to real weight. If your studs don’t align with your ideal shelf placement, use toggle bolts rated for at least 50 lbs per anchor point.
What to put on them: keep the bottom shelf for things you grab every wash cycle (detergent, pods, dryer sheets). The middle shelf for extras (backup supplies, stain remover sticks). The top shelf — the one you can barely reach — for seasonal items, spare hangers, and anything you use monthly, not weekly.
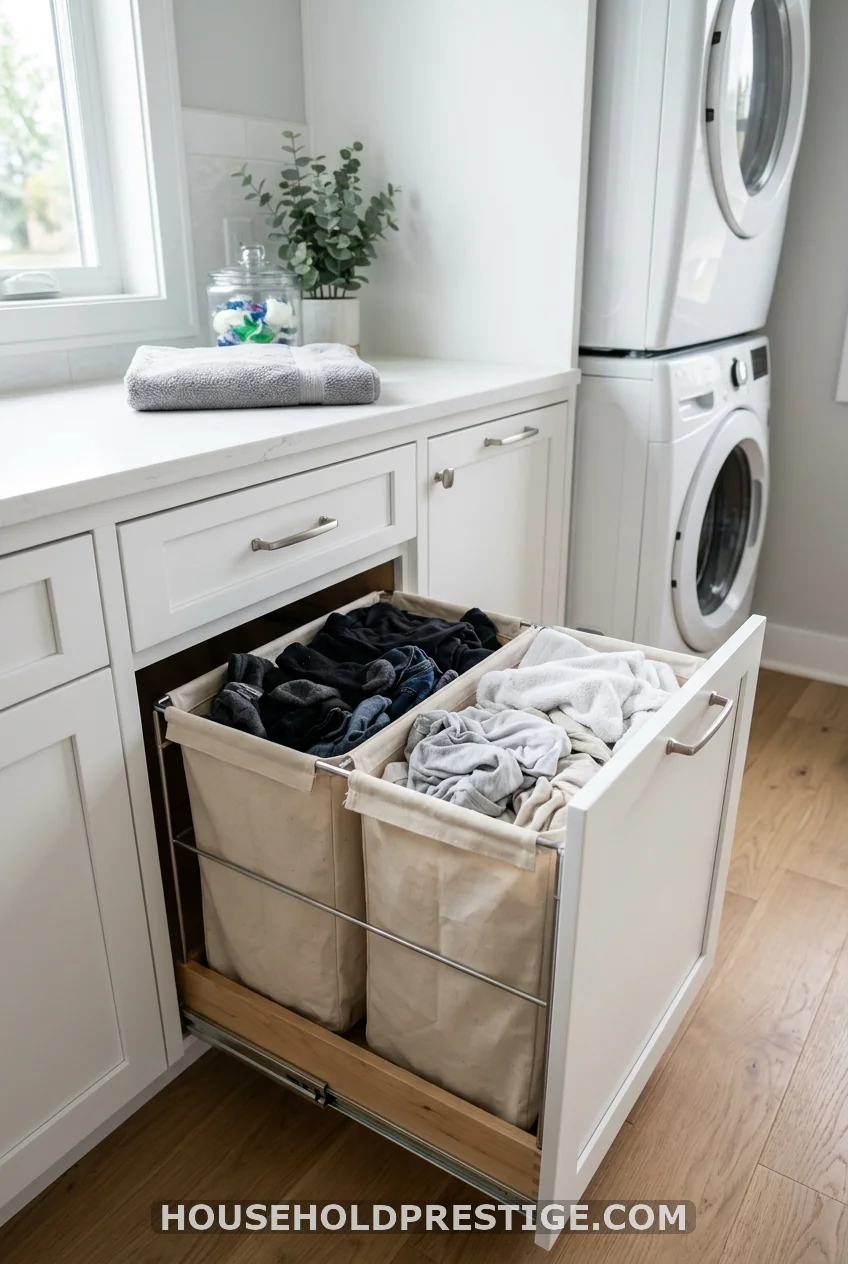
3. The Slim Rolling Cart in the Gap
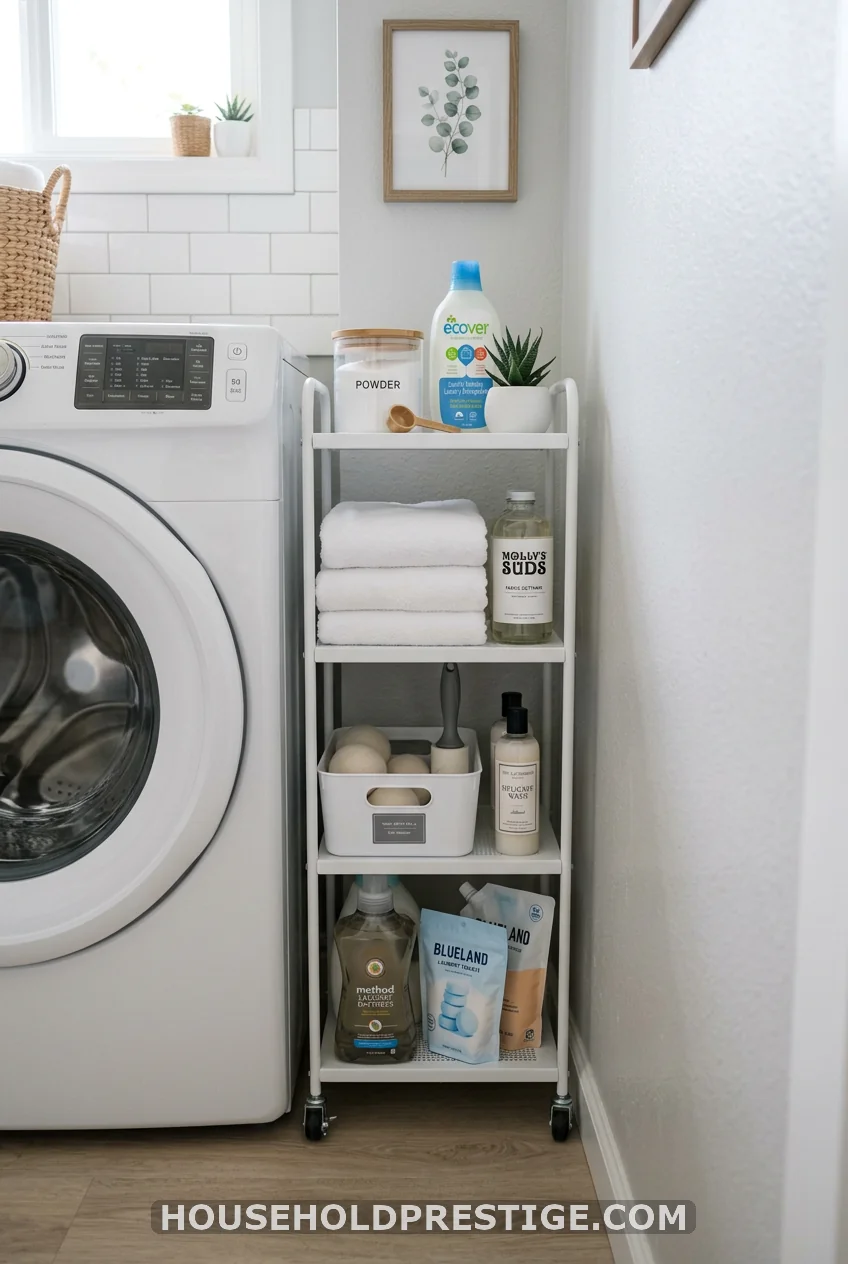
That gap between your washing machine and the wall? Probably 4–6 inches. It feels useless. It isn’t.
A slim rolling cart ($25–$40 from SONGMICS or HANAMYA) slides right in and gives you 4 tiers of storage in a footprint your hand can barely fit into. Pull it out when you need it. Push it back in. Done.
4. Go Floor-to-Ceiling With Open Shelving
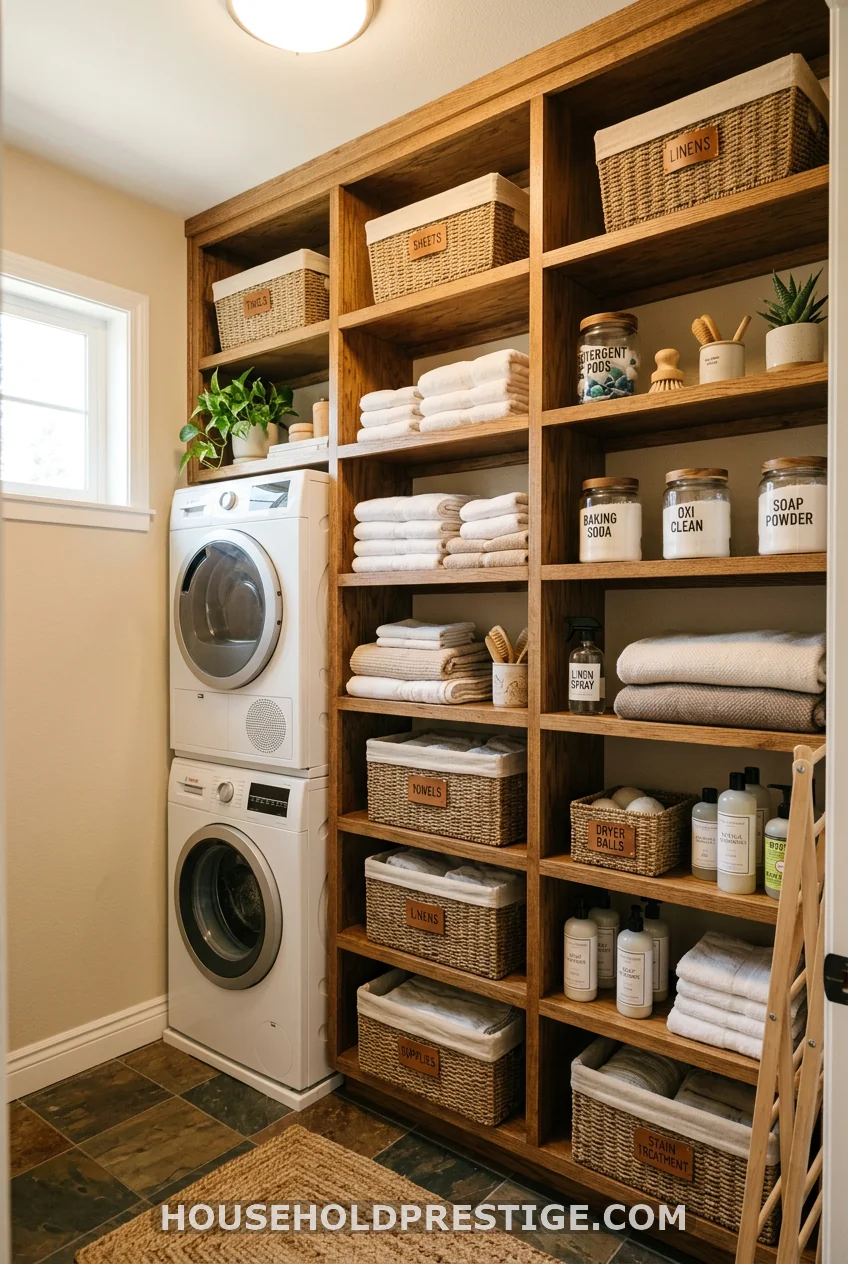
Most laundry rooms have 8-foot ceilings with storage that stops at 6 feet. Those top two feet are prime real estate you’re ignoring.
IKEA’s Kallax or Hejne shelving systems let you go full height for under $100. The Hejne is particularly good for laundry rooms because it’s moisture-resistant, adjustable, and costs about $35 for a basic unit. Add casters to the bottom section, and it becomes a mobile island when you need floor access.
The trick is to keep the top shelf (anything above eye level) for rarely used items in labeled bins. Reach-in storage that requires a step stool should be reserved for things you grab once a month — extra dryer balls, seasonal bedding bags, backup cleaning supplies.
Open shelving forces you to stay organized, which sounds like a threat but is genuinely a gift — because when everything is visible, you deal with it. When everything is visible, clutter accumulates more slowly than it does behind cabinet doors.
5. Recessed Shelving Between Studs
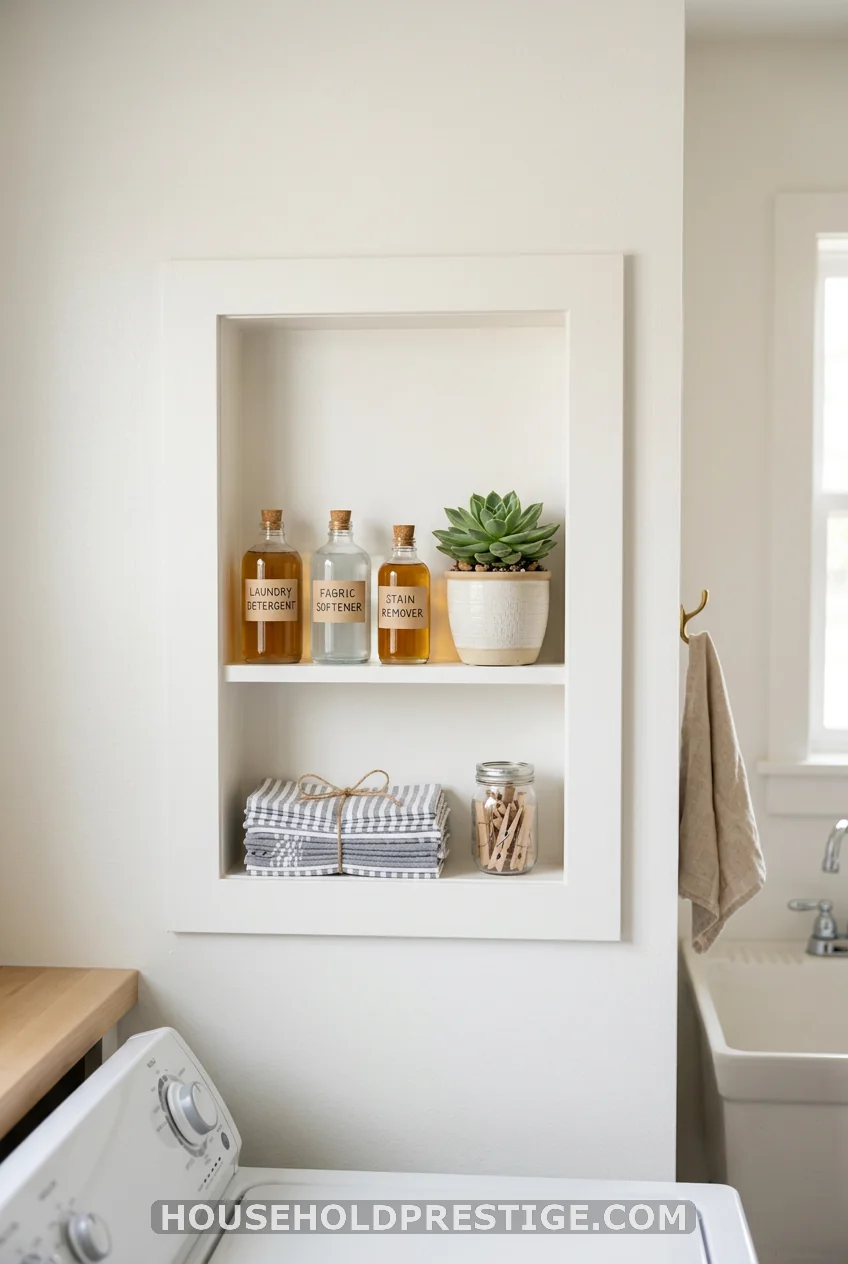
This one takes a Saturday and a circular saw, but the result is a shelf that literally exists inside the wall — no depth stolen from the room.
Standard stud spacing in US homes is 16 inches on center, which gives you about 14.5 inches of usable space between studs. The depth of a standard 2×4 wall is 3.5 inches — enough to store dryer sheets, small spray bottles, a box of stain remover sticks, or decorative jars.
Cut the drywall between two studs, frame the opening with 2×4 scraps, add a backer board, sand, prime, and paint. Total material cost: $30–$60. Total time: 4–6 hours if you’ve done basic carpentry before. The finished look is architectural and clean — like the shelf was always meant to be there.
6. The DIY Folding Counter Over Your Machines: A Complete Build Guide
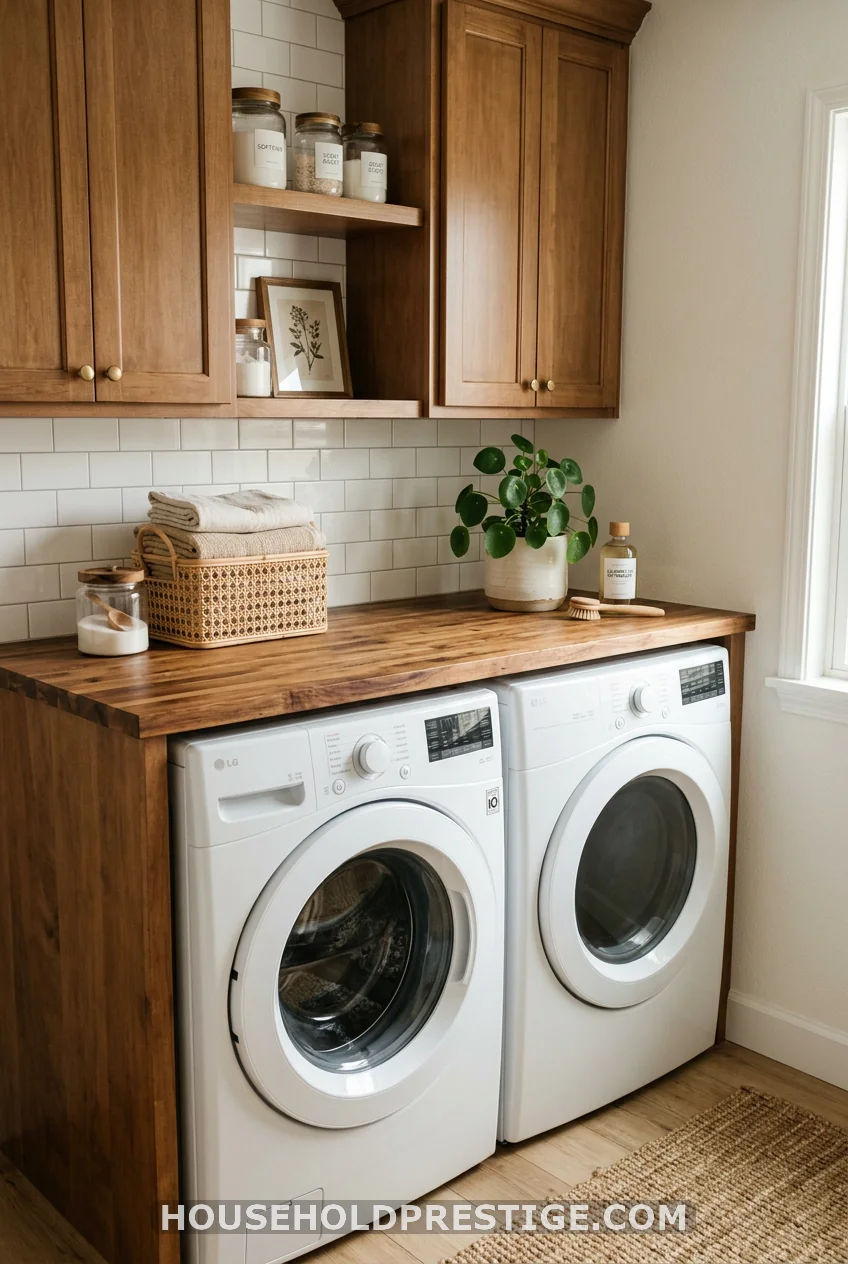
This is the small laundry room makeover project that changes the room more than any other single item. A folding counter over your machines takes a room that feels like a closet and gives it the functionality of a real laundry room.
Here’s everything you need to know to build one properly.
Why This Works
Side-by-side washers and dryers typically sit between 34 and 36 inches high. That’s exactly countertop height. All you’re doing is bridging the gap between the two machines and the wall — creating a flat, stable surface you can fold on, sort on, or use as a landing pad for anything coming out of the dryer.
A bare dryer top is borderline useless for folding because it vibrates, it’s metallic, and things slide off. A wood countertop is stable, warm, and gives you a real workspace.
Dimensions to Measure First
- Width: Measure the combined width of both machines, plus any gap between them, plus 1–2 inches of overhang on each side.
- Depth: Standard washers and dryers are 27–32 inches deep. Measure yours specifically — older models and compact units vary.
- Height clearance: Check that whatever you install clears the washer lid (top-loaders need 30+ inches above the lid to open fully). For front-loaders, you just need 1–2 inches of clearance above the machines.
Materials and Costs
| Item | Cost |
|---|---|
| IKEA Badelunda butcher block (74″×25.5″) | ~$129 |
| OR: Custom-cut pine board from Home Depot (1″×30″×72″) | ~$45–65 |
| OR: Laminate countertop offcut from a home center | ~$30–80 |
| L-brackets or hidden countertop supports | $12–25 |
| Wood screws (#8, 2.5-inch) | $6 |
| Sandpaper (120-grit, 220-grit) | $5 |
| Waterlox or Rubio Monocoat oil finish (if using raw wood) | $25–40 |
| Caulk (color-matched to wall) | $5 |
Total estimated cost: $60–$200, depending on material choice.
Step-by-Step Installation
Step 1: Clear and measure.
Remove everything from the top of both machines. Measure the exact width between your wall and the outer edge of each appliance. Write these down — don’t rely on memory.
Step 2: Cut your board.
If using IKEA Badelunda, it may already be close to the right width. If using a custom board, have Home Depot or Lowe’s cut it for you using your measurements. Most locations offer one free cut, additional cuts for $1 each.
Step 3: Sand and finish.
If you’re using raw wood, sand to 120-grit, then 220-grit. Wipe with a tack cloth. Apply Waterlox original sealer/finish (two coats, 24 hours drying time between each). This makes the surface water-resistant — essential in a laundry room where spills happen.
Step 4: Mark the wall.
Hold the board in position and mark where the back edge meets the wall. Use a level to confirm it’s straight. If your machines aren’t the same height (common with older washers and dryers), you may need to shim one side.
Step 5: Install supports.
For a board attached to the wall, use two L-brackets screwed into wall studs — or use hidden countertop supports (Häfele makes a good one for $8 each). The board rests on top of the machines and is secured to the wall at the back. You don’t need to bolt it to the machines themselves.
Step 6: Set and secure.
Place the board. Screw the L-brackets or hidden supports up into the underside of the board. Run a bead of paintable caulk along the back edge where the board meets the wall. This prevents moisture from seeping in and gives a finished look.
Step 7: Let it cure.
If you used any finish, wait 48 hours before loading it up with laundry.
Pro Move
If you have cabinet space above the counter, install a small strip of LED under-cabinet lighting (Govee makes a plug-in version for $15). It makes the counter feel intentional and gives you actual task lighting instead of just overhead fluorescent.
Common Mistakes to Avoid
- Using MDF near a washer: MDF swells and warps in humid environments. Stick to solid wood, plywood, or laminate.
- Skipping the finish on raw wood: Unsealed wood will stain within weeks in a laundry room. Always seal it.
- Not checking machine height variance: If one machine is 34″ and the other is 36″, your “level” counter will have a visible slant. Shim the shorter machine using anti-vibration pads stacked as needed.
- Making it too deep: If the board overhangs the front of the machines by more than 4 inches, it becomes a hazard — you’ll bang into it constantly. Keep front overhang to 1–2 inches max.
7. Over-Door Organizer for the Back of the Door
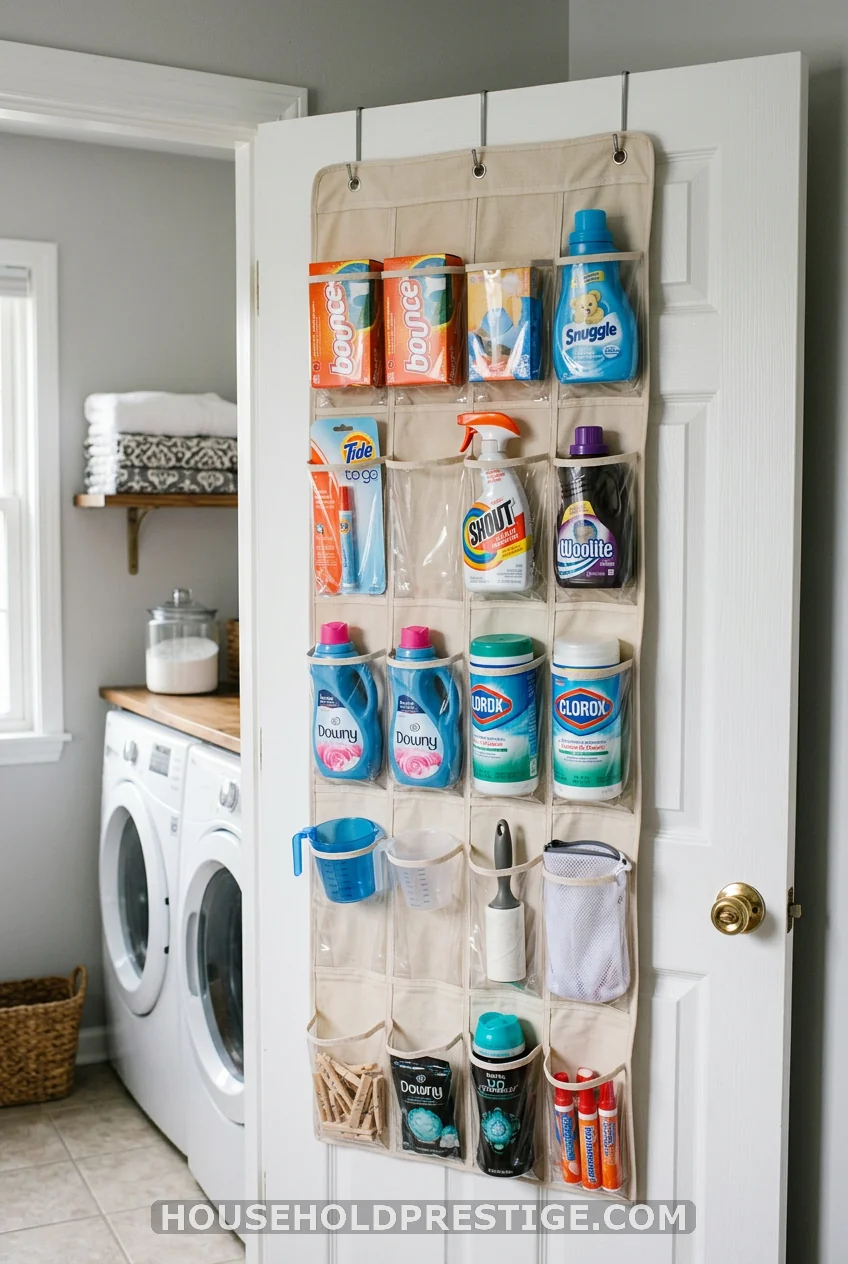
The back of your laundry room door is flat, dry, and usually completely wasted. A simple over-door organizer (SimpleHouseware makes a great one for $19 with 24 pockets) holds dryer sheets, stain remover sticks, measuring cups, rubber gloves, and anything else that clutters your counter.
Clear pockets mean you can see everything at a glance without rummaging. No drilling required. Hangs in 30 seconds.
8. Tension Rod Under the Shelf: The Hanger Hack That Costs $4
No image prompt for this one — it’s too simple to need one.
A spring tension rod (the kind you’d use in a closet, from $3 at Dollar Tree) installed horizontally under an existing shelf becomes an instant hanging bar. Slide wire hangers onto it as clothes come out of the dryer. Keeps shirts from getting wrinkled while you wait to take them to the bedroom.
Max weight: about 10 pounds for cheap tension rods. Don’t hang soaking wet jeans on one. Works best for shirts, blouses, and anything lightweight.
9. A Pegboard for Supplies and Tools
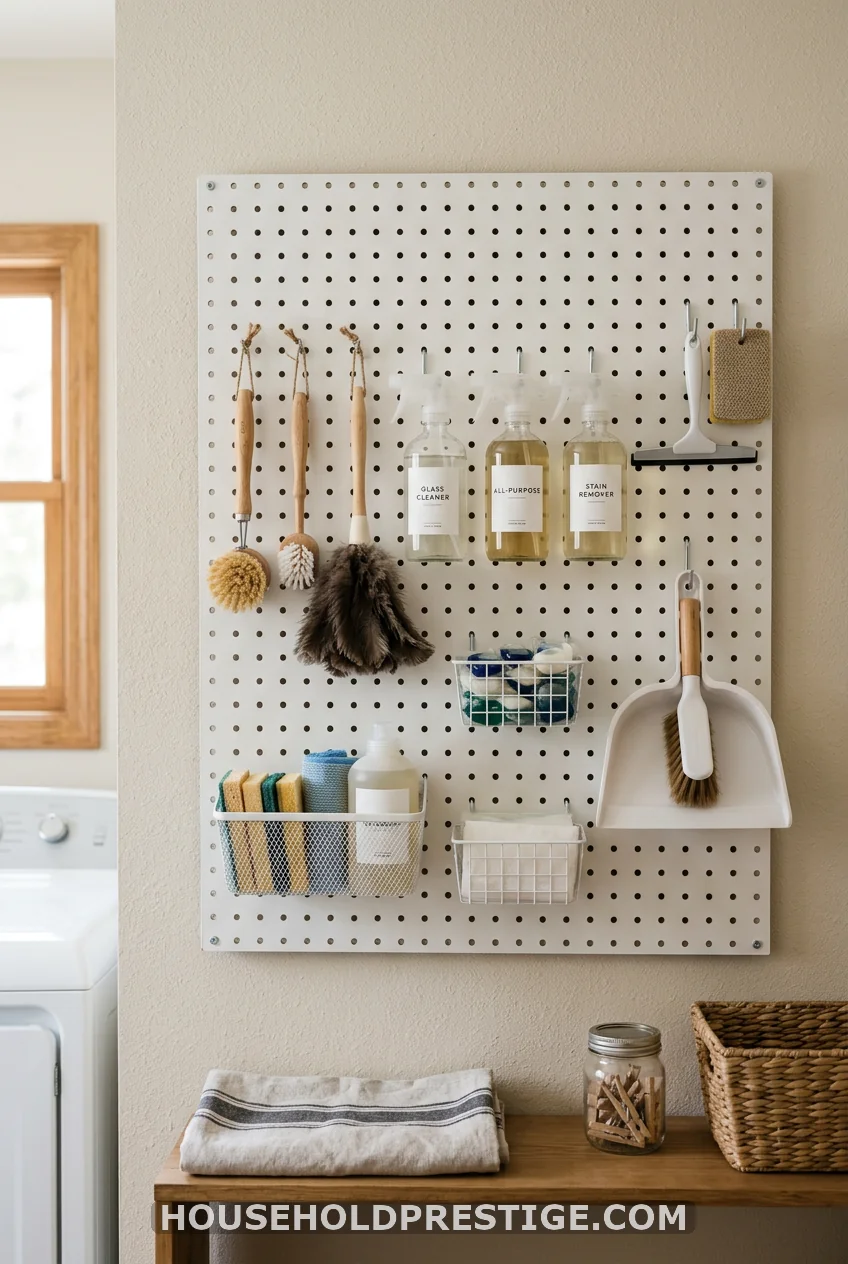
Pegboards get used in garages and craft rooms constantly, but rarely in laundry rooms. That’s a mistake. A 24″×36″ sheet of pegboard from Home Depot costs $12. A box of assorted hooks costs another $8. Together, they give you a completely customizable wall organizer for under $25.
Hang spray bottles, measuring cups, a mesh bag for delicates, dryer balls, cleaning brushes, and anything else that currently lives on your counter. Paint the pegboard first — white, sage, or black all look intentional rather than industrial.
10. Switch to Laundry Detergent Strips
No measuring cup drips. No giant jug hogging shelf space. No sticky mess.
Laundry detergent strips (Tru Earth, $20 for 64 loads) are thin sheets that dissolve completely in the wash. The entire 64-load supply fits in a small cardboard box smaller than a paperback book. For small laundry rooms where every inch of shelf space matters, this single swap clears more room than you’d expect.
11. Wall-Mounted Pull-Out Hamper
Floor hampers take up floor space. A wall-mounted pull-out hamper (Rev-A-Shelf makes the standard, $80–$120 with canvas bag) mounts inside a cabinet or to a bare wall behind a door, and pulls out only when you need it.
If you already have base cabinets in your laundry room, this is an easy retrofit. Remove a cabinet door, slide in the unit, reattach. If you don’t have cabinets, the unit can be surface-mounted to a wall with a small enclosure built from plywood.
The sorting version ($150) includes two bags side-by-side — one for lights, one for darks. Worth every penny if you hate sorting on laundry day.
12. Labeled Glass Jars for Detergents: Prettier AND More Practical
Big plastic detergent jugs are ugly, drippy, and take up enormous shelf space. A set of 1-liter glass canisters ($25 for four from IKEA’s Korken line) takes the same amount of product and arranges it in a fraction of the footprint.
Pour in pods, powder detergent, or dryer ball beads. Add chalkboard labels or print-and-tape labels from Canva. Instantly, your shelf goes from “back of a garage” to “aspirational Pinterest board.” Takes 10 minutes. Costs $25.
13. The Lost Sock Station
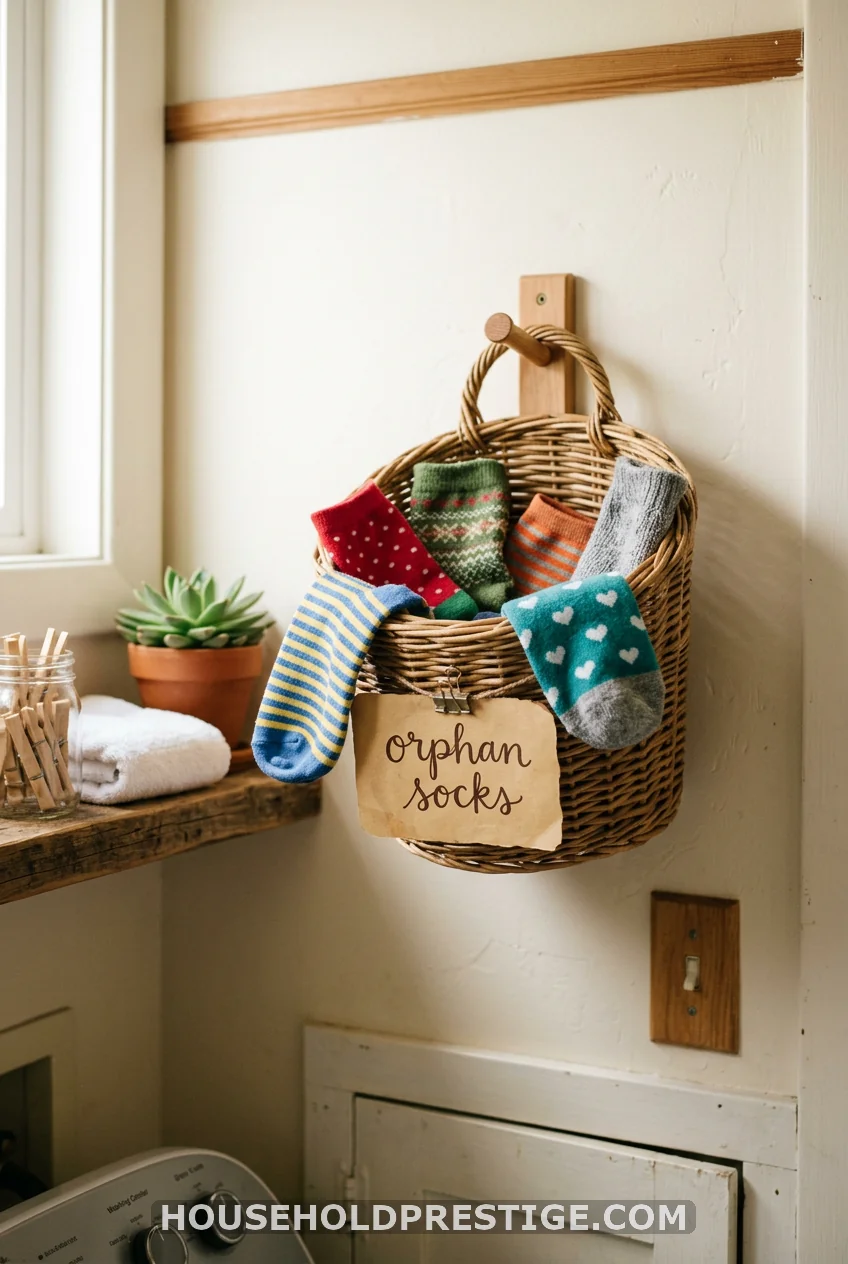
Hang a small lidded basket on the wall (or screw a hook and hang a fabric pouch). Label it “orphan socks” or “sock waiting room” or whatever makes you smile. Every unmatched sock goes in there instead of getting tossed back in the hamper to disappear again.
Check it on laundry day. Matches appear. Life improves.
14. Paint the Walls a Moody, Unexpected Color
Most laundry rooms are white. Aggressively, apologetically white. White because nobody thought harder than “laundry room = clean = white.”
A dark laundry room can feel cozy, not gloomy. Benjamin Moore’s Newburyport Blue (HC-155), Sherwin-Williams’ Urbane Bronze (SW 7048), or even a dusty terracotta all do something that white can’t — they give the room personality. They make it feel chosen, not defaulted into.
A quart of paint ($20–$30) covers a small laundry room completely. This is the highest ROI change on this list on a pure cost-to-impact basis.
15. Peel-and-Stick Wallpaper on One Accent Wall
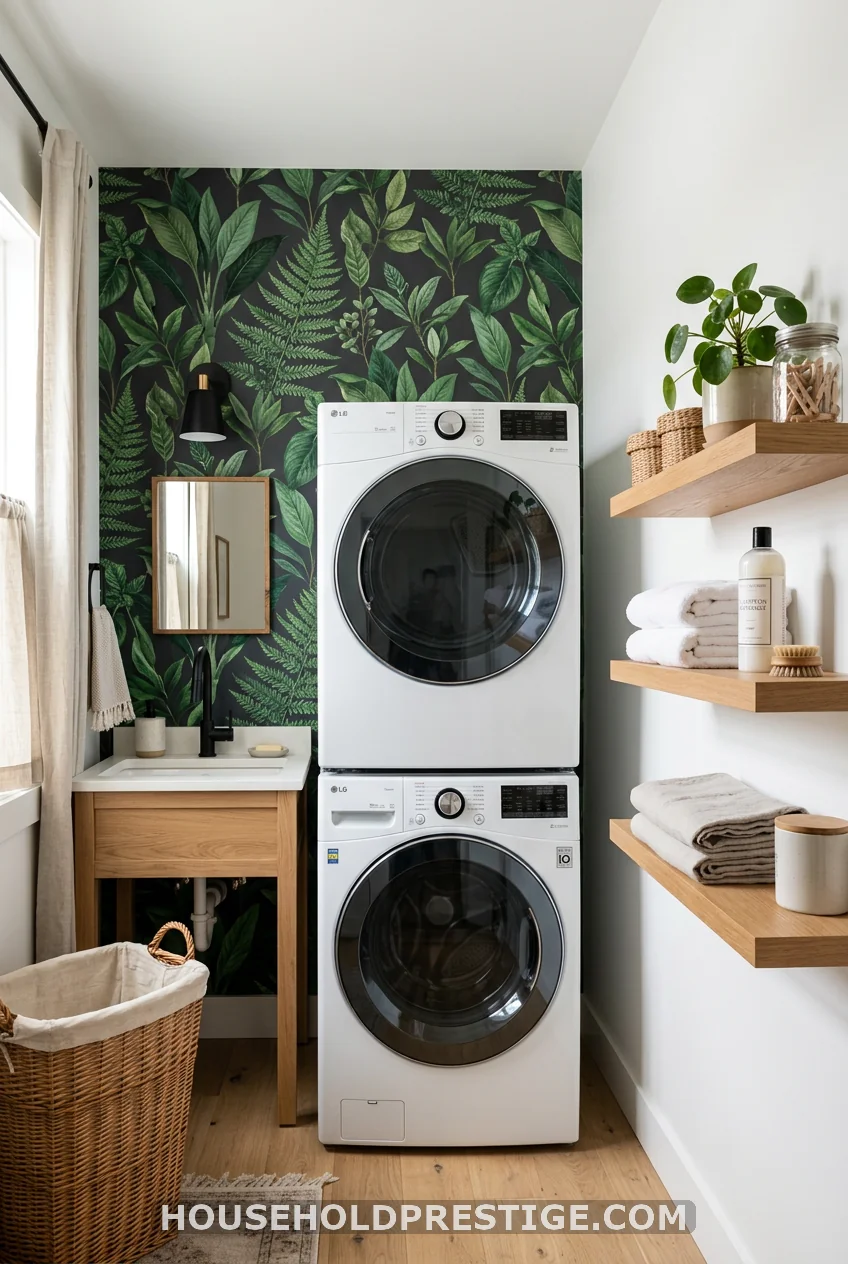
Renter? No problem. Peel-and-stick wallpaper from Chasing Paper, Spoonflower, or Tempaper runs $2–$6 per square foot. A typical laundry room accent wall is 8 feet tall by 4–6 feet wide — about 32–48 square feet, meaning $64–$288 depending on the brand.
Apply to the wall behind or above the machines. This is the wall that shows up in every photo, every Pinterest save, every before/after. One patterned wall — botanical, geometric, stripes, anything intentional — does more for the feeling of a room than three plain painted walls combined.
Remove it cleanly when you move out. Most peel-and-stick papers, applied to properly primed walls, come off in full strips.
16. Swap Cabinet Hardware for Under $30
You know how a new necklace can change an outfit that felt tired? Cabinet hardware does that to a room. The standard brushed nickel bar pulls that came with your builder-grade cabinets are the laundry equivalent of a beige polo shirt.
For $20–$35 (Cabinet Knobs from Amazon’s Franklin Brass line, or Rejuvenation’s pulls on sale), you swap every knob and handle in the room. Black matte, antique brass, and unlacquered brass — all look more expensive than they are. Takes 20 minutes with a screwdriver.
17. Install a Barn Door or Curtain Panel to Hide the Alcove
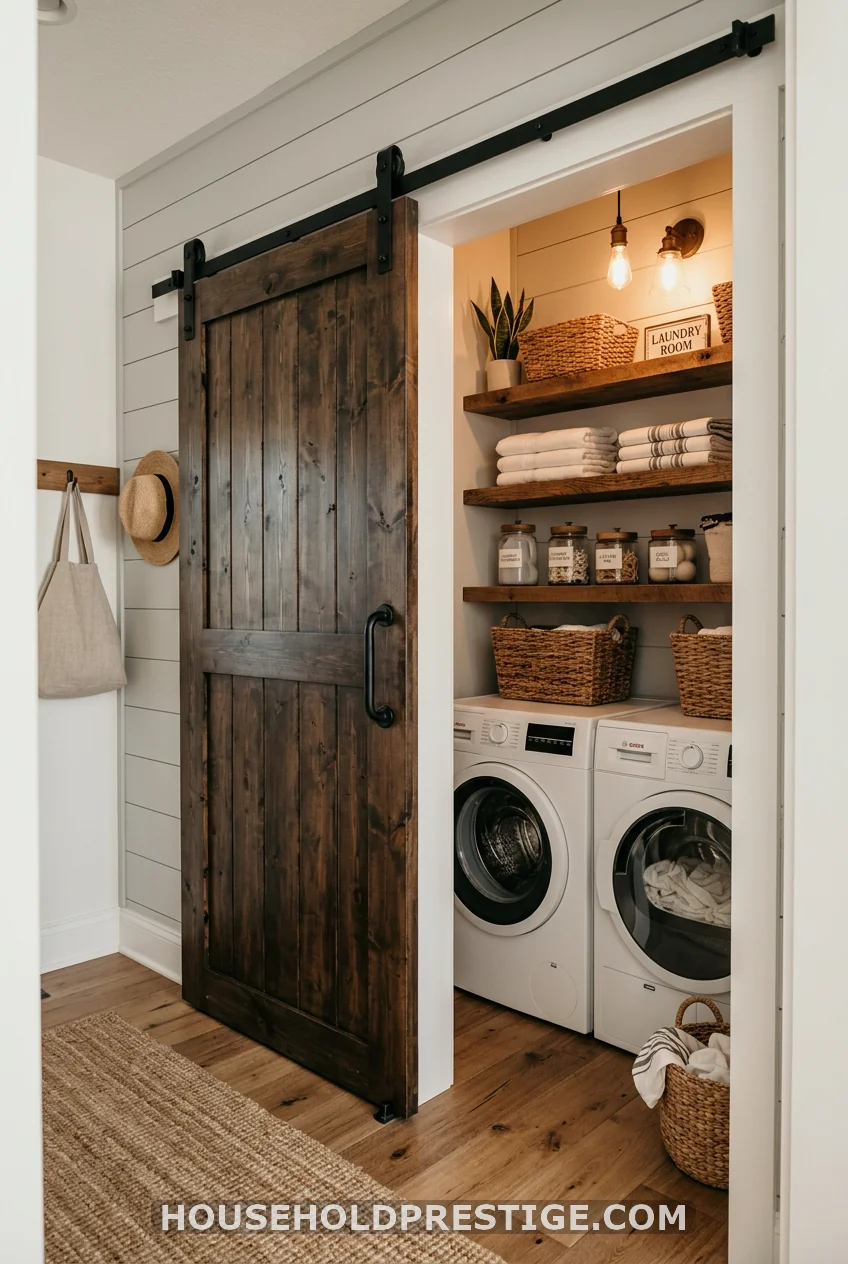
If your washer and dryer sit in an open alcove off a hallway or kitchen, a barn door or a linen curtain panel changes the space fundamentally. Not just aesthetically — practically. It contains the noise. It hides the visual mess of mid-cycle laundry. It makes the adjacent room feel calmer.
Barn door hardware kits (Winsoon makes a reliable basic kit, $50–$80) mount above the opening. The door itself — a hollow-core door from Home Depot ($40–$80) or a decorative panel — slides on the hardware. Total project: $100–$160 and an afternoon.
A curtain panel version costs $15 and a tension rod. Less dramatic. Just as effective at hiding the machines.
18. The Before/After That Changed How I Think About Laundry Rooms
I want to tell you about a room that was 36 square feet.
Six feet wide. Six feet deep. A stacked washer and dryer taking up half the floor space. Two wire shelves that came with the apartment — the kind that droop in the middle and collect dust on the wires. A single bare bulb overhead. The floor was this aggressively 1990s beige linoleum that curled at the corner near the drain.
Here’s what changed it for under $250:
- Replaced the wire shelves with two IKEA Boaxel shelving units ($45 each), floor to ceiling
- Added a butcher block offcut from IKEA’s AS-IS section ($30) as a folding counter bridging the machines
- Painted the walls Sherwin-Williams Sage ($27 for a quart, had leftover)
- Decanted all detergents into Korken jars ($10 for four)
- Hung a small LED strip under the top shelf ($15 from Amazon)
- Added a $12 woven mat on the floor to cover the curling corner
Total: $224.
The wire shelves looked like a storage unit. The IKEA shelves look intentional. The butcher block counter made folding possible for the first time. The paint made the room feel like a room. The LED light made everything visible without the overhead bulb’s harsh shadows.
Nothing in this list was hard. None of it required a contractor. It took one Saturday and one Sunday morning.
That’s the thing nobody says enough: small laundry room makeovers don’t require a renovation budget. They require a plan.
19. Wall-Mounted Fold-Down Drying Rack

A wall-mounted drying rack (Umbra Trigg, $35, or Whitmor’s MDF version, $30) mounts to the wall and folds completely flat when not in use. Open, it gives you 5–8 dowel rods for air-drying delicates. Closed, it’s 3 inches off the wall.
Mount it at 60 inches from the floor — high enough to clear most garments hanging at full length. Use two screws into studs.
This replaces a floor-standing drying rack, which typically takes up 2–4 square feet of floor space — the single most valuable real estate in a small laundry room.
20. Ceiling-Mounted Pulley Drying Rack
If you have high ceilings (9 feet or more), a ceiling-mounted pulley rack uses completely otherwise-dead space. These have been standard in European laundry rooms for 200 years. They work. The SHEILA MAID brand (a classic) runs $60–$90. You raise clean laundry up toward the ceiling heat clothes dry faster. You lower the rack to hang items. The whole thing disappears when raised.
Installation requires ceiling joists. Use a stud finder before you drill anything.
21. Double Clothing Rods at Two Heights
Rather than one rod at one height, install two — one at 40 inches from the floor for shorter items (shirts, jackets, folded pants), and one at 68 inches for full-length garments. This is standard closet-organizing logic and costs the same as a single rod: one curtain rod tension bar or a fixed closet rod from the hardware store, $10–$20.
You effectively double your hanging capacity in the same wall footprint.
22. Swap the Overhead Bulb for Something With Actual Character
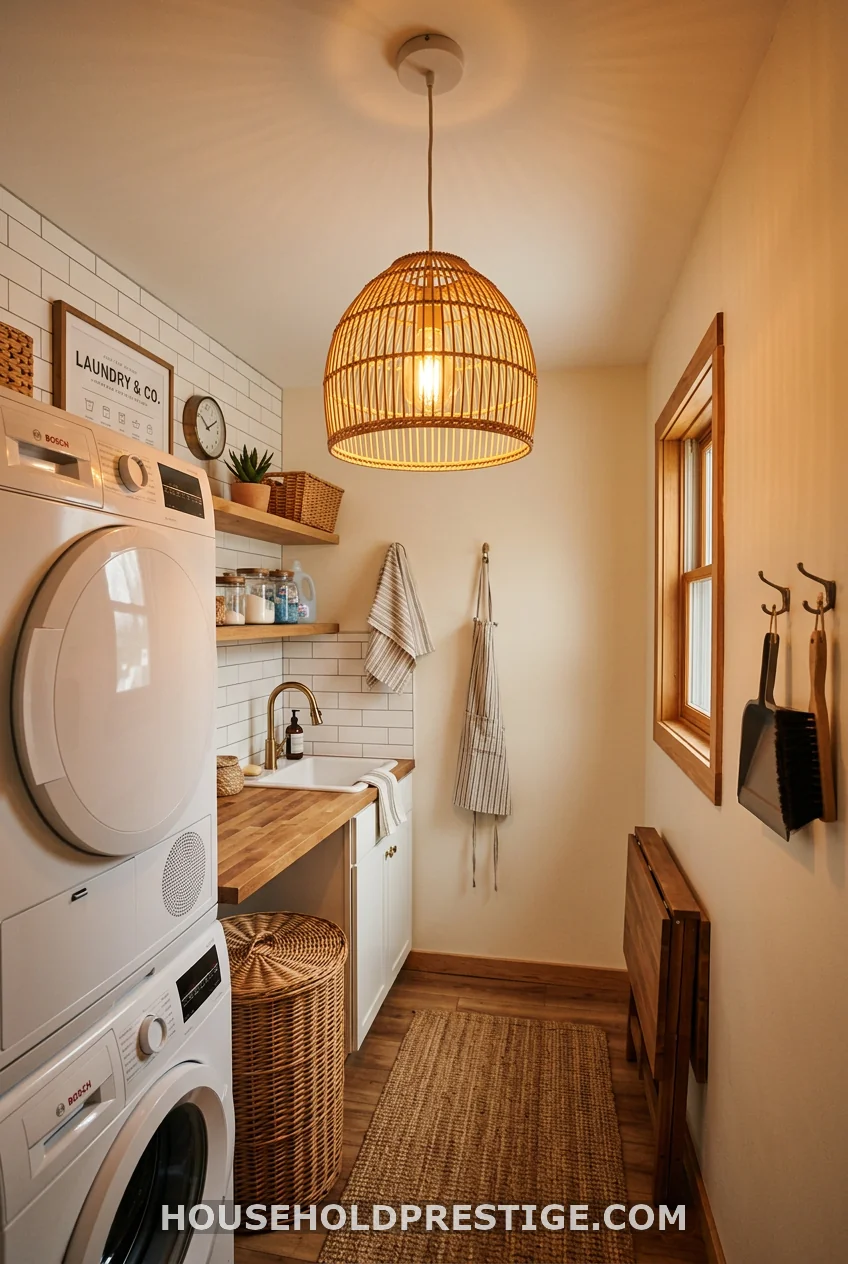
Changing a light fixture takes 15 minutes if you’re comfortable with basic wiring, or $75–$150 for an electrician if you’re not. The fixture itself? A rattan pendant from Amazon ($30–$60) or a simple schoolhouse-style globe from Lamps Plus ($45–$80) does something that no amount of shelf organization can: it makes the room feel like someone cared.
Lighting is the thing that separates “functional storage space” from “room.”
23. Add a Mirror or Mirrored Tile to One Wall
A mirror makes a small room feel twice as large. It’s not a trick — it’s physics. Light bounces. Depth is implied. A 24″×36″ frameless mirror from IKEA’s Hovet line ($80) or a peel-and-stick mirrored tile set ($35 for a 6-pack) on the back wall doubles the perceived depth of the room.
Particularly effective opposite a window, where it reflects both natural light and the outdoor view.
24. One Plant. Just One.
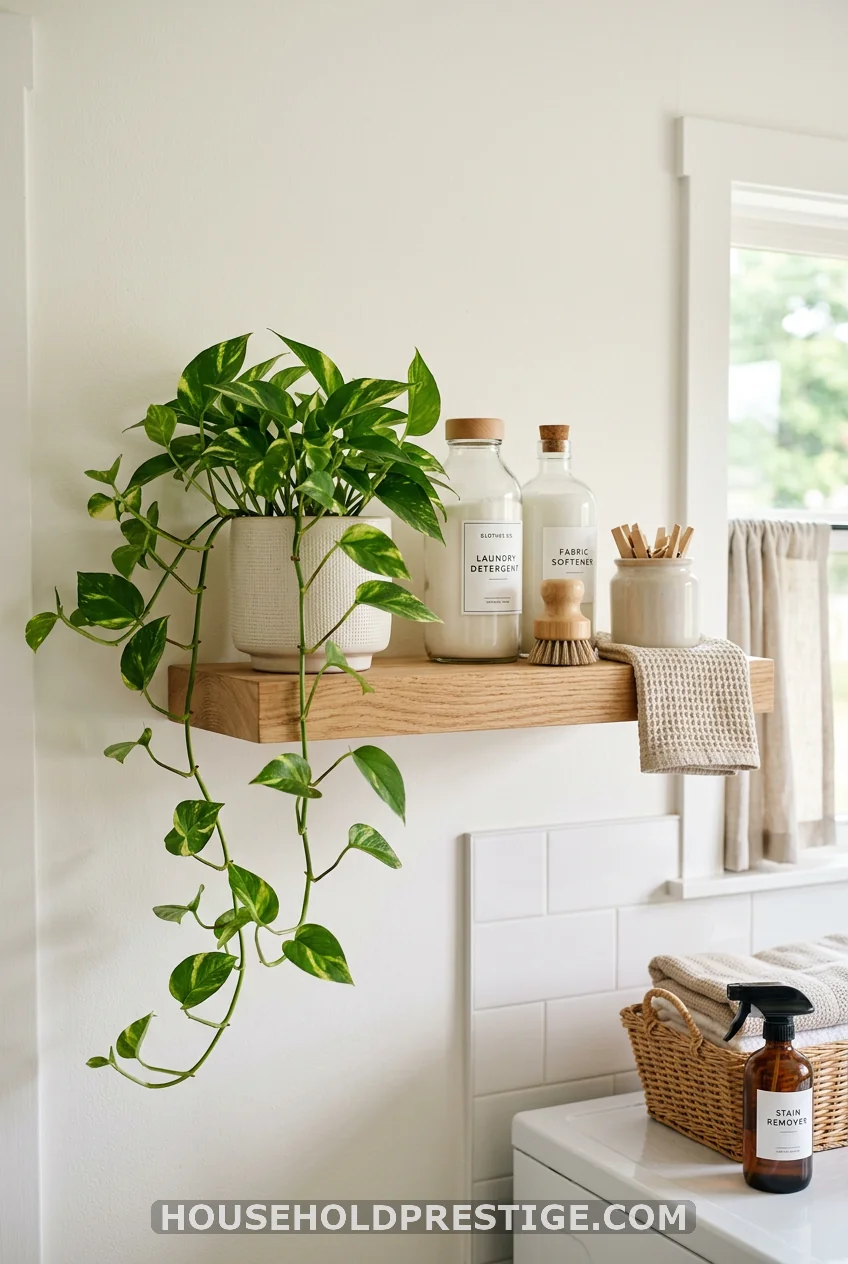
Pothos thrive in humidity. Spider plants love indirect light. Both are essentially indestructible, and both do something that no organizational product can: they signal that this room has warmth, not just function.
One plant, one shelf, $6 from a local nursery. That’s it.
25. Add a Runner Rug
Cold tile + bare feet on laundry day = the full sensory misery experience. A runner rug ($20–$40 from Amazon’s Lahome collection, or the IKEA Lohals at $12) makes the room quieter, warmer, and more comfortable to stand in for the 15 minutes you spend sorting and folding. Get a machine-washable version. Because, of course, you have a washing machine.
26. Install Under-Shelf Baskets
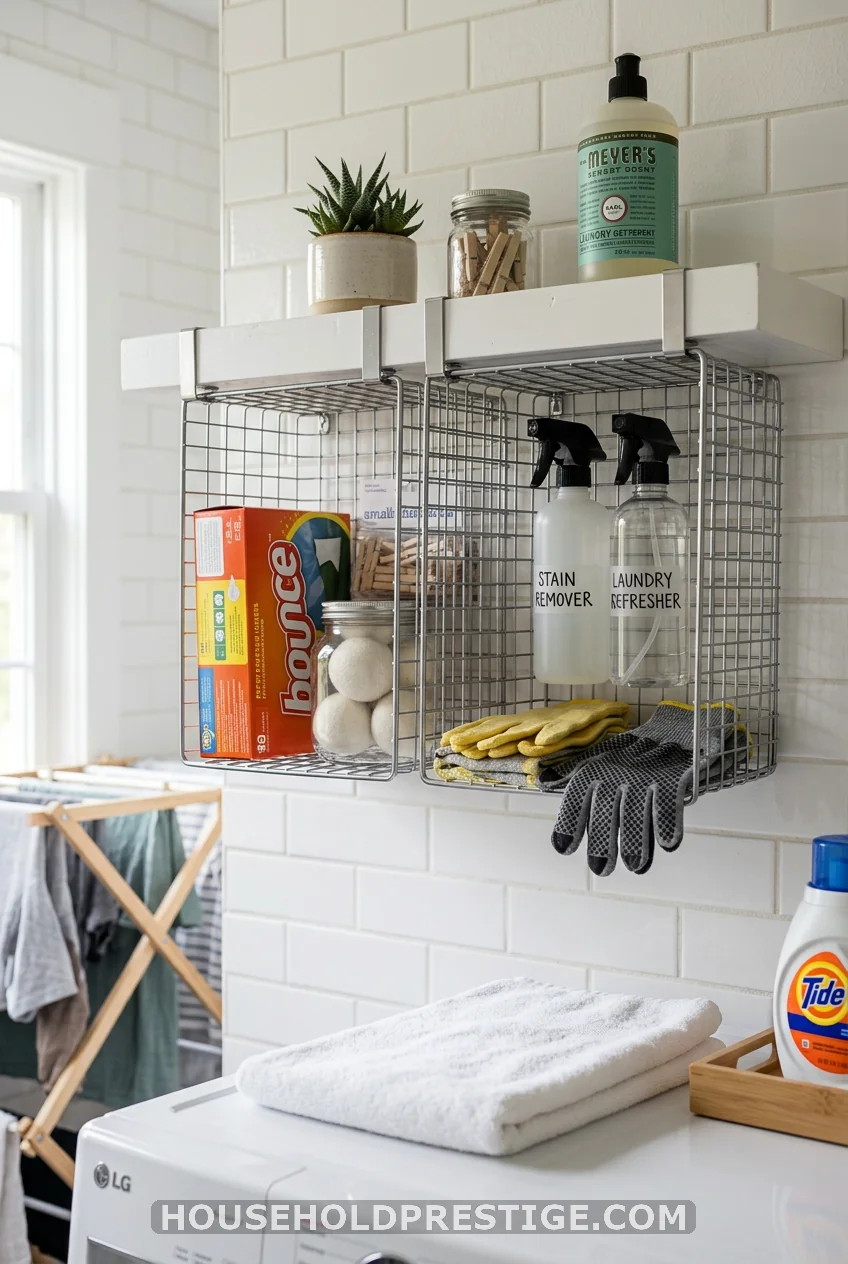
Under-shelf wire baskets (SimpleHouseware makes a good 4-pack for $18) clip onto existing shelves and create storage beneath the shelf surface. You’re using space that currently holds only air. Each basket holds about 5 lbs.
Great for: dryer sheets, rubber gloves, mesh laundry bags, stain remover sticks, and anything small and flat.
27. Consider a Washer-Dryer Combo for Closet-Size Rooms
If your laundry “room” is truly a closet — under 20 square feet, barely fitting a stacked pair — a washer-dryer combo unit might be worth considering for your next appliance cycle. These single-drum units (LG’s WM3555HWA, $1,499, and Samsung’s DV22N6800HW, $1,200) wash and dry in one machine with a single drum. They fit in a 24-inch-wide space, use a standard 120v outlet, and don’t require external venting.
The tradeoff: longer cycles (3–4 hours for a combined wash and dry), smaller capacity per load, and generally less efficient drying than a dedicated dryer. For a single person or couple in a small apartment, the space savings often outweigh these limits. For a family of four, probably not.
Putting It All Together
A small laundry room makeover doesn’t need a contractor, a demolition permit, or a design degree. Most of what transforms a room costs less than a dinner out — it just requires knowing which specific changes buy you the most impact per dollar.
Start with the one thing that bothers you most about your current setup. Is it the clutter? Start with shelves and jars. Is it the lack of a folding surface? Build the counter. Is it that the room just feels depressing? Paint it a color you love.
Pick one idea from this list. Implement it this weekend. I promise the room will feel different. And once you see what one change can do, you’ll want to do two more.
Frequently Asked Questions
How do I make a small laundry room look bigger?
Use light-reflective colors, add a mirror on one wall, and maximize vertical storage to draw the eye upward rather than across the floor. Keeping the floor visible — not cluttered — also makes a room feel more open. Swapping a sliding door for a barn door eliminates door swing clearance and frees up several square feet of usable space.
What’s the cheapest small laundry room makeover idea?
Repainting the walls or adding a peel-and-stick wallpaper panel gives the biggest visual impact for the smallest budget. A quart of paint costs $20–$30 and covers most small laundry rooms completely. After that, decanting detergents into glass jars ($25 for a set) and adding labeled baskets ($15–$30) transforms the look for around $60–$80 total.
Can renters do a laundry room makeover?
Yes. Renters have access to peel-and-stick wallpaper, over-door organizers, tension rods, command strips, removable hooks, rolling carts, and freestanding shelving — none of which requires drilling or permanent modification. The most impactful renter-friendly upgrades are replacing wire shelves with freestanding shelving units and adding a folding counter that rests on top of the machines without being bolted to walls.
How do I add storage to a laundry room with no cabinets?
Floor-to-ceiling freestanding shelving (IKEA Hejne or Boaxel) is your best option — no drilling, no cabinets, adjustable shelves. Add under-shelf wire baskets, a slim rolling cart in any gap next to the machines, and wall-mounted hooks or pegboards for frequently used items. A combination of these three approaches can add 20–40+ cubic feet of storage to an empty-walled laundry room.
Is it worth doing a laundry room makeover before selling a house?
For most homes, a laundry room makeover delivers strong ROI before a sale because buyers notice it — especially if every other home in the price range has a cluttered, neglected one. Focus on cleanliness, organization, and one or two visual upgrades (fresh paint, a folding surface). A full renovation is rarely necessary; targeted cosmetic improvements cost $100–$500 and show well in listing photos.