

You know that moment when you reach for the detergent and the cap is crusted shut, there’s a sticky ring on the shelf, and the whole jug is slightly sticky from a mystery drip? Yeah. That’s the laundry room most of us are actually living with, not the ones we save on Pinterest.
Here’s the thing, though — laundry room organization detergent doesn’t require a renovation budget or a custom cabinet installation. It requires about $15, an afternoon, and the willingness to admit that the original plastic jug was never going to stay on that shelf looking pretty. I’ve tried nearly all of these ideas in my own laundry room, and I’ll tell you exactly what worked, what clogged, and what I’m still obsessed with two years later.
By the end of this list, you’ll have a system that doesn’t just look good in photos — it stays organized through back-to-back laundry days, toddlers, and the chaos of actually living in your house.
1. Decant Everything Into Glass Jars
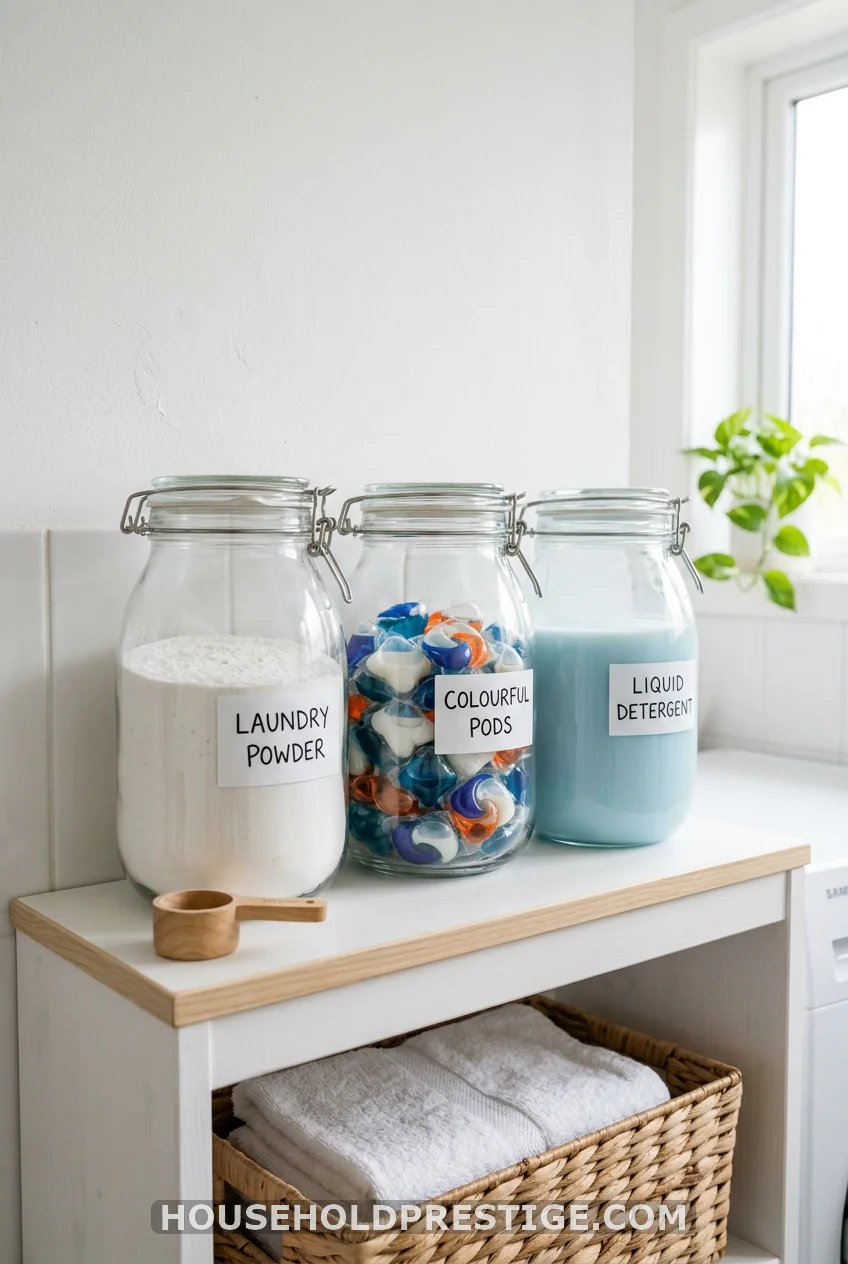
Glass jars are the entry point to a laundry room that looks like it belongs in a home magazine. And they cost almost nothing — a set of three 64-oz Bormioli Rocco Fido jars runs about $22 on Amazon, or you can raid your kitchen cabinet for any large jar with a tight lid.
The key is matching the jar to the product. Powder detergent goes into a wide-mouth jar so you can scoop easily. Laundry pods need a jar with a lid that’s slightly harder to open — think a flip-top rather than a screw-on — because childproofing matters. Liquid detergent works in a glass jar only if you decant it into a smaller quantity and use a ladle or pump. More on why full decanting of liquids gets complicated in a minute.
One quick tip: Label every jar, even if it seems obvious. Six months from now, your partner will still reach for the wrong one.
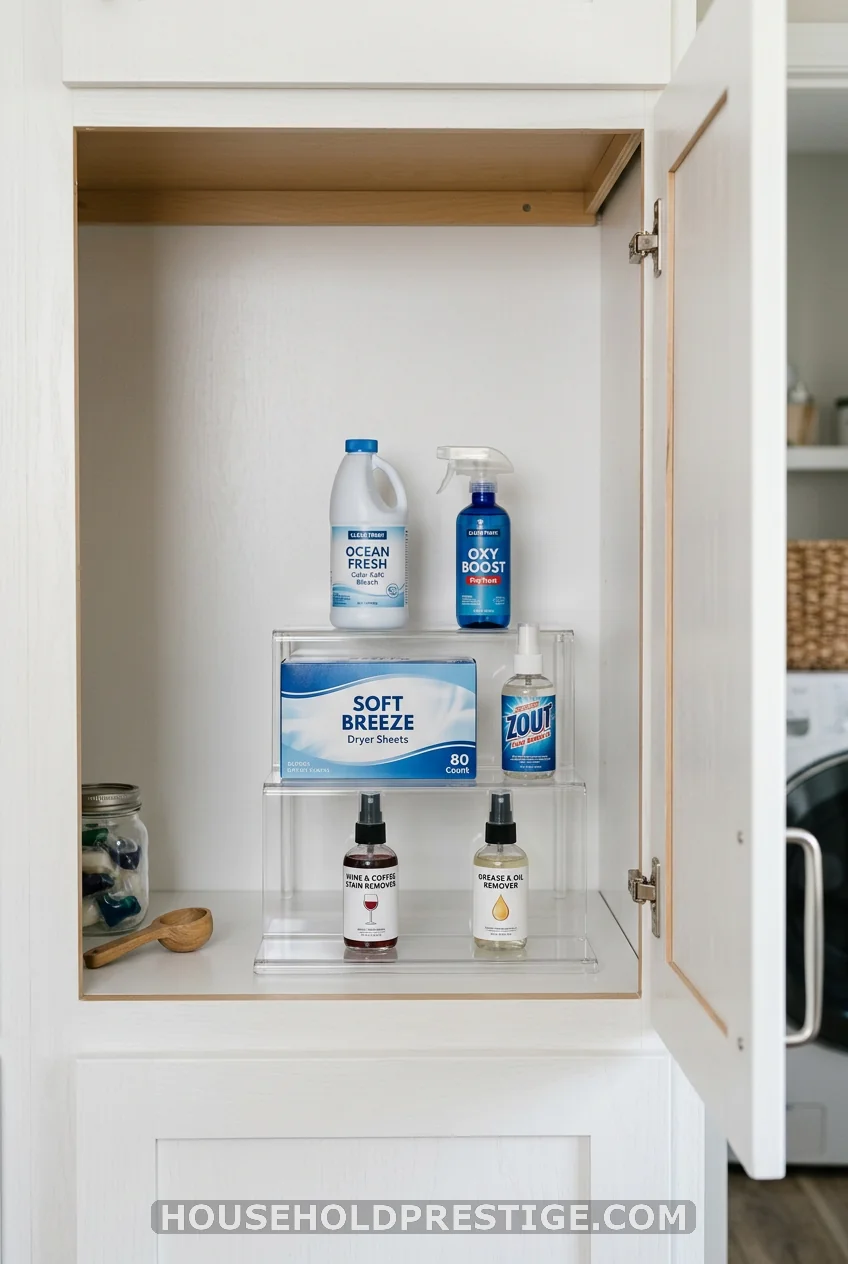
2. Build a Complete Detergent Station From Scratch
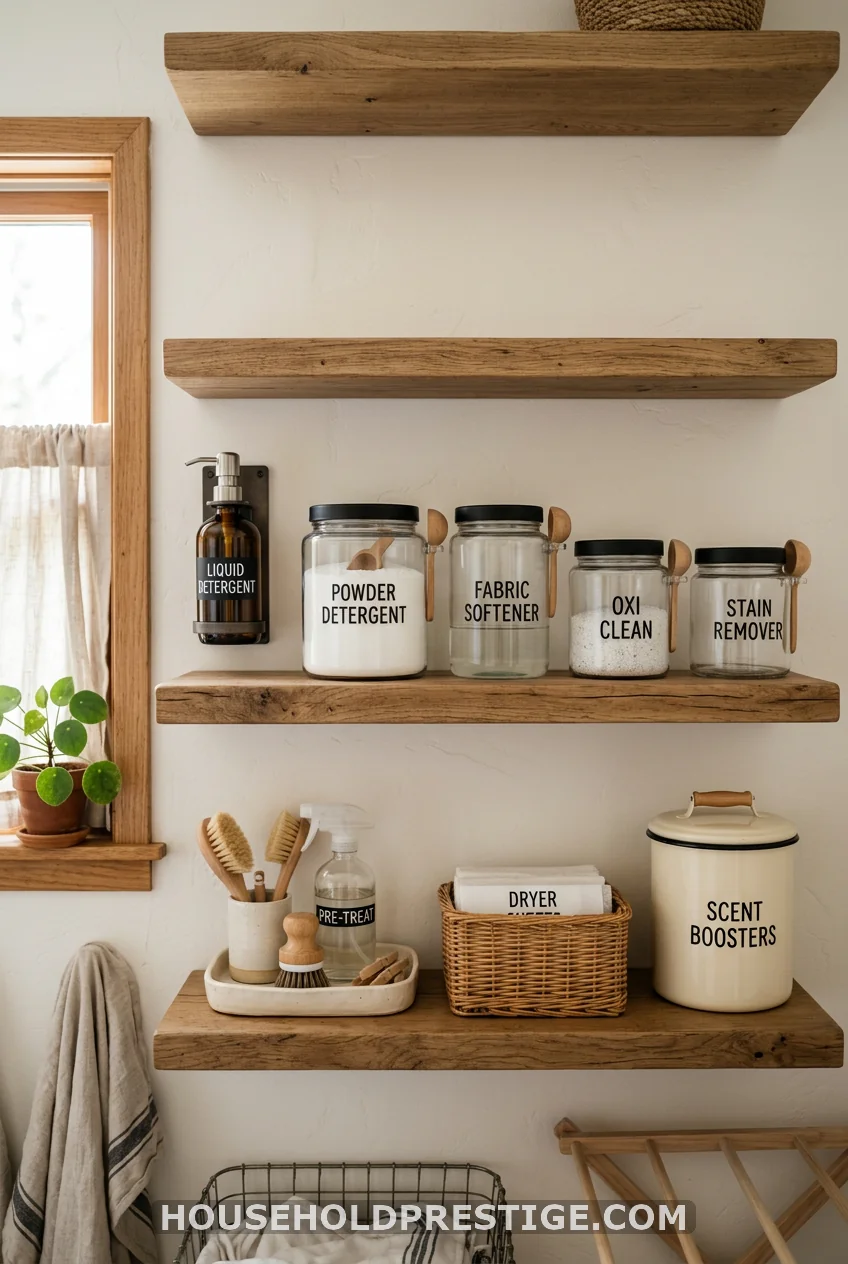
This is the idea that does the heavy lifting. A full detergent station means everything laundry-related lives in one dedicated zone — detergent, softener, pods, dryer sheets, stain stick, scent boosters — all within arm’s reach of the washer, all looking like they belong together.
Why This Setup Works
When your supplies are scattered across three shelves, a cabinet, and the top of the dryer, you waste time hunting. You also forget what you’re running low on. A single organized station fixes both problems. You can see everything at once, restock as a group, and it takes under two minutes to wipe down.
Exact Dimensions to Plan Around
A good detergent station fits on a 24-inch wide by 10-inch deep shelf. That gives you room for three medium containers across the front row and a second row behind for overflow or less-used products. Standard floating shelves from IKEA’s Lack series are 43 inches wide and 10 inches deep — one shelf gives you plenty of station space.
Step-by-Step: How to Set One Up
- Clear the shelf. Remove everything and wipe it down. If the shelf is wire, add a shelf liner first — it makes the containers sit flat and stops things from tipping.
- Group your supplies into categories. You have roughly four: wash (detergent + pods), soften (fabric softener + dryer sheets), boost (scent boosters + color-safe bleach), and treat (stain remover stick + spray + pre-wash). Keep each category together.
- Pick your containers for wash category. For powder detergent, you need a wide-mouth container with a scoop — an OXO Good Grips 4.3-qt POP Container ($17.99) is perfect because the lid pops open one-handed. For pods, a 2-qt round acrylic jar with a flip-top lid works well and shows color nicely. For liquid, skip full decanting and store the original bottle in a tray (see item #6).
- Set up the soften category. A small wicker basket (Ikea Nipprig, $5) for dryer sheets keeps them contained without a lid. For liquid fabric softener, a pump bottle works well — decant into a 16-oz glass pump bottle and you’re done.
- Build the boost section. Scent boosters (Downy Unstopables, for example) are small beads that pour out fast. They need a jar with a pour spout or a narrow opening. A vintage-style enamel canister from Target’s Hearth & Hand line (~$12) is perfect and keeps the aesthetic warm rather than clinical.
- Place your stain tools. A short, narrow cup or small clay pot holds your stain stick upright. A spray bottle of Zout or Carbona sits next to it. These don’t need to be prettied up — they get grabbed fast, so just keep them accessible.
- Label everything. Use a $10 label maker or print labels through Canva and run them through a laminator. Clear labels on glass look cleanest. Chalkboard labels look beautiful for about two weeks — pass.
- Add a small tray. A 9-inch ceramic or marble tray from Home Goods ($6-12) corrals the whole station and signals “this is a zone.” When the tray is full, it’s a cue to restock.
Materials and Full Cost Breakdown
| Item | Product | Cost |
|---|---|---|
| Powder detergent container | OXO POP 4.3-qt | $17.99 |
| Pods container | Vtopmart 2-qt acrylic jar | $9.99 |
| Dryer sheet basket | IKEA Nipprig | $4.99 |
| Softener pump bottle | Glass pump, 16 oz | $7.99 |
| Scent booster canister | Target Hearth & Hand enamel | $11.99 |
| Stain spray holder | Small clay pot (dollar store) | $1.00 |
| Tray | Marble-look ceramic (HomeGoods) | $9.99 |
| Labels | Canva print + laminating pouch | $3.00 |
| Total | ~$67 |
You can cut that in half if you already own any of these containers, or you shop at the dollar store. The dollar store ceramic tray is just as good as the HomeGoods version.
Common Mistakes to Avoid
Don’t fill the powder container all the way to the top. It compresses and clogs — leave two inches of clearance at the top. This is real-world tested (shout out to the Organized-ish blog for documenting this one).
Don’t put liquid detergent in a decorative container without a pour spout or pump. You’ll end up dripping it everywhere and the container will be permanently sticky within a week.
Don’t mix categories. Stain spray next to the scent boosters means you’ll grab the wrong one in a hurry. Physical separation prevents laundry errors.
Pro Move
Mount your station at counter height — about 36 inches from the floor — so you don’t have to bend to reach it mid-load. If you’re installing a new floating shelf specifically for this, the sweet spot is 6–8 inches above the washer lid so the lid clears when you open it.
3. The Liquid Dispenser Myth — Busted
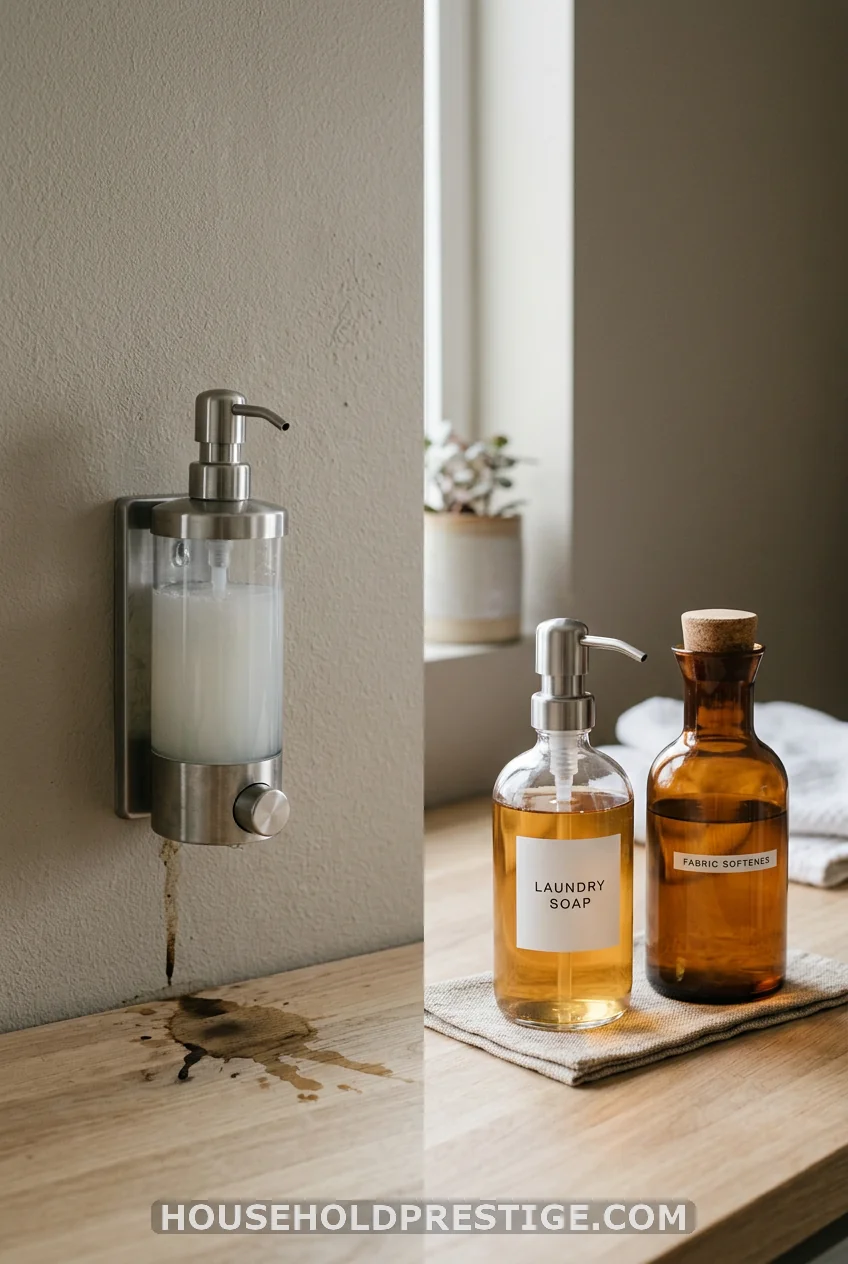
What most people think: “I’ll buy a fancy wall-mounted liquid detergent dispenser and it will look incredible, and I’ll just refill it from my big jug.”
Reality: Most wall-mounted liquid detergent dispensers are designed for hand soap — a thin, water-based liquid. Laundry detergent is viscous, often gel-based, and designed to pour slowly. Standard pump dispensers clog within weeks unless you’re using a very thin liquid formula (like Dropps or Tru Earth). Cold temperatures make this worse.
There are dispensers specifically rated for laundry detergent — the simplehuman 9-oz precision pump ($15) handles it better than most because the pump mechanism has a wider valve. But it still needs to be rinsed monthly or the formula builds up in the pump chamber and locks it.
The real issue isn’t the dispenser — it’s the formula. If you switch to a concentrate or a sheet detergent (like Tru Earth strips at $14.99 for 32 loads), you eliminate the dispenser problem entirely because there’s nothing liquid to store.
What actually works: A glass pump bottle (like the OXO Soap Pump, $14) for a pre-measured amount of liquid detergent, refilled weekly from your large container. It’s on your shelf instead of the wall, it doesn’t clog, and it looks just as good.
4. Magnetic Pod Holder on the Side of the Washer
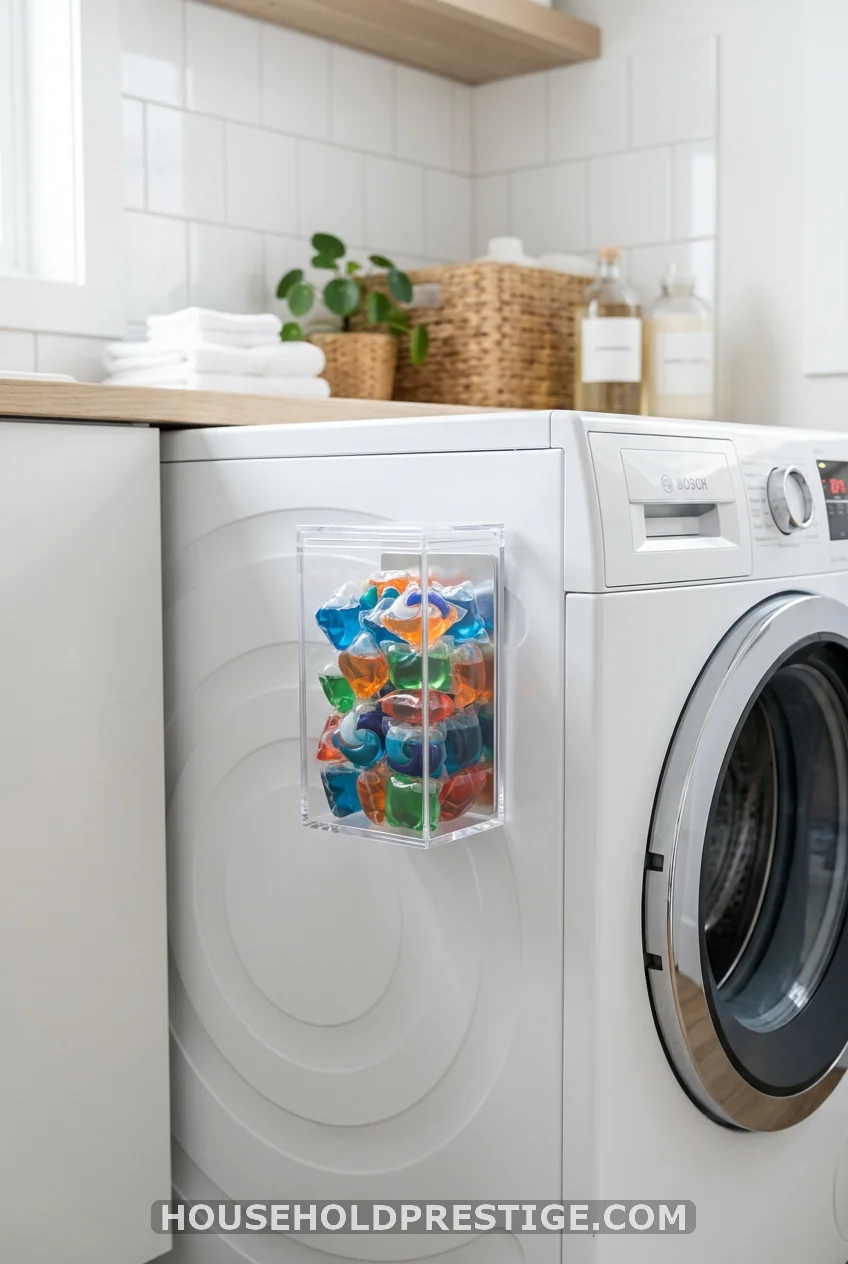
Pods belong right next to the washer. Not in a cabinet. Not on a shelf two feet away. Right there, at arm’s reach, where you can grab one without thinking.
A magnetic acrylic pod holder (ClearSpace brand, $16.99 on Amazon) sticks directly to the side of most front-load washers via magnet. No drilling, no adhesive, fully removable. Fill it with 12–15 pods, and you have two weeks of laundry handled. Refill from a larger sealed container on your shelf.
5. A Wall-Mounted Pump Dispenser That Actually Works
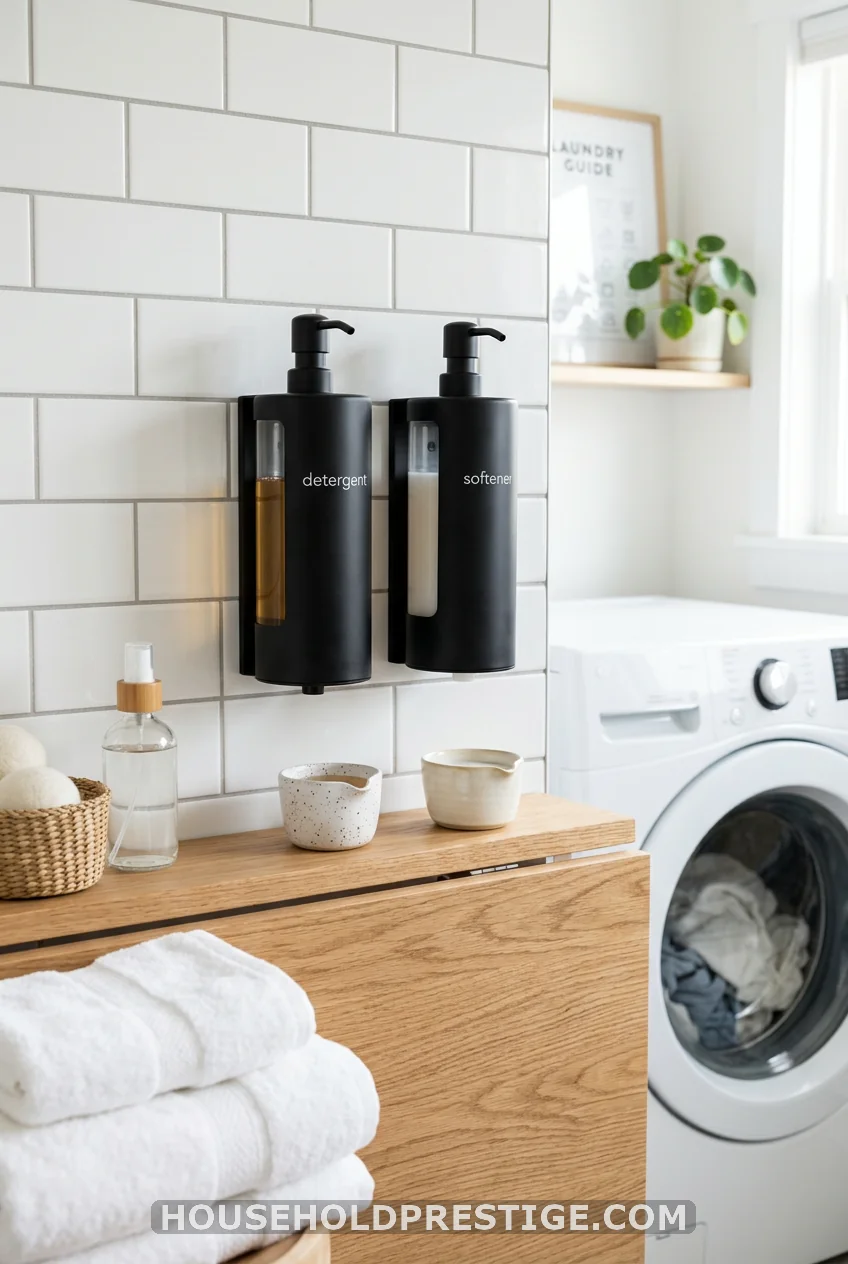
If you’re committed to the wall-mounted look, the key is choosing a dispenser built for it. The Soap Opera Premium Liquid Soap Dispenser with a 17-oz capacity ($24.99) has a pump stroke rated for viscous liquids, not just hand soap. Mount it at shoulder height, 12 inches from the wall edge, so you can get a measuring cup under the spout without bumping the wall.
Install two — one for detergent, one for fabric softener. Use a 3M Command Adhesive Large Strip set rather than screws if you’re renting, rated for 16 lbs on tile or painted drywall. The trick is to let the strips cure for 72 hours before loading weight.
One honest note: plan to clean the spout weekly. A damp cloth around the nozzle takes 10 seconds and prevents the sticky drip halo that makes these look grubby fast.
6. The Corralling Tray
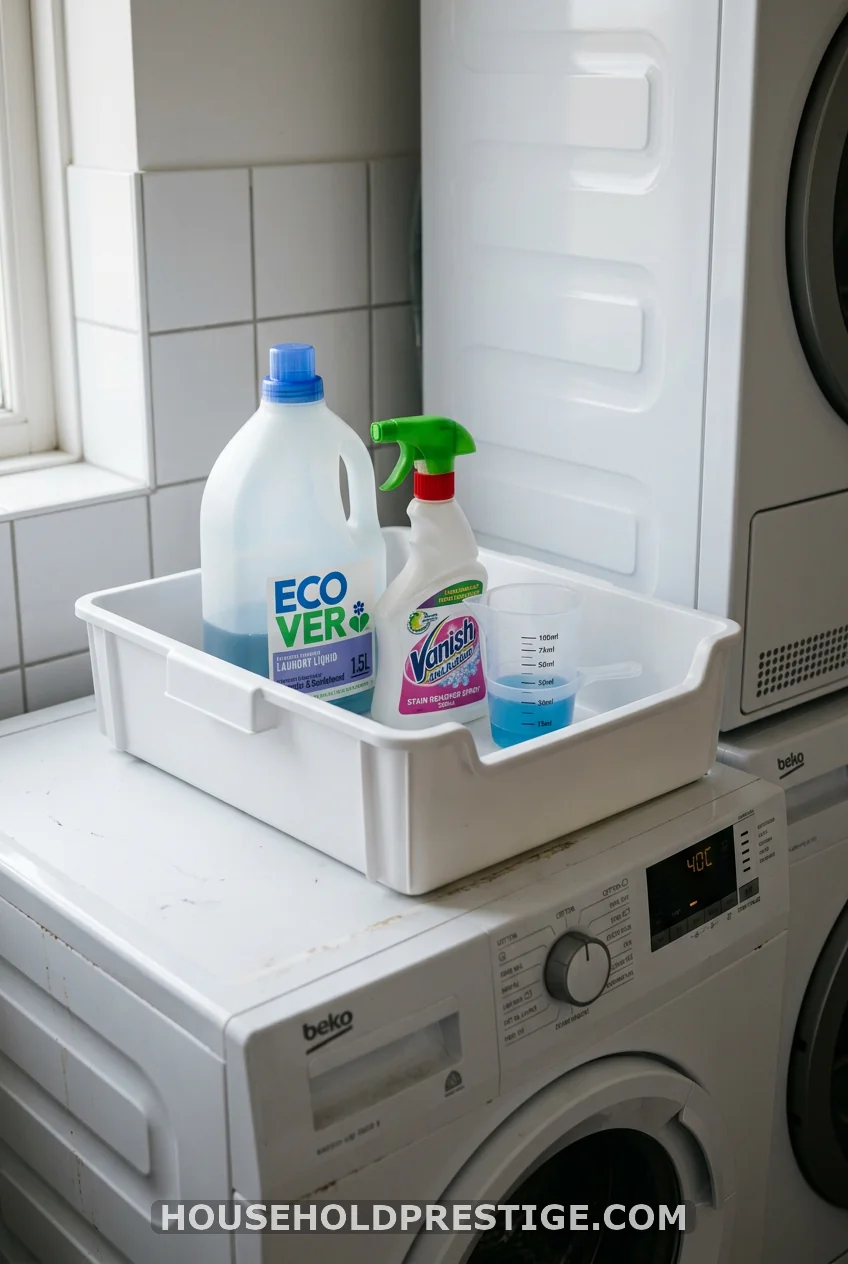
Not everything needs to be decanted. The big liquid detergent jug can stay in its original packaging — it just needs a tray.
A tray with raised edges (like a kitchen or bath tray, minimum 1-inch lip height) catches every drip. The jug doesn’t make a ring on your shelf. The tray wipes clean in 30 seconds. Done. This is the $6 solution for people who want to organize without a whole project.
7. The Full Scent Booster + Dryer Sheet Station
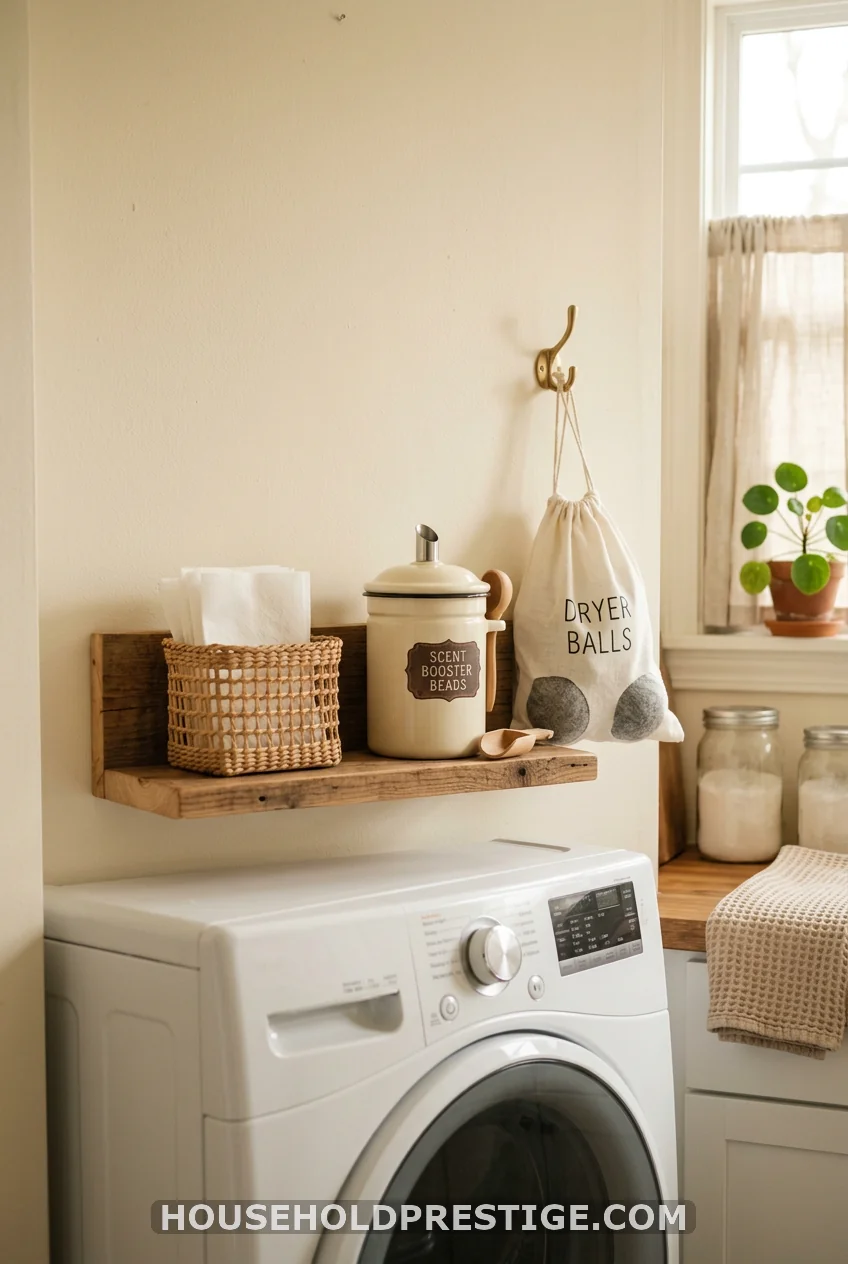
Dryer sheets and scent boosters are always the afterthought of laundry organization — you set them on top of the dryer, and they slowly migrate behind it and under it until you’re fishing for them with a ruler. The fix is a dedicated zone, right at the dryer.
An open rattan basket for dryer sheets keeps them accessible without a lid to fumble with. Scent boosters (Downy Unstopables are the most common) need a jar with a pour spout rather than a wide mouth — they’re small beads, and they pour out in an avalanche. A small glass jar with a cork-lined flip-top gives you control. Dryer balls live in a hanging fabric bag on the dryer handle or a wall hook — they don’t need to be stored flat.
Keep this setup separate from your washing station. Washer supplies near the washer. Dryer supplies near the dryer. Six extra steps on laundry day add up to exactly zero motivation.
8. Labeled Woven Baskets for a Warmer Look
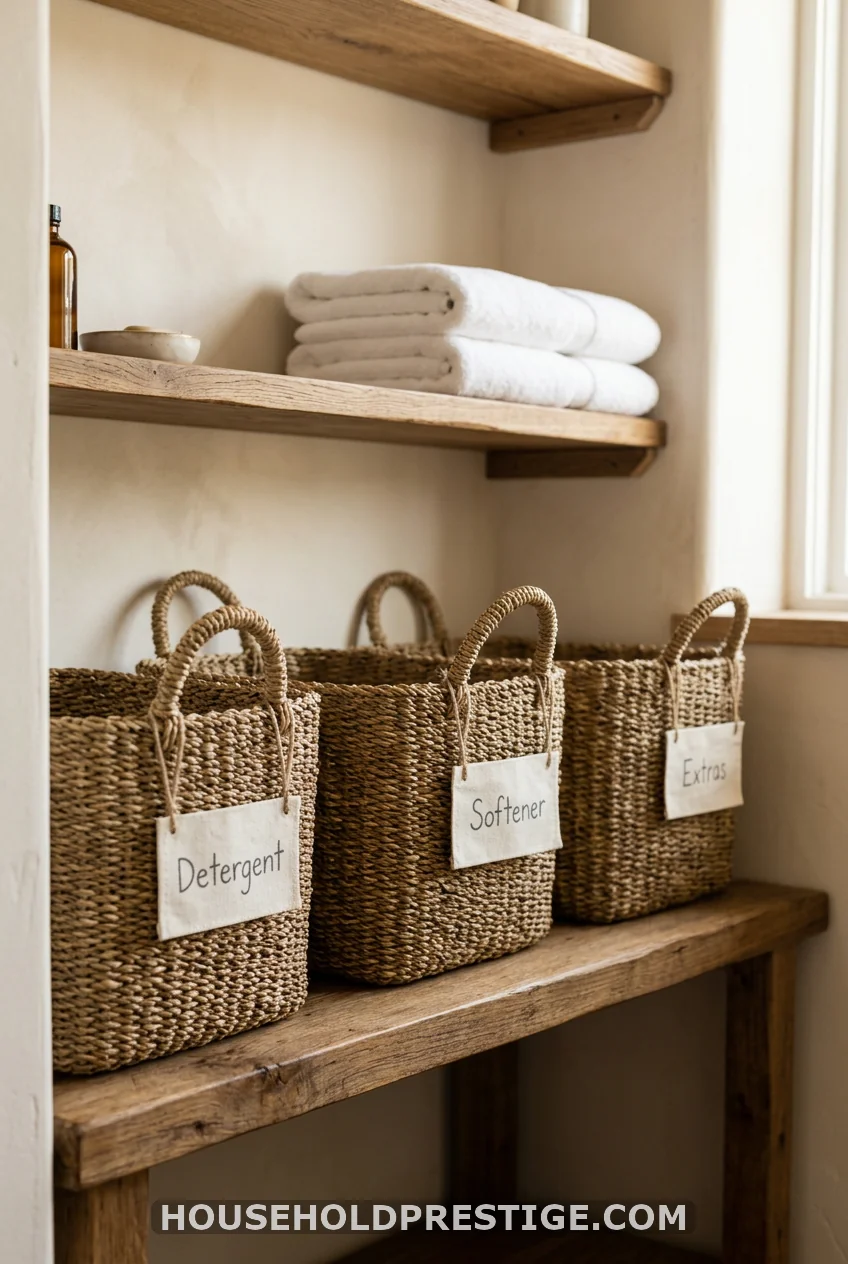
Not everyone wants glass jars and acrylic containers. If your laundry room leans warm and natural rather than clean and clinical, woven baskets on open shelves give you the same organizational benefit with a cozier feel.
The IKEA Nipprig baskets ($4.99–$9.99 each) in the seagrass version work perfectly on 10-inch deep shelves and hold standard-sized detergent boxes or bottles with room to spare. Use one basket per category — one for washing supplies, one for softening supplies, one for miscellaneous extras. Attach small manila cardstock labels with jute twine. The visual warmth carries the whole room.
The trade-off: you can’t see how much product is left, so set a restock day once a week to check each basket. Sunday evenings work well — it takes under five minutes.
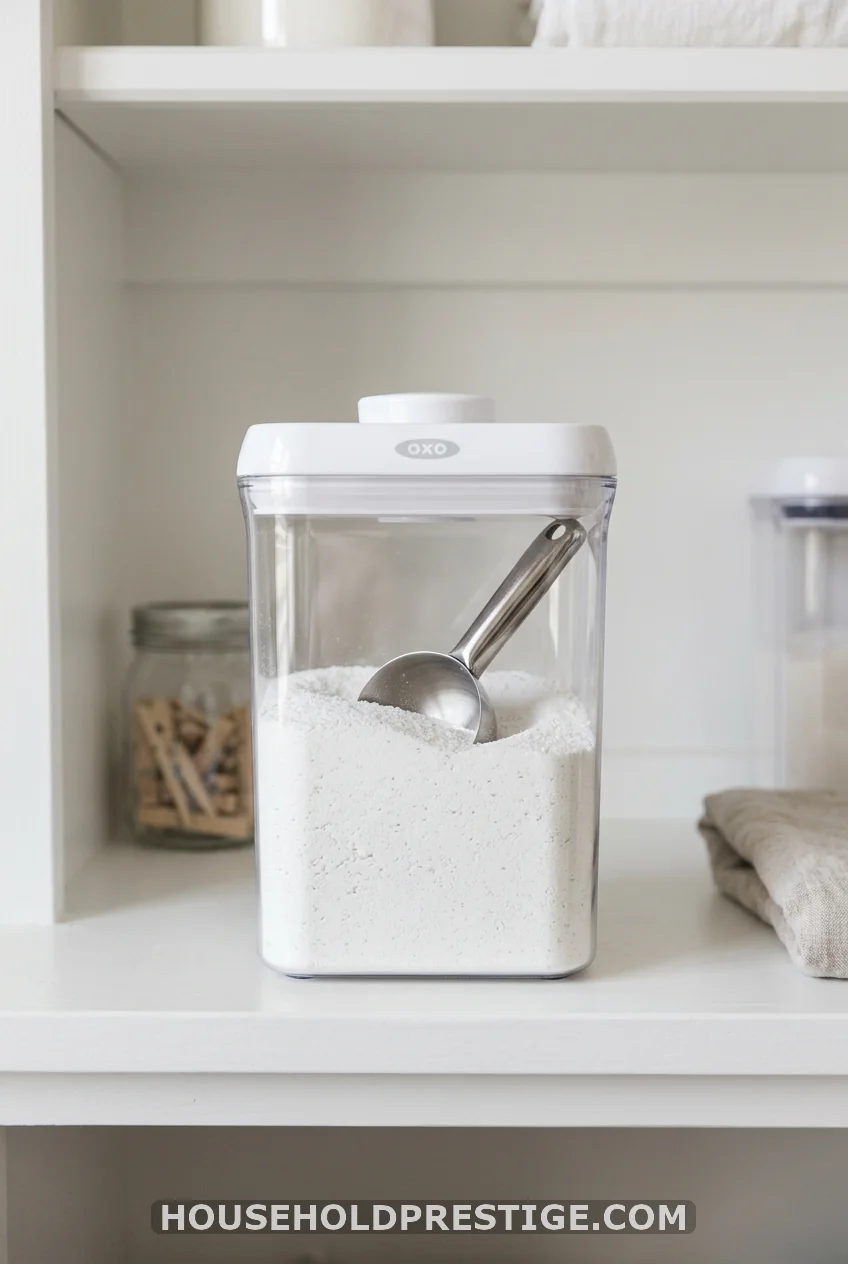
9. Powder Detergent Storage — The Trickiest Type to Organize
Powder detergent is underrated — it costs less per load than liquid, has a longer shelf life, and is easier on certain washer types. But it is the hardest detergent format to store attractively, and it has two real failure modes that most organizers don’t warn you about.
The Moisture Problem
Powder detergent absorbs ambient moisture from the air. In a laundry room with a running washer and dryer, humidity is real. If you store powder in an open container or a poorly sealed one, it clumps into hard chunks within weeks and loses effectiveness. The container you pick matters more for powder than for any other format.
Best container choice: the OXO Good Grips POP Container (4.3-qt) at $17.99. The button-lock lid creates an airtight seal, the opening is wide enough for a standard scoop, and the flat bottom sits stably on any shelf. Don’t use a container with a pour spout for powder — clumping will block it.
The Clogging Problem
If you’ve ever tried to put powder in a gravity dispenser or a flip-top pump, you’ve seen this happen: it works for two weeks, then it doesn’t work at all. The powder packs under its own weight and blocks the exit. The only powder-safe dispensers are scoop-based wide-mouth containers where gravity isn’t doing the dispensing work.
The Scoop Problem
Every powder detergent comes with a scoop, and the scoop goes missing within three days. Solve this permanently: store the scoop inside the container, handle-up, so it’s visible when you open the lid. Alternatively, a set of three stainless steel scoops (OXO brand, $8.99 for a set of three) standardizes your measuring across all your powder products.
How Much to Decant
A 150-oz box of Arm & Hammer powder is roughly 12 cups by volume. A 4.3-qt OXO POP container holds about 18 cups. One container fits a full large box with room for the scoop. Don’t top it off — leave 2 inches of air space at the top, or you’ll fight the lid seal every time.
H4 Pro Tip
Store your overflow powder box in a cool, dry cabinet or closet rather than the laundry room itself. The humidity in an active laundry room will degrade an open box faster than you’d expect. Only decant what you’ll use in two to three weeks.
10. Clear Acrylic Risers Inside Cabinets
If your cabinets are deep enough that things hide behind each other, a set of clear acrylic tiered risers fixes this entirely. You can see every item without moving anything. A standard two-tier riser set (SimpleHuman or similar, $12–18) fits most cabinet depths and supports bottles up to 32 oz.
11. Over-the-Door Organizer for Tiny Laundry Rooms
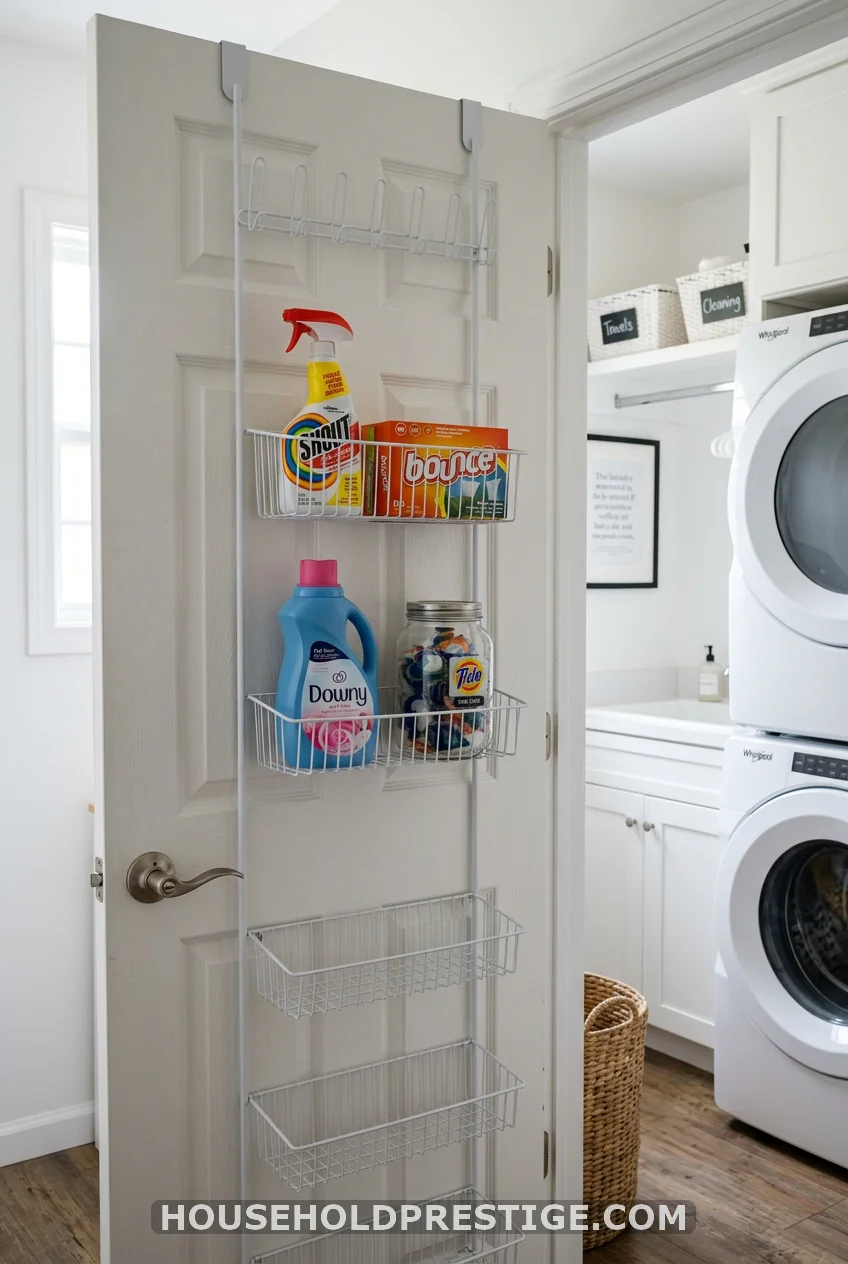
When you have zero shelf space and zero cabinet space, the back of the laundry room door is wasted real estate. An over-the-door organizer (Command brand or SimpleHuman wire version, $18–28) adds storage without a single hole in the wall.
The sweet spot: use the top three pockets for frequently accessed items (stain spray, dryer sheets, a few pods) and the bottom two for backup supplies. Heavy items like a full fabric softener bottle should go in the lower pockets — if you put weight high on an over-door organizer, it rocks forward every time the door moves.
If your door swings into the laundry room, check clearance first. You need at least 6 inches between the door surface and the nearest shelf or appliance when the door is fully open.
12. The Shelf Liner Under Everything

Before you put any container on any shelf — lay down shelf liner. The foam-backed non-slip kind, not the waxy paper kind. It stops containers from sliding, catches any drips before they hit the shelf itself, and makes the whole surface look intentional. A roll of Con-Tact brand liner runs $6–8 and covers three standard shelves. This is the unsexy step that most organizations skip, and it’s the one that makes the whole setup actually function.
13. A Rolling Utility Cart Between the Washer and Dryer
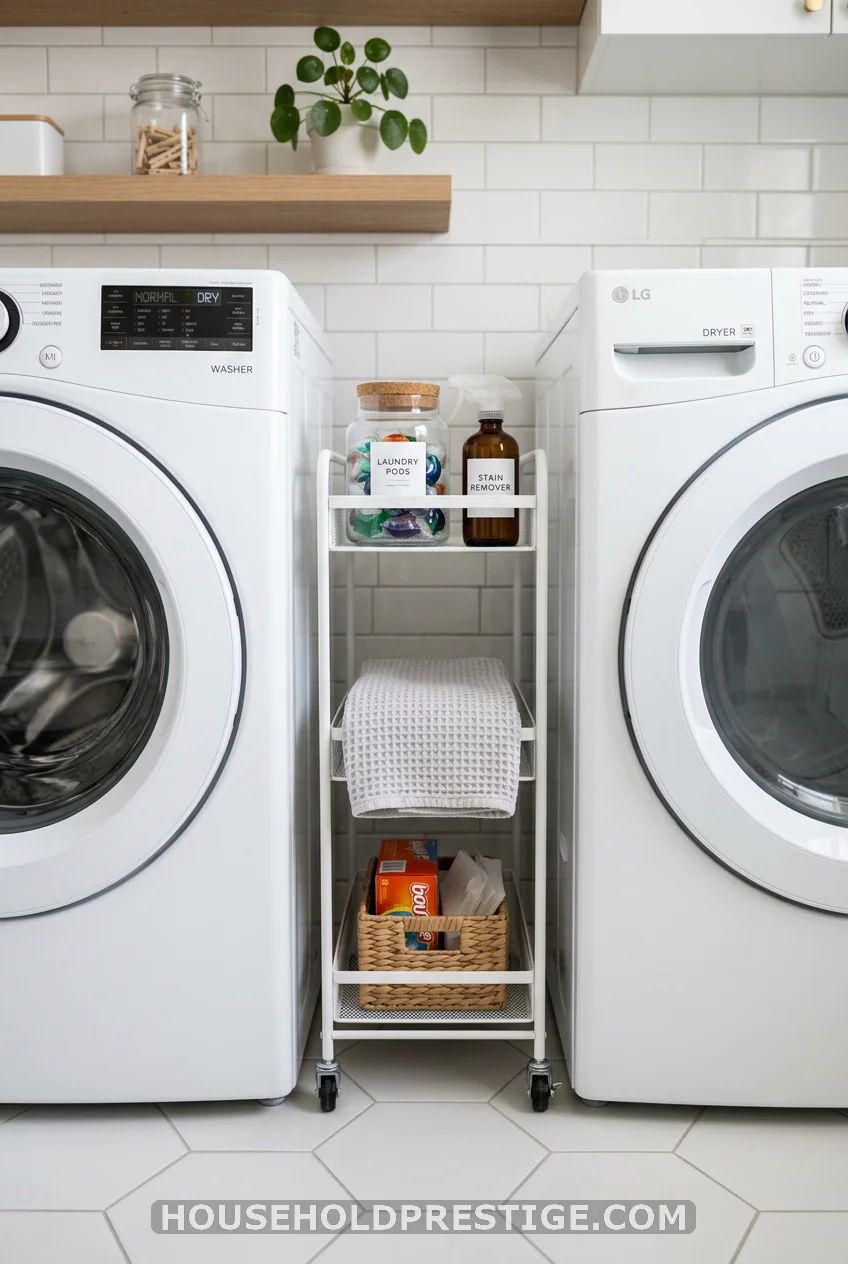
The gap between a washer and dryer — usually 2–4 inches for side-by-side front-loaders — is almost always wasted. A slim rolling laundry cart fills that gap perfectly. The Neatfreak Slim Rolling Cart (1.7 inches wide when collapsed, 3.5 inches when in use) fits into most side-by-side setups and rolls out when you need it.
Use the top for daily-use items (pods, measuring cup). Lower shelves for backup supplies. When you need to service the machines, it rolls out in one motion. The real value is that you stop losing things to the gap — no more pods that fell behind the washer, no more measuring cups that vanished into the floor.
14. Repurposed Kitchen Canisters

If you have matching canisters from your kitchen you’re no longer using — the flour-sugar-coffee set — they work perfectly in a laundry room. Ceramic canisters with tight-fitting lids handle powder detergent well, and they give the space a cohesive, homey look that plastic containers can’t. This costs exactly zero dollars.
15. Adhesive Bins on the Inside of Cabinet Doors
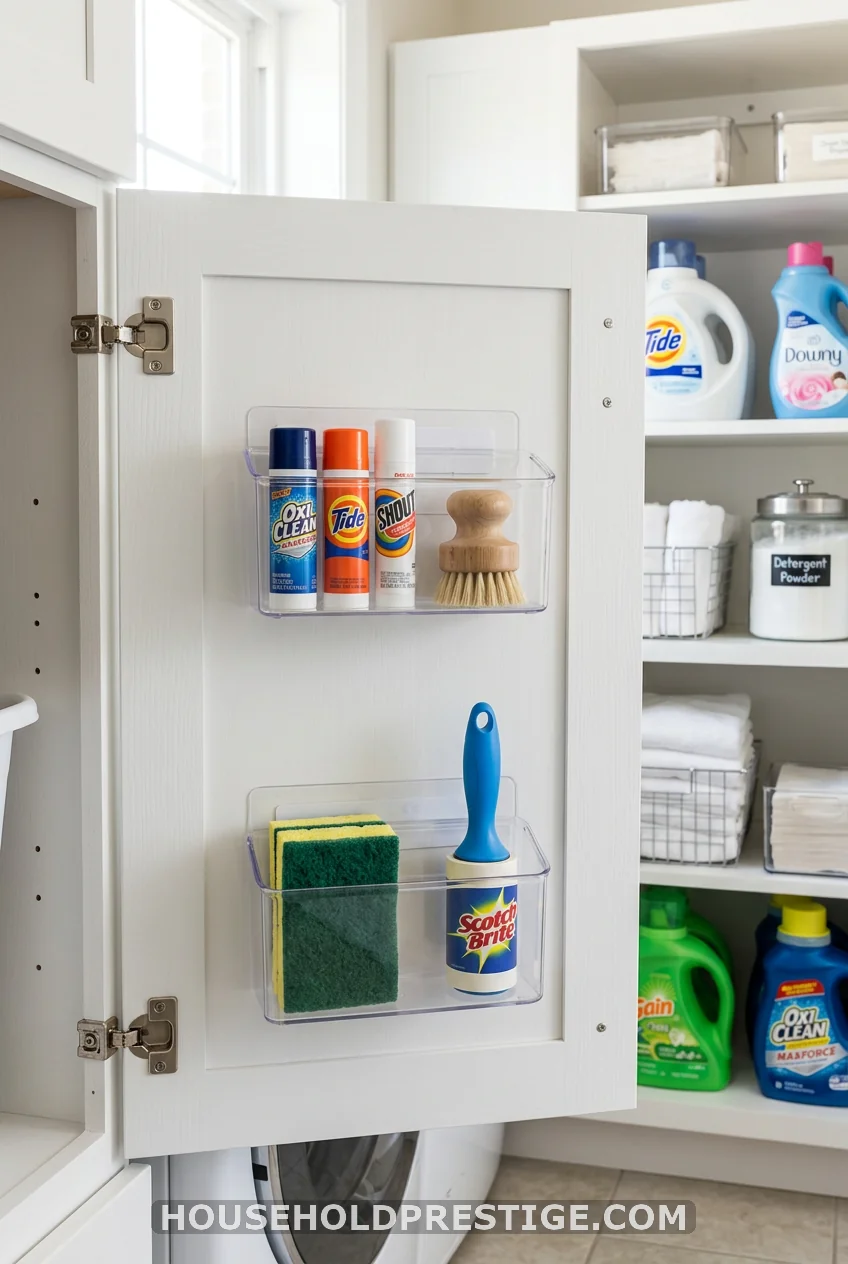
Command adhesive bins ($10.99 for a set of two from 3M) mount directly to the inside of cabinet doors with no drilling and support up to 1 lb each. Use them to store the flat, small items that otherwise vanish — a stain stick, a small scrubbing brush, lint roller sheets, safety pins from dry-cleaned clothes. These are the items that should live where you need them, not where there’s technically space.
The adhesive strips hold well on painted wood or MDF cabinet doors. Let them cure for 24 hours before loading. When you’re done or if they loosen, the strips remove without finish damage on properly painted surfaces — test one strip in a low-visibility spot first.
16. What Happened When I Tried to Decant My Entire Laundry Room at Once
Here’s a cautionary tale: I watched a very popular organization video, bought a set of matching glass jars and a wall-mounted metal dispenser, spent a Sunday afternoon decanting everything, and stood back feeling very accomplished.
By Tuesday, the liquid dispenser had dripped blue gel down the tile for the second time. By the following weekend, I’d given up on it entirely and gone back to the original bottle. The glass jars for powder and pods? Still perfect. The wall dispenser for liquid? In the donation bin.
The lesson isn’t that glass jars don’t work. They do. The lesson is that liquid laundry detergent doesn’t behave like liquid hand soap. It’s thick, it drips slowly, and it leaves a sticky film if even a small amount gets on a surface. The methods that work for liquid soap don’t transfer directly to laundry detergent.
What I replaced the dispenser with: a 32-oz OXO pump bottle ($14) on the shelf next to the washer. I refill it from the big jug weekly. It pumps clean because the pump mechanism is properly sized for viscous liquid. It drips zero because I pump directly over the washer door. It’s been two years, and I’ve cleaned the pump exactly once.
The takeaway: don’t decant your liquid detergent into anything beautiful unless you’re prepared to maintain it. Decant your pods and powder. Leave your liquid in something functional.
17. Color-Code by Detergent Type
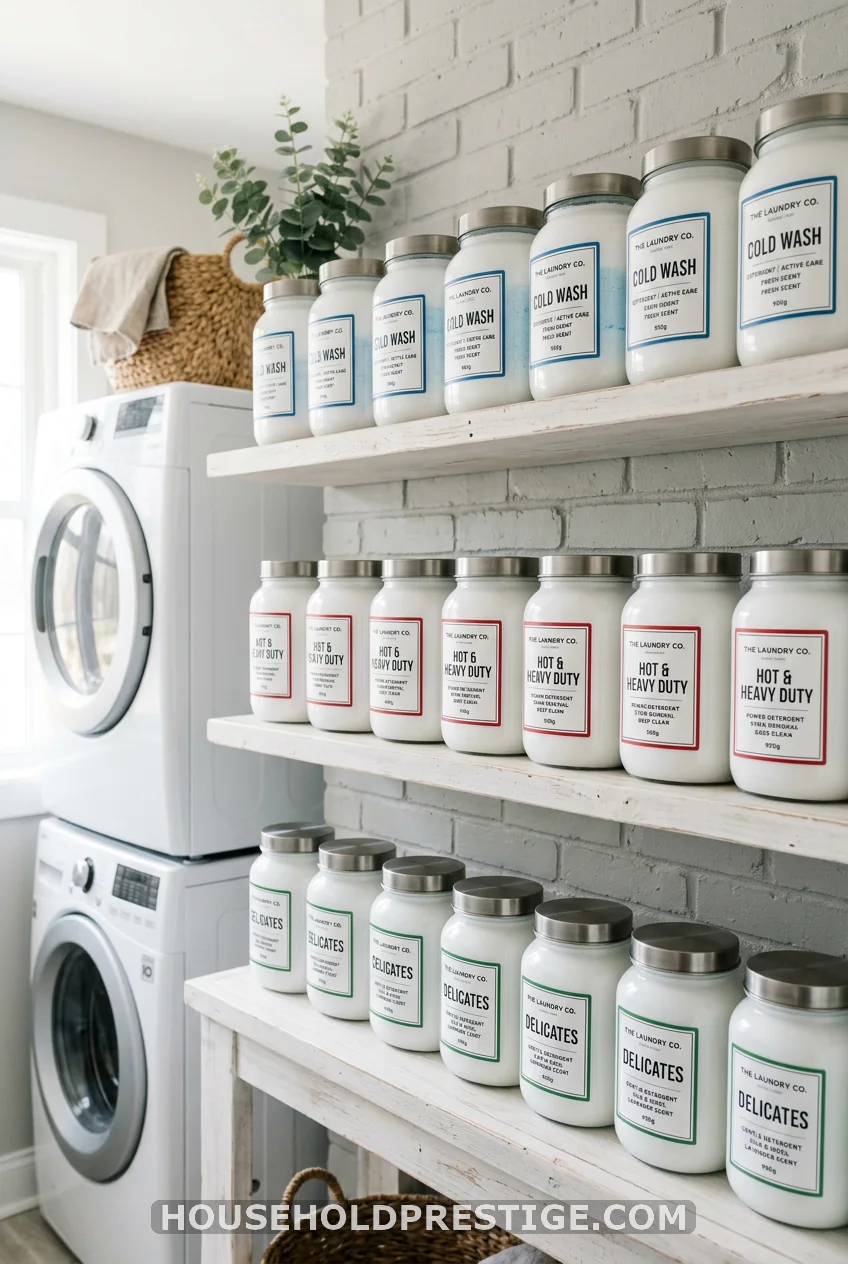
If multiple people do laundry in your house, color-coding by detergent type cuts down on errors faster than any label system. Blue for regular/cold wash. Red for heavy-duty or sport formula. Green for delicates or wool. Anyone can identify the right one at a glance without reading.
Use colored washi tape on identical containers ($6 for a multi-pack), or choose containers that come in matching colors per category. You don’t need to be matching and perfect — you just need a clear visual system that works when you’re running a load at 10 PM and you’re not reading labels carefully.
Wrapping Up
Your laundry room doesn’t need to be an Instagram set. It needs to be a room where you can find what you need, use it without making a mess, and not dread walking into. Organized laundry room detergent storage is less about aesthetics and more about removing the small friction points — the sticky shelf, the missing scoop, the dripping jug — that make laundry feel harder than it is.
Pick two or three ideas from this list that match your setup and budget. Start there. The full detergent station (#2) is the highest-impact single project if you have the shelf space. The corralling tray (#6) and the shelf liner (#12) take ten minutes and cost under $10 combined. Small things. Real difference.
FAQ
Q: What’s the best container for laundry pods to keep them safe from kids?
A: A jar with a child-resistant flip-top or a container that requires two simultaneous motions to open (like the OXO SNAP container line) works best. Pods are one of the leading causes of accidental household poisoning in children under five — treat their storage with the same mindset as under-sink cleaning products. Keep them out of reach and in an opaque container if possible.
Q: Can I store liquid laundry detergent in a glass jar?
A: Yes, but only a small amount meant to be used within two weeks. Liquid detergent in an unsealed or wide-mouth container is exposed to air, which degrades the surfactants over time. Use a glass jar with an airtight lid and a pump attachment, and refill from a larger sealed container rather than storing a full batch. Never store liquid detergent in a decorative jar with a loose-fitting cork lid.
Q: How do I organize laundry detergent in a small space with no shelves?
A: Your best options are the back of the laundry room door (over-door organizer), the side of your washer (magnetic holders), and the gap between appliances (slim rolling cart). You can also mount a floating shelf above the washer for about $12 in materials — a single 24-inch floating shelf dramatically increases your storage options without taking any floor space.
Q: Does powder detergent last longer than liquid?
A: Yes. Properly stored powder detergent in an airtight container lasts 12–18 months without losing effectiveness. Liquid detergent has a shelf life of 6–12 months once opened, and the concentrated enzymes break down faster when exposed to heat or direct light. If you’re buying in bulk, powder is the better investment for long-term storage.
Q: What’s the easiest way to keep laundry supplies from getting sticky?
A: A drip tray under anything liquid — detergent, softener, bleach — is the simplest prevention. Wipe the tray weekly, not the whole shelf. For containers themselves, rinse the cap and nozzle with warm water after each use to prevent buildup. The cap on most standard detergent bottles is the source of 90% of the stickiness.