

You’ve scrolled past those dreamy galvanized pools on Pinterest approximately one thousand times. Maybe you’ve saved a few. Maybe you’ve talked yourself out of it — convinced that the cute ones require a contractor, a big yard, and a weekend you don’t have.
Here’s the truth that stock tank pool owners learn fast: the best setups in this space weren’t built by landscape designers. They were built by regular people with a truck, a Saturday, and about $600.
Stock tank pool ideas run the full spectrum — from a bare 8-foot Tractor Supply tank dropped in the yard in an afternoon, all the way to flush-mounted garapa wood decks that’ll make your neighbors do a double-take. This list covers both ends and everything in between. I’ve pulled real costs, real product names, and real mistakes so you can skip the trial and error that every first-timer goes through.
Let’s get into it.
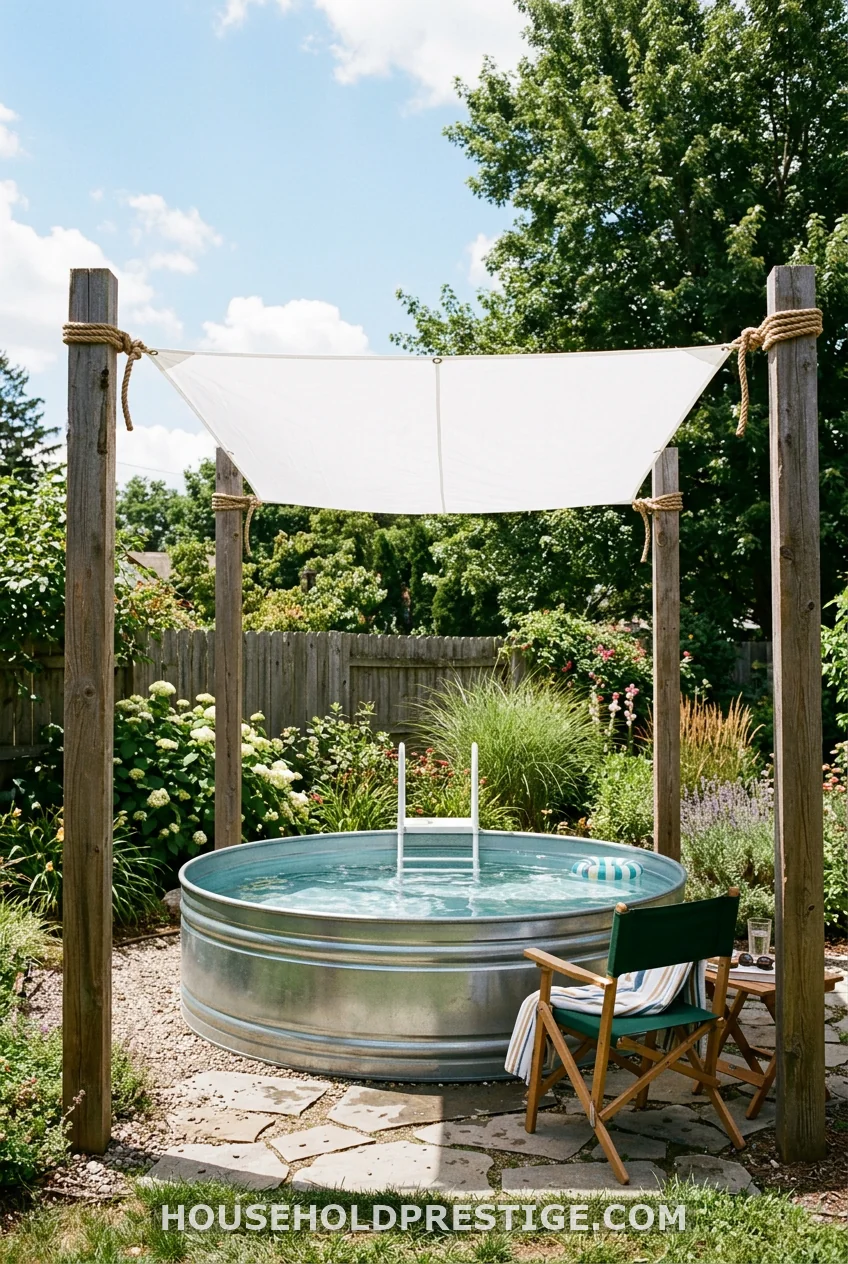
1. The Raw Galvanized Look (and Why It Actually Works)
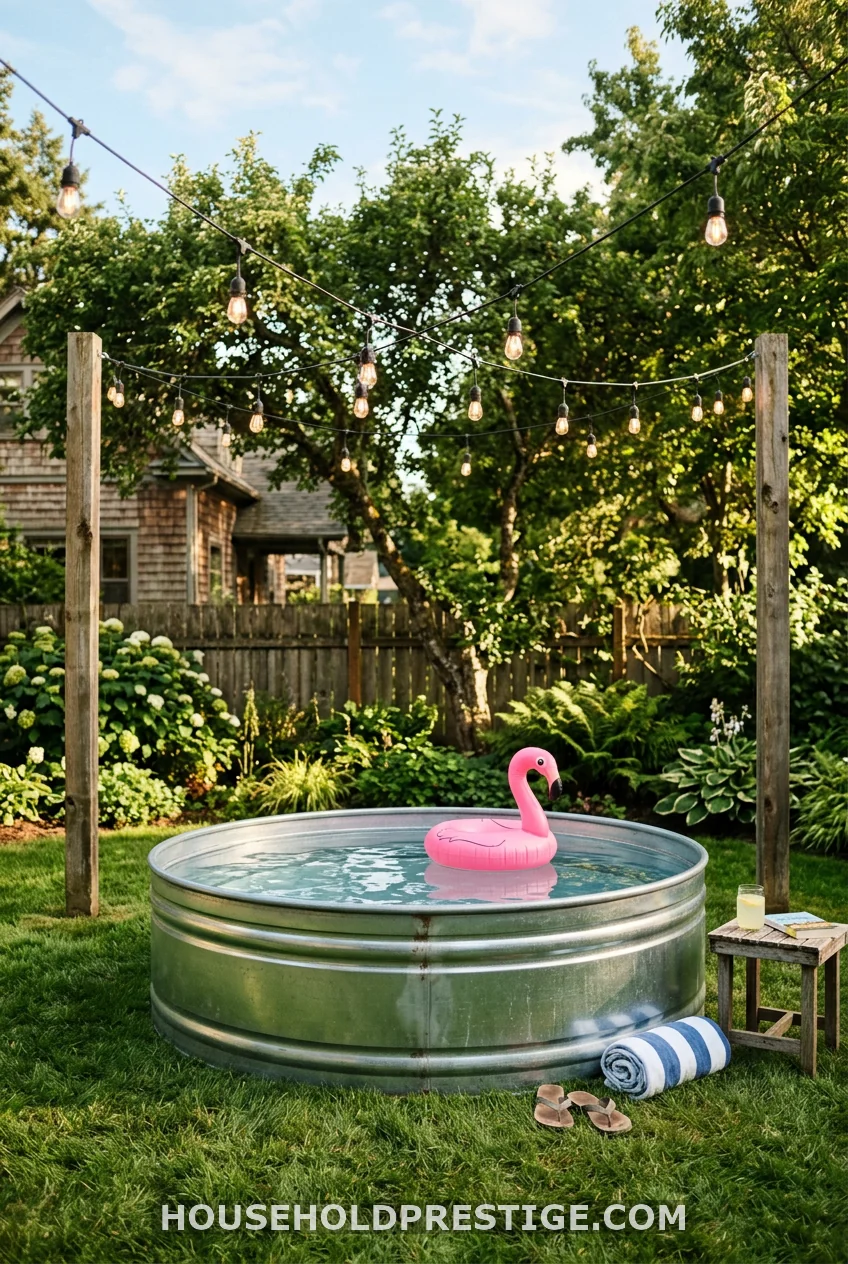
Don’t touch it. Don’t paint it. Don’t wrap it. Just set it up and let the silver shine.
Sounds too simple, right? But the raw galvanized look outperforms plenty of “styled” setups precisely because it’s honest. It leans into the cowboy pool identity instead of fighting it. Add a flamingo float, some string lights strung between two shepherd’s hooks, and a stack of rolled towels in a market basket — and you’ve got a Pinterest image that will drive saves.
Cost reality: 8′ round tank from Tractor Supply runs $349–$399. Intex Krystal Clear 1500-gallon pump (model 28635EG) costs around $89 on Amazon. Total out-of-pocket for a swim-ready pool: under $500.
2. The Full Deck Surround That Fakes an In-Ground Pool
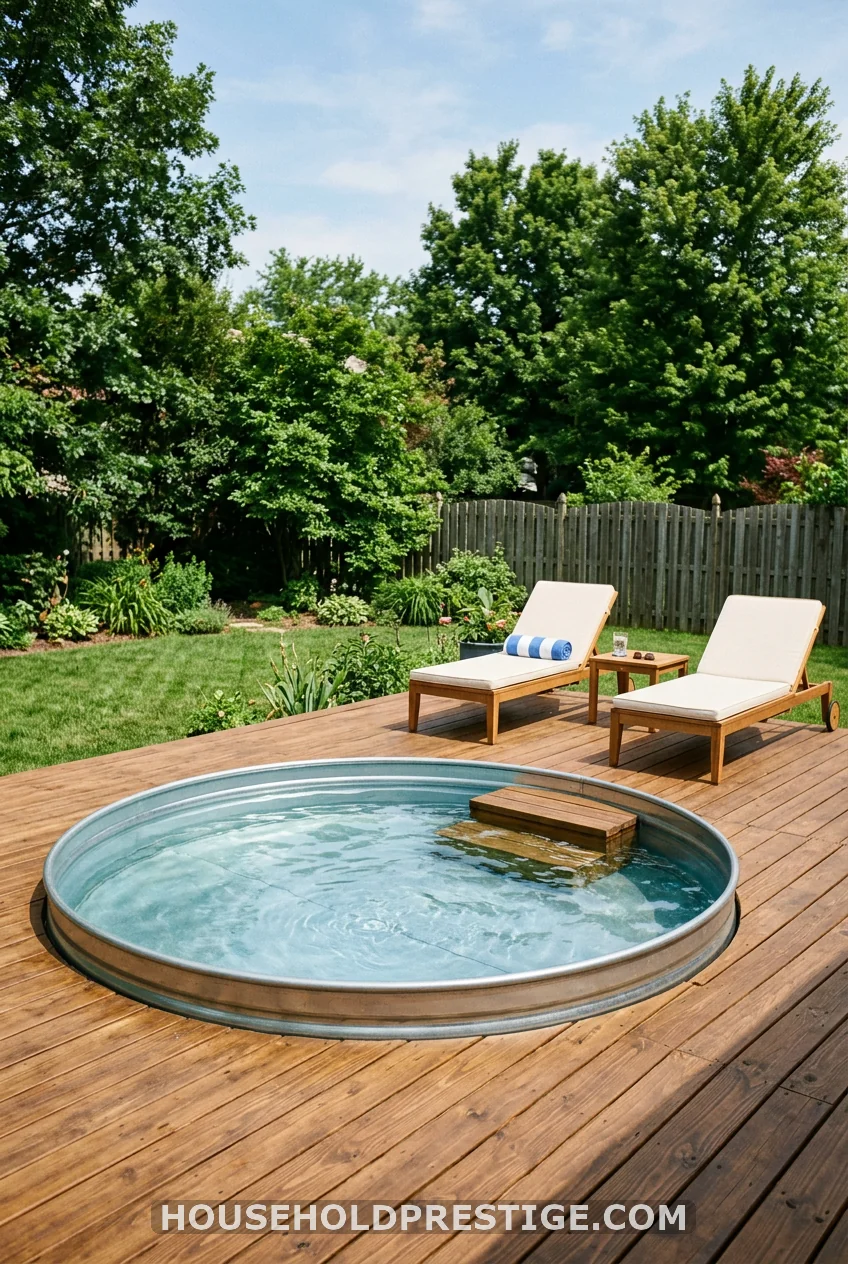
This is the transformation that makes guests ask “is that inground?” out loud. When the deck sits flush with the pool rim — or within an inch of it — the galvanized edge disappears and you’re left with something that reads like a proper plunge pool.
It’s also the most work-intensive idea on this list. Here’s exactly what’s involved.
Why It Works
An 8-foot stock tank holds roughly 1,100 gallons and weighs close to 9,200 pounds when full — about the same as a large SUV. Because of that weight, you cannot build the deck first and set the tank on top. The tank goes on the ground, and the deck gets built around it. That constraint is actually your friend: it means the pool is load-bearing on the earth, which is exactly where it should be.
Sizing Your Deck
For an 8′ round tank, a 14’x14′ deck feels generous — enough room for two loungers, a small side table, and easy entry access. A 12’x12′ is functional but tight. Anything smaller starts to feel like a platform, not a deck.
If you’re working with a 6′ round tank (better for couples or small families, holds about 700 gallons), a 10’x10′ deck is proportionally right.
Standard deck height should meet the pool rim, which on most galvanized tanks sits at 24 inches off the ground. Build your decking joists to hit that height, then trim the boards flush against the tank exterior.
Materials and Costs (8’x8′ tank, 14’x14′ deck)
| Item | Spec | Approximate Cost |
|---|---|---|
| 8′ round galvanized tank | Tractor Supply Behlen or Hastings | $349–$420 |
| Pressure-treated 4×4 posts | 8 posts, 36″ length | $55–$70 |
| Pressure-treated 2×8 joists | 24 pieces, 14′ | $180–$220 |
| Composite decking boards | 140 linear feet (Trex Enhance Basic) | $420–$480 |
| Carriage bolts + hardware | — | $40–$55 |
| Concrete tube forms + bags | 8 footings | $60–$80 |
| Intex 1500-gal pump | Model 28635EG | $89 |
| Fittings + drill + hole saw | 1.5″ hole for pump outlet | $20–$35 |
| Total | $1,213–$1,449 |
That’s still a fraction of even a modest above-ground pool installation, and it looks dramatically better.
Step-by-Step Build Process
Step 1 — Choose and level your location. Use a construction level across a 14’x14′ area. Any slope over 1 inch needs to be addressed with a shovel and compacted fill sand before anything else goes in. Rocks and roots under the tank will create pressure points that can damage the tank floor over time.
Step 2 — Mark and dig 8 footing holes. Place concrete tube forms at each corner and midpoint of your future deck perimeter. Pour concrete, set your post bases, and let cure for 48 hours minimum. Don’t rush this — wet concrete under post bases is how decks shift and warp.
Step 3 — Set the tank. Position the galvanized tank in the center of your marked area before any framing goes up. It’s much easier to adjust a 60-pound empty tank than a partially framed deck.
Step 4 — Install your 4×4 posts and 2×8 joist frame. Frame around the tank, leaving 1–2 inches of clearance on all sides. The tank will expand slightly as it fills with water and heats up — that gap matters.
Step 5 — Drill the pump fitting holes. Use a 1.5-inch hole saw on the tank side, 4–6 inches above the ground. Follow the Intex pump’s included instructions for inlet/outlet placement. Apply waterproof thread sealant tape on all fittings.
Step 6 — Lay your decking boards. Run composite boards perpendicular to the tank, trimming them with a circular saw to follow the curved tank wall. A jigsaw works better for tight curves. Gap boards at 1/8 inch for drainage.
Step 7 — Sand and finish edges. Router any sharp corners on exposed board ends. Install a single step on the entry side (a 2-step pressure-treated stair kit runs $45–$65 at Home Depot).
Step 8 — Fill, treat, and test. Fill the tank, run the pump for 4 hours, add one 1″ Clorox chlorine tablet to a floating dispenser, and test pH with a basic strip kit. Target pH 7.2–7.6.
Pro Move
Trex Enhance Basic in Clam Shell or Foggy Wharf matches galvanized metal’s cool tones better than warmer brown tones. It also doesn’t require annual sealing, which matters when the deck lives in a splash zone.
Common Mistakes to Avoid
- Building the deck before setting the tank — the tank must go in first, every time
- Skipping concrete footings and just sinking posts in the ground — posts shift, especially in freeze-thaw climates
- Running the pump without prime water in the filter housing — burns out the impeller on first use
- Using a standard power strip instead of a GFCI outlet — the pump manufacturer requires a GFCI circuit, and for good reason
3. Paint the Outside White to Keep the Water Cooler
White reflects solar radiation instead of absorbing it. In climates where afternoon air temperatures hit 100°F+, an unpainted galvanized tank can warm the water to the high 80s by 3 p.m. — refreshing for some, bathwater for others.
The Cuellars, who run a Joshua Tree Airbnb called Dreamscape, painted their exterior white specifically to combat California desert heat. The surface paint lowers the exterior temperature of the metal by reflecting sunlight, which slows the rate of heat transfer to the water inside.
Paint reality: You’ll need Rust-Oleum Stops Rust in Gloss White (about $12 per can), and you’ll use 4–6 cans for an 8′ tank exterior. Surface prep is non-negotiable: clean the tank with TSP substitute, let it dry completely, and apply a self-etching metal primer ($14/can) before topcoat. Skip the primer and the paint will peel within one season.
Total paint cost: $90–$110. Do NOT paint the interior.
4. Convert It Into a Year-Round Hot Tub with a Propane Heater
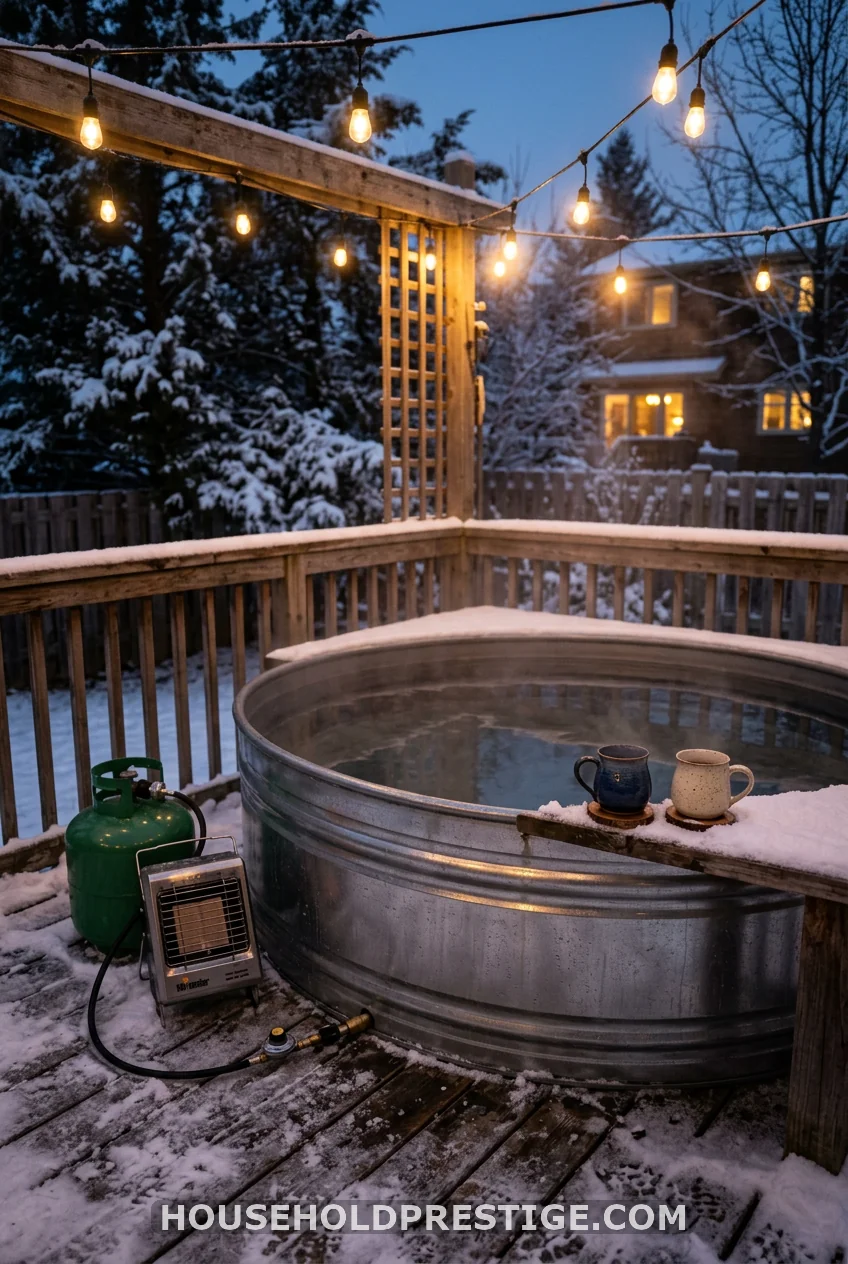
Most people shut their stock tank pool down in September. The people who add a propane heater use theirs through December. A few use it all year.
The most referenced setup across stock tank communities involves a Camplux 5L outdoor propane water heater (roughly $85–$110 on Amazon) paired with a submersible pump to circulate water through the heater and back into the tank. It adds 5–10°F per hour to an 8′ tank. Getting from 65°F to 103°F takes about 4–6 hours, so you typically set it running in the morning for an evening soak.
What nobody mentions upfront: metal stock tanks are bad at retaining heat. Once you hit your target temperature and shut the heater off, the tank loses heat faster than an insulated hot tub. A solar cover — even a cheap $35 cut-to-fit version — dramatically slows that loss. In colder climates, wrapping the tank exterior with outdoor-rated foam pipe insulation buys you another hour or two of soak time.
Safety note: run propane heaters in ventilated outdoor areas only. Keep the heater a minimum of 3 feet from the tank and away from any overhead structure.
5. A Pool Noodle on the Rim Costs $3
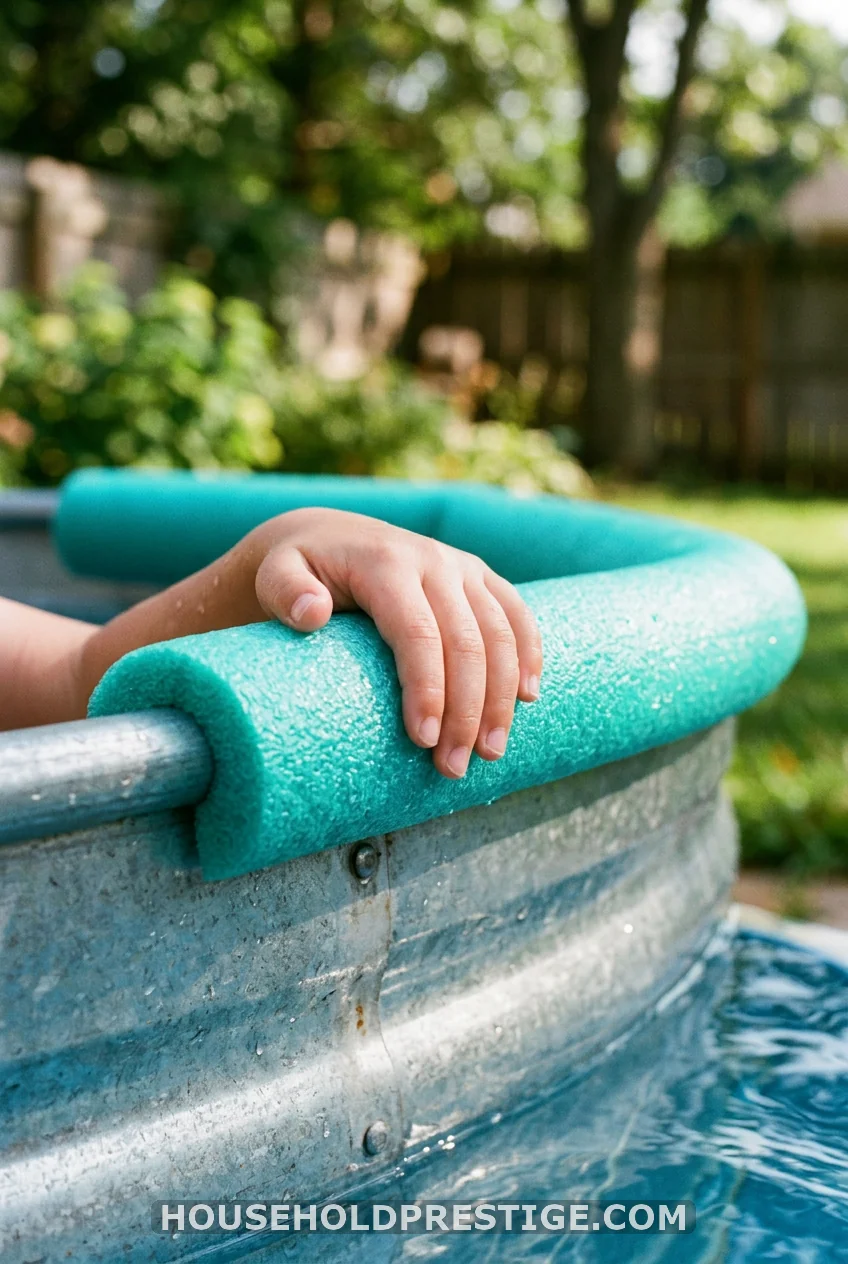
Slice a pool noodle down its length with a kitchen knife. Slide it over the tank rim. Done.
The galvanized edge is sharp enough to scratch arms and thighs after an hour of leaning on it. One $3 pool noodle from Dollar Tree solves that completely. Choose a color that either matches your aesthetic or commits fully to the chaos — a bright yellow rim on a raw silver tank is oddly charming.
6. The Cautionary Tale: Why I Almost Buried Mine (And What You Should Know First)
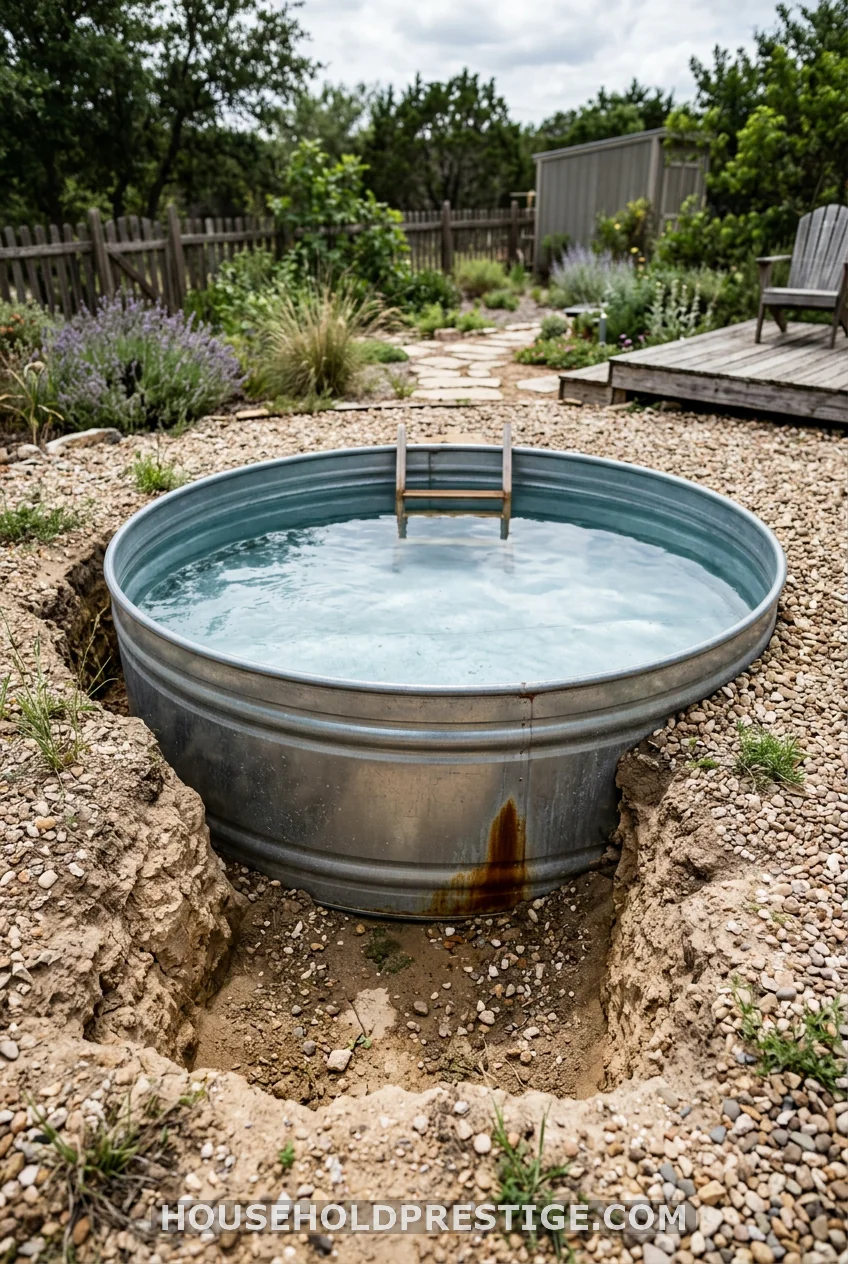
I almost buried mine. I even dug the hole.
The in-ground look is genuinely stunning — the tank disappears into the landscape, you get a seamless patio surface right to the water’s edge, and the thermal mass of the surrounding soil keeps the water several degrees cooler than an above-ground setup. On Instagram, buried stock tanks look like private plunge pools at a boutique hotel.
Here’s where it went sideways for me.
I dug a 9-foot-diameter hole, 26 inches deep, in a corner of the yard where drainage wasn’t great. When I lowered the empty tank in, it sat fine. When I started filling it with water, the tank walls began to bow outward from the hydrostatic pressure — the weight of 1,100 gallons pushing against thin galvanized steel without the earth packed tightly enough against it.
I had to drain it, repack the surrounding soil, and fill in stages over two days.
Then the rust started. Direct soil contact accelerates galvanic corrosion on the tank exterior — the zinc coating that protects against rust works best in air, not in constant contact with wet earth. By the second season, I had rust streaks forming at the base that I hadn’t seen on any above-ground tank.
Here’s what stock tank pool experts actually recommend if you want the buried look: dig your hole slightly oversized, lay a pond liner or heavy-duty landscape fabric against the soil before setting the tank, pack crushed gravel tightly around the exterior for drainage, and plan for the possibility that corrosion will reduce the tank’s lifespan from 10+ years to 5–7.
The above-ground deck surround in idea #2 gives you 90% of the same visual result, with none of the structural headaches. I filled my hole back in and built a deck instead.
7. Wrap It in Bamboo Rods and Zip Ties
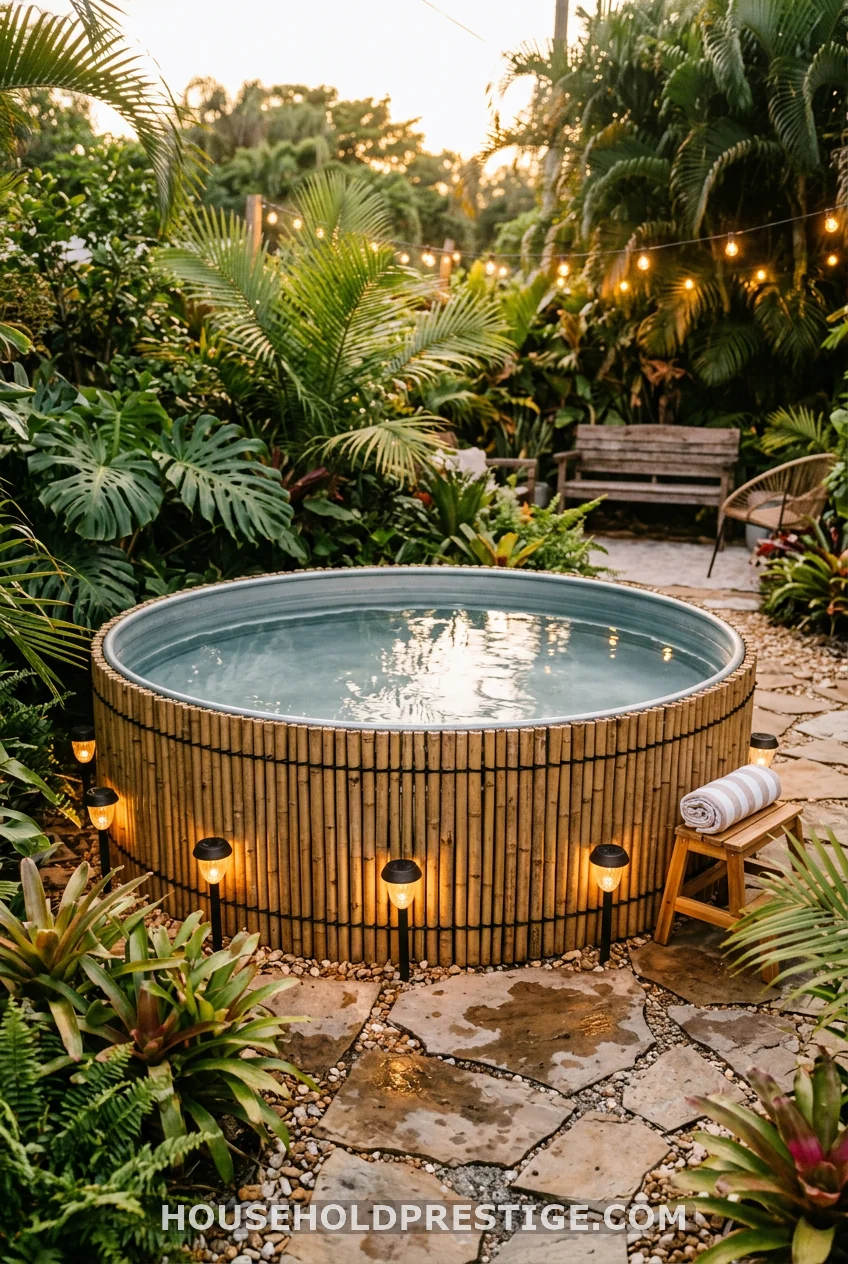
Bamboo poles. Zip ties. Twenty minutes.
Grab a bundle of bamboo garden stakes from any home improvement store (8-foot, 3/4-inch diameter, roughly $25 for 25 stakes), cut them to 25 inches to match tank height, and zip-tie them around the exterior — one zip tie at the top edge, one near the base. Stain the bamboo with a dark exterior wood stain for a deeper, more intentional look.
Total cost: under $40.
8. Build a Half-Moon Entry Deck
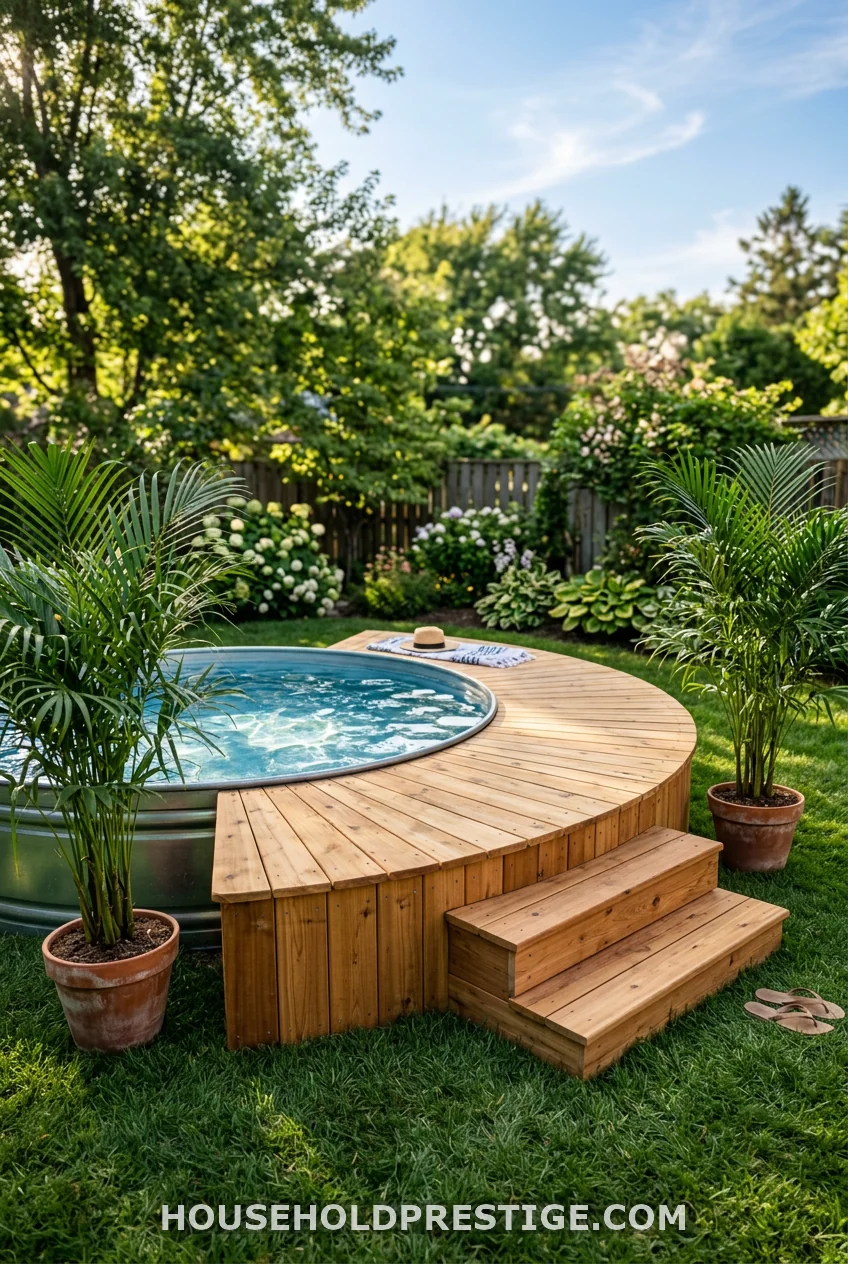
A half-moon deck hits a sweet spot that full surrounds don’t: it gives you a proper entry/exit point and a place to sit with your legs in the water, without the cost and weekend commitment of a full perimeter deck.
Build the half-moon as a freestanding platform using pressure-treated 2×6 framing, curved with a jigsaw cut on the outer edge. Use the same decking boards as the platform surface. Standard half-moon dimensions for an 8′ tank: 5 feet deep, following the tank’s curve across a 7-foot chord. Two 12-inch drop steps on the grass side complete it.
Material cost for the half-moon alone: $180–$240. Add a 4-foot wide teak step stool on the pool side for $45–$65, and you have a full entry system.
9. The Black + String Lights + Fire Pit Trifecta
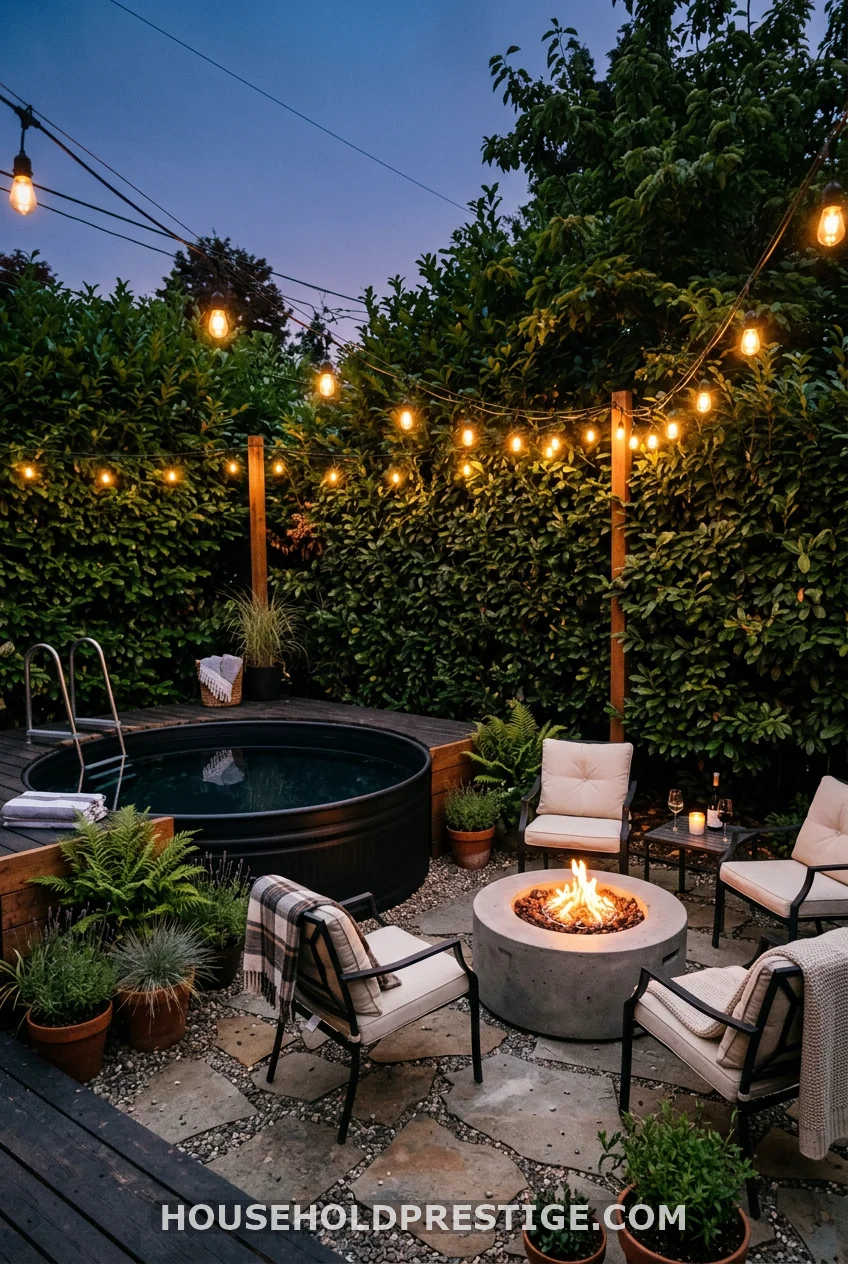
Paint the exterior matte black. Position it 6 feet from a fire pit. String Edison bulb lights overhead at 8-foot height. Add two black metal chairs with weather-resistant cushions.
This is the setup that photographs at dusk in a way that looks like a boutique hotel’s private courtyard. The black exterior reads dramatically against silver water and warm light. The fire pit extends the usable evening by keeping the air temperature comfortable even when the water isn’t heated.
Paint recommendation: Rust-Oleum Painter’s Touch 2X in Flat Black, applied over self-etching metal primer. Budget for 5–6 cans of topcoat.
One catch: matte black absorbs heat. In full-sun climates, this setup needs a shade structure, or the water will hit 90°F by afternoon. Position it where it gets afternoon shade from a structure or tree, or commit to the umbrella.
10. Let the Plants Do the Work
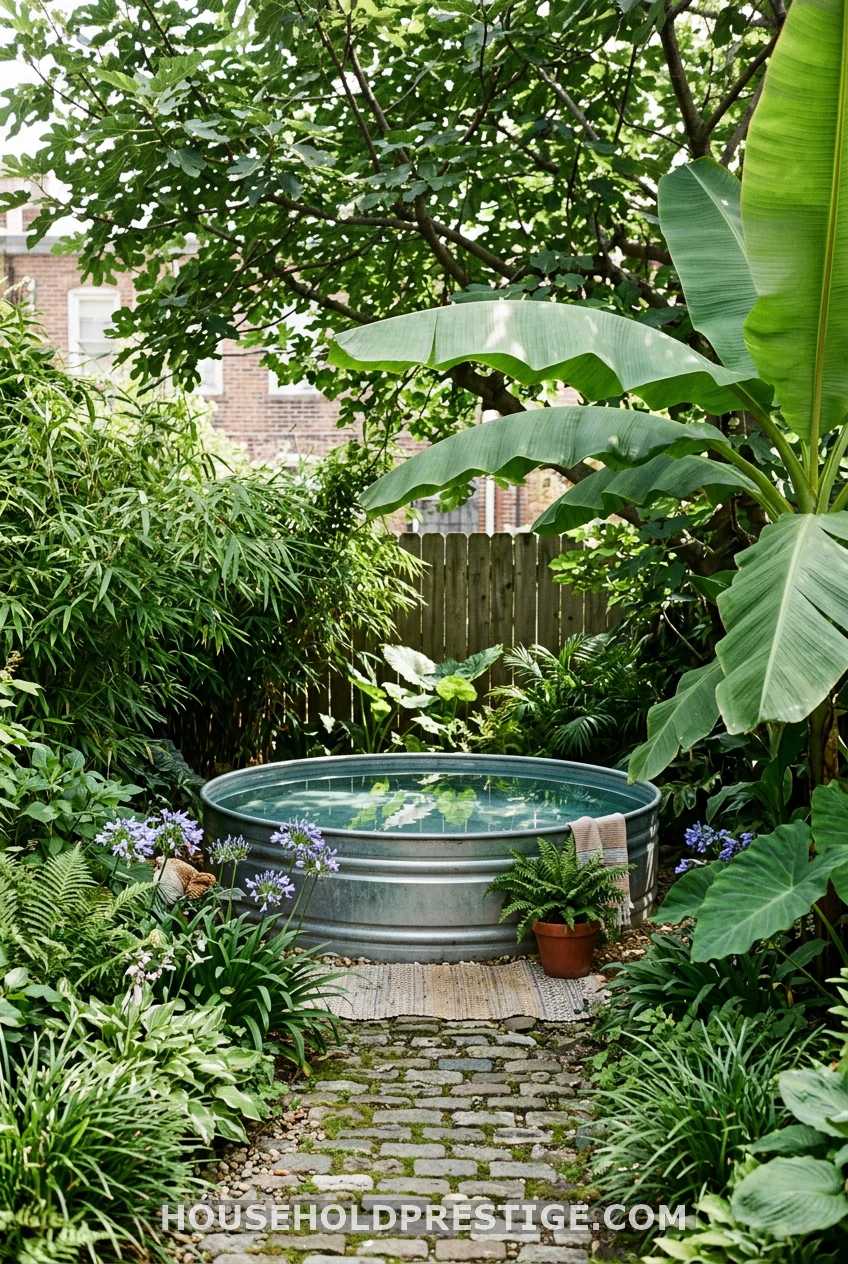
Jeremy Batsche’s San Antonio setup won awards for this exact approach: use existing and planted greenery to create natural shade, privacy, and visual integration.
A fig tree canopy plus a stand of bamboo at the yard perimeter cuts afternoon sun by 30–40% without a single structural element. In water-scarce climates, that shade pays dividends on evaporation too — a shaded 8′ tank loses roughly 1–2 gallons less per day than a full-sun tank.
Plant a fast-growing privacy screen like Emerald Green arborvitae ($15–$25 each at most garden centers) 3 feet back from the tank and you have living privacy walls in 2–3 seasons.
11. Slide-and-Splash for the Whole Crew
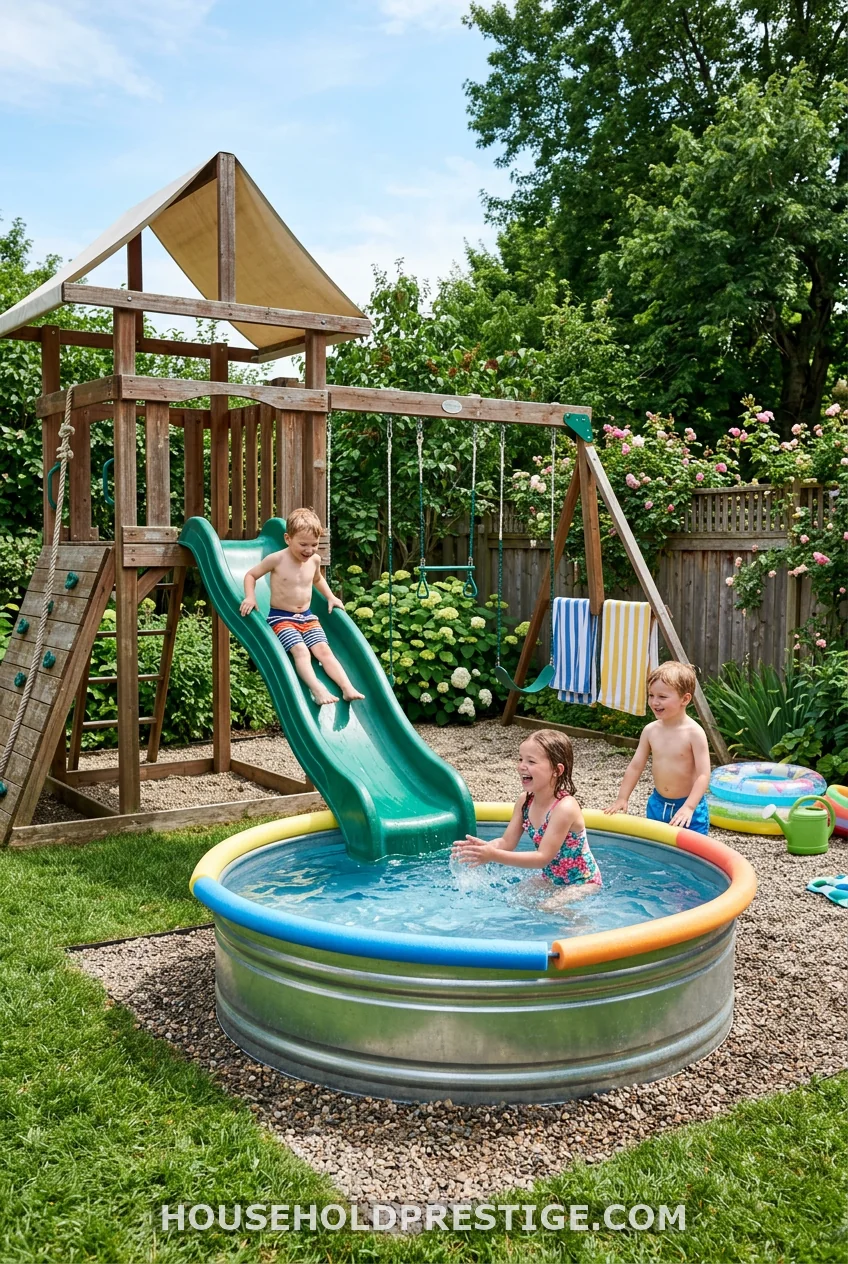
Position the tank at the base of a backyard slide. Full stop.
Nat Davis popularized this setup and it’s hard to argue with the logic: the tank is 2 feet deep — deep enough to splash, shallow enough to be safer than a traditional pool for supervised kids. Paired with a playset slide, it becomes the kind of backyard feature that means you never need to fight about screen time in July again.
Key safety note here: a 2-foot-deep stock tank is not a safe pool for children under 6 without constant direct supervision. Shallow water drowning risk is real and doesn’t require depth. Install a fence or pool alarm if children have unsupervised yard access.
Pump tip: if the tank is doubling as a kids’ play pool, run your filter pump at minimum 6–8 hours daily instead of the standard 4. Sunscreen and general kid chaos require more filtration.
12. Stencil the Bottom with Flex Seal
Get a stencil. Use a can of Flex Seal spray. Press the stencil against the empty tank floor and spray.
Hannah Reesor stenciled “No Diving Please” on hers. Others have done wave patterns, coordinates, or a simple sun. The waterproof coating bonds well to galvanized metal and stays readable through a full season without peeling.
Cost: one can of Flex Seal Spray ($12–$14), one roll of stencil vinyl or a laser-cut craft stencil ($5–$15). Total: under $30.
13. Lean Into the Midcentury Moment
Stock tanks don’t have to scream “farmhouse.” In California, Suburban Pop set one into a 1960s ranch property — poured concrete patio, butterfly chair, structured landscaping — and it read as a deliberate architectural accent, not a DIY project.
Match your tank to your house’s existing aesthetic rather than defaulting to the “Texas ranch” look. If your home is midcentury, go concrete patio + sculptural plants + one accent color. If it’s cottage style, go raised beds + reclaimed wood + wildflowers at the border.
14. The Tarp Shade Trick
Four 8-foot posts. Four eyebolts. A 10×10 ripstop tarp from REI ($35–$55). Rope.
This is what Carolina Stovall used over her Denver setup, and from the photos it reads as intentional — like a cabana, not a construction site. White tarps photograph especially well because they scatter light instead of blocking it, giving you that soft, diffused midday ambiance.
The catch: tarps need to slope for rain runoff. Run your posts at slightly different heights — two at 8′ and two at 7’6″ — so rainwater drains off the low side automatically.
15. Flush-Mount in a Garapa Wood Deck for the Year-Round Look
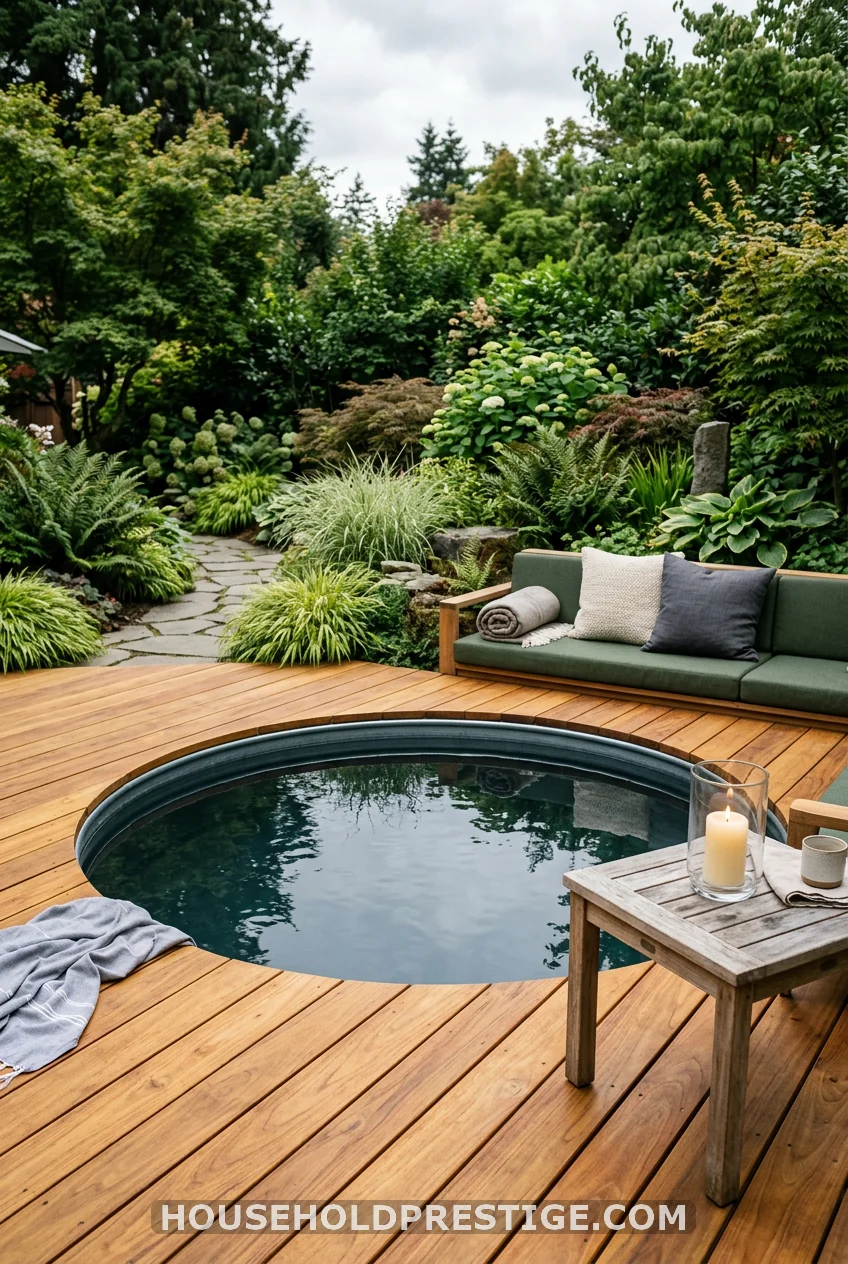
Garapa is a South American hardwood — dense, golden, naturally resistant to moisture and rot — and it’s the material behind the most polished stock tank pool setups you’ll see. Harvey House’s famous flush-mount setup used garapa specifically because of how its color sits against both the silver tank and green surroundings.
Flush-mounting requires one key step beyond the standard deck build: you frame the deck slightly lower than the tank rim — by about 1/2 inch — so the decking surface meets the outside of the tank wall at the water line. Water that splashes onto the deck drains away through the board gaps rather than pooling against the tank.
Garapa decking costs more than pressure-treated pine: expect $3.50–$4.50 per linear foot versus $1.50–$2.50 for PT. For a 14’x14′ deck, budget an additional $350–$500 over the basic deck cost. Worth it if you’re planning to keep the setup for 5+ years.
With a propane heater added (see idea #4), this becomes a legitimate year-round backyard feature — not a summer accessory.
16. The Elevated Deck with Matching Loungers (“Swim Club” Aesthetic)
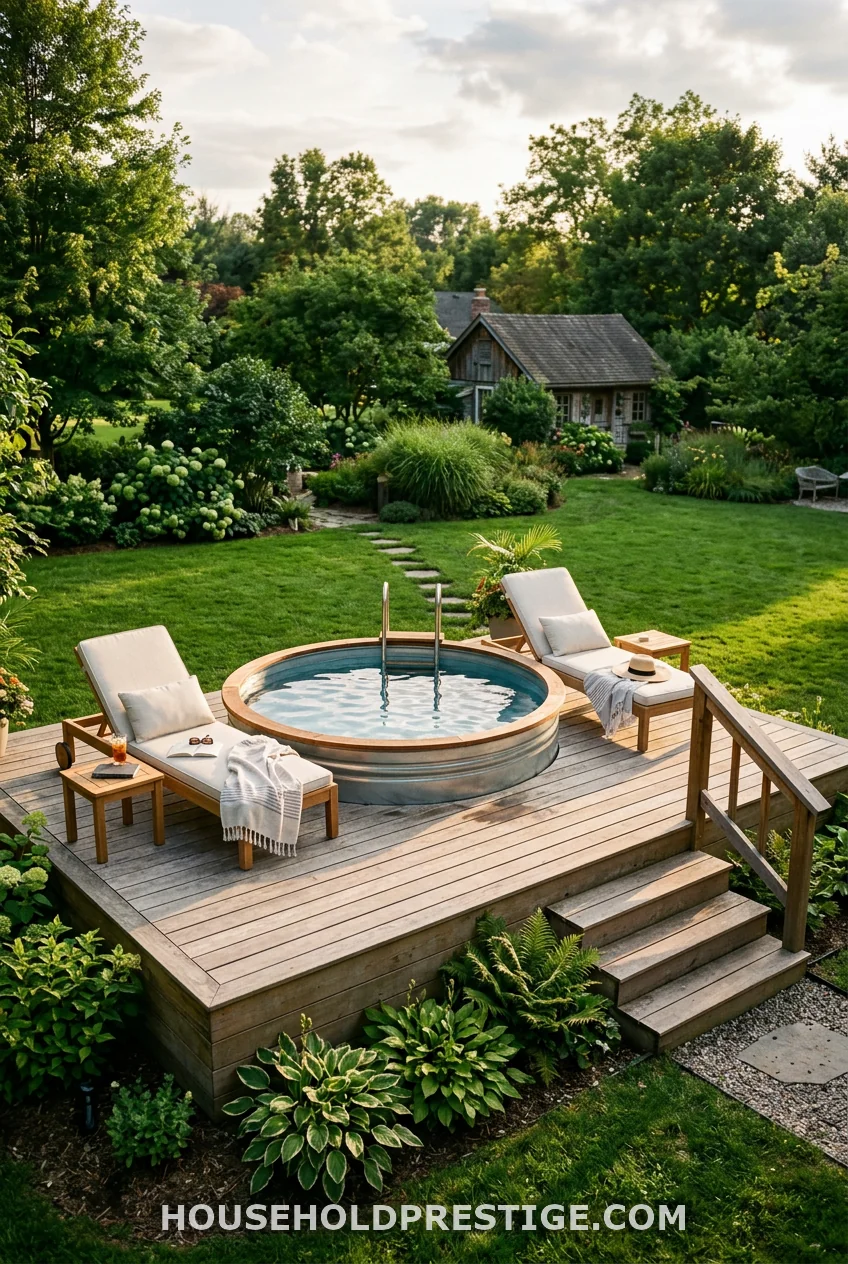
The Stoneway Swim Club — a backyard setup that circulated heavily on Instagram — made one counterintuitive move: instead of lowering the tank to ground level or flush-mounting it in a deck, they elevated the entire platform 18 inches off the ground. The pool sits higher than the yard. The result looks less like a DIY project and more like something a mid-range resort would charge you $40 a day to access.
The elevated approach works because of perception: things that sit up on a platform read as intentional and designed. Ground-level setups read as placed. That 18 inches of elevation changes how the entire setup registers visually.
Here’s how to build it.
Why the Elevation Works
When your pool platform sits above grade, you get three practical benefits along with the aesthetic one. First, drainage is trivial — water runs off in every direction with no pooling risk. Second, you can route the pump electrical cord and hose connections cleanly beneath the platform rather than running them along the ground. Third, leveling is much easier because you’re setting posts to a consistent height rather than fighting uneven terrain.
The only real trade-off is that entry requires steps, which adds cost and complexity.
Dimensions
For an 8′ round tank, a 16’x16′ elevated platform gives you room for two full-size loungers (standard dimensions: 72″x24″) on either side of the pool with 12 inches of clearance. That’s your comfort minimum — go narrower, and you’re squeezing in and out constantly.
Platform height of 16–18 inches requires a single step up, which keeps it accessible without needing a railing (check your local code — most jurisdictions don’t require railings under 30 inches, but verify before building).
Materials and Costs (8′ tank, 16’x16′ elevated platform)
| Item | Spec | Approximate Cost |
|---|---|---|
| 8′ round tank | Hastings Brand, Tractor Supply | $349–$420 |
| Concrete tube forms + bags | 12 footings | $80–$100 |
| Pressure-treated 6×6 posts | 12 posts, 24″ above grade | $90–$120 |
| Pressure-treated 2×10 joists | 28 pieces, 16′ | $280–$340 |
| Cedar 5/4×6 decking | 220 linear feet | $350–$440 |
| Stair stringers + tread kit | Single-step entry, both sides | $80–$110 |
| Carriage bolts + joist hangers | — | $55–$75 |
| Matching teak loungers | Set of 2, Threshold brand or similar | $160–$280 |
| Intex pump + fittings | Model 28635EG | $89–$109 |
| Total | $1,533–$1,994 |
Step-by-Step Build
Step 1 — Lay out your 16×16 footprint. Use batter boards and string lines to establish perfectly square corners. Measure diagonals — they should match within 1/4 inch. Slightly off-square platforms are the #1 frustration in elevated deck builds.
Step 2 — Dig and pour 12 footings. Place footings at corners, midpoints, and at the 4 points that will support the heaviest load — the area directly beneath the tank. Footings should extend 6 inches below your local frost line. In moderate climates, that’s 12–18 inches down; in freeze-thaw zones, go 30–36 inches.
Step 3 — Set and level your 6×6 posts. Cut all posts to equal above-grade height (16″–18″) using a miter saw. Verify level in both directions with a 4-foot level before any framing.
Step 4 — Install your 2×10 joist frame. The inner frame carrying the tank needs double-joist headers where the tank rim will rest. That’s where the load concentrates. Use joist hanger hardware at every connection — no toe-nailing.
Step 5 — Position the tank before decking. Lower the empty tank into position and confirm the rim clearance matches your planned decking height. Adjust post heights if needed — it’s much easier now than after boards are down.
Step 6 — Drill pump fittings. Use a 1.5″ hole saw on the tank wall, 4–6″ above the platform framing. Route the pump hose beneath the platform to a protected outlet. Use a GFCI outdoor outlet — extension cords are not appropriate here.
Step 7 — Lay cedar decking. Run boards in a consistent direction, gapping 1/8 inch. Screw-fasten with stainless deck screws (3-inch coated) to avoid rust bleeding through the cedar within a season. Trim boards to within 1/2 inch of the tank exterior using a jigsaw.
Step 8 — Build entry steps on two sides. Cut your stair stringer to a single 18-inch rise. Add a 12-inch-deep tread using matching cedar boards. Sand tread edges smooth.
Step 9 — Position loungers and fill. Place loungers to face the direction with the best sightline — afternoon sun, a garden feature, or privacy from neighbors. Fill the tank slowly (fast fill can shift the platform on freshly set footings). Run the pump immediately and add chlorine.
Common Mistakes
- Using 4×4 posts instead of 6×6 — this load needs the larger dimension
- Skipping the double joist headers beneath the tank — an engineer would wince at single-joist loading here
- Placing the electrical outlet directly under the platform without weatherproofing — moisture accumulates in enclosed platform cavities
- Forgetting to account for the pump cord length — 25 feet is standard, but if your outlet is farther, you need a proper outdoor junction box, not a household extension cord
17. Ring It with Solar Stake Lights for Night Swims
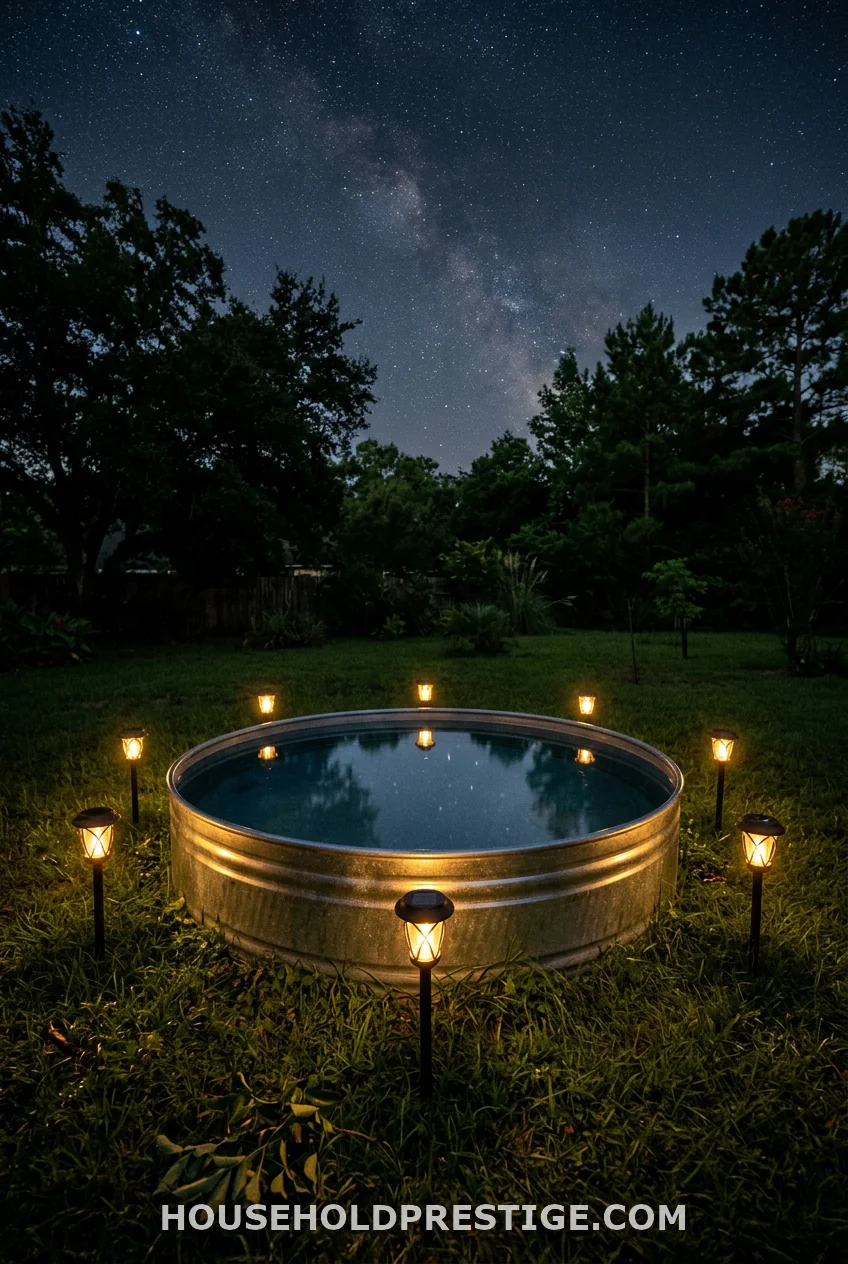
Eight solar stake lights. Two feet back from the tank edge. Spaced evenly. Zero wiring.
GIGALUMI or Aootek solar path lights (about $3–$5 each) last 6–8 hours per night and turn on automatically at dusk. The ring effect is genuinely striking from above and from inside the pool. Add two solar floating pool lights inside the tank and night swimming becomes something you actually plan around.
18. DIY Tile Hack: Mosaic the Exterior for $40
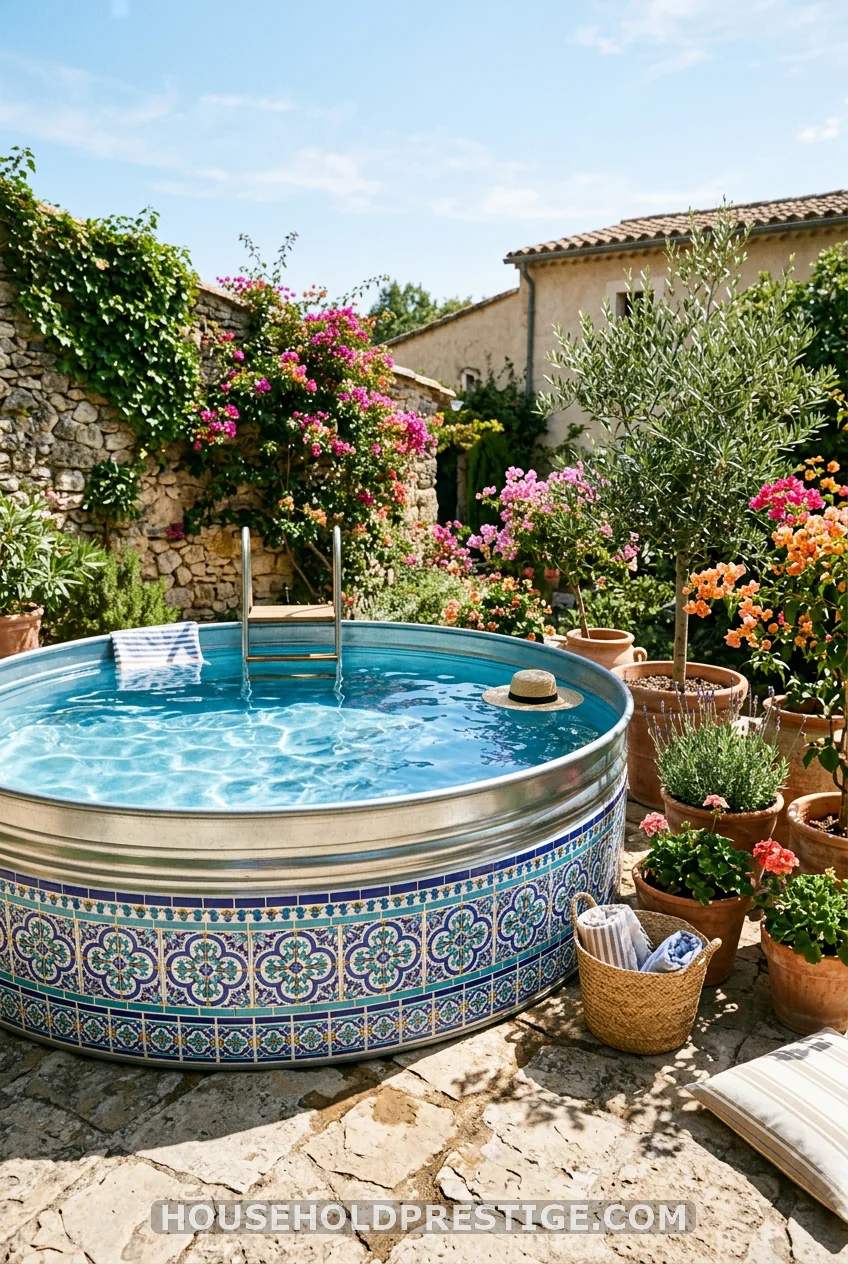
This one blew up on Pinterest as “DIY Tile Hack to Upgrade Your Stock Tank Pool Setup” — 5,237 saves in the dataset — and the results look genuinely expensive.
Pick up a box of self-adhesive mosaic tile sheets from any tile supply shop (or Amazon — Tic Tac Tiles peel-and-stick run $15–$20 per sheet). Clean the tank exterior with rubbing alcohol, dry completely, and apply the tile sheets to the lower 8–10 inches of the exterior wall. Press firmly along every edge.
The reality: peel-and-stick tile was not designed for outdoor environments. In direct sun and rain, adhesive fails within 1–2 seasons. Use construction adhesive (Loctite Power Grab) instead of relying on the tile’s backing, and seal the finished exterior with an exterior tile sealer ($12–$18). That buys you 3–4 seasons of the look.
19. Concrete Pavers + Gravel Base: No Grass Required
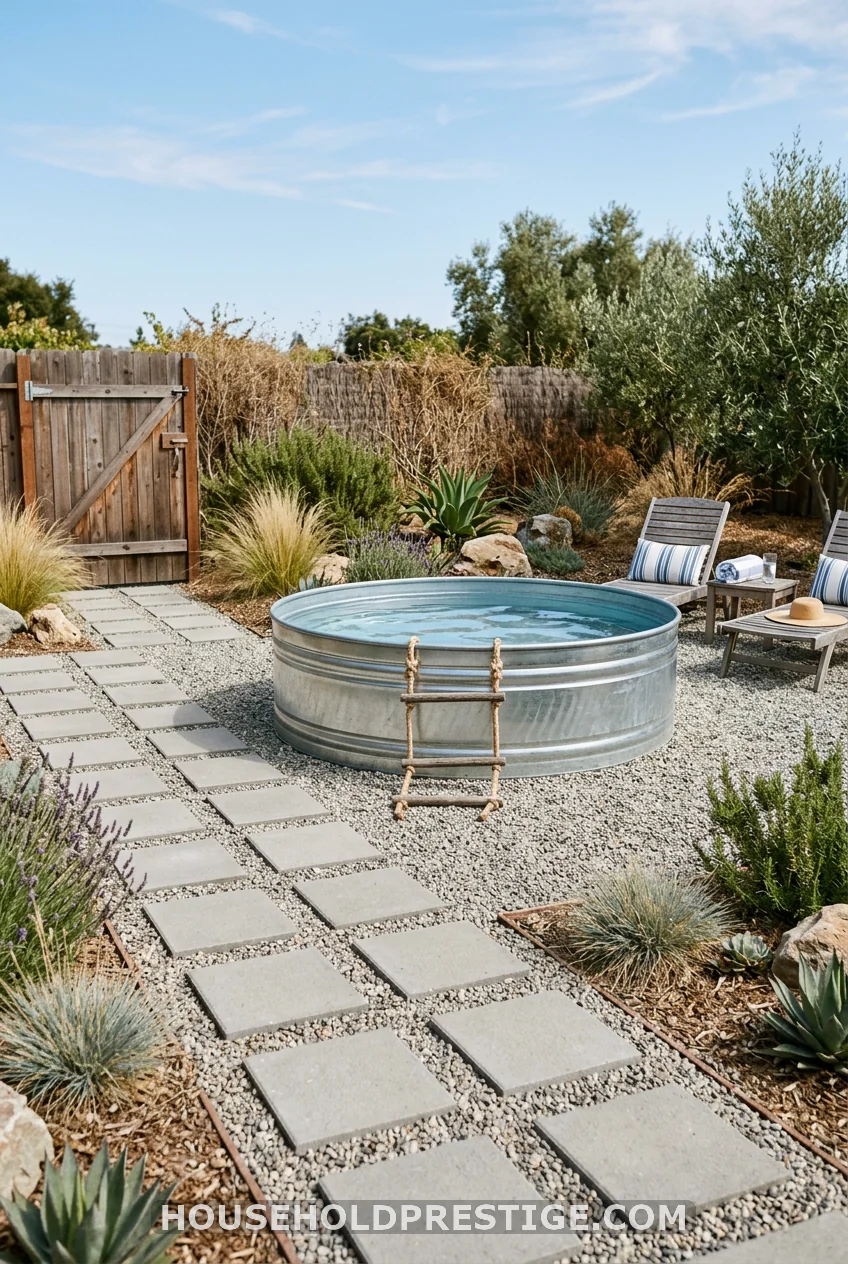
Willa DiTaranto’s setup solved a problem most pool guides ignore: what do you do when you have no grass, no patio, and no obvious flat surface?
Her answer: a compact gravel pad as the base (level it with a rake and a tamper), then concrete paver stepping stones laid in rows from the gate to the pool. The aesthetic reads as intentional hardscaping, not improvisation.
A 10×10 area of crushed limestone gravel (2–3 inches deep) costs $80–$120 delivered. Twelve 16×16 concrete stepping pavers at $3–$5 each add another $36–$60. For under $200, you have a dry, level pool surround that works in any soil type.
20. The “Cocktail Pool” Setup: Floating Tray, Snack Board, and a Good Book
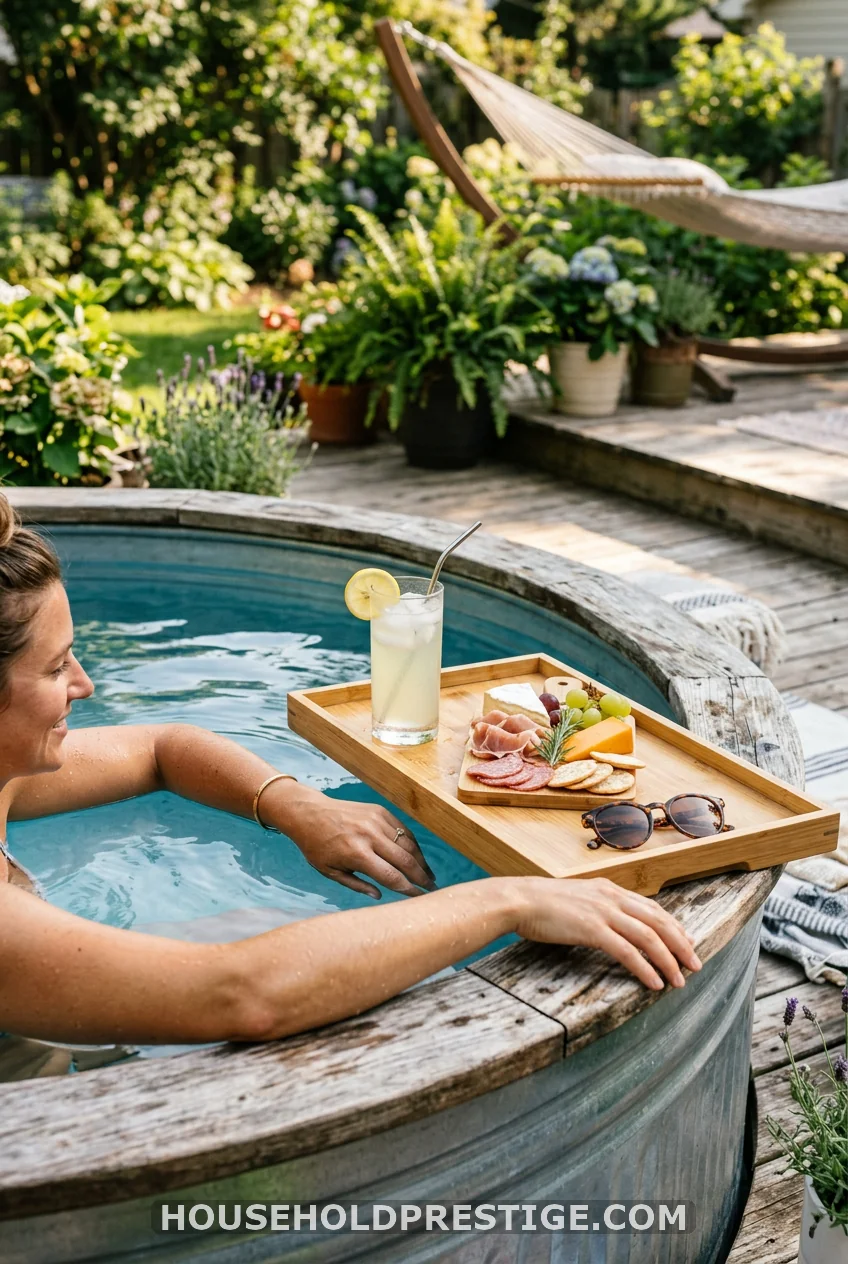
The cocktail pool concept has nothing to do with the tank itself — it’s a use pattern. Fill the tank, add a floating bamboo tray that rests across the rim diameter (search “bathtub caddy tray” — they fit 8′ tanks perfectly with the extendable sides fully open, around $25–$45), load it with a drink, a snack board, and whatever you’re reading, and call it a Saturday.
This is the setup that performs well for Airbnb hosts — low cost, high photography value, and it communicates a lifestyle rather than a DIY project.
21. The Myth You Should Stop Believing: Painting the Interior
Every summer, someone sees a pink or turquoise stock tank pool on Pinterest and decides they need that. They buy a can of Rust-Oleum, skip the prep work, and paint the interior.
What most people think: Paint sticks to metal. Metal is just a surface. How hard can it be?
What actually happens: Galvanized steel has a zinc coating specifically engineered to resist bonding with paint. Without a proper surface etch (muriatic acid wash, then self-etching primer, then actual pool-rated paint), any topcoat you apply will peel and flake within 4–8 weeks of water contact. Those flakes end up in your pump filter — and in the water you’re swimming in.
The one exception: Pond Shield epoxy ($65–$85 per kit, covers about 8–12 sq. ft. at 10 mil thickness) is formulated for continuous water immersion and bonds to metal when properly prepped. Multiple stock tank pool communities report 3–5 seasons of adherence when applied correctly. It comes in Pebble Tec-style aggregate colors that look genuinely upscale. The prep process is still significant: 60-grit sand the entire interior, clean with acetone, apply in two coats with 24-hour cure between each.
If you want color, paint the exterior. Use Pond Shield if you want interior color and are committed to doing it right. Don’t use anything else.
Conclusion
You don’t need a big yard, a contractor, or a $40,000 budget to have a pool you actually use every day in summer. An 8′ Hastings tank from Tractor Supply, an Intex 1500-gallon pump, and a Saturday afternoon are your entry point. Everything else on this list is optional — and all of it can be added incrementally as your budget and ambition grow.
Start simple. The raw galvanized look with a good float and some string lights is genuinely beautiful, and it beats a $3,000 inflatable pool by every metric that matters. Then add a deck, a tarp shade structure, and some stake lights. Convert it to a hot tub when October arrives.
The best stock tank pool is the one you actually build — not the one you keep saving on Pinterest.
Frequently Asked Questions
How much does a stock tank pool cost to set up?
A basic swim-ready stock tank pool — 8-foot round tank plus a filter pump — runs $450–$550. An 8-foot Hastings or Behlen galvanized tank from Tractor Supply or a local farm supply store costs $349–$420, and an Intex 1500-gallon above-ground pool pump (model 28635EG) runs $89–$109 on Amazon. You’ll also want chlorine tablets ($12 for a 3-pound tub) and a basic pool test strip kit ($8–$12). Add a simple deck surround and you’re looking at $1,200–$1,500 all-in.
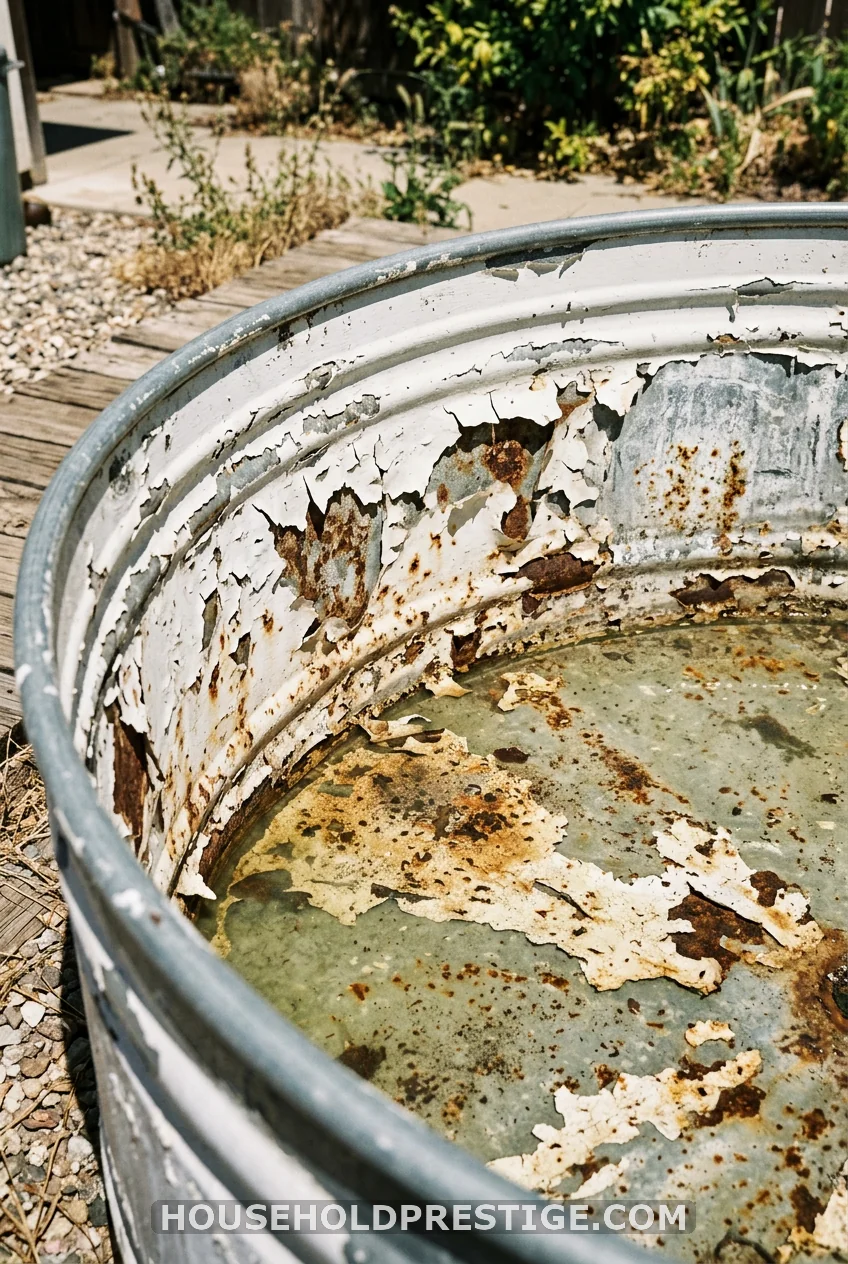
Do stock tank pools rust?
Eventually, yes — but most owners report 5–10 seasons before rust becomes a real problem. All galvanized tanks are coated with zinc, which provides corrosion resistance in normal conditions. The main rust accelerators are: chlorine levels too high or pH too low (keep pH between 7.2 and 7.6), contact with soil (avoid direct burial), and shock treatments on galvanized steel. Stick with 1-inch Clorox chlorine tablets in a floating dispenser rather than granular shock, and you’ll slow corrosion significantly.
What size stock tank is best for a family?
The 8-foot round tank is the most popular for families — it holds approximately 1,100 gallons and comfortably fits two adults and two children. The 6-foot round (about 700 gallons) works well for couples or small families. Oval tanks are narrower and suit one or two people lounging lengthwise. Most stock tanks are a standard 2 feet deep regardless of diameter.
How do you keep a stock tank pool water clean?
Three things: a filter pump, chlorine tablets, and a skimmer net. Run the pump a minimum of 4 hours daily (6–8 hours if kids are using it frequently). Place one or two 1-inch Clorox chlorine tablets in a floating dispenser and replace weekly. Use a skimmer net every day or two to remove leaves, insects, and debris before they break down and cloud the water. Test pH once a week with pool test strips and adjust with pH Up or pH Down as needed.
Can a stock tank pool be used in winter?
Yes, with a propane heater. A Camplux 5L outdoor propane water heater (roughly $85–$110) connected to a small submersible circulation pump can heat an 8′ tank to hot-tub temperatures — around 100–104°F — in 4–6 hours. A solar pool cover (cut to fit the tank’s diameter) keeps the heat in between uses. In climates that drop below freezing, drain the tank and remove the pump in winter to prevent freeze damage, or keep the heater running continuously.