

You bought the pool. You set it up. And now it’s just… sitting there. A big blue cylinder surrounded by patchy grass and that slightly awkward look of something that doesn’t quite belong yet.
The good news? DIY above ground pool landscaping doesn’t require a contractor, a huge budget, or any special skills. Most of these ideas cost under $200 and a free weekend. A few of them take less than an afternoon. What they all do is make your pool look like it was always meant to be there — like it grew up out of your backyard instead of arriving on a flatbed truck.
I’ve pulled together 17 ideas that range from dirt-cheap quick wins to one full deep-dive build you can follow start to finish. Whether your yard is tiny, sloped, or a blank slate, there’s something here for you.
1. The Gravel Ring — Cheapest Fix That Makes the Biggest Visual Difference
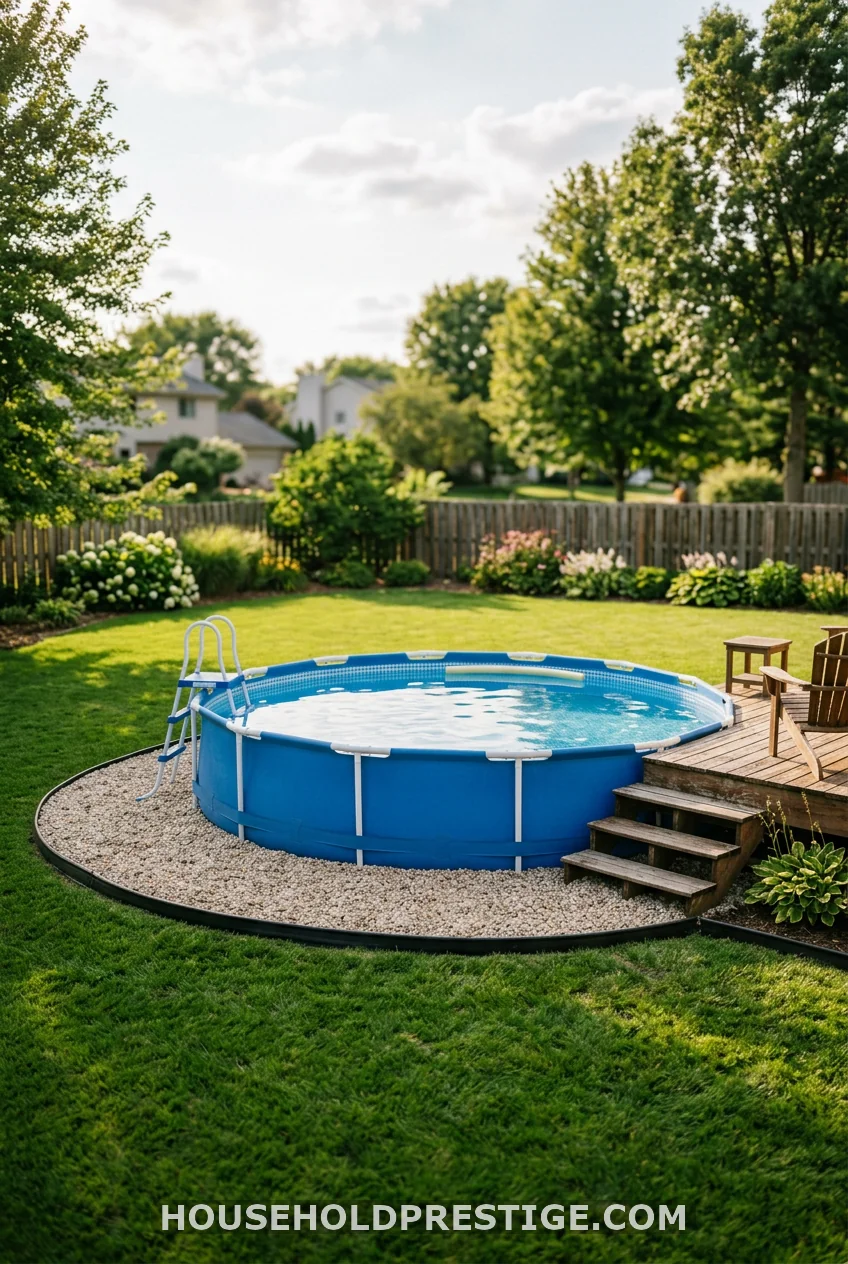
Skip the grass right next to your pool. Just skip it. Grass gets muddy, your mower nicks the pool wall, and wet footprints become a slip hazard in seconds. Lay a 3-foot-wide ring of pea gravel or decomposed granite around the entire pool base instead. Add a plastic landscape border to keep it crisp. Total cost: $40–80. It takes two hours. Your pool will look intentional the same afternoon you install it.
2. Wood Cladding the Pool Wall — The Full DIY That Makes an Above-Ground Pool Look In-Ground
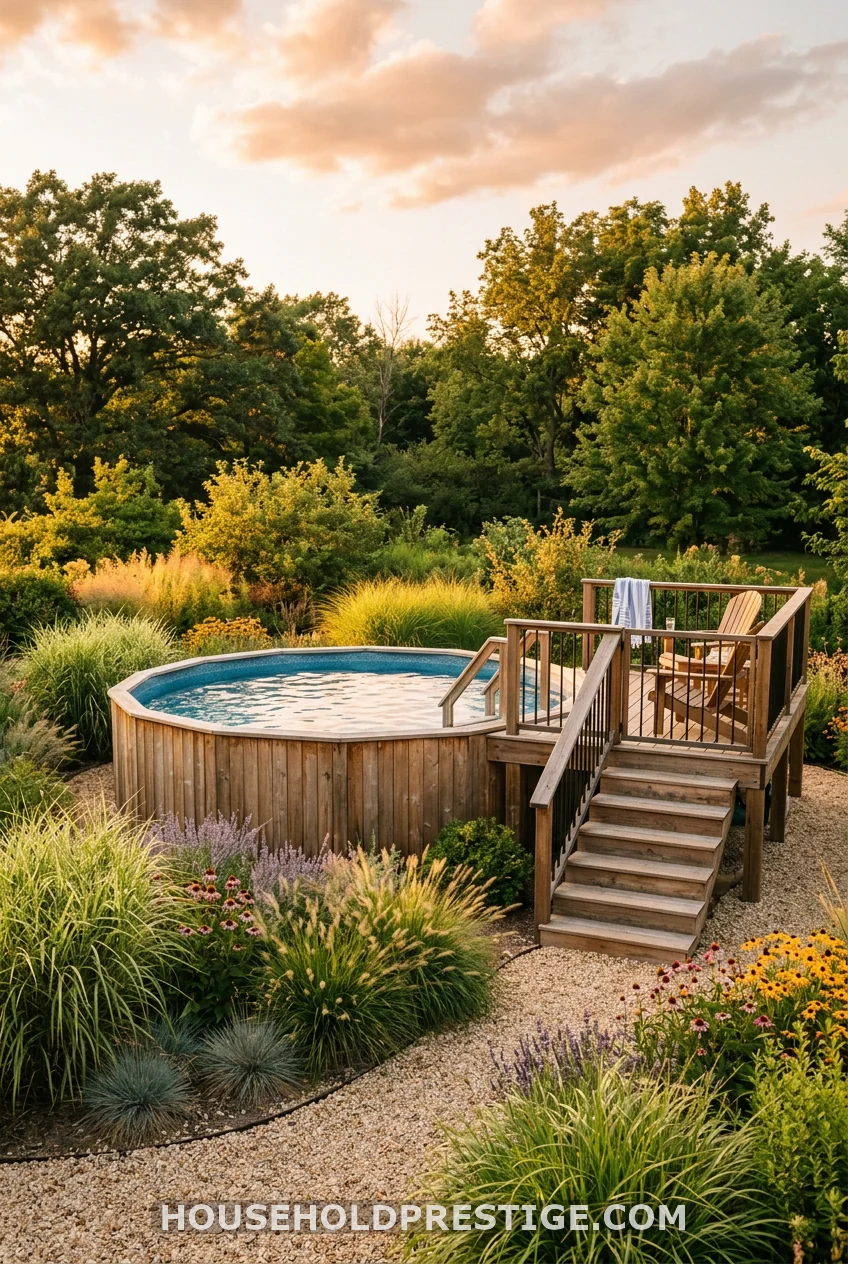
This is the one that gets the “wait, is that an in-ground pool?” reaction from every guest. Wrapping your pool’s exterior wall in wood planks is the highest-impact landscaping upgrade you can do — and it’s DIY-able over a weekend.
Why It Works
Most above-ground pools have an exposed metal or resin wall that screams “temporary.” Wood cladding covers that wall completely, creating a visual base that grounds the pool in the yard. When you add plantings against it, the pool reads as a permanent structure — not a seasonal purchase.
Best Wood Options and What They Cost
- Pressure-treated pine: Most affordable at $1.50–2.50 per linear foot. Resists rot and insect damage. Needs annual sealing. Looks great stained dark brown or gray.
- Cedar: $3–5 per linear foot. Naturally rot-resistant and weathers beautifully to silver-gray without treatment. Worth the upgrade if you’re keeping the pool long-term.
- Composite (Trex or TimberTech): $5–8 per linear foot. Won’t warp, splinter, or need sealing. Most expensive upfront but basically zero maintenance. TimberTech’s “Tigerwood” and “Antique Palm” profiles look stunning against water.
For a 15-foot round pool, expect to use approximately 47 linear feet of planking plus 10–15% waste factor. Budget $150–400 depending on wood choice.
Materials You Need
- Wood planks or composite decking boards (measured to your pool’s circumference + waste)
- Pressure-treated 2×4 frame lumber (for mounting)
- Exterior wood screws (stainless, 2.5-inch)
- Circular saw or miter saw
- Drill
- Level
- Exterior wood stain or sealant (for natural wood)
- Metal post brackets (for ground-mounting the frame)
Step-by-Step Instructions
Step 1 — Measure your pool’s circumference. Use the formula: circumference = π × diameter. For a 15-foot pool, that’s about 47 feet. For an 18-foot pool, about 56 feet. This tells you how much lumber to buy.
Step 2 — Build your horizontal frame. Cut 2×4 pressure-treated lumber into sections that span between the pool’s existing upright posts (usually 4–6 feet apart). You’ll attach two horizontal rails per span: one near the top of the pool wall, one near the bottom. This creates the framework your cladding will screw into.
Step 3 — Attach the frame to the pool posts. Use metal post brackets and exterior screws to mount each horizontal 2×4 directly to the pool’s structural uprights. Do NOT attach anything to the pool’s flexible wall panel — only to the rigid posts.
Step 4 — Cut and attach the cladding boards. Cut boards to height (measure from ground to top of pool wall, minus 2 inches for clearance). Screw each board vertically into the horizontal rails. Keep a 1/4-inch gap between boards for drainage and expansion. Work around the pool in sections.
Step 5 — Address the pool’s skimmer and return fittings. Mark and cut notches in the boards that land near your skimmer, return valve, and any electrical connections. Use a jigsaw for clean cutouts. These areas need to stay fully accessible.
Step 6 — Seal or stain (for natural wood). Apply two coats of exterior deck stain or water-repellent sealant before the wood gets wet. Dark walnut stain makes pine look like cedar. Gray weathering stain creates a modern, Hamptons-style look.
Pro Move
Add a 2-foot cap rail along the top of the cladding using a wider board (a 2×6 works perfectly). This creates a built-in ledge for drinks, towels, sunscreen, and potted plants. It also hides the pool’s top rail and finishes the whole thing cleanly.
Common Mistakes to Avoid
- Attaching to the pool wall panel: The metal or resin panel flexes and expands. Screwing into it will cause warping and voids your pool warranty.
- Skipping the gap between boards: Tight boards trap moisture and warp within one season. The gap is not optional.
- Using untreated pine at ground contact: Any board touching soil or wet ground needs to be rated for ground contact (pressure-treated, Grade 2 or better). Regular lumber rots in 1–2 seasons.
- Forgetting the access panel: You’ll need to winterize your pool, service the pump, and drain it eventually. Build one 18-inch-wide removable panel near the skimmer. Use hidden fasteners or a latch so it’s clean-looking but functional.
Cost Reality
| Item | Budget Option | Mid-Range |
|---|---|---|
| Cladding lumber (15-ft pool) | $110 (pine) | $280 (cedar) |
| Frame lumber | $45 | $45 |
| Screws + hardware | $25 | $35 |
| Stain/sealant | $30 | $50 |
| Cap rail | $20 | $40 |
| Total | ~$230 | ~$450 |
3. Layered Plant Border — How to Make Your Pool Look Like It Grew There
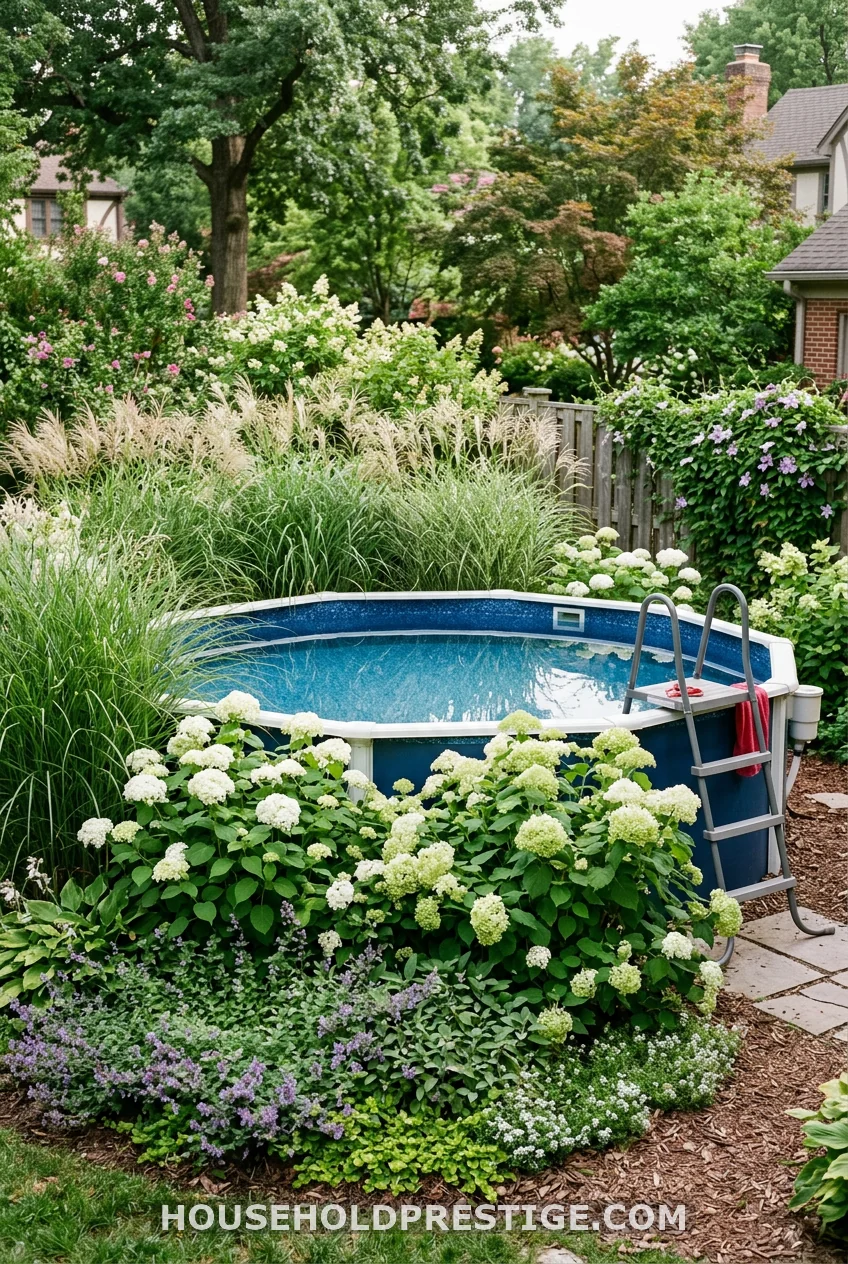
The trick professional landscapers use is layering: tall at the back, medium in the middle, low at the front. It mimics how plants naturally grow in the wild and makes everything look intentional.
For above-ground pools specifically, you want plants that can handle occasional water splash and chlorine drift without dying. Good options by layer:
Back row (3–5 feet tall): Ornamental grasses like Karl Foerster feather reed grass, arborvitae, or bamboo (in a root-barrier pot). These provide privacy and year-round structure.
Middle row (18–36 inches): Hydrangeas, knockout roses, or daylilies. Fast-growing, colorful, and tolerant of moist conditions. Hydrangeas in particular look striking against a wood-clad pool.
Front row (under 12 inches): Creeping thyme, stonecrop sedum, or mondo grass. These spill over the gravel edge and soften the hard line between ground and pool.
Plant in fall or early spring when root establishment is easiest. Space your back-row plants 2–3 feet apart — they’ll fill in within one season. Mulch the bed with 3 inches of dark hardwood mulch to retain moisture and keep weeds out.
What this costs: A basic planting scheme for a 15-foot pool runs $80–150 at a garden center, less if you divide plants from friends or buy smaller starter plants.
4. Paver Pathway to the Pool
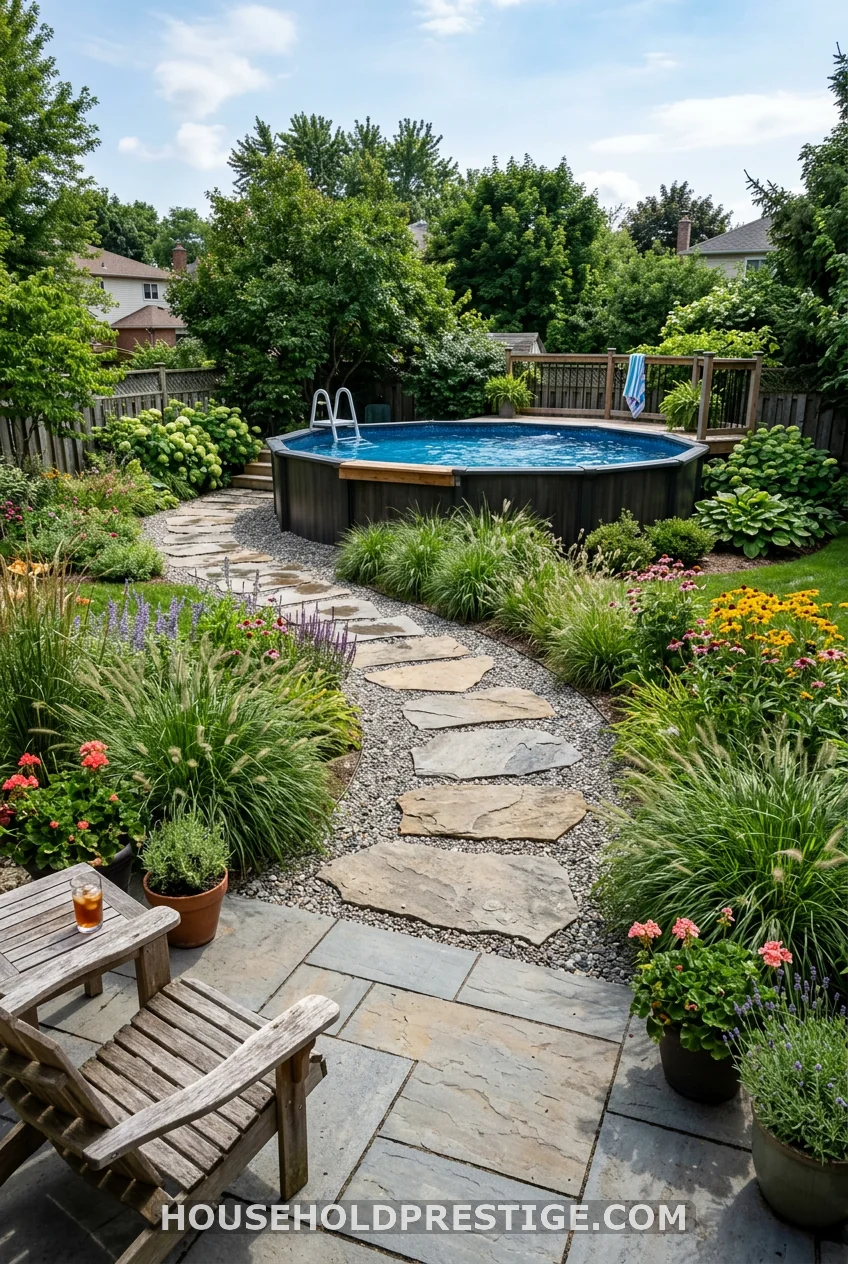
A path from your house to the pool does two things: it stops muddy footprints, and it signals that the pool has a place in your yard’s story. You don’t need a full hardscape contractor. Stepping stones set in a bed of pea gravel take an afternoon.
Large irregular flagstones (18–24 inches across) laid in a slight curve look more natural than a straight line. Set each stone into a 2-inch sand base so they sit flush and don’t rock underfoot. Fill the gaps with gravel or plant low-growing creeping thyme between them for a garden cottage look.
Cost: $60–130 depending on stone type and path length. Flagstone is cheapest at about $0.50–1.50 per pound from a landscape supply yard.
5. Bamboo Privacy Screen — Privacy in One Afternoon
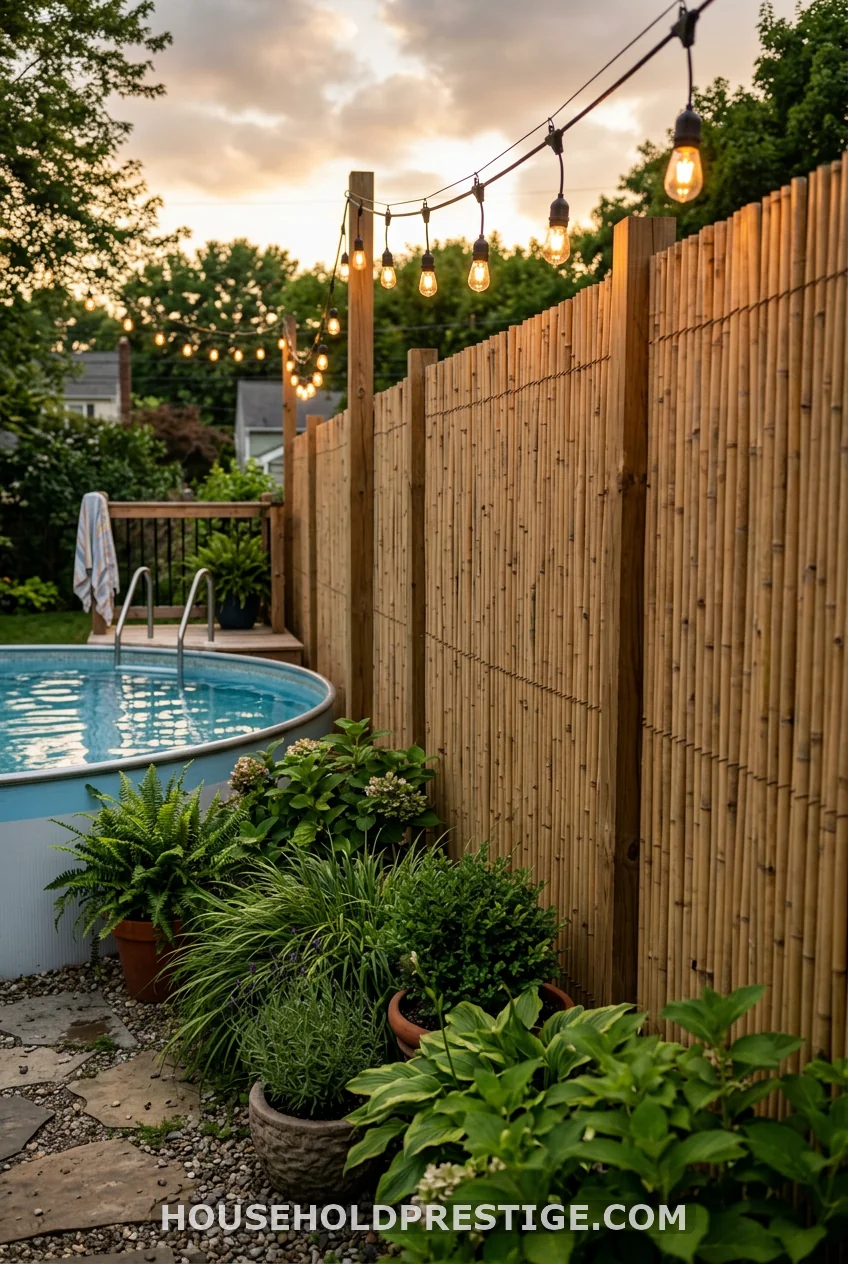
Your neighbors didn’t sign up to watch you float around in a swimsuit all summer. Neither did you sign up to feel watched. A bamboo roll fence is the fastest, cheapest privacy fix available — about $30–60 for an 8-foot-wide, 6-foot-tall panel from any hardware store.
Roll it along the side of your yard that faces neighbors or the street, zip-tie it to existing fence posts or T-posts you drive in yourself, and plant ornamental grasses in front of it for a layered look. It installs in under an hour. The natural texture reads as intentional landscaping rather than a privacy wall, which matters for the overall feel.
For a more permanent version, install a horizontal wood slat fence instead. The same material as your pool cladding, built as a standalone screen — keeps everything visually cohesive.
6. DIY Stone Steps — Because Ladders Are Nobody’s Favorite
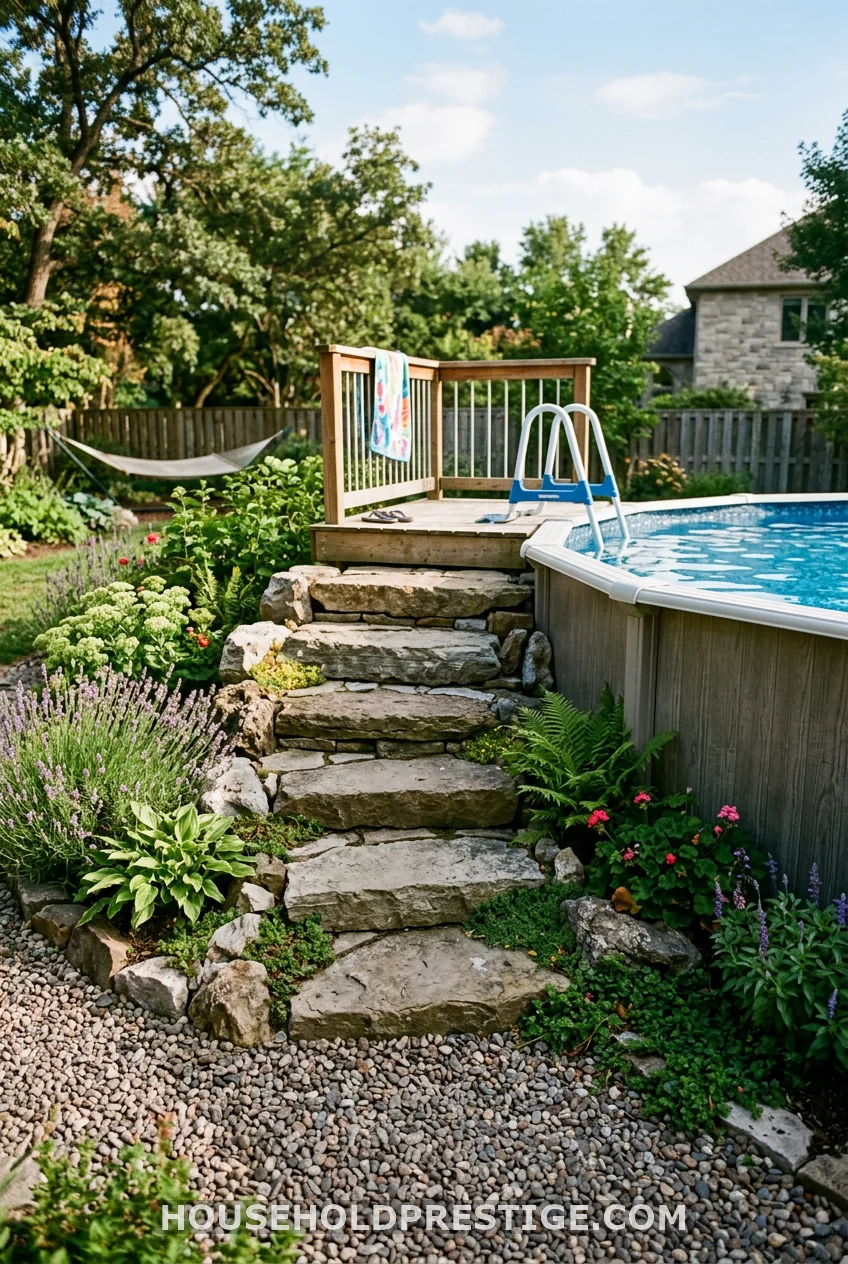
A pool ladder works. Stone steps are better. Wide, solid steps make it easier to carry out towels, help kids and older family members in and out safely, and look like they belong in a resort. You can build a simple set of two or three steps using concrete retaining wall blocks (the stackable landscape blocks from any home improvement store work perfectly) for around $60–90.
Stack the blocks in a staggered pattern for stability, with each step about 12 inches deep and the riser height matching your pool wall height divided by the number of steps. Add a non-slip rubber mat on each step surface. No mortar required for a basic set.
7. Tropical Potted Plants — The Instant Resort Trick
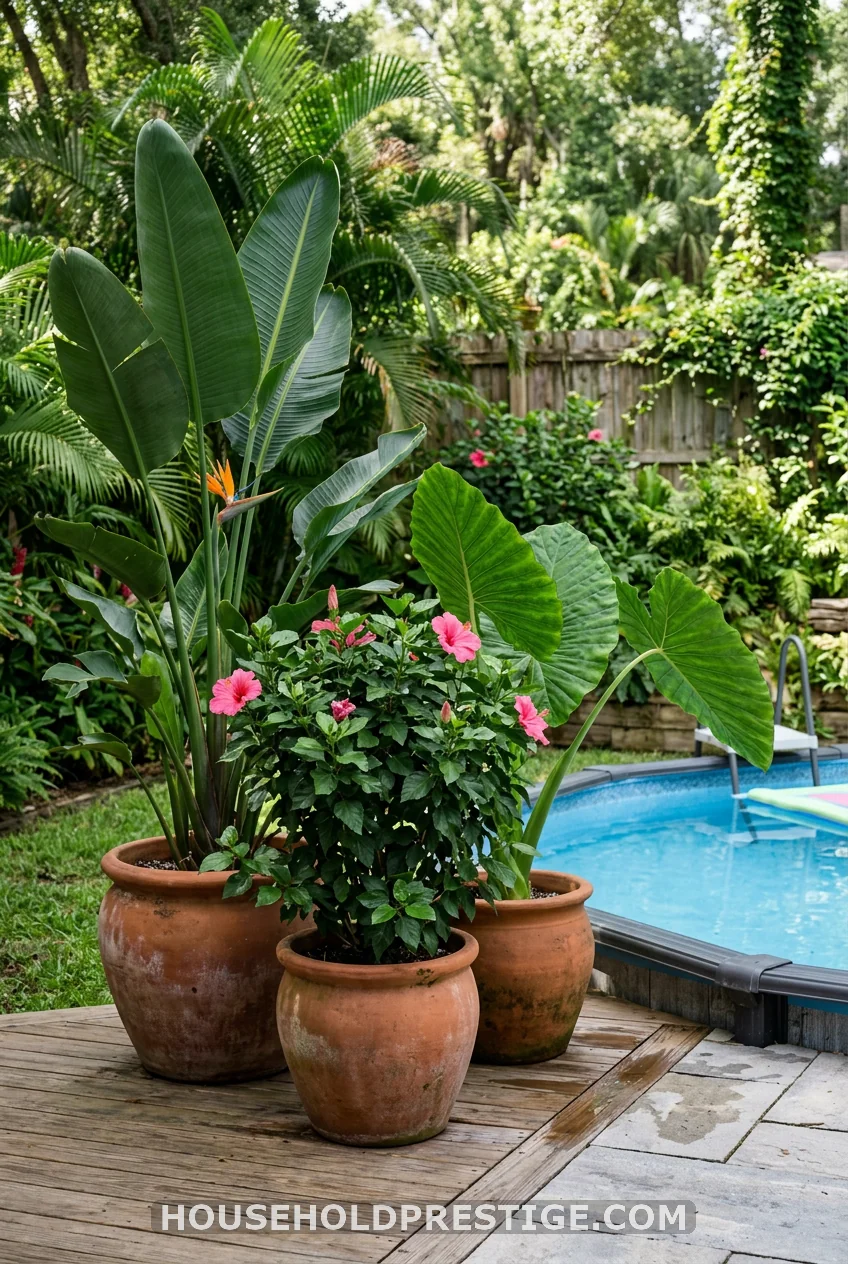
Four pots. Four hours. Done.
Grab a bird of paradise, a canna lily, an elephant ear, and a hibiscus from your local nursery. Put each one in a large pot (14-inch minimum). Cluster two on one side of the pool entrance, two on the other. Instant tropical. The height creates a gateway effect that makes walking to the pool feel like an arrival rather than an afterthought.
Total cost: $80–140 depending on plant sizes. In colder climates, bring them inside in fall — they overwinter beautifully and come back bigger every year.
8. String Light Canopy — Makes the Pool Work After Dark
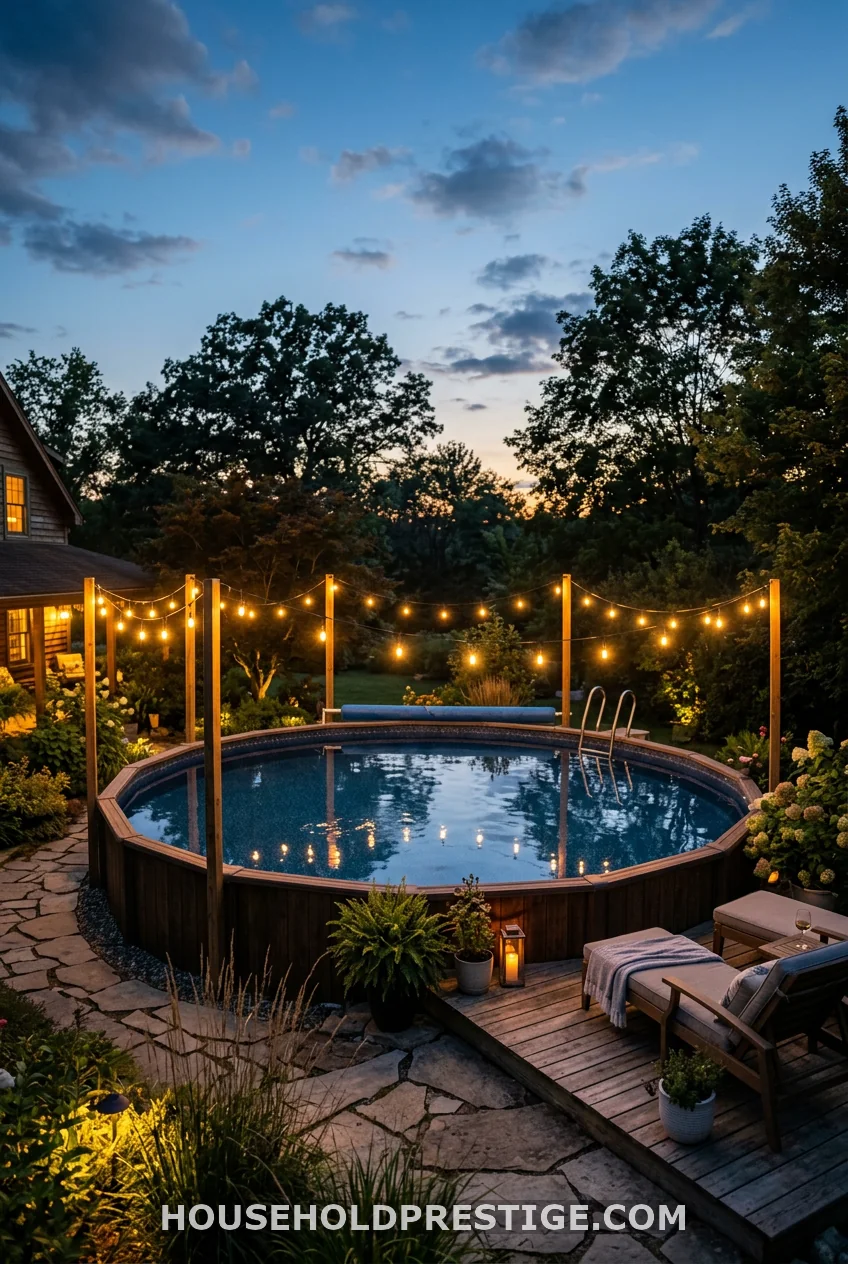
String lights turn a daytime pool into an evening destination. Run them from 8-foot wooden posts anchored in the ground around your pool perimeter — two or four posts is enough. Use outdoor-rated string lights (S14 Edison bulbs look the best, sold in 25-foot or 50-foot strands starting at $18 on Amazon). Connect to an outdoor-rated timer so they come on automatically at sunset.
Cost: $50–80 total. Setup: one afternoon.
9. The Shade Pergola — Because Three Hours in Direct Sun is Enough for Anyone

There’s a reason every hotel pool has a shaded area nearby. Direct sun is great for 45 minutes. After that, everyone retreats — and if there’s nowhere to retreat to, people leave the pool earlier than they would otherwise. A shade structure next to your pool extends how long the space gets used.
A freestanding pergola kit from Costco, Home Depot, or Wayfair runs $300–600 for a 10×10 structure. You anchor it in the ground next to the pool (not over it — you want airflow above the water). Top it with a shade sail, outdoor fabric panels, or let wisteria or clematis vine up the posts over a season or two for a more organic look.
For a DIY build, a basic 4-post pergola using 4×4 cedar posts and 2×6 beams runs about $180–250 in materials. There are solid free plans on family handyman websites — the entire build takes a weekend and two people.
One caveat: If you’re building over or within 18 inches of the pool, check your local code. Most jurisdictions have rules about permanent structures near pools, and some require permits. A freestanding pergola set 3+ feet from the pool edge typically doesn’t trigger permits, but it’s worth a quick call to your city’s building department before you dig footings.
10. Mulch and Flower Bed Combination
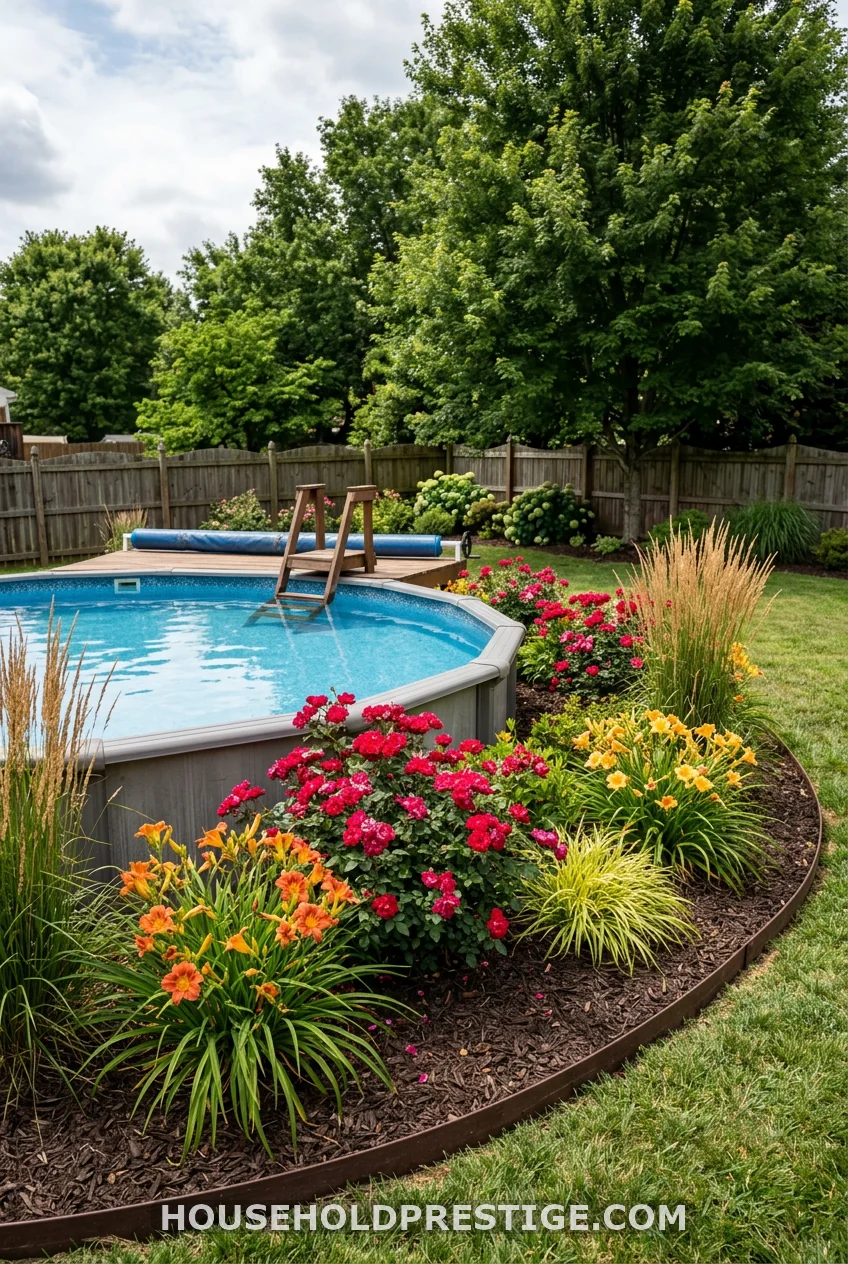
Sometimes the simplest thing looks the best. A defined flower bed with dark mulch and three to four flowering perennial varieties on the sunniest side of your pool creates a real “backyard magazine” moment without requiring anything more technical than a shovel and an afternoon at the garden center.
The key is the mulch color: go dark (dark brown or black mulch, not the reddish-orange kind). Dark mulch makes every plant color pop. It also reads as more intentional and polished against the blue of pool water.
Budget about $50–90 for plants and mulch on a 6-foot section of pool edge. Knockout roses, coneflowers, black-eyed Susans, and daylilies all thrive near pools in most climates and come back every year without replanting.
11. The Myth Everyone Believes: “You Can Just Leave Grass Around the Pool”
What most people think: Grass around an above-ground pool is fine. It’s soft underfoot, looks natural, and saves money on landscaping.
Reality:
Grass is one of the worst things to have directly against your pool for four reasons:
1. Mowing risk. Running a mower within 12 inches of the pool wall is a genuine danger. The discharge chute can throw debris at the wall at high speed, denting it or creating small tears in the liner over time. Most pool manufacturers void structural warranties for damage caused by lawn equipment.
2. Wet soil destabilizes the pool. Grass holds water. The soil under grass near a pool — constantly splashed and shaded — stays wet for extended periods. Saturated soil shifts, and even a half-inch of uneven settling under one side of an above-ground pool puts uneven stress on the frame and can cause catastrophic failures in oval and larger round pools.
3. Grass clippings in the pool. Every mow that happens anywhere near the pool sends clippings into the water. Clippings spike nitrogen levels, feed algae blooms, and clog your filter far faster than normal use.
4. Muddy traffic paths. The path between your door and the pool edge will go from grass to a worn mud strip within one summer. No way around it.
What works: A 2–3 foot perimeter of gravel, mulch, pavers, or decomposed granite around the entire pool base. Grass is fine 3+ feet out — just not up against the wall. This one change alone cuts your pool maintenance work noticeably.
12. Matching Your Hardscape to the Pool’s Exterior
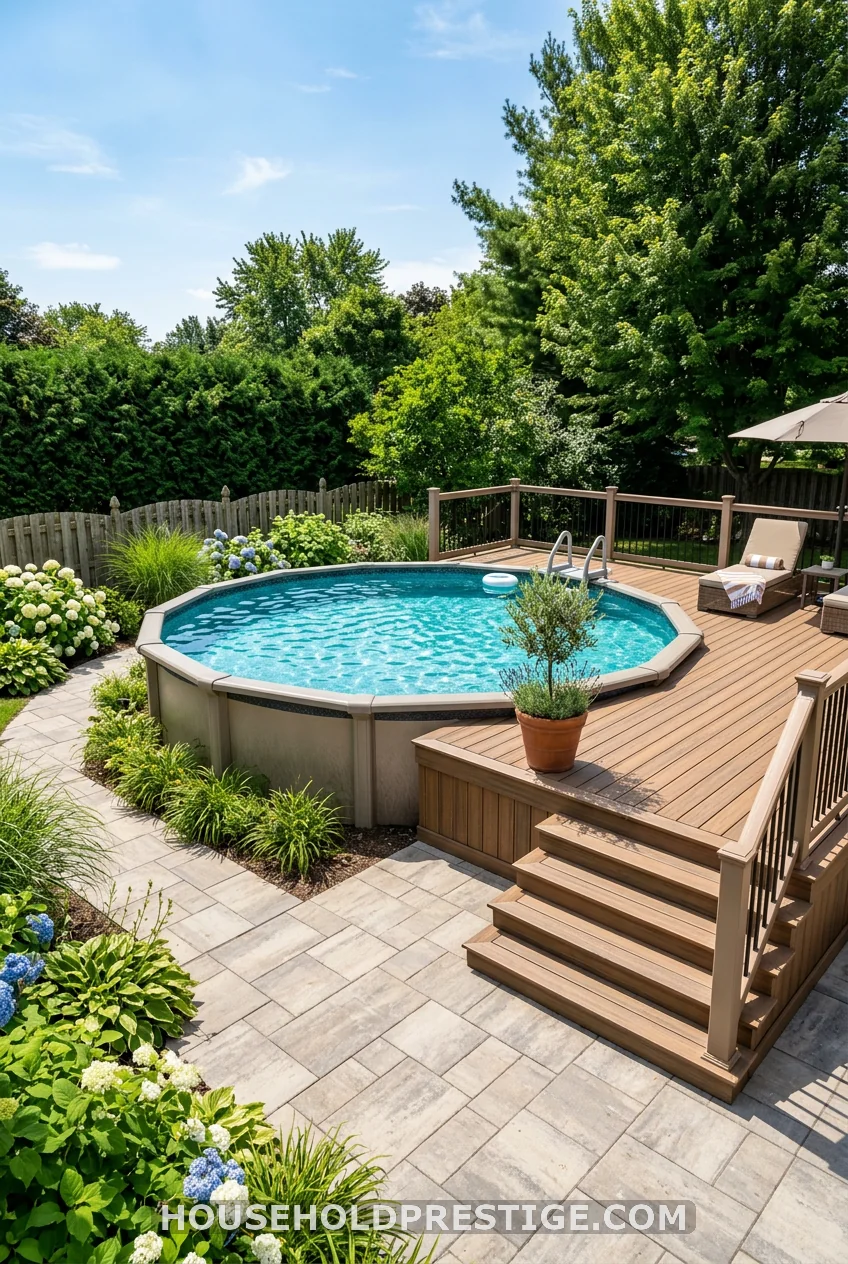
Pools look expensive when everything around them matches. Pools look cheap when every element is a different material and color fighting for attention. This principle costs nothing — it’s just intentional buying.
If your pool has a tan or beige frame, choose sandstone-colored pavers and warm-wood-toned decking. If your pool is dark-framed, go with charcoal pavers and gray-washed composite decking. Take a photo of your pool frame with you when you shop for landscaping materials. Color-matching is the easiest free upgrade in landscaping.
13. Raised Planter Beds Against the Pool Wall
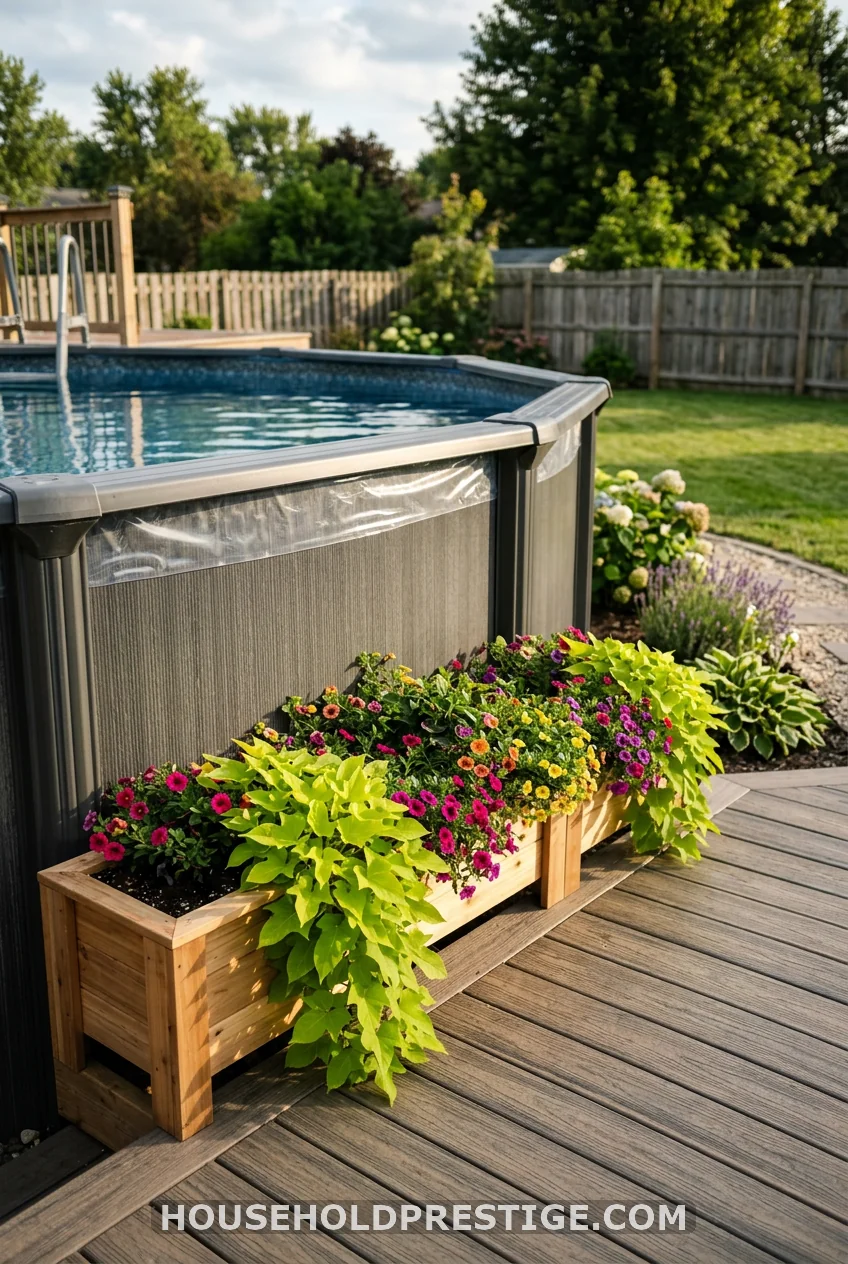
Instead of planting in the ground, build shallow raised planters right against the pool base. A simple 8-inch-tall frame made from the same wood as your pool cladding, filled with potting mix, and planted with trailing annuals (sweet potato vine, trailing petunias, lobelia) creates a lush overflowing look that softens the pool wall beautifully.
The planters drain away from the pool, the roots never touch the pool structure, and you can swap plants each season. Cost: $40–60 in materials per 4-foot section of planter.
14. Fire Pit Lounge Zone
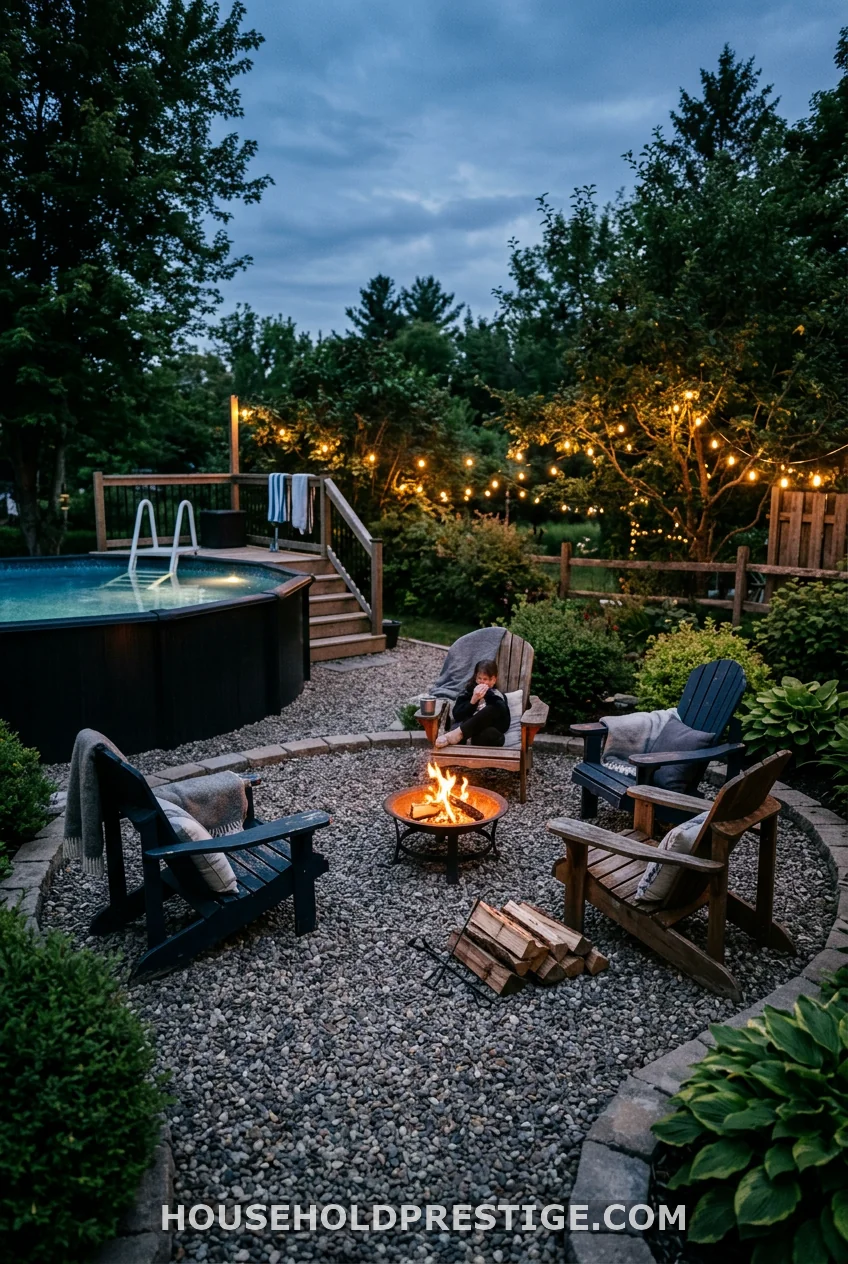
A pool and a fire pit together turn your backyard into a destination that works from June through October instead of just July and August. The fire pit gives people somewhere to be after they get out of the water. It creates the kind of evening ritual that makes people stay for three hours instead of one.
Keep the fire pit at least 10 feet from the pool (NFPA guidelines recommend 10 feet minimum from any structure for portable fire pits). Set it on a level gravel pad, ring it with three or four Adirondack chairs, and you have a complete outdoor room. A basic steel fire pit bowl from Home Depot runs $50–80. Adirondack chairs in HDPE plastic (maintenance-free) start around $60 each.
15. The Concrete Paver Surround — Clean, Permanent, No-Maintenance
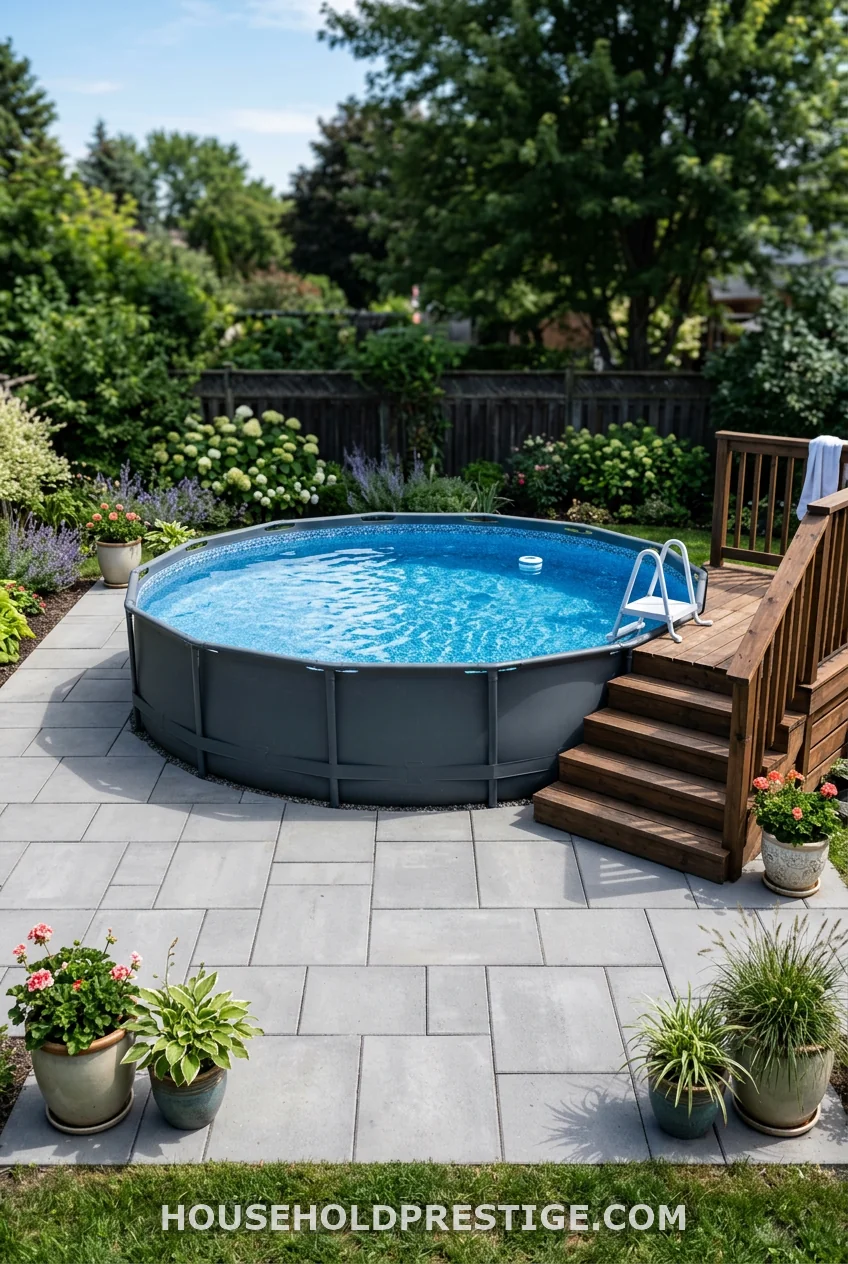
If you want one material that handles all of it — no mud, no gravel migration, no weeds, no mowing — interlocking concrete pavers are the answer. Lay a 4-foot-wide paved surround around the entire pool, and you eliminate every maintenance headache at once.
Interlocking concrete pavers (brands like Belgard, Techo-Bloc, or the basic patio block at any home improvement store) run $2–4 per square foot in materials. A 4-foot surround around a 15-foot round pool uses roughly 200 square feet, so $400–800 in materials. You install them over a compacted gravel base (4 inches) topped with a 1-inch sand screed layer. No mortar needed. Level, tamp, and done.
This is a full-day job for two people, but within DIY range. The result looks completely permanent and requires zero upkeep beyond an occasional weed pulling between joints.
16. Natural Stone Steps with Built-In Planters
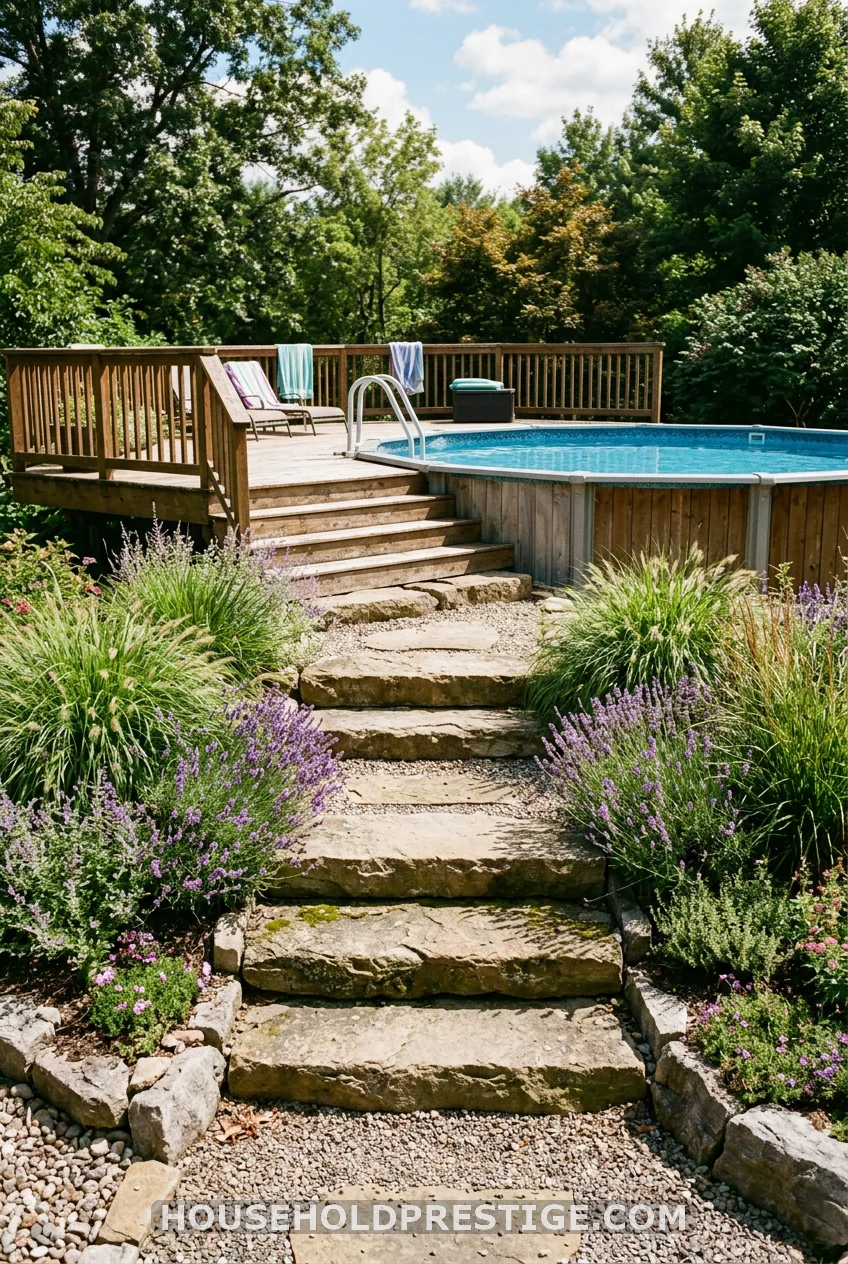
This upgrades the entry experience the same way a nice front door does for a house. Use irregular fieldstone or tumbled bluestone to build 2–3 wide steps up to pool level, with extra-wide risers (18–24 inches wide) that feel generous and safe. On either side of the steps, leave 12-inch-wide planting pockets filled with lavender, ornamental grasses, or dwarf fountain grass.
The plantings soften the stone and make the entry feel like a designed feature rather than a structural necessity. Cost for this entry: $120–200 in stone from a landscape supply yard, planted out over a weekend.
17. The All-In Monochromatic Palette
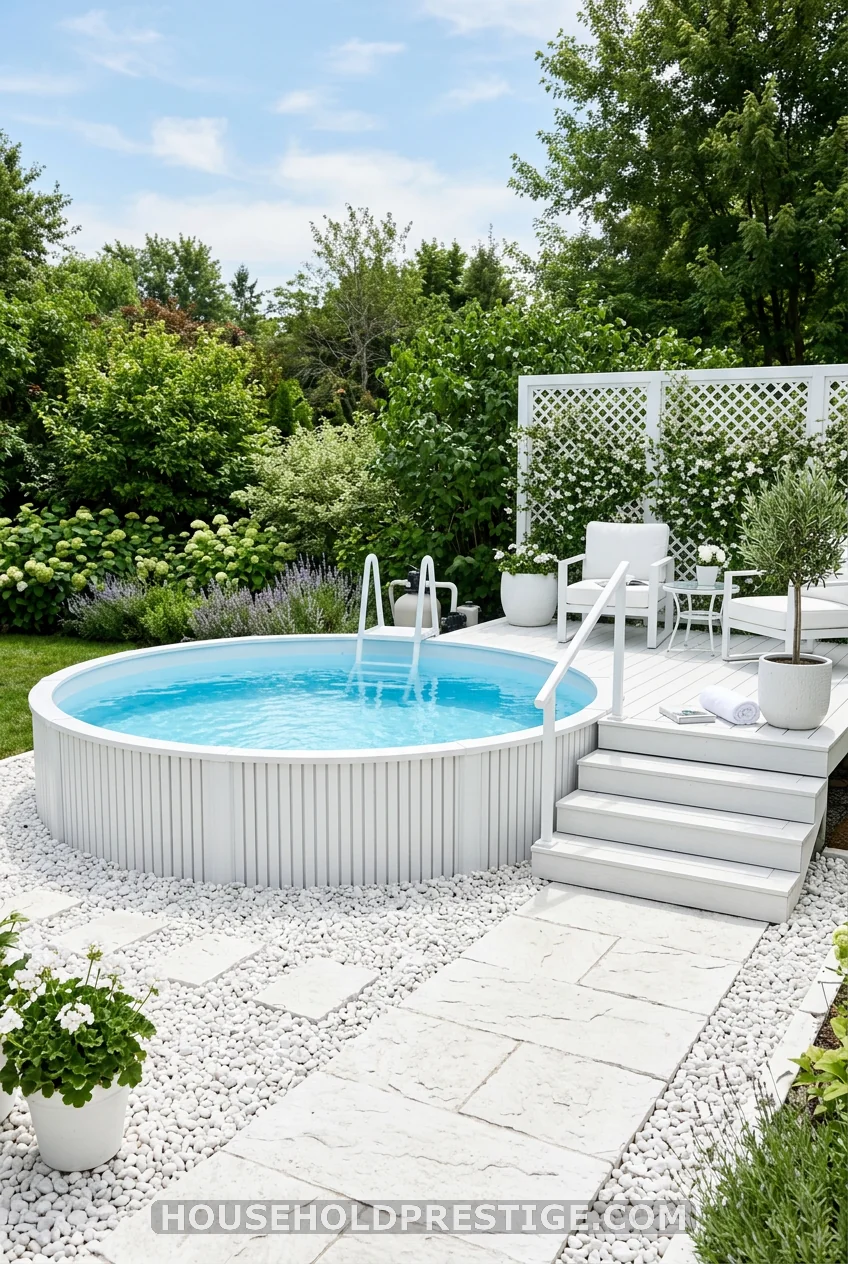
Pick one color. Use it for everything — the pool cladding, the pavers, the furniture, the pots, the fence. White is the most striking version of this (white stone, white wood, white gravel), but warm tan, charcoal gray, or terracotta all work beautifully.
A monochromatic scheme is the single easiest way to make a DIY landscaping project look intentional and designed rather than piecemeal. It also photographs exceptionally well, which matters if you’re building this for Pinterest or just want it to look its best in photos. You don’t need to buy more — you just need to buy consistently.
Putting It Together
The best above-ground pool landscaping doesn’t happen all at once. Start with the gravel ring — that takes an afternoon and costs $60. Add wood cladding on the next free weekend. Plant the border in the fall. Install the pergola the following spring.
Do it in layers, and each piece builds on the last. By the end of your second summer, the pool will look like the centerpiece you always imagined when you bought it.
Pick one idea and start this weekend. The rest will follow.
Frequently Asked Questions
What is the best thing to put around the base of an above-ground pool?
A 2–3 foot perimeter of pea gravel or decomposed granite is the most practical and affordable solution. It prevents muddy footprints, stops lawn equipment from getting close enough to damage the pool wall, and drains quickly after splashing. Edge it with a plastic landscape border to keep the gravel from spreading. Cost: $40–80 for most pools.
What plants are safe to grow near an above-ground pool?
Choose plants that tolerate occasional chlorine drift and moist conditions. Good options include ornamental grasses (Karl Foerster, fountain grass), hydrangeas, knockout roses, daylilies, coneflowers, and black-eyed Susans. Avoid heavy shedders like cottonwood, sweetgum, and silver maple — loose debris clogs your filter and turns pool maintenance into a daily chore.
How do I hide the sides of my above-ground pool?
Wood cladding is the most permanent and polished option. Cedar or pressure-treated pine boards screwed to a 2×4 frame attached to the pool’s structural posts cover the metal wall completely and can be stained to match any aesthetic. A faster budget option is a bamboo roll fence zip-tied to the pool’s upright posts — it installs in under an hour and looks intentional.
Do I need a permit to build a deck around my above-ground pool?
It depends on your municipality and the deck’s size. Freestanding ground-level decks under 200 square feet often don’t require permits in most US jurisdictions. Attached decks, raised decks, or anything with electrical work typically do. Call your local building department before you break ground — it’s a two-minute conversation that can save you a lot of trouble.
How do I prevent erosion and muddy ground around my above-ground pool?
Grade the ground around the pool so it slopes slightly away from the pool base (about 1 inch of drop per foot). Install a gravel or paver perimeter directly around the pool. For sloped yards, use retaining wall blocks to create level terraces rather than letting water sheet down toward the pool base. French drains are an option for severe drainage issues, but for most residential situations, gravel + correct grading handles it completely.