

You bring home a sweet little wardrobe of newborn things. Then the gifts arrive. Then the hand-me-downs. Suddenly that one small closet is holding clothes in five sizes, a diaper stockpile, and a stuffed giraffe the size of a toddler.
Sound familiar? Baby closet organization feels impossible when the closet is the size of a phone booth and the stuff keeps multiplying. I’ve set up four nursery closets now, two of them painfully small, and I’ve learned what works and what just looks cute for a week before it falls apart.
Here’s my promise: by the end of this list, you’ll have a real plan. Not a Pinterest fantasy. Eleven ideas you can mix and match, with the measurements, the costs, and the one mistake that cost me a whole afternoon. Let’s set up a closet that does the work for you, especially during those 3 a.m. changes.
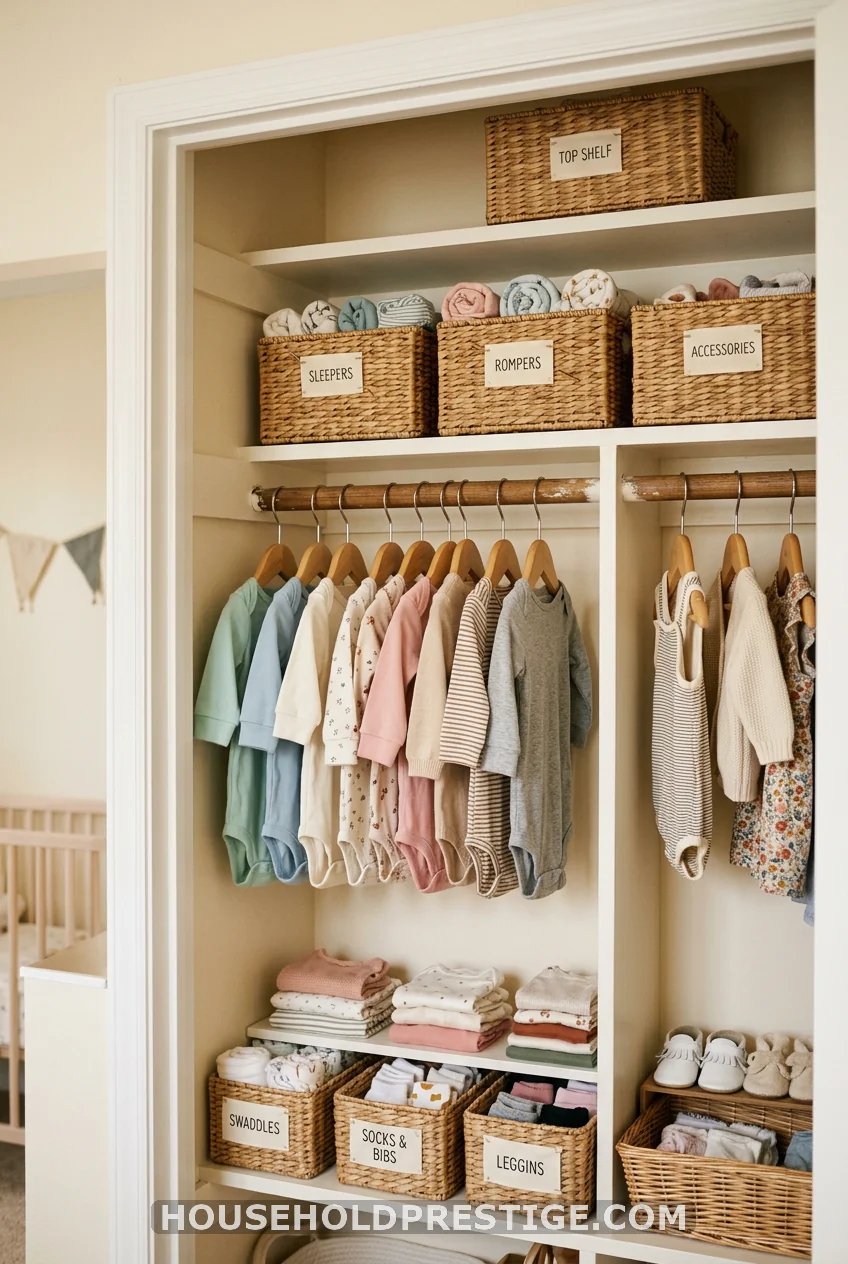
1. Sort Everything by Size First
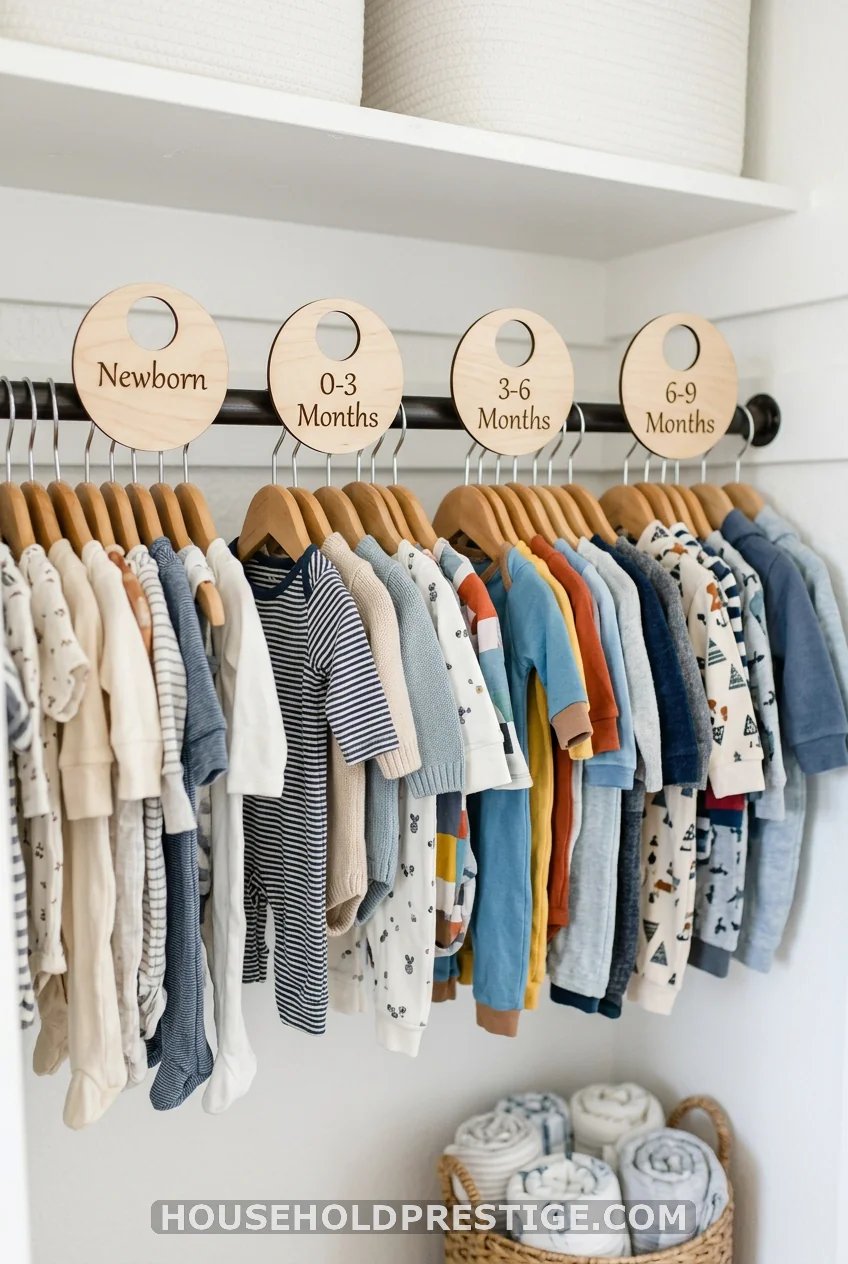
Before you buy a single bin, sort. Babies grow through sizes in weeks, so a closet that isn’t sorted by size becomes a daily guessing game.
Hang a set of closet dividers (the little arc-shaped labels that slide onto the rod). They run about $10 to $15 for a pack. Mark them Newborn, 0–3, 3–6, and up. Now you grab the right size half-asleep, and you can see at a glance what’s coming next. It’s the cheapest fix on this list and the one I’d never skip.
2. Claim the Empty Floor
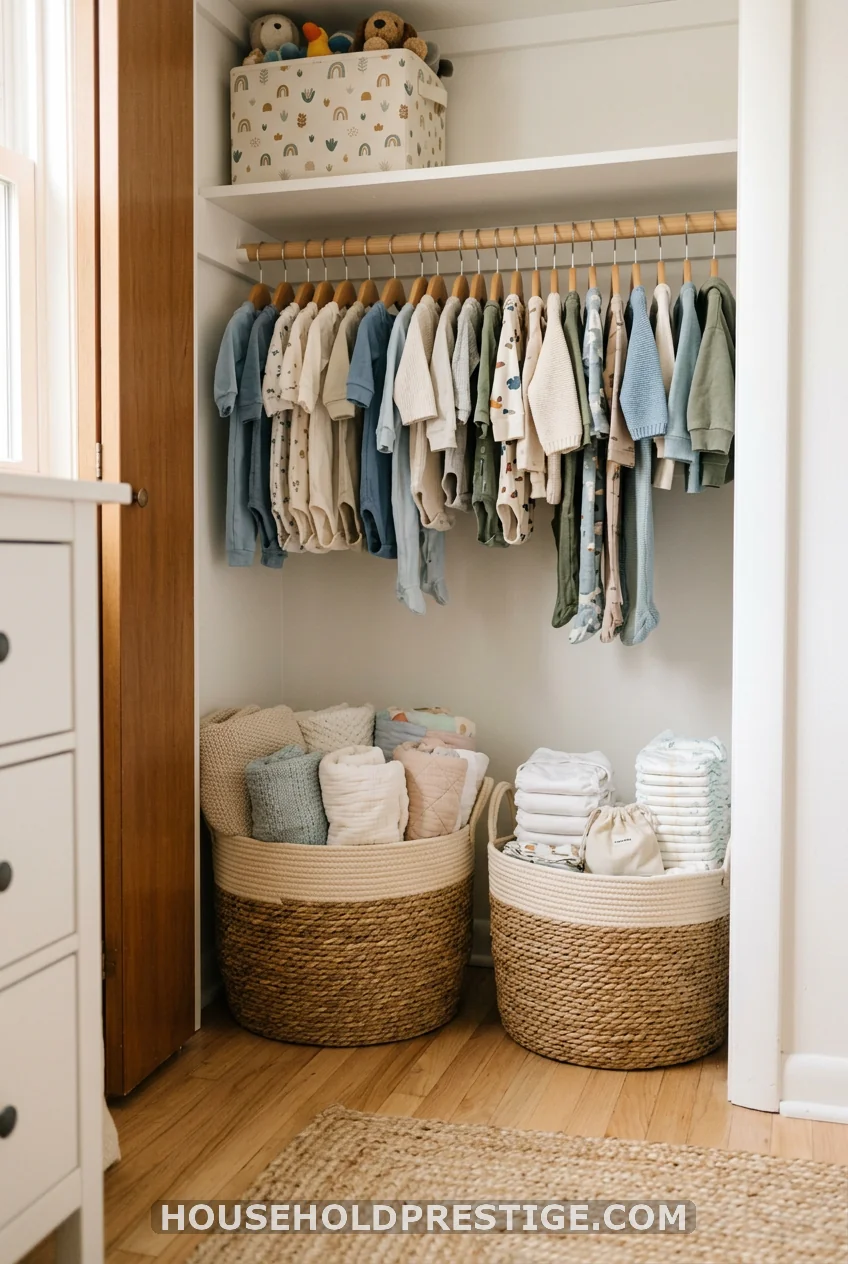
Baby clothes hang short. That leaves a big dead zone under them. Drop two floor baskets there for blankets, swaddles, or your diaper backstock. Done. Free space you already had.
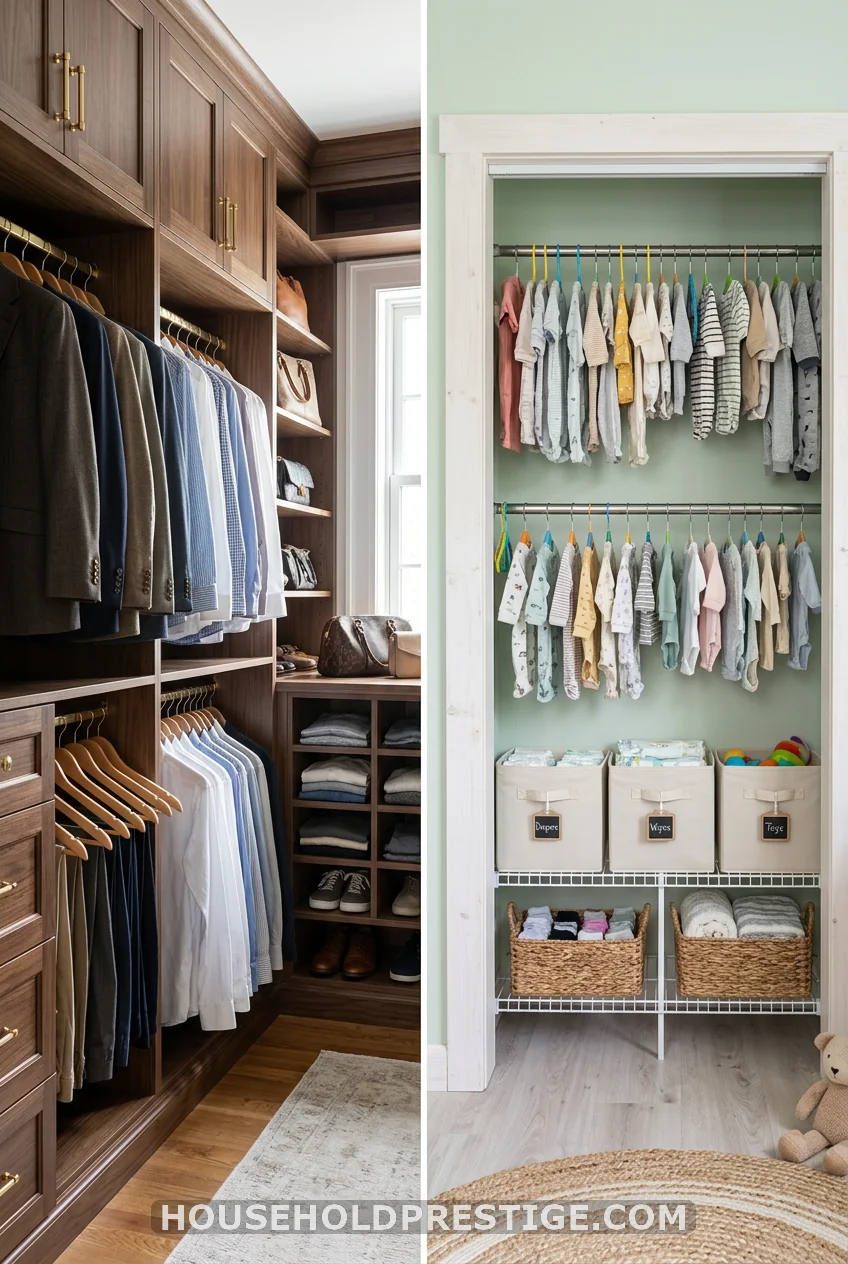
3. Add a Second Rod and Double Your Hanging Space
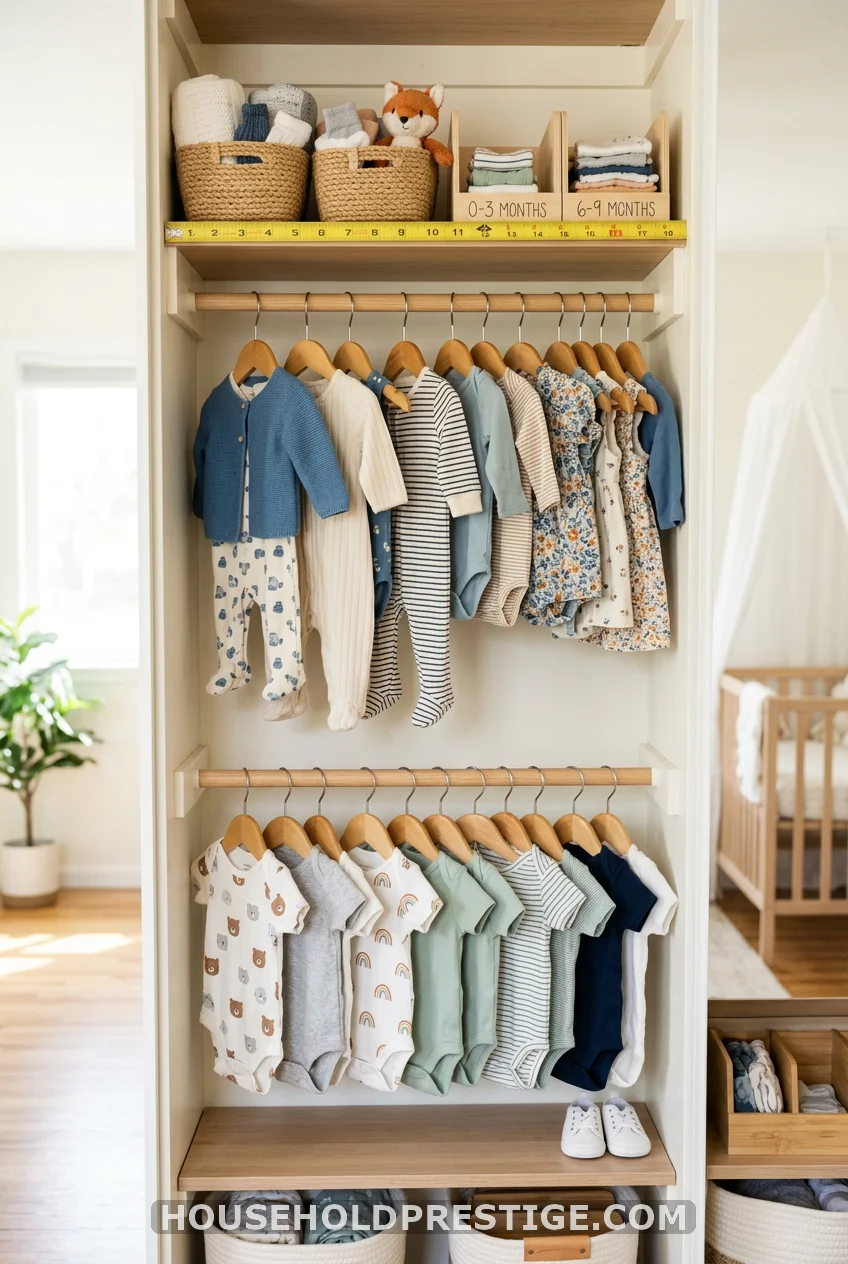
This is the single biggest win in a small nursery closet, and almost nobody explains how to do it. So I will.
Why It Works
A standard closet has one rod at about 60 to 66 inches high. Adult clothes need that height. Baby clothes? They hang maybe 18 to 24 inches long. So you’ve got roughly three feet of wasted air under that single rod. Add a second rod down low and you double your hanging capacity without touching the walls structurally.
The Measurements
- Top rod: keep it at 60 to 64 inches from the floor.
- Bottom rod: mount it around 32 to 34 inches from the floor.
- That gives each zone about 26 to 28 inches of clearance, plenty for onesies, sleepers, dresses, and tiny jackets.
Step-by-Step
- Measure your closet width. Most reach-in closets run 48 to 72 inches.
- Pick your method. A hanging double-rod bar (it clips over your existing rod and drops a second rod below) needs zero tools. A fixed rod needs two wall brackets and a drill.
- For the no-drill route, hook the double-hang bar over the top rod and adjust the chains so the lower rod sits near 32 inches.
- For the fixed route, mark your bracket height at 33 inches, check the level, then drill into studs or use heavy-duty drywall anchors.
- Load the current size on the lower rod (easy reach for daily grabbing) and the next size up top.
Materials and Costs
| Item | Where | Cost |
|---|---|---|
| Hanging double-hang rod bar | Container Store / Amazon | $12–$20 |
| Fixed rod + 2 brackets | Hardware store | $15–$25 |
| Drywall anchors (if no studs) | Hardware store | $5 |
| Wood baby hangers (set of 20) | IKEA / Target shops | $10–$15 |
A Quick Pro Move
Put your everyday outfits on the lower rod and the “grow into it” clothes up top. You’ll thank yourself on busy mornings when everything you need is at chest height.
Common Mistakes to Avoid
- Mounting the bottom rod too high. Under 30 inches and the lower clothes drag; over 36 and you lose your top-zone clearance.
- Skipping the level. A crooked rod makes the whole closet look off, and hangers slide to one end.
- Forgetting weight. Cheap tension bars sag under a full rod. Use a bracketed or clip-on bar for anything more than a dozen outfits.
Double-hanging took me 30 minutes with a drill and turned a cramped closet into one with room to spare. It’s the change I recommend to every pregnant friend.
4. Hang an Over-the-Door Organizer
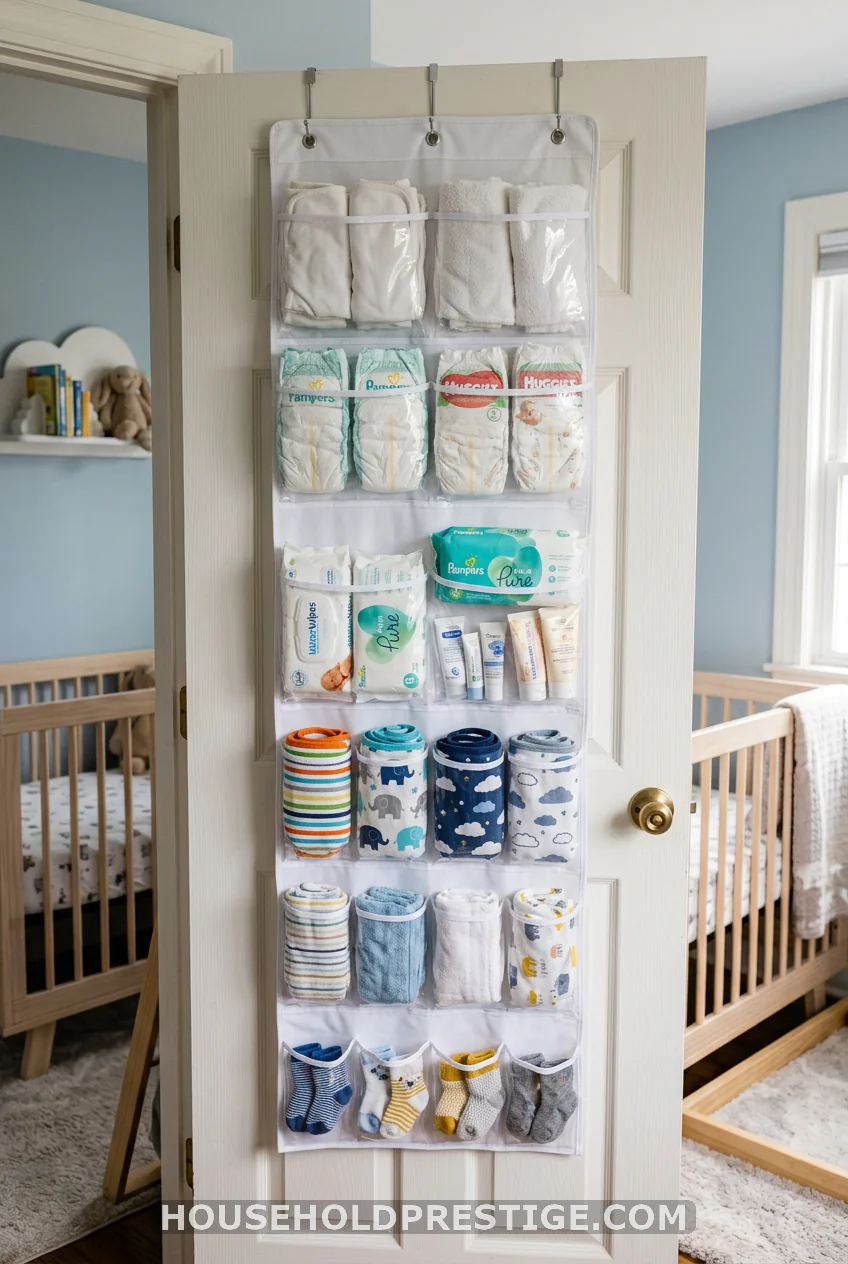
The back of the door is the most wasted real estate in any closet. A clear-pocket organizer ($10 to $15) turns it into a wall of small-item storage: diapers, wipes, bibs, socks, mittens. You see everything, and the door still shuts.
5. Use the Side Walls, Not Just the Rod
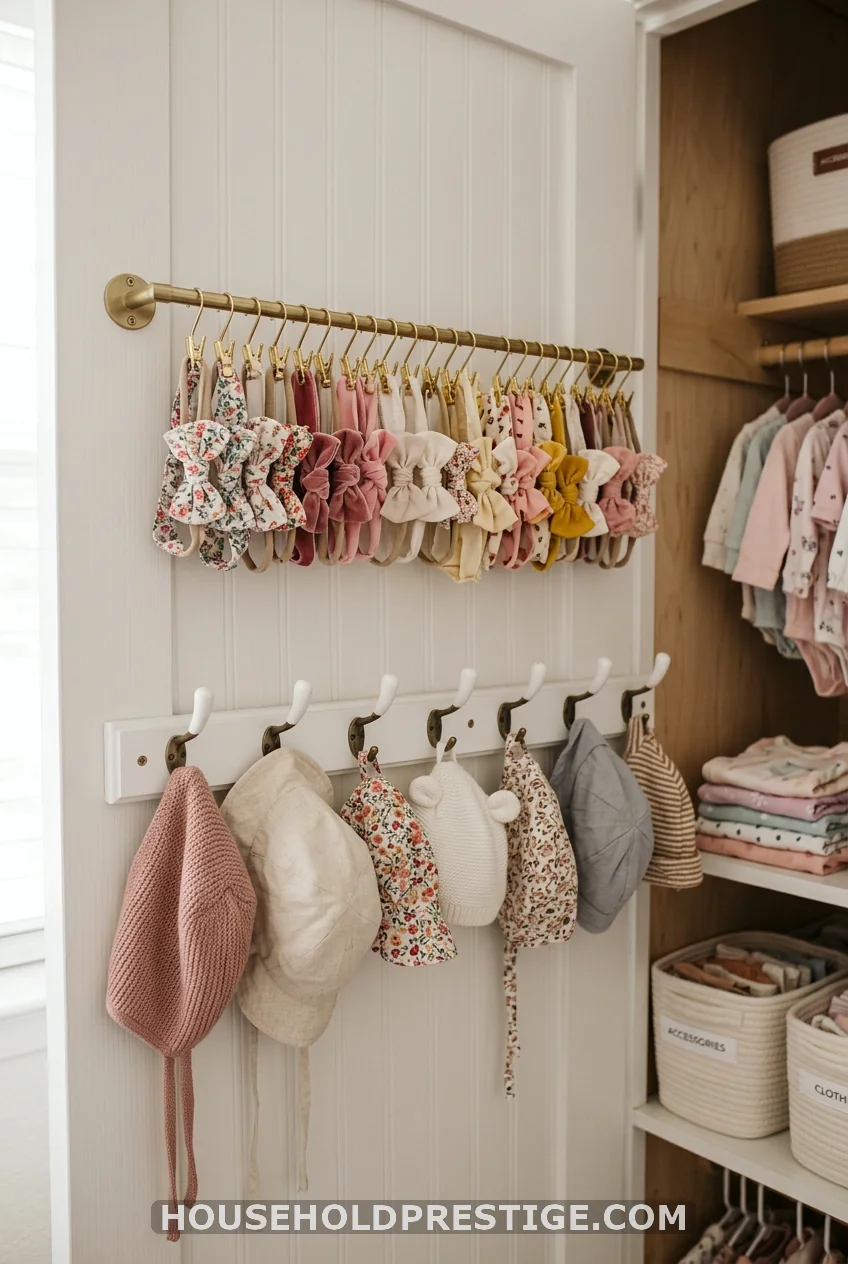
The interior side walls of a closet usually hold nothing. That’s a missed chance. Mount a slim rail with clips to display headbands and bows, or add a row of adhesive hooks for hats, swaddles, and the little drawstring bags that hold pacifiers.
This works beautifully in a narrow closet where you can’t fit another shelf. You’re building storage up and out instead of cramming more onto the floor. A rail-and-clip set costs around $12, and stick-on hooks are a few dollars for a pack of six.
6. Build a “Too Small” Basket Before You Need It
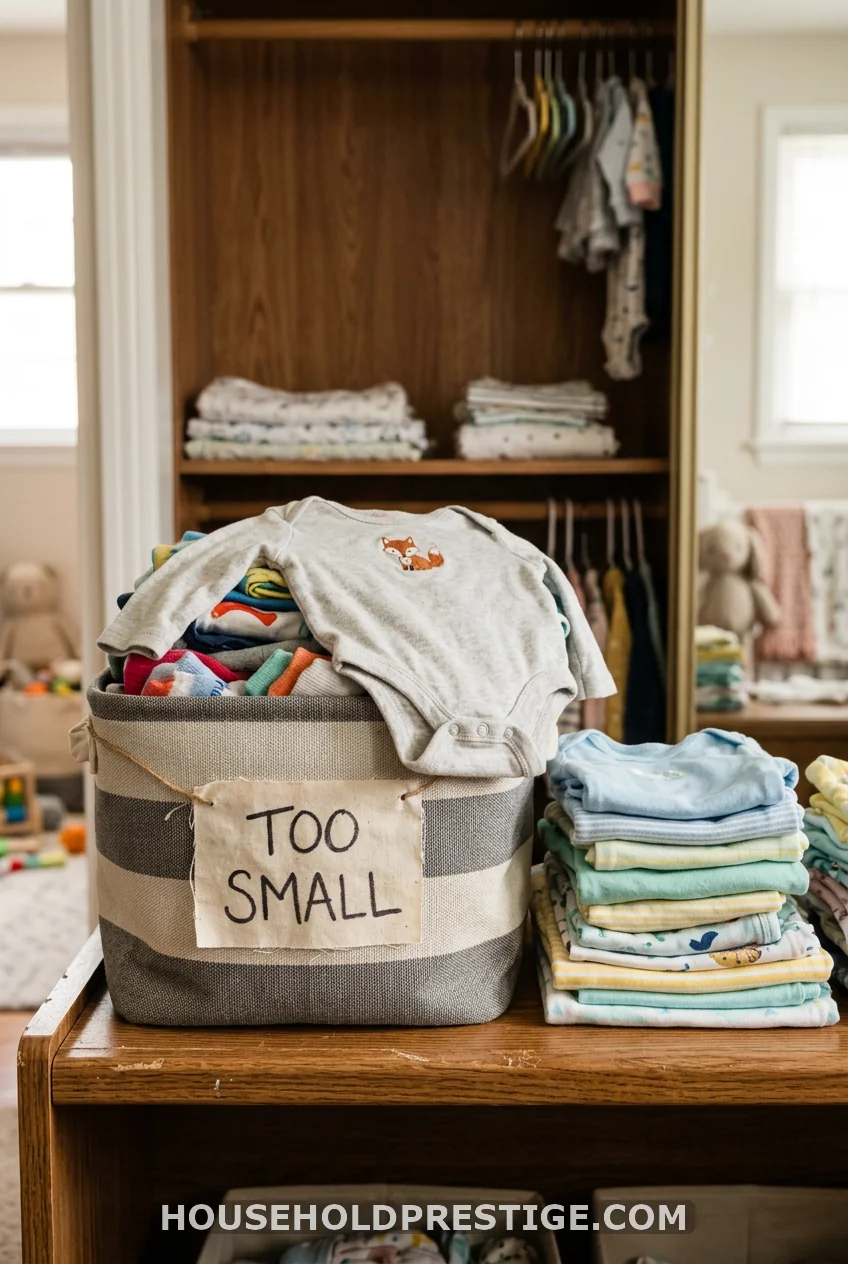
Let me tell you what I got wrong the first time, so you don’t repeat it.
With my first baby, I had no system for outgrown clothes. I just kept cramming everything back in. By month three, the closet was 70% clothes she could no longer wear, and I was digging past them every single morning to find what fit. I finally pulled everything out on a Sunday and lost two hours sorting a mountain.
With my second, I kept one labeled basket on the closet floor marked “Too Small.” The second something didn’t fit, in it went, no decision required. Once a month, I emptied it into a storage bin or the donation pile. Two minutes a month instead of a lost afternoon. Set up the outgrown system before the clothes pile up, not after.
7. Pattern the Back Wall
Want the closet to feel finished? Add peel-and-stick wallpaper to the back wall. One small roll covers most reach-in closets, costs $20 to $35, and peels off clean when you move. Big impact, tiny effort.
8. Anchor a Cube Unit at the Base
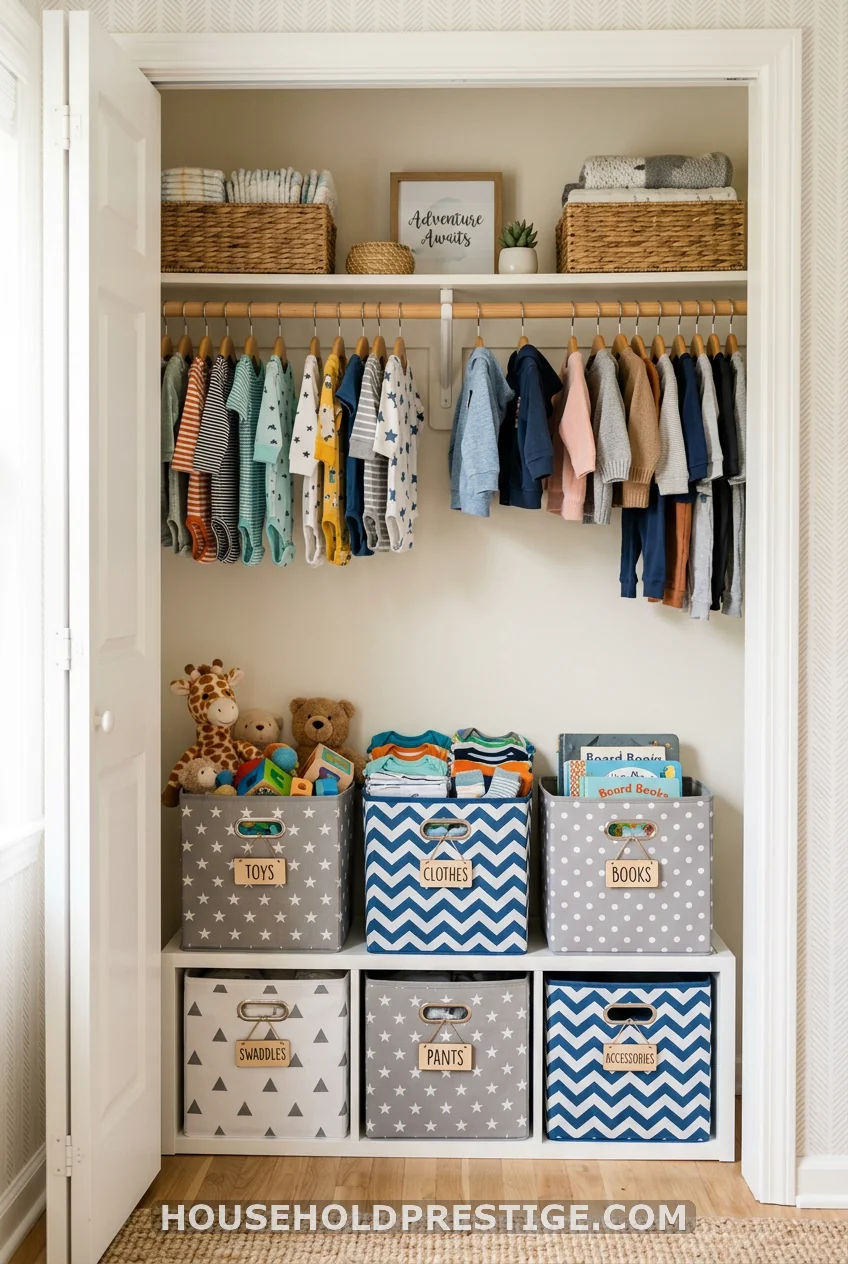
If your closet floor is wider than it is deep, slide in a low cube unit. A 2×4 cube shelf (think IKEA’s KALLAX) fits under hanging clothes and gives you eight defined homes for things that otherwise turn into floor clutter: toys, books, extra sheets, folded basics.
Drop a soft fabric bin in each cube (around $5 to $7 each) and label the front. The bins hide the mess; the labels keep you honest. A cube unit usually runs $80 to $130, and it grows with your kid long past the baby years. When the toddler stage hits, the same cubes hold board books and blocks.
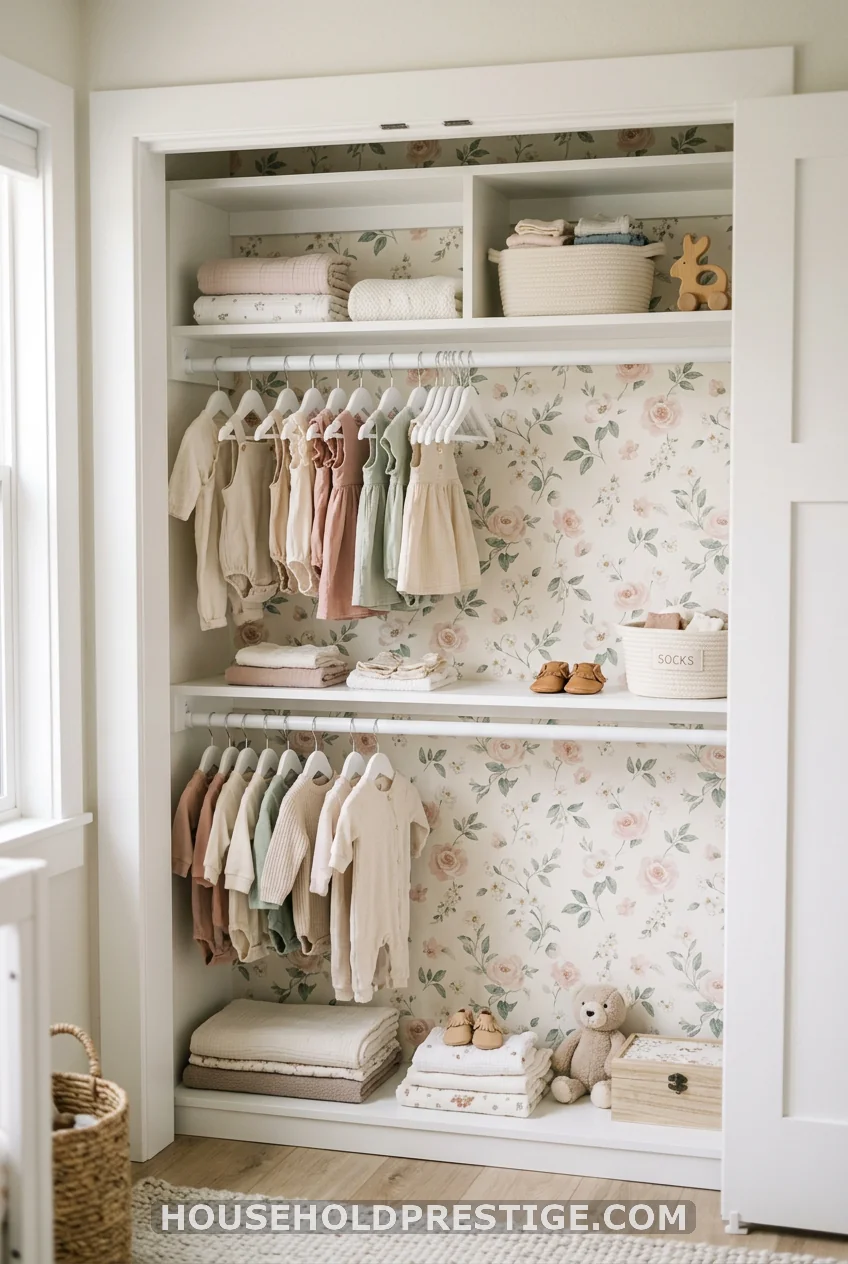
9. The Myth of the Custom Closet System
What most people think: you need a built-in custom closet system to get that magazine-worthy nursery, and it’ll cost thousands.
The reality: the closets that get the most saves online are mostly DIY. The Greenspring Home built theirs for around $100 to $150. The look comes from three cheap things working together: matching baskets, wood hangers, and a sorted rod. That’s it. A custom system is lovely if your budget allows, but it is not what makes a closet work. A $40 haul of bins and dividers gets you 90% of the result. Spend the savings on diapers.
10. Light It for Night Changes
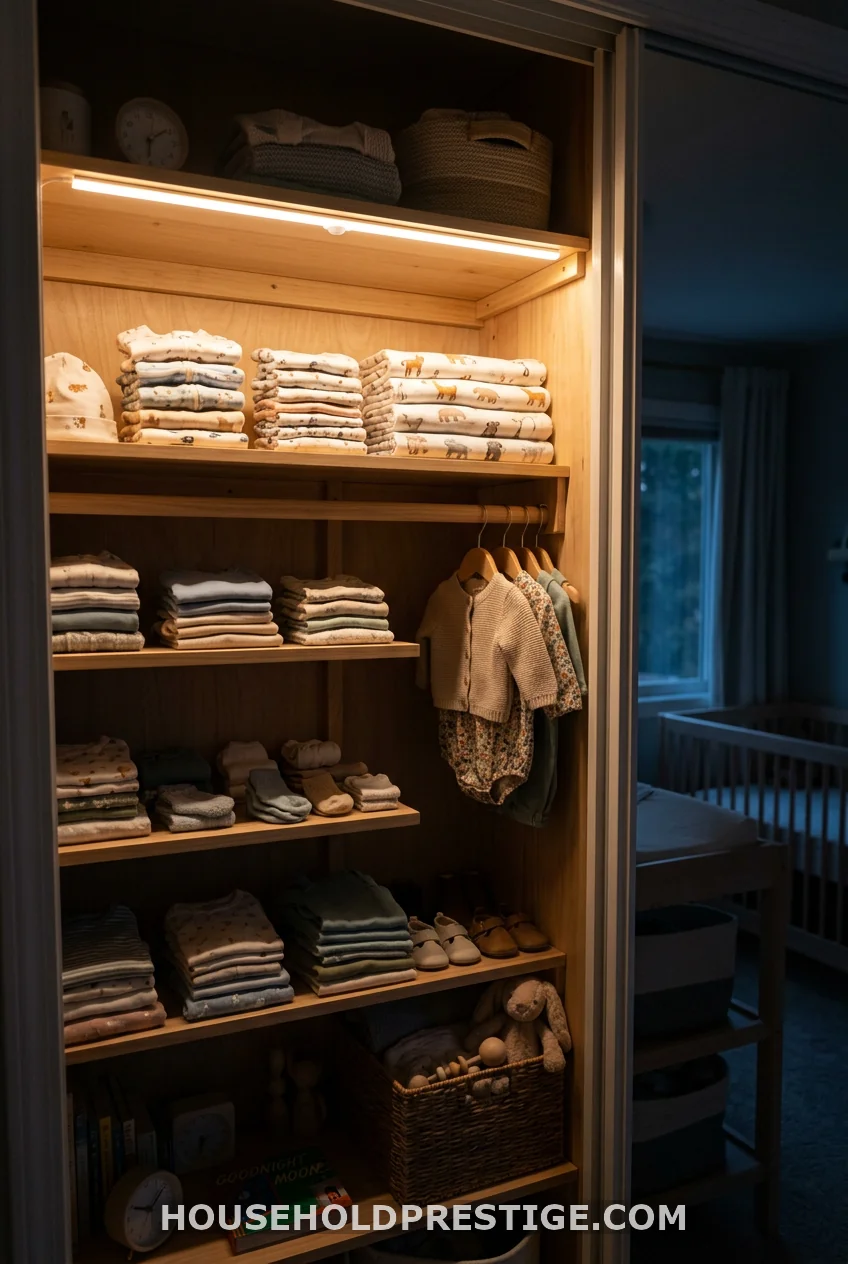
Closets are dark, and you’ll be in there at 3 a.m. Stick a battery or rechargeable motion-sensor LED strip ($15 to $25) along the top shelf. It clicks on when you reach in and keeps the big light off, so you find a clean sleeper without waking the baby or your partner.
11. Secure Anything That Can Tip
Here’s the step the pretty photos always skip. If you add a freestanding wardrobe, a tall shelf, or a standalone closet system, anchor it to the wall.
Babies become climbers fast, and a loaded, top-heavy unit can tip. An anti-tip strap kit costs $8 to $12 and takes ten minutes to install. Screw one bracket into a wall stud and one into the furniture, then connect the strap. It’s the cheapest insurance in the whole nursery, and it’s not optional once your little one starts pulling up to stand.
Bringing It All Together
You don’t need a big closet or a big budget. You need a sorted rod, a way to use the empty air and the back of the door, a plan for outgrown clothes, and a few anchored, well-chosen storage pieces.
Start with the dividers and the double rod. Those two alone will change how your mornings feel. Add the rest as you go. The best baby closet isn’t the one that looks perfect in a photo. It’s the one that still works when you’re running on three hours of sleep, and one of you is crying. (Sometimes both of you.) You’ve got this, mama.
Frequently Asked Questions
How do I organize a baby’s closet with very little space?
Start by sorting clothes by size with rod dividers, then add a second lower rod to double your hanging space. Use the closet floor for baskets and the back of the door for an over-the-door organizer. In a small nursery, the trick is using vertical and door space instead of just the rod.
What’s the best way to store baby clothes baby hasn’t grown into yet?
Keep next-size-up clothes on the top rod or a high shelf, separated from current sizes with closet dividers. Store anything too far out (more than a couple of sizes ahead) in a labeled bin up top or under the crib so it doesn’t crowd daily-use clothes.
Should I hang or fold baby clothes?
Hang the nicer or wrinkle-prone things: dresses, rompers, jackets, and sweaters. Fold the basics like onesies, pajamas, socks, and swaddles into drawers or baskets. A mix of both uses your closet space most efficiently.
How much does it cost to organize a nursery closet?
You can do a solid setup for $40 to $80 using rod dividers, fabric baskets, an over-the-door organizer, and a double-hang bar. A cube unit or freestanding system adds $80 to $200. A full custom build-in runs into the thousands, but it isn’t necessary for a functional, good-looking closet.
How do I keep a baby’s closet organized as my child grows?
Use an adjustable system so you can raise the rods as clothes get longer. Keep one “too small” basket in the closet to catch outgrown items continuously, and do a quick sort once a month. Reassessing sizes monthly keeps the closet working through every stage.